Project of the rafter system. Construction of a hipped roof truss system - installation options and construction rules
Erection of the roof is one of the most critical stages of construction. The durability of the building itself and the level of comfort of living in it directly depend on the reliability of the “umbrella” on top, on its resistance to precipitation and any external influences.
Of all the variety of roof designs, the gable roof can be considered one of the most popular, simply due to the relative ease of its construction. However, even behind this “simplicity” lies a lot of different nuances, the need to carry out certain calculations and follow technological rules. However, this publication has the main task: to show that installing gable roof rafters with your own hands is a completely doable task, even for a novice builder.
Let's go through all the stages of the process of installing rafters for such a roof, from the basics of preliminary design to an example of practical implementation.
General structure of a gable roof
Basic Concepts
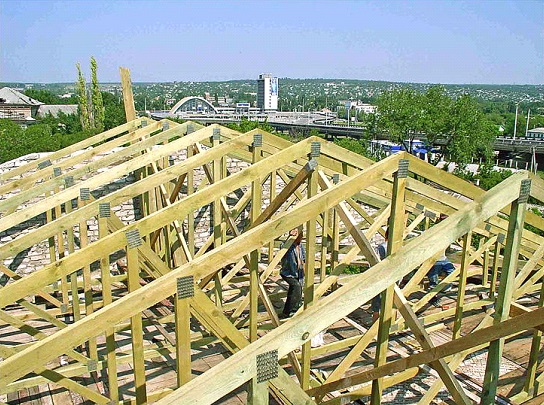
Structural elements of a gable roof truss system

Let us immediately make a reservation that this diagram, of course, cannot reflect the entire possible variety of designs, but the main parts and assemblies are shown quite clearly on it.
1 - Mauerlat. This is a board or beam that is rigidly attached to the upper end of the external load-bearing walls of the building. Its purpose is to uniformly distribute the load from the entire roof system onto the walls of the house, creating conditions for reliable fastening rafter legs at their lowest point of support.
2 – rafter legs installed in pairs. They become the main load-bearing parts of the entire roof system - it is the rafters that determine the steepness of the slopes and will be the basis for attaching the sheathing, roofing covering, and if the roof is planned to be insulated, then the entire thermal insulation “pie”.
To make rafter legs, high-quality boards or timber are used; round timber can also be used. The cross-section of lumber, which will be sufficient to guarantee withstand all possible loads, will be discussed below.
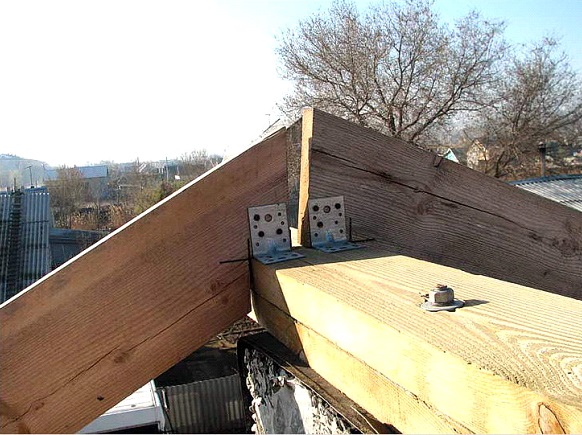
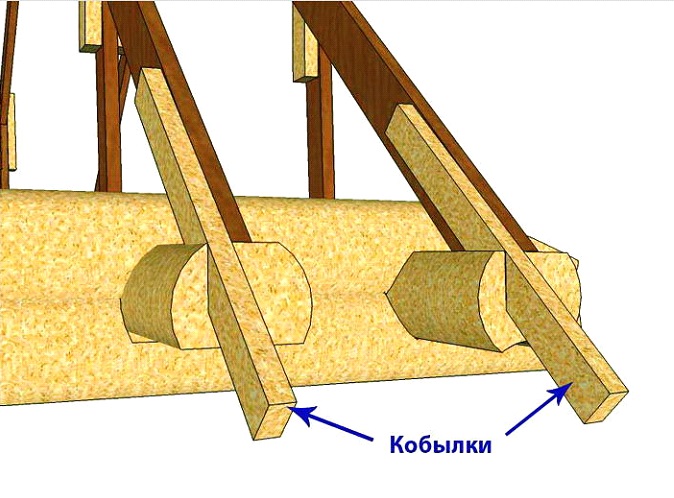
The rafters can end at the mauerlat, but more often they extend beyond the perimeter of the walls of the house, forming a cornice overhang. However, lighter parts can also be used for this - the so-called “fillies”, which are used to extend the rafter legs to the required overhang width.
 To form the eaves overhang, the rafters are extended with “fillies”
 3 - ridge run. It could be a beam, a board, or even composite design. The purlin runs along the entire line of the ridge and serves to reliably connect the upper points of paired rafter legs, connecting all rafter pairs in order to impart overall rigidity to the entire roof structure. In various roof options, this purlin can be rigidly supported by racks, or linked only to the connection node of the rafter legs.
4 – tightening (contracts, crossbars). Horizontal reinforcement parts of the system, additionally connecting paired rafter legs to each other. Several puffs located at different heights can be used.
5 – floor beams, which will serve as the basis for installing the floor in the attic and the ceiling on the side of the room.
6 - and this beam simultaneously serves as a bench. This is a beam that runs along the entire length of the roof, which serves as a support for installing additional reinforcement parts for the rafter system. The beam can be installed as shown in the figure (like a floor beam), or it can be rigidly laid on a permanent partition inside the building.
7 – racks (headstocks) – additional vertical supports of the rafter legs, preventing them from bending under the influence of external loads. The racks at the top can rest against the rafters themselves, or into an additional purlin that longitudinally connects the rafter legs at a certain height.

8 – struts. Often, when the rafter legs are long, their load-bearing capacity is not enough, and reinforcement with racks alone does not provide the necessary strength. In these cases, diagonal reinforcing elements are used, resting on the bottom of the beam, creating an additional support point for the rafters. The number of struts and their installation location may vary in roofs of varying degrees of complexity.
Some differences between the hanging and layered gable roof systems
Gable roofs can be divided into two types of structures - with layered and hanging rafters. In addition, combined systems are widely used, in which both principles of construction are combined. What is the fundamental difference?
Layered rafter system
This rafter system design is characterized by the presence of support on the internal main partition in the building. At the upper end of this partition, a bench is mounted on which the drains supporting the ridge girder rest. Thus, the rafter legs are “leaned” onto a vertical support, which makes the entire system as strong as possible.

This type of scheme is the most popular because of its reliability and relative ease of implementation. If it is possible to create an additional point of support in the center, then why not take advantage of it? True, if it is planned to place living space in the attic, then vertical racks can sometimes become a hindrance. However, their presence is also sometimes “played up”, using, for example, to install an internal light partition.
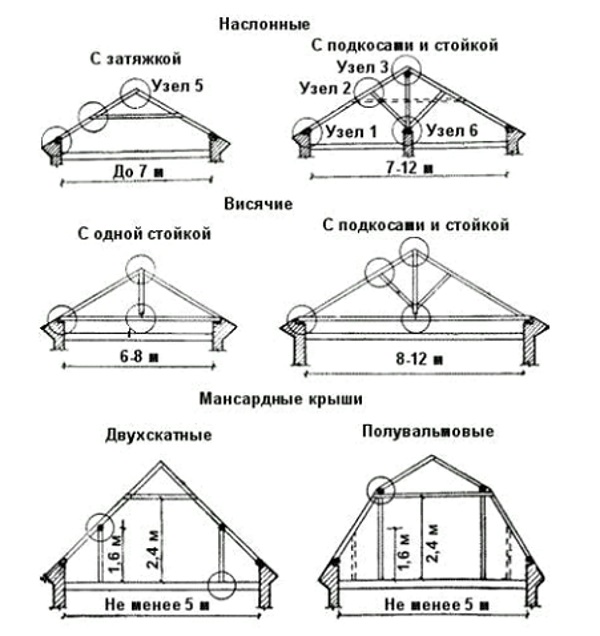
Depending on the number and placement of internal partitions, the design of the layered rafter system may vary. Some examples are shown in the illustration below:

Fragment “a” shows the simplest option, which, by the way, on short rafter lengths (up to 5 meters) may not even have the shown struts - a row of central posts under the ridge girder is enough
As the width of the building increases, the system naturally becomes more complex, and additional reinforcing elements appear - tie rods and struts (fragment “b”).
Fragment “c” clearly demonstrates that the internal main wall does not have to be located exactly in the center, under the ridge. An option as shown in the illustration is also quite possible, but with the condition that the displacement of the bed relative to the ridge does not exceed one meter.
Finally, fragment "d" shows how the rafter system in a building can be supported big size, but having two capital partitions inside. The distance between such parallel beams can reach up to a third of the width of the building.
Hanging rafter system
Graphically, this roof diagram can be depicted something like this:

It is immediately noticeable that the rafters rest only on the lower part, and then are connected to each other at the ridge. There is no additional support in the center, that is, the rafter legs seem to “hang”, which determines the name of such a system. This feature imposes certain restrictions on the use of hanging rafters - usually this scheme is practiced when the distance between the load-bearing walls to which the Mauerlat is attached is no more than 7 meters. The installed puffs only partially relieve the load from the external walls.
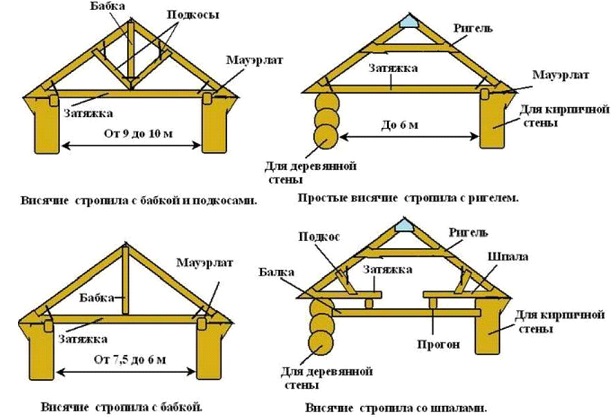
The illustration below shows several options for a hanging system. However, some of them can rather be classified as combined.

Fragment “d” - hanging rafters are connected to each other by a tie at the level of the mauerlat or fixed to a powerful floor beam, forming a triangle with it. There are no other reinforcing parts. A similar scheme is acceptable with a distance between walls of up to 6 meters.
Option “w” is for a house of the same size (up to 6 meters). The tie (bolt) in this case is shifted upward, and is often used for lining the ceiling attic space.
Options “e” and “z” are designed for a span between walls of up to 9 meters. Multiple tie-downs may be used (or a top tie-down in combination with a bottom joist). Another approach is to install racks under the ridge girder, similar to the layered system. Only, as the lower point of support, it is not the support on the main partition that is used, but the racks are supported by a tie or a floor beam. It is already difficult to call this option purely “hanging”, since here it is clearly a combination of parts from both designs.
To an even greater extent, this combination of two schemes is expressed in the “and” option, which is designed for large spans, from 9 to 14 meters. Here, in addition to the headstock, diagonal struts are also used. Often such trusses are assembled on the ground, and only then they are lifted and installed in place, connected to each other, thereby forming the entire roof frame.
So, when preparing for the construction of a gable roof, it is necessary to study the principles of the design of a particular system, evaluate their advantages and disadvantages, choose the optimal one for your conditions and draw up a graphical working diagram. It will be needed both when purchasing the necessary material and for the production of the installation work. However, drawing up a drawing must still be preceded by some calculations.
Calculation of the basic parameters of a gable roof rafter system
Let's take another look at the schematic diagram of a gable roof to highlight the parameters that will need to be calculated.

So, in the calculation process we will need to decide on the following values.
The initial data is the length of the side of the house along the gable part (highlighted in blue - F), and the length of the house along the ridge (purple - D). It is assumed that the owners have already decided in advance on the type of roofing - since there will be certain restrictions on the steepness of the roof slopes. (angle a).
- The height of the ridge above the plane of the Mauerlat (H - green), or, conversely, determine the angle of the slope, starting from the planned height of the ridge.
- Length of rafter leg ( Blue colour– L), and, if necessary, extending the rafters to form a cornice overhang of the required width (l).
- Calculate the total loads falling on the rafter system in order to determine the optimal cross-section of lumber for the manufacture of rafters, the pitch of their installation (red color - S) and the permissible length of spans between support points. All these parameters are closely interconnected.
- Once you have these calculated values in hand, it’s easy to draw up a graphical diagram, determine the need and optimal location reinforcement elements, calculate the amount of material for their manufacture.
Chainsaw prices
chainsaw
We calculate the steepness of the slope and the height of the ridge
The steepness of the slopes can be determined by the owners according to various evaluation criteria:
- For purely aesthetic reasons - when the appearance of the building becomes “of paramount importance”. Many people like roofs with a high ridge, but we must not forget that the wind load on such a roof increases sharply. And there will be immeasurably more materials needed to make a high roof. At the same time, on steep slopes the snow load is reduced to almost zero - it is possible that for “snowy” regions this assessment parameter may become decisive.
- For reasons beneficial use attic space. With a gable roof scheme, in order to achieve the maximum area of the attic, it is necessary to build slopes with a very large steepness, that is, with the same consequences as mentioned above.

- Finally, there may be a completely opposite approach - for reasons of economy, make a roof structure with minimum height in a skate. But in this case, you will have to focus on the minimum permissible slope angles for a specific type of roofing. Reducing the slope below the values recommended by the manufacturer means “planting a bomb” in your roof, both for reasons of its strength and durability, and from the standpoint of the waterproofing qualities of the coating.
Calculating the height of the ridge above the plane of the ceiling (mauerlat) is not difficult. The vast majority of nodes are based on any roofing system lies a triangle, which, in turn, obeys strict geometric (more precisely, trigonometric) laws.
So, in our case, the width of the roof along the gable line is known. If the roof is symmetrical, then the ridge will be placed exactly in the middle, and for calculations you can simply divide the width F by two (the base of the triangle f =F/2). For asymmetrical slopes, you will have to project the top of the ridge onto line F, and measure the distances f1 and f2 from it to the edge of the triangle (to the Mauerlat) on each side. Naturally, in this case the slope of the slopes will be different.
N =f×tga
In order not to force the reader to look for tangent values and carry out calculations manually, below is a calculator in which the necessary tabular values have already been entered.
During the construction of farms and other suburban premises, they are used, which are used in residential buildings.
Wooden rafter systems in the form of a triangle are mainly used for residential premises.
The layout of the rafters is also important here, since it makes the task of calculating the system easier.
For residential premises, rafters are mainly made of wood. Such elements, as a rule, are made in the form of a triangle, but sometimes other design solutions are used.
If there is a need to save living space, then you should use it, which will allow you to equip another room in the attic suitable for living.
How to design a rafter system and rafters?
Designing the location of the rafters is quite difficult. This task requires special skills and knowledge. To create a scheme, you must reliably calculate the amount of precipitation and wind strength, as well as the optimal weight of the entire system.
That is why ensuring the greatest efficiency and, naturally, durability of the farm can only be achieved if the layout of the rafter elements was drawn up by a competent specialist who is highly qualified and has extensive experience in performing such work.
The most basic points that should be taken into account when drawing up a home roofing project are:

- slope angles;
- type of roof required;
- material used to cover the roof;
- correct choice of rafter sections;
- correct calculation.
The slope of the slopes is directly related to the strength calculation load-bearing structure, as well as the choice of material with which the roof will be covered.
Most of these materials have a significant impact on the design of the rafter system, so the covering material should be selected at the design stage.
The layout of the rafter elements must be calculated carefully during the design of the roof, since errors that were made during load assessment can lead to both deformation of the rafters and damage to the roof covering during the operation of the home, and to the collapse of the entire roof .
Load-bearing roof structures, which consist of elements such as rafters and sheathing, can ensure its strength and stability.
Parameters and design features
The structural drawing of the arrangement of rafter elements directly depends on such parameters as:
- the shape of the roof itself;
- the presence of internal supports and their location;
- the length of the covered space.

When drawing rafter elements, you need to take into account that there are 2 types of rafters or rafter trusses:
- Hanging, which are used when supporting exclusively external walls. They consist of inclined rafter legs and a brace, which is a beam in a horizontal position.
- Layered, which are installed in houses with a central load-bearing wall. They consist of 2 rafter legs, the bottom of which rests on the mauerlats (bearing beams), and the top on the ridge run, supported by racks.
Often the rafter design is made in a triangular shape, which guarantees the highest efficiency and rigidity.
Complex rafter trusses consist of large quantity auxiliary elements:
- puffs;
- racks;
- rafter beams, which are otherwise called rafter legs;
- crossbars;
- various struts, etc.

The rafter drawing is developed in the following sequence:
- It is necessary to apply modular coordination axes, to which the denominators of the thickness of the main walls of the building are then attached. In this case, the extension of the crowning cornice of this structure should be displayed on the plan of the wall surfaces in the form of a contour line.
- Then you should draw smoke and ventilation ducts, pipelines. Their location must certainly be taken into account in the process of placing everyone.
- Next, a diagram of the selected roof type (shape) is developed in the form of a sketch, which should take into account the location of all walls.
- Then, valleys, ridges, ribs and a few more elements should be drawn on the drawing in the form of lines:
- direction of slope;
- shape of roof slopes;
- location of dormer windows;
- location of gables, etc.
- Using the roof drawing, you need to draw a plan for the rafter system, where you should indicate the placement of such elements as:
- Mauerlats;
- rafter legs with ties and fillies that rest on mauerlats;
- racks.

The cross sections of the various elements take approximate values depending on the type of wood that will be used. The pitch of the rafters also depends on the material. 100 - 120 cm, and rafters made of beams 150 - 180 cm.
In addition, the distance is also affected by such details as the chimney and ventilation.
- Then on the drawing you need to put the values of the distances between the axes of the modules, to which the values of the volume of the walls are attached. The lines where the steps between the axes are marked are drawn on the drawing very close to the contour.
Inside the plan, you should indicate the distance between the ventilation pipes and the chimney, racks and other elements. In addition, the plan needs to display all callouts on which the values of the cross sections and lengths of the listed parts are indicated.
Rafter system represents the most important element the design of the roof under construction, many indicators depend on the correctness of its design, including the strength of the roof, its safety, and service life.
That is why, if you do not have the necessary skills and abilities, it is better not to draw up a rafter layout diagram. The best option will entrust this work to a professional who has the necessary skills and, of course, experience.
It is difficult to imagine a building without a reliable roof over it. Any roof is the basis, the main guarantor of the inviolability of things in the house and the safety of property. It is the main protector from rain, snow and wind. After its construction, you can move on to the next stage, which involves interior work. Having made this part unreliable, there is no need to talk about a full-fledged home. Gable roof, built with your own hands, is the simplest and most functional option among other types of roofing.
There are several roof options, one of which is gable. Construction does not require a lot of talent, since this type of roof is the simplest. The housing element consists of the parts shown in the figure:
The structure consists of the following parts:
Horse. Top part, which will connect 2 slopes.
Rack. An installation used to redistribute weight from the top to the bottom of the roof. It must be done from quality materials.
Sill. A beam located horizontally. Connects the rack and the load-bearing wall.

Struts. These boards are fixed at a slight angle. Serve to redistribute weight from the rafters to the load-bearing elements below.
Rafter leg. These elements form a visible outline in the shape of a triangle. Serve to hold the roofing covering. The heavier it is, the more often it is necessary to lay rafters.
Fillies. Boards that extend the rafters. Necessary for creating an overhang from a gable roof, which according to building codes must be at least 0.5 m.
Difference between rafters
It is quite possible to complete a gable roof and the drawing on your own. All elements can be constructed in several ways. The difference is the rafter system used for construction. There are the following types of rafters:
The systems are used in many homes, and both are of sufficient quality for comfortable use. When constructing an attic roof, they are used together. In this case, hanging and inclined types of rafters are combined. It is worth creating rafter drawings that will show the location of each element of the roof, built with your own hands, so that there are no incomprehensible moments. It will help you calculate the amount necessary materials.
Any element of the house must be created, understanding how it will all look as a result. For clarity, a drawing is created, and so that everything fits perfectly, it is calculated in advance. The plan takes into account the length of the roof along the ridge, the length of the slopes, and the length of the plumb lines is shown separately. The angle of inclination of the roof is determined. The angle is determined taking into account the following points:
- At strong winds in the construction zone, the angle is made about 10-12o so that the roof is not torn off.
- With significant winter precipitation, the slope is within 30-40o. the snow will easily slide off the surface. There are no difficulties in the calculations, but if the roof is made with a complex shape, this will make it difficult to calculate the required values.
Roof construction
After making calculations and purchasing the necessary parts, the Mauerlat is installed. After this, the sheathing is created. The element is the basis for a do-it-yourself roof, made from pine or other coniferous wood. The material is durable and lightweight, capable of distributing the weight of all elements over the entire plane. Placed along the roof slopes, between the rafters, and on the top of the walls. 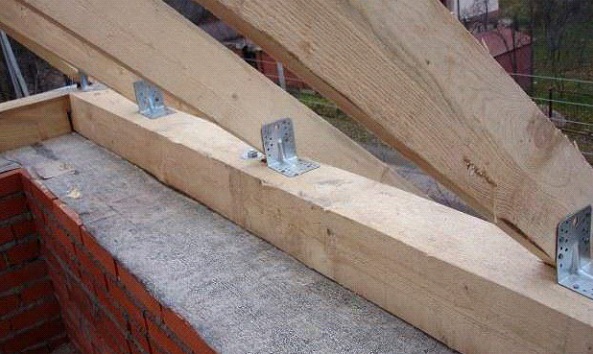
In order for the element to last longer, an insulating layer is necessary between the wall and it. Roofing material is suitable for this. The Mauerlat can be secured using any fasteners that are convenient.
To erect a roof, you must follow the plan:
- Fastening the rafters. If hanging ones are used, they must be assembled in advance, using fasteners to stiffen this part. The outer elements are made first, then the inner ones. With a layered system, a bed is first created where the supports will be installed. If the length of the elements is insufficient, you can add it by installing fillies.
Installation of sheathing. You can use any materials for construction, but it is important to get rid of bark from the boards in order to increase the service life of the elements. If you plan to use a soft roof, the sheathing is made continuous. A rigid base is required here so that there is no deformation during operation. Lattice system
Roofing. There are many coating materials, each of them involves the use different methods coverings. Do not neglect the recommendations of the material manufacturer. It is important to make a slight overlap between the elements. The structure must not be disturbed to prevent leaks.
Don't forget that reliable roof built with your own hands is a guarantee of the safety of property in the house. You shouldn’t neglect its construction, so that you don’t have to make complex repairs later.
The gable roof is very popular, since its construction is considered a relatively simple and quick stage in the construction of a house. Different types of gable roofing allow you to choose suitable option for a specific building. It will not be possible to install such a roofing structure a lot of work, even if you have a little experience in construction, but of course you can’t do it alone. All work is carried out in stages, taking into account the characteristics of such a roof.

Peculiarities
When erecting a gable roof, a rafter system and the main parts of the roof structure are installed. This includes the frame (in the form of rafters with struts) and the Mauerlat. They are made from high-quality wood - beams 150x150 mm and boards with a section of 50x150 mm. Gable roofs of a symmetrical type with straight slopes (gable roofing) are considered traditional. The angle of inclination of the slopes of such a roof reaches 45 degrees, which avoids loads on the structure (for example, during snowfalls and wind).
Other types of gable roofing, for example, with broken slopes, allow you to equip an attic under the roof. In this case, the slopes on top of the roof are more gentle slopes, and on the bottom - with a sharp slope. A sloping gable roof must be erected on a more complex and durable structure. When constructing an asymmetrical roof, the roof ridge is offset from the center. This is done taking into account the design features of the building.


Kinds
The frame structure of a gable roof can be:
- layered;
- hanging.


It is characteristic that most buildings use a layered rafter system, inside of which there is load-bearing walls. The frame thus serves as an intermediate support. When the roof width is no more than 10 m, one support is usually used. A roof more than 10 m wide has several proportionally located supports. A frame in the form of a hanging type rafter system is possible in the case when the structure can get by with one support and without internal load-bearing walls. Such a roof is built from two belts - the upper (two rafters), the lower (rigidly connected puffs). The rafters rest on the mauerlat, and the ends of the rafters go to the outer walls.
A gable sloping roof can be reinforced in the form of support frames that prevent the sloping roof from sagging. This way you can get a more durable structure. The hanging sloping roof has additional support frames to which the attic walls are installed. The support frame, which is located under the load-bearing wall inside, takes on part of the load, which makes the roof structure slightly lighter.

Device
The design of a gable roof is characterized by the presence of inclined surfaces on both sides. The roof base area has a rectangular surface. The slopes prevent snow and melt water from collecting on the roof. The roof is naturally cleaned. The roof consists of structural units: a mauerlat, a rafter system, a ridge and a filly, roof overhangs, struts, tie rods, sheathing and racks. It is worth understanding what characterizes all the structural elements of a gable roof.
Mauerlat is necessary for proper distribution of the load on the load-bearing walls from the rafters. For this purpose, durable wood is usually chosen - timber (it can be oak, larch, pine). The choice of beam cross-section is determined by the type of wood (solid or glued). For example, 100 by 100 mm or 150 by 150 mm. It is worth noting that when choosing a metal rafter system, the mauerlat must also be made of metal.


The main element of a gable roof system is the rafter leg. These elements are made from durable timber and logs. When connecting the rafter leg from above, a truss is formed with a different type of intermediate support. The rafter parameters and structural components play an important role here.
Tightening is necessary to connect the rafter system (rafter leg) and to impart strength and the necessary rigidity to the structure.
There are two types of purlins: ridge purlin, in which installation is carried out at the junction of the rafters (the ridge of the roof is then installed in this place), and side purlin, which provides the roofing elements (truss) with additional rigidity (the size and number of such purlins will depend on the load on the structure ).

Rafter supports in the form of vertical beams also take on a significant part of the load from the roof. The rack for the rafters of a gable roof is usually located in the center. If the width of the span is greater than usual, then also on the sides. During construction asymmetrical roof racks are placed depending on the length of the rafters. For a sloping roof, the installation of racks is carried out on the sides, leaving free space. If you plan to have two rooms under the roof, then the rafter racks are placed in the center and on the sides.
Struts are supports for racks. When braced at an angle of more than 45 degrees, the roof is better protected from deformation (snow, wind). Depending on the climate zone Both longitudinal and diagonal struts can be installed with a pair of rafters on the same plane.


The bench serves as a reliable support for the racks. This is where the strut is attached.
Lathing is necessary for fixing materials and structural elements of the roof. The sheathing is installed perpendicular to the rafter legs. One of the important purposes of the sheathing is to redistribute the load from the roof to the rafter system.


Requirements for building materials
Selection of materials for the rafter system - important stage in preparation for the installation of a roof structure. When calculating the material for gable roof you need to assume that it must be high-quality wood, the material does not have knots, damage or wormholes, is well processed and impregnated with special compounds (for safety and reliability during operation). For the reliability of the structure, there must be a stable connection between the elements of the entire rafter system. The roof must be a durable structure made from modern high-quality materials.
Wood species such as larch, cedar, spruce or pine are easy to process, so they are most often used in the rafter system. The rafters are made of timber with a width of 10 to 15 cm and a thickness of 5 cm. In this case, aged timber is usually used, which will not change shape after the roofing is installed. This is necessary to increase the stability of the structure. In addition to timber, boards are used for rafters, especially if we're talking about about raising the roof of a private house.


In multi-story construction, metal rafters are used. The disadvantage of a metal rafter system for private housing construction is that such a structure is not capable of retaining heat. Wood has more advantages in this regard - the material is distinguished high degree thermal insulation and energy saving. Wood is distributed by grade. First-class material is used to create hanging rafters and tie rods. Racks and struts are made from both first and second grade materials.


Projects and drawings
In the process of planning a gable roof, a drawing is prepared. This is a diagram of the future structure, where there are slopes, a pediment, and a ridge. Essentially, the plan is a drawing with detailed elements in different projections, showing how to tie the rafters. Drawing up a drawing of a gable roof is carried out taking into account all stages of work.
Its construction scheme includes:
- beams for sheathing;
- beams and rafters;
- scheme for laying thermal and waterproofing;
- roofing layout layout;
- installation diagram of additional fasteners;
- installation drawing of a ventilation system and chimney.


A well-designed roofing plan will reduce the cost of purchasing building materials. To create a project of any type, one or another type of material is used, based on calculations and taking into account the reliability of the coating. The size of the roof covering is also taken into account. When drawing, a part of the rafter system must be indicated, which allows you to understand how maximum the load on the roof can be.
The plan also includes:
- storm drain plan ( storm drain certain length);
- slope connection elements;
- construction area;
- diagram of roof junction points (pressure profile).
The design diagram must clearly indicate the type of roof. Detailed details in the diagram will allow you to complete the work faster and better.


Drawing up a diagram
Depending on the characteristics of the roof (single or gable, shape, etc.), design documentation is drawn up.
This work takes place in several stages:
- a sketch of the future roof is drawn up (at this stage the drawing should have a finished appearance of the roof with elaboration of the style design of the building);
- the main roofing elements are being worked out (the drawing shows the degree of load and the amount of materials);
- The diagram shows the construction of the roof.


It is worth considering that differences in pitched structures are associated with the type of rafters(hanging or layered), with uneven angles of inclination, with the dimensions of the overhang of the cornice. It is also worth considering design errors. One of the most common of them is considered to be an error in calculating the consumption of materials for the entire complex. The process of drawing up drawing diagrams is best left to specialists. Roof structure is being built in accordance with accepted building codes. In addition, it is important to minimize possible mistakes and defects. So, if the choice of roof type and installation method are chosen incorrectly, this will cause the roof structure to collapse. If the slope is incorrectly drawn and constructed, there is a risk of increasing the load on the roof. Although mistakes are made in the design of ventilation elements. The drawing itself should not be complicated, however, the rules for installing all roofing elements must be followed, and accordingly, they must be spelled out. A professionally executed roof plan increases the safety of the structure.


Calculation
The importance of calculating the rafter system of a gable roof cannot be underestimated. During the design process, it is necessary to calculate the usable area and, based on the data obtained, decide how high the vertical posts will be. In this case, several factors come into play.

When erecting a roof structure, it is important to calculate the maximum load on the roof of the house, on all rafters and beams. It may be necessary to strengthen the rafters, then adjustments are made to the project. For example, it may be necessary to use additional pads or timber with a larger cross-section than planned. The weight of the entire rafter system is also important. In this case, the calculation is carried out taking into account not only the cross-section of the lumber, but also the density and moisture content of the wood, and the pitch distance between the rafters is determined.
Today there is a special classification of loads on the roofing system:
- The main load concerns the weight of the truss structure, load temperature, snow and other weather factors.
- An additional burden concerns calculations of the influence of wind and ice.
- Force majeure loads are associated with man-made circumstances (a modern roof must withstand everything).
Limit calculations of the rafter system, taking into account all loads, are constructed according to two criteria (limits or states): the limit at which destruction of the structure is possible, and the limit at which the probability of deformation and deflections is taken into account.


Slope
It is important to correctly calculate the angle of inclination of the slopes. With a standard house width of 6-8 m, the angle of the slopes is 45 degrees, but this is not enough for the space in the attic. With a tilt angle of 60 degrees, the structure will cost more, but the entire roof will be designed more successfully. With 45 degrees of inclination, you can choose any roofing materials. If the gable roof is initially planned to be asymmetrical, then you can easily arrange it in the attic space residential attic, but for this you need to calculate the usable area. A standard gable roof is usually selected. It is important to take into account the load on the roof due to wind and snow. As the angle of inclination of the slopes increases, the consumption of materials will also increase. But also performance characteristics such a roof will compare favorably. If you plan to build a gable roof with unequal slope angles, then all work can be done in the original design. However, when designing, it is better to start from the classic design in the form of a symmetrical roof with an isosceles triangle at the base.

Step
The pitch of the rafters used to create the roof is one of the fundamental ones in the construction of the structure. There is a dependence of the pitch of the rafter system on the roofing material. The latter is used corrugated sheeting, slate, soft roof or metal tiles.
Slate roofing is used everywhere. This roofing material is characterized by relative strength, low cost and resistance to temperature changes. However, the material has a certain weight, so it is necessary to provide the roof with a powerful rafter system. It is worth considering that for a slate roof there must be at least three points of support (in the center and along the edges).

In recent years, metal tiles have become quite widespread among roofing materials. The material is easy to install and has an attractive appearance. Metal roofing sheets are convenient to use because they are light in weight. In this regard, the distance between the rafters can be large (for example, 600-950 mm with sectioned timber 150x50 mm).
The corrugated sheet covering can be made of galvanized steel sheet with a special protective coating (from external weather influences). Modern corrugated sheets differ in color and corrugation width. Externally, this coating differs in design. The pitch between the rafters under the corrugated sheet will depend on the type of profile, the angles of inclination and the configuration of the roof. For the rafter system in this case, timber with a cross section of 50-75 mm is used. This can be a board 20-50 mm wide.


Tools
When installing a rafter system, a set of tools is required. For this purpose, they usually make do with traditional tools - a power saw (this can be a hacksaw), a hammer and screwdrivers. Sheathing the roof with metal sheets is done with special metal shears. Do not cut material with polymer coating a simple grinder so as not to damage upper layer with sheet protection. Otherwise, the casing will quickly rust. To cover the roof with roofing felt, you need a barrel in which the bitumen will be melted.
Undoubtedly, when performing installation and any construction work You can’t do without a reliable ladder. It's also worth thinking about your own equipment. For example, when working, shoes with non-slip soles are required.
Installation
It is better to do the installation of a gable roof rafter system yourself with help, and many structural elements cannot be installed alone. Installation of the rafter system is carried out in several stages.
Let's look at them step by step:
- First you need to make a template. Rafter trusses are assembled according to a template. So, you need to take two boards the same length as the rafter leg. They are attached to each other from the edges with one nail. The result is a “scissors” design.
- This structure, with its other edges, must be placed in those places where there are supports for the rafter legs. The angle obtained in this way (according to the slope of the roof slope) is fixed with several nails. Fastening the corners must be done on an additional crossbar between the boards.

- Next, another template is prepared. With its help you can further assemble the structure. Installation of cuts on the rafters is being carried out. The template itself is easier to make from plywood.
- The cuts are cut on the rafters using a template. The elements are connected at an angle of inclination of the slope. The finished triangle is the roof truss. It is lifted onto the roof and attached to the Mauerlat (this will require logs and ladders).
- The rafter system is fastened to the mauerlat using nails, staples, and corners. And wooden “shorts” help to secure the structure from displacement along the axis; they need to be positioned over the entire area.
- At the initial stage, two gable trusses are installed along the edges. Installation and correct fixation horizontally and vertically is carried out using temporary struts to which the structure is attached.


- For reliability and convenience, a cord is stretched along the edges (between the tops of the trusses). It must be secured in such a way as to mark the place for the future skate. You will also need a cord when installing intermediate rafters.
- At the next stage, the remaining trusses are lifted and installed (at a certain distance (usually 0.6 m) from each other).
- In the presence of bulky structures, if there is a need to strengthen the structure, they are strengthened with crossbars, struts and supports.
- The purlin (ridge beam) is placed on special supports. Rafters of various types (short, intermediate or diagonal) are then attached to it.
The basis of the frame is the Mauerlat. Its production and assembly forms the basis of the roofing structure.


Mauerlat fasteners
The frame structure of rafters is fixed to the floor beams. However, in this case the load on truss structure distributed in the places where the beams are attached. This approach to installing a roof structure is possible for small and light buildings. The Mauerlat is needed to evenly distribute the roof load in the upper part of the walls. The Mauerlat is mounted parallel to the ridge of the future roof. This is how the main frame is formed. The manufacture of the Mauerlat requires a wooden beam with a section of 150x150, 100x100 or 100x150 mm.
When designing any residential building, architects pay special attention to the roof, since it performs not one, but several functions at once, depending on its design features. It must be said that not all future homeowners are satisfied with an ordinary gable roof, although it can be called the most reliable, since it has only two pitched planes and one joint between them. Many are attracted to more complex designs, which add special attractiveness and originality to the building. Other, more practical homeowners prefer attic structures, which can simultaneously serve as a roof and a second floor.
The basis of any roof is an individual rafter system, which has its own design features. It will be much easier to choose the right roof frame if you figure out which ones in advance. types and diagrams of rafter systems used in construction practice. After receiving such information, it will become more clear how difficult such structures are to install. This is especially important to know if you plan to build the roof frame yourself.
Main functional tasks of rafter systems
When arranging pitched roof structures, the rafter system serves as a frame for covering and for holding the materials of the “roofing pie”. With proper installation frame structure will be created the necessary conditions for correct and non-insulated types of roofs, protecting walls and inner space houses from various atmospheric influences.

The roofing structure is also always the final architectural element of the exterior design of the building, supporting it with its appearance stylistic direction. However, the design features of rafter systems must first of all meet the strength and reliability requirements that the roof must meet, and only then the aesthetic criteria.
The frame of the rafter system forms the configuration and angle of inclination of the roof. These parameters largely depend on natural factors, characteristic of a particular region, as well as the desires and capabilities of the homeowner:
- Amount of precipitation in different periods of the year.
- The direction and average speed of the wind in the area where the building will be erected.
- Plans for the use of space under the roof - arranging residential or non-residential premises, or using it only as air gap for thermal insulation of rooms below.
- Type of planned roofing material.
- Financial capabilities of the homeowner.
Atmospheric precipitation and the strength of wind currents place a very sensitive load on the roof structure. For example, in regions with heavy snowfall, you should not choose a rafter system with a small slope angle, since snow masses will linger on their surface, which can lead to deformation of the frame or roofing or to leaks.
If the area where the construction will take place is famous for its winds, then it is better to choose a structure with a slight slope of the slope so that sudden gusts that occur do not tear off individual elements of the roof and roofing.
Main elements of roof structure
Parts and components of rafter systems
Depending on the chosen type of rafter system, the structural elements used can vary significantly, however, there are parts that are present in both simple and complex systems roofs

The main elements of a pitched roof rafter system include:
- Rafter legs that form the roof slopes.
- - a wooden beam fixed to the walls of the house and used to fix the lower part of the rafter legs on it.
- A ridge is the junction of the frames of two slopes. It is usually the highest horizontal line of the roof and serves as the support to which the rafters are anchored. The ridge can be formed by rafters fastened together at a certain angle or fixed on a ridge board (purlin).
- Sheathing is slats or beams mounted on rafters at a certain pitch and serving as the basis for laying the selected roofing material.
- Supporting elements, which include beams, purlins, racks, struts, ties and other parts, serve to increase the rigidity of the rafter legs, support the ridge, and connect individual parts into an overall structure.
In addition to the mentioned design details, it may also include other elements, the functions of which are aimed at strengthening the system and optimally distributing roof loads on the walls of the building.
The rafter system is divided into several categories depending on different features of its design.
Attic space
Before moving on to considering different types of roofs, it is worth understanding what an attic space can be, since many owners successfully use it as utility and full-fledged residential premises.

design pitched roofs can be divided into attic and attic. The first option is called this way because the space under the roof has a small height and is used only as an air layer insulating the building on top. Such systems usually include or have several slopes, but located at a very slight angle.
An attic structure that has a sufficiently high ridge height can be used in different ways, be insulated and not insulated. Such options include an attic or gable option. If you choose a roof with a high ridge, then it is imperative to take into account the wind loads in the region where the house is built.
Slope slope
To determine the optimal slope of the roof slopes of a future residential building, first of all you need to take a closer look at the low-rise neighboring houses that have already been built. If they have been standing for more than one year and can withstand wind loads, then their design can be safely taken as a basis. In the same case, when the owners set a goal to create an exclusive original project, unlike standing nearby buildings, you need to familiarize yourself with the structural and operational features various rafter systems and make the appropriate calculations.

It should be taken into account that the change in tangential and normal values of wind force depends on how large the slope of the roof slopes is - the steeper the slope angle, the higher value have normal forces and less tangent forces. If the roof is flat, then the structure is more affected by the tangential wind load, since the lifting force increases on the leeward side and decreases on the windward side.

Winter snow load should also be taken into account when designing the roof. Usually this factor is considered in conjunction with the wind load, since on the windward side the snow load will be much lower than on the leeward slope. In addition, there are places on the slopes where snow will certainly accumulate, putting a large load on this area, so it should be reinforced with additional rafters.
The slope of roof slopes can vary from 10 to 60 degrees, and it must be selected not only taking into account the consolidated external load, but also depending on the roofing covering that is planned to be used. This factor is taken into account because roofing materials differ in their weight; to secure them, a different number of elements of the rafter system is required, which means that the load on the walls of the house will also vary, and how large it will be also depends on the angle of the roof. Of no small importance are the characteristics of each coating in terms of resistance to moisture penetration - many roofing materials in any case require one or another slope to ensure the free drainage of storm water or melting snow. In addition, when choosing a roof slope, you need to think in advance about how the cleaning process will be carried out and repair work on the roof.
When planning a particular angle of the roof slopes, you need to know that the fewer joints between the sheets of roofing, and the more airtight they are, the less you can make the slope of the slope, of course, if you are not planning to arrange a residential or utility room in the attic space.
If a material consisting of small elements is used to cover the roof, for example, ceramic tiles, then the slope of the slopes must be made steep enough so that water never lingers on the surface.
Considering the weight of the roofing material, you need to know that the heavier the covering, the larger the angle of the slopes should be, since in this case the load will be correctly distributed over the rafter system and load-bearing walls.
Can be used to cover the roof following materials: or profile sheet, galvanized steel, corrugated asbestos concrete and bitumen-fiber sheets, cement and ceramic tiles, roofing felt, soft roofing and other roofing materials. The illustration below shows the permissible slope angles for various types roofing coverings.

Basic designs of rafter systems
First of all, it is worth considering the basic types of rafter systems relative to the location of the walls of the house, which are used in all roof structures. Basic options are divided into layered, hanging, and combined, that is, including elements of both the first and second types of systems in its design.
fastenings for rafters
Layered system
In buildings where internal load-bearing walls are provided, a layered rafter system is often installed. It is much easier to install than a hanging one, since the internal load-bearing walls provide reliable support for its elements, and in addition, this structure will require less materials.

For rafters in this system, the defining reference point is the ridge board, on which they are fixed. The non-thrust type of layered system can be arranged in three options:
- In the first option, the upper side of the rafters is fixed on a ridge support, called a sliding one, and their lower side is fixed by cutting to the mauerlat. Additionally, the rafters in the lower part are fixed to the wall using wire or staples.

- In the second case, the rafters in the upper part are cut at a certain angle and connected to each other using special metal plates.

The lower edge of the rafter legs is attached to the Mauerlat with movable fasteners.

- In the third option, the rafters are rigidly fastened in the upper part with bars or treated boards located horizontally, parallel to each other on both sides of rafters connected at an angle, and a ridge girder is clamped between them.

In the lower part, sliding fasteners are used to secure the rafters, just as in the previous case.
It is necessary to explain why sliding fasteners are often used to secure rafters to the mauerlat. The fact is that they are able to relieve load-bearing walls from excessive stress, since the rafters are not rigidly fixed, and when the structure shrinks, they are able to move without deforming the overall structure of the roofing system.
This type of fastening is used only in layered systems, which also distinguishes them from the hanging version.
However, in some cases, for layered rafters, a spacer system is used, in which the lower end of the rafters is rigidly fixed to the Mauerlat, and to relieve the load from the walls, tie-downs and struts are built into the structure. This option is called complex, as it includes elements of a layered and hanging system.