DIY shoe rack made of chipboard. How to make a shoe rack (shoe rack) with your own hands
This furniture accessory for the hallway can be bought ready-made, but it is better when the shoe rack is assembled with your own hands in the style of the room. In many cases, this is justified not only by reasons of economy, but also by lack of free space.
Similar articles:
What is it like, a shoe rack in the hallway?
The hallway in a city apartment is not spacious. Everyday shoes, which are taken off when entering the apartment, and house slippers often clutter it, and it seems impossible to install a shoe rack.
In a small hallway convenient option there may be a combined design with a seat and shelves underneath, which will provide space for storing shoes and a small bench for putting them on. By replacing a simple stool or ottoman with this design, it will be possible to solve the problem of boots and shoes lying around, even in a large family.


An option for such a shoe rack could be pull-out shelf with a door panel behind which the contents will be hidden under the seat. You can make such models yourself, decorating them to match the style of the hallway:
- for rustic interiors, wicker or wine boxes can be installed in a body made of thick plywood or MDF, and the upper part can be used as a seat;
- for Victorian or classic styles the same base can be decorated with plastic molding and a velvet cushion on the seat, or a door can be hung to hide the contents of the shelf;
- By covering the body with a plain film and without resorting to excessive decoration, you will be able to get a minimalist piece of furniture for a formal hallway.
A small space behind the door can be rationally used if you hang tiered shelves on a canvas or wall.
But most often there are shoe racks, which are openwork structures made of racks and shelves attached to them. They differ from each other only in material and size.
DIY shoe rack: what to assemble from?
You can make a shoe rack with your own hands from any available materials. Craftsmen assemble furniture from leftovers from apartment renovations:
- boards and bars;
- drywall;
- scraps of plastic and metal pipes.
For making shelves, parts from waste material: cardboard or plastic containers.
The most common option for a shoe rack in the hallway of a home is a plywood or plank structure. The material is easy to process and the wooden shelf is durable. Its disadvantage is low moisture resistance, therefore street shelves They are rarely built from wood.
A good outdoor shoe rack will be made of metal or plastic. Such products will last for decades, and you can come up with many options for how to make a shelf for a hallway, using the qualities of the selected material.
Homemade shelves for the hallway
When deciding how to make a shoe rack, the master should evaluate his skills and abilities, select necessary materials and prepare the tools:
- for woodworking you will need a hand or electric saw;
- when using metal or plastic tubes, a hacksaw will be useful;
- cardboard and plastic can be cut with a knife;
- fastening materials for a small product - screws for wood or metal;
- drill with drills and bits for self-tapping screws;
- to connect cardboard parts or decorate, you will need glue;
- you can finish a finished shoe rack self-adhesive film, remnants of wallpaper, paint or varnish.
If the product is intended for outdoor use, it is advisable to protect the metal from corrosion and the wood from rotting. For this purpose, impregnation and enamels for exterior use are used.
Cardboard version
Budget and simple shelf it will turn out big cardboard box. To make it you need thick corrugated cardboard. Having measured the space for the shelf in the hallway, you need to determine the required width and length of the cardboard container. To ensure neat edges and greater strength of the product, the valves of the bottom and lid should not be cut off. It is better to bend them inside the box and glue them to the walls.


For tiered shelves, you need to cut rectangular parts from another box. Their width is equal to the depth of the body, and their length is equal to its length with 2 allowances. The dimensions of the latter must be determined individually: they must correspond to the distance between the tiers. Bend the allowances upward and glue the shelves inside the body. Treat the product with decorative self-adhesive film to protect it from moisture.
You can also make a shoe rack made of cardboard on the wall with your own hands, taking up minimal space behind the door leaf. To make it, you need to select several large boxes from which you can cut rectangles measuring 60x70 cm. Cutting and assembly is done as follows:
- Set aside 20 cm from the edges of the long sides. Draw lines that will divide the workpiece into 3 parts.
- Set aside 25 cm from the top of the workpiece along the short sides and connect the points with a straight line. The workpiece will form a T-shaped figure that needs to be cut out.
- Along the top of the cardboard letter T, set aside 11 cm from the edges and mark these points.
- Connect each mark to the corner formed by connecting the crossbar of the T to its leg. You should get 2 slanted lines.
- Pressing the cardboard with a ruler, bend the workpiece along all existing lines, bending the parts upward. It’s easy to roll cardboard into a fragment of a future shelf. In this case, the triangles on the edges of the crossbar need to be placed on the wrong side of the leg of the letter T.
- Using silicate or any universal glue, secure the triangles. If you do everything correctly, you will get a convenient pocket with a protruding upper part. Make as many such pockets as necessary to create a shelf.
- Decorate the details to your taste: cover with film or wallpaper, paint, add the necessary details. Connect the fragments, bringing the parts protruding above the pocket to the wrong side above the tier. Use glue for fastening.
Make holes on the topmost pocket for hanging and place the shelf on the wall.
If you cut out many identical parts representing the type of shelving of the required dimensions from the facade, and then glue them all together, you will get a product in the spirit of European fashion designers. Between identical slats you can install spacers made of small pieces of cardboard. Then the shoe rack will turn out to be openwork.
Pipe construction
Metal tubes can be used different ways. Shiny chrome parts will help create an interior accessory in a high-tech or minimalist style. These parts are used to assemble the basis of the structure - the frame struts. You can connect them with tubes smaller diameter or chrome-plated utility shelves-lattices. For connections, use self-tapping screws and bolts with nuts.
For a fashionable loft or techno, do-it-yourself shoe shelves are assembled from pipes in the form of a pipeline. The craftsman needs skills in working with metal and taps for cutting threads. You can connect the pipes plumbing fittings different shapes.
From profile pipe craftsmen collect bent and forged products. But such work can only be done if there is equipment for cold forging. Parts of the structure are welded or connected with threaded fasteners. Elegant forged shoe racks made from pipes are appropriate even in classic interiors.
Plastic construction
When the apartment's sewer system is replaced, new PVC pipes are cut large diameter used for making various organizers. A shoe rack in the hallway, made in this style, will take up minimal space. It can be placed on the floor or hung on the wall. The length of 1 fragment should not exceed the shoe size of the apartment owners. You can determine this parameter individually or cut the PVC pipe into pieces 27-30 cm long.


Film, wallpaper, and paint are used for decoration. You can connect the parts of the structure with bolts or short self-tapping screws, or use superglue for PVC. The segments are placed on top of each other or form a honeycomb structure of any shape. When the assembly is completed, it is advisable to fix the shelf by attaching the upper part to the wall.
A small hallway space can be easily used rationally by strengthening the lower parts plastic bottles large diameter directly on the door, the wall behind it or the wall of furniture. With this method, you can occupy a small partition near the door, placing the bottom parts of the bottles one above the other to any convenient height. The easiest way to fasten is with self-tapping screws, screwing them into the bottom of each part.
From scraps plastic pipe and panels (wall, window slopes etc.) it is easy to build a rack-type structure by attaching straight shelves from panels to racks from pipe sections. The design is also suitable for outdoor use, as it is not subject to corrosion and rotting. A more complicated version will require connecting vertical and horizontal pipes using fittings. By using scraps of transparent polycarbonate, you can give the shelf some airiness. Plastic parts easy to connect with self-tapping screws.
Metal shoe rack
You can also assemble from the remnants of metal profiles for installing drywall convenient shelves under shoes in the hallway with your own hands. The design will be strong enough to serve as a seat, under which you can place several tiers for storing slippers and boots.
It is required to make 4 parts vertical racks the same length. To connect them, you will need 2 short and 2 long crossbars for each tier. A simple design option is a product made from racks that are connected by ready-made lattice shelves or parts from an old one household appliances(refrigerator, oven, etc.).
Using soft welding wire (up to 1 cm thick) for work, it is easy to simulate forged product, connecting bent parts by welding or clamps made of thinner wire. Segments welding wire easy to bend without special equipment, using only a vice and pliers.
To shape the end parts of the parts, the wire must be heated in a flame gas burner and hammer it down. The design of the shoe rack is chosen at your own discretion, but its basic principle is a rack of twisted decorative vertical posts and horizontal crossbars connecting them.
A metal shelf can also be built from empty tin containers (coffee cans, paint, etc.). The parts are attached directly to the wall, as indicated for the shelf made of plastic bottles. Using cans different sizes you can create not just a shoe shelf, but also decorative panel, having additional functions shoe racks To make it mobile, you need to attach the tins to a plywood base.
Wooden shoe design
Make a shoe rack with my own hands made of wood is not too difficult. At the core simplest design The principle of the rack is: 4 racks made of bars, connected by boards or the same bars. Beautiful shelves are obtained by combining wood and transparent plastic (for shelves) or lattice metal parts.
If you have a jigsaw and lathe a craftsman is able to create beautiful shelves for shoes made of wood with decorative posts or carved sides. For minimalist interiors, it is enough to cut 2 identical boards without decoration for the side parts and several tiers connecting them. For the door, you can use a panel made of chipboard or MDF or a rectangle of plywood. To open such a door, use small furniture hinges installed on its lower edge.


The body consists of 2 sides, a bottom and a lid. Horizontal parts need to be cut so that they extend slightly beyond the vertical sides.
To assemble a shelf with your own hands, you need self-tapping screws and 1 metal stud with threads and nuts. Assemble the shelf like this:
- Strengthen the drum partitions around the central hole, along the radii of the circle. Fastening with self-tapping screws. Install the second circle, securing it with self-tapping screws.
- Drill holes for the pin in the center of the lid and bottom. Assemble the body using self-tapping screws, placing the sides between the bottom and lid parts. The distance between the sidewalls is 1-2 cm greater than the diameter of the drum. Attach legs 2-2.5 cm high to the bottom part. They can even be made from plastic bottle caps.
- Pass the pin through the holes in the cover, drum and bottom. If there are several drums, they should be separated with washers. Screw nuts onto the ends of the studs.
The dimensions of this shoe rack are at least 65x65 cm, so it is only suitable for a spacious hallway.
Corner shoe rack
In the partition behind the door you can place racks for shoes: you make them yourself from waste scraps. To make the simplest model, screw supports made of bars or metal profiles onto adjacent walls. On them you can mount triangles or squares made of boards, plastic, lattice parts, etc. planes on which it is easy to place 1-2 pairs of shoes. The height of the structure is dictated only by the convenience of the apartment owner.
To make a movable corner shelf for shoes, cut out rectangular sides and triangular parts for the lid and bottom from plywood or chipboard. They should be slightly larger than the corner formed by the sidewalls. If internal tiers are needed, the dimensions of the legs of the parts must correspond to the internal length of each sidewall.
Assembly begins with the sides and connects them with self-tapping screws and a furniture corner. The bottom and lid are attached in the same way: with self-tapping screws through holes in the plane of the parts. The fasteners must be driven into the edge of the sidewalls and screwed in flush. For shelves, you can install supports from thin planks or fasten the parts to the corners.
What do you do with old furniture?
How to save and make original stand under your own shoes - find out here!Ideas, useful tips, manufacturing instructions.
Making a stylish shoe stand with your own hands
A beautiful shoe rack can become not only a place to store shoes, but also a full-fledged element of the hallway interior. The choice of options in stores is extensive, but the prices are often overpriced. To make a roomy and compact shelf For shoes that fit perfectly into the look of the corridor, you need to put in a little effort and imagination. Let's consider options for making shoe racks from available materials with your own hands.

Types and purposes of homemade shelves for the hallway
Before installation, be sure to measure the space where you plan to place the shoe rack. For a small hallway, the ideal option would be a narrow (20-30 cm) and high shelf; in a larger room, a closed cabinet with a width of 60-90 cm would look good.
Should the shelf be closed? If you want the hallway to look more aesthetically pleasing, this is a good option. Do not forget to regularly ventilate closed shoe racks, otherwise you will not be able to avoid unpleasant odors. This problem can also be solved by installing a lamp inside for drying and disinfecting shoes.

The advantages of homemade shoe shelves are obvious:
- you can use eco-friendly materials;
- the cost of a homemade shoe rack is several times less than in a store;
- You can make a shelf for a hallway with a non-standard layout.
The design of a shoe rack directly depends on its purpose and the number of residents. Here are some popular and practical options:
| Shoe shelf design | Description |
| Classical | Shoe shelves This type is popular because of its simple and convenient installation. It can have a regular rectangular or asymmetrical design. |
| Hanging | The shelf is attached to the wall using slats, straps or cables. Conveniently folds when necessary (for example, if you need to carry furniture into a narrow corridor). |
| Corner | Fastening is carried out on adjacent walls. Great space saver. |
| Floor | The support in this design is on the floor. Suitable for spacious hallways, but can also have compact dimensions if the sections are distributed not in width, but in height. |
| Closed | This option looks more aesthetically pleasing. Doors can be made of plywood or frosted glass. |
| Cassette | Shoes will be stored vertically here; there are 2 or more cassette-type drawers on the door, which slide out when opened. Well suited for a small corridor (width 20-25 cm). |
There are many options for making shelves. The interior can be decorated with shelves made of metal, in particular aluminum; processed clay shelves, dense oak, and glossy plastic look very beautiful. The material of manufacture can be anything, as can the configuration of the elements. Based on the type of installation, shoe racks can be divided into several types.
Materials and tools for making shelves
The selected material for making a shoe rack determines its service life and ease of use. For example, it’s easier to make a shelf out of a cardboard box, but it won’t last long. But as a temporary option it will work great.  When choosing wood as a material, you should take care of the final treatment of the wood with varnish or paint to ensure an attractive appearance preserved for a long time. There is no universal set of tools, due to the peculiarities of installation and material. But you will probably need the following tools:
- electric drill;
- glue;
- a simple pencil;
- sandpaper;
- mounting hardware;
- screwdriver;
- wood hacksaw;
You will also need varnish or paint, the color of which is selected to match general interior hallway
How to make a shelf with your own hands
Before starting work, it is worth drawing an approximate layout of the future product, where you also need to indicate the dimensions. After this, they begin marking on the material, where they indicate the location of the fasteners (if any), the required length and width. Here are a few useful recommendations:
- When creating a simple shelf for shoes, you can do without using metal fittings - all elements are fastened with self-tapping screws.
- The doors are easy to install if you use awnings.
- Materials should be treated with varnish or painting before assembly. If you do this after, the layer will be uneven, and the procedure itself will be problematic. The process of assembling a shelf for shoes depends not only on the design, but also on the complexity of processing the material, and the features of working with it.

Wooden shoe rack
First of all, a shoe rack should have small dimensions, but at the same time accommodate a sufficient number of pairs of shoes. This is its integral feature. Materials from which you can build this design, many, but the main one is wood. Unlike chipboard and MDF, it will not unstick or swell when exposed to moisture. To do this, the wood should be varnished or painted.
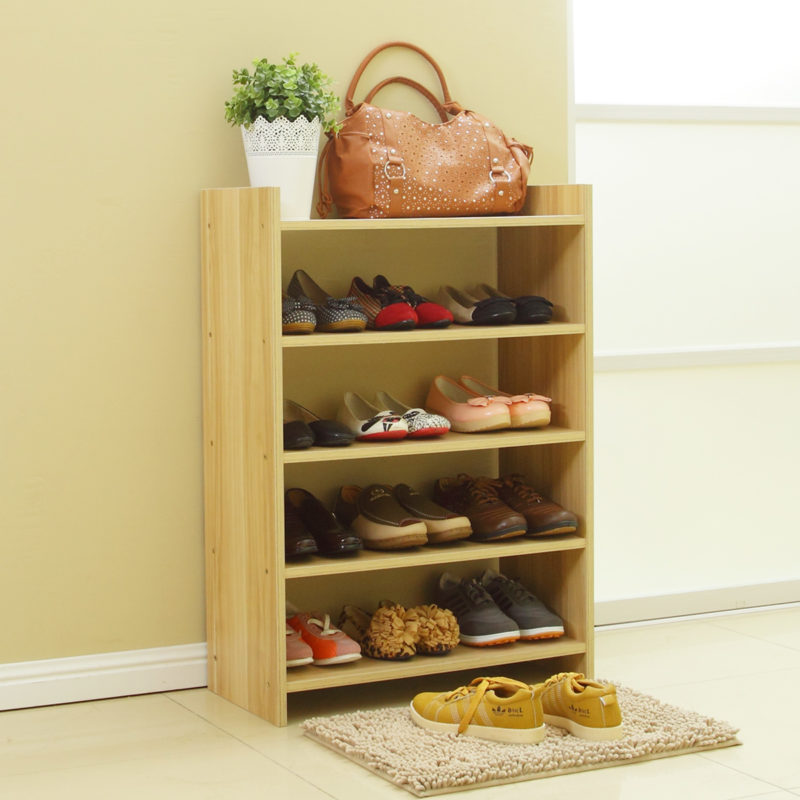
What will you need?
Basic kit for making: wood, glue, screws, glazing beads, varnish or paint. Tools you will need: saw, screwdriver or screwdriver, hammer, sandpaper, drill. Beads, screws, and drills are selected in accordance with the size of the structure. Self-tapping screws need to be small, but capable of being firmly fixed in the structure. Please remember that wood may crack or split if wrong choice screw size.

Assembly of the structure
A depth of 35 centimeters will be sufficient. This distance is enough to accommodate almost any shoe. This will be the length of the sides of the structure. You need to saw off 6 elements of 35 cm each. You can determine who in the family has the most big size shoes, and measure the distance along it, leaving 1 cm in reserve. Then you need to distribute 4 bars on one of the elements and make a cut to the depth of the bars. The bars must be spaced evenly.
Each shelf should be able to accommodate 3 pairs of shoes, so its length must be determined based on the 3 largest pairs of shoes in the family. 4 pieces of this length will go on each shelf. To connect the elements, it is necessary to cut out recesses. These places must be secured with self-tapping screws. For a more aesthetic appearance, you can drill holes and use glazing beads and glue that will hold the shoes without any problems. This operation is similar for each shelf. After this, sand the tops of the side panels with sandpaper.
Any height can be set, but a reasonable limit is no higher than 80 cm. High shoes should fit in one of the compartments of the structure. The distance between the shelves (between the floor and the first shelf) should be 30 cm. All connections are made in the same way.

Practical shoe rack made of chipboard
To make a simple shelf for shoes from chipboard, you need to take two sheets of canvas (the dimensions are determined based on the space in the hallway). You will need a sheet of fiberboard for the back wall. The assembly algorithm is simple:
- We attach the bottom and the shelves themselves to the two side walls. For the screeds, use a drill (8 mm drill); at the end, use a drill with a diameter of 5 mm.
- The folding element is secured with medium-sized self-tapping screws;
- The upper part is attached to 4*30 self-tapping screws;
- The shelves are mounted inside;
- Secure the back wall of the product.
- This is a budget and uncomplicated option that can be used in any hallway layout.

Beautiful laminate shoe rack
If after renovating your apartment there is unused laminate, you can use it to make a stylish and compact shelf that will fit seamlessly into any design. For production you will need laminate sheets, the number of which depends on the tier and metal pipes with slots. They can be made using a metal grinder. If desired, the structure can be made to any height; for safety, the edges of the tubes are sealed with plugs.
 From profile
An interesting option are shelves for shoes made of profile and tempered glass (or wood). For manufacturing you will need the following tools:
- glass cutter;
- jigsaw;
- Bulgarian;
- level;
- electric drill for metal;
- screwdriver
You can use a regular colored profile or a galvanized one; the second option will be more reliable, as it is resistant to moisture.

Step-by-step instruction
- The profile is attached to the wall with one self-tapping screw;
- Using a level, check the horizontalness of the markings;
- Screw in the remaining screws;
- The frame is assembled;
- Already cut shelves are attached to the frame.
- This option will look good in a Hi-Teck design.
 Simple shoe rack made from boxes
The presented design is able to withstand a lot of weight, despite the fact that cardboard is a fairly flexible material. To make it, it is advisable to use boxes from household appliances. Depending on the height and width, take required amount boxes The structure is attached with glue, tape, a stapler or another method. The finished shelf can be decorated as your imagination dictates. There is one drawback - this shelf is only suitable for summer shoes.
 Corner shoe stand
Most suitable material to create a corner wooden shelf for shoes - larch. It tolerates dampness well and is easy to use.
First, we decide on the size and design of the shelf, draw a diagram and calculate the required amount of material.
For creating corner shelf necessary following materials and tools:
- two boards up to 2 m long (the ends of the boards can be rounded or cut with a wave);
- shelves cut from the same board (the shelves can be cut into different sizes and shapes);
- jigsaw for cutting;
- plane and sandpaper for leveling;
- corners and screws for connecting parts;
- level to check the accuracy of the design;
- antiseptic;
- varnish or paint.
The boards must be sanded and treated with an antiseptic, varnished or painted. Varnish is chosen if you want to emphasize the naturalness and structure of the wood, paint - if preferred rich colors and when deciding to use special design techniques with color play.
 Construction connection
To create a lightweight structure, the two main boards are not attached to each other: they are installed at an angle and connected using shelves. First, the lower shelf is attached, then the upper one, the structure is installed vertically and its evenness and stability are checked. Then the remaining shelves are installed.
The space between the shelves must be sufficient, otherwise there will be a feeling of crampedness and congestion.

Decorative elements
To further decorate the shelf, you can use thin decorative slats cut out yourself. Or purchase a decorative wooden lattice partition, and after sawing it, decorate the shelf by adding carved stops.
Using decoupage or aging techniques in painting will also add a fresh touch to the interior of the hallway. Bright color solutions may be relevant to complement the interior.

Making a carousel shelf
The carousel shelf takes up little space and at the same time can accommodate many pairs of shoes. To make it you will need: fiberboard, metal pins and screws.

How to do
Blanks in the form of circles and quadrangles are cut from fiberboard. Using a compass and a strip, markings are made for the pins.
Discs for stands are fixed with discs of smaller diameter, which are placed at the desired height.
Prepare the bottom, on which quadrangular blanks are installed, attached with a corner. The bottom circle is conventionally divided into 3-4 parts (space for 3-4 pairs of shoes on the “floor”).

To make a shoe shelf, you can use your imagination and then the most interesting ideas come to mind. unexpected decisions. Here are a few ideas that will be of interest not only to independent use, but also as a gift for loved ones.

On video: DIY shoe rack from an old closet
What a wide variety of shoes in stores and markets! The female half cannot resist buying new shoes to go with a new dress. Men have a choice practical shoes and there is a lot of it too. How much inconvenience do shoes cause in the hallway? Where should I store all this at home?
The solution can be found in a furniture store, namely, buy a shoe rack or make it yourself.
Someone has a small and narrow apartment small hallway, while others spacious house. Some live with adult children and grandchildren, while others live alone. Hallways, like families, are different, so standard pieces of furniture do not always suit a specific room. A comfortable shoe rack, created with your own hands, will help solve the problem of choice.

With it, your hallway will be transformed into a stylish and comfortable one. business card Houses.
How to choose the right thing? First, let's get acquainted with the types of furniture such as shoe racks.
- Shoe wardrobe.

It is very convenient in small rooms, as the doors move apart and can be combined with the main wardrobe for clothes.
- Showcase-rack with doors.

You can place shelves along the entire wall, any size of shelves, but the disadvantage of such a shoe rack is instability.
- Slim-format cabinet.
This cabinet has hinged doors at an angle of 45-90 degrees. And the name speaks for itself. This type of furniture is “thin”; shoes will be located at a slope.

Tall over-the-knee shoes may become deformed on such shelves.
- Galoshnitsa.

More suitable for a balcony. Shoes dry quickly on such shelves, but they are inconvenient to store.
- Rack.

It is the simplest design, but unstable and unaesthetic for the hallway.
- Cabinet-cabinet.

The most common and practical shoe rack.
Advantages:
- With tenacity;
- M multifunctionality;
- Compactness;
- E aesthetic.

A closed shoe rack is suitable for people with pets. It will help protect your shoes from any damage from pets.
For the cabinet you can make folding, sliding or regular doors. So it will take up little space. A shoe rack made from laminated chipboard will be durable and will not fail for a long time.

Wooden models are easy to make with your own hands, which saves the family budget.
Shelves and drawers in the closet can be made to suit any type and size of shoes. And on top there is the opportunity to make a table or cover it with fabric, a shoe rack with a seat in the hallway will come out.

The seat replaces an ottoman or stool for convenient changing of clothes.
Types of materials that can be used for shoe racks:

Metal and wood make the cabinet heavier; shoes in plastic will not breathe. MDF is a good choice, but not cheap. The most suitable material for storing shoes- Chipboard. Does not weigh down the shoe rack and is easy to assemble.

Today it is the most popular material in the shoe furniture segment.
And so, let's focus on a cabinet cabinet made of chipboard.The tools we need are:

Preparation of parts

Instructions for assembling a shoe rack with your own hands

Thickness of the chipboard + Width of the planned shelf + Half the thickness of the chipboard.
For example, a part is 12mm, shelf width is 300. It turns out: 12+300+6=318mm.
We do this from the right and left edges. Transfer the drawing directly to the inside of the chipboard and sign each detail where it will be located. Then you won’t confuse anything during assembly.

When marking the holes for the height and width of the shelves, you need to take into account the back part, since on this side the entire view of the cabinet is located in the same plane.
- Inside, the shelves will be supported by shelf holders. You need to drill holes for them. To calculate correct location These holes must be subtracted from the height of the rack for each thickness of the partition and divided by the number of shelves.

To the result obtained, add the thickness of the shelf and half the diameter of the shelf holder.
For example, the height of the rack is 600 mm. Two shelves are planned. Shelf thickness 12 mm. The diameter of the shelf support is 5mm.
The calculation procedure will be as follows:
600-12=588
588/2=294
294+12+2=308
Therefore, you will need to measure 308 mm from the top.

After the holes are drilled, you can install the shelf supports by filling them with glue and hammering them in with a hammer.

Assembling a shoe rack according to a drawing with your own hands
When all the holes are made, you can begin assembling the confirmat. We attach the middle posts to the bottom part, then the outer ones. Make sure there are no protrusions at the corner joints.We attach the lids to the corners, put the shelves on the holders and install the finished drawers on the guides.

We attach furniture handles to the doors in any location. They can also be attached to awnings, or you can install sliding ones.
Decorating a homemade shoe rack can be varied.


Hand-made furniture always distinguishes the interior from other apartments where there are typical chests of drawers and wardrobes.
VIDEO: DIY shoe cabinet.
Every person's wardrobe is undoubtedly large. Among all things, shoes occupy an important place. It is placed separately from all other items of clothing. In most cases, shoes, for convenience, are stored in the hallway or corridor. In order for it to serve for a long time, it is necessary to handle it carefully and also store it properly. For the latter, a separate shelf is best. You can buy it in a store or make it yourself. In this article you will learn how to make a shoe rack with your own hands.
Today, furniture stores have a huge number of shelves. different forms and designs. Choosing a model yourself is sometimes difficult. First of all, the dimensions of the structure are calculated:
- height;
- length;
- width.
It is also worth considering the number of shelves or cells and their height. To do this, you need to review all shoes for their size. In addition, the design can be supplemented with a cabinet, banquette or other decorative finishing. The shelf can have a corner, round, rectangular shape, or be rotating.
A simple, but at the same time durable shelf can be made from scrap materials, for example, wood or a sheet of fiberboard.

The durability and practicality of a shoe rack will depend on the material from which it is made. So today there are practically no restrictions in choice. Among the most common materials are:
- plywood;
- tree;
- laminate;
- slats;
- profile;
- box;
- pipes;
- metal.
The most common is wood. You also need to buy varnish or paint. Thanks to this, the shelf will repel moisture and dirt. This also applies to chipboard. Experts advise providing a bottom shelf for wet shoes, which will serve for drying. They also need additional protection hardware, since corrosion may occur as a result of exposure to moisture. You can use leftover paint to create a protective layer. The manufactured shelf can be installed in the hallway.
Thanks to the protective layer, the wood will not be subject to swelling and, as a result, deformation. This will increase service life products for several years.

Making a shelf at home does not require a lot of time and effort. In most cases, everything depends on the design, so specifying a standard set will be somewhat problematic. When selecting tools, be sure to include in the list:
- electric drill;
- screwdriver;
- hacksaw (for metal or wood);
- ruler;
- pencil;
- glue;
- fasteners;
- chisel;
- sanding machine or sandpaper.
When planning to make a shelf out of wood and metal, carefully select paints and varnishes. It is desirable that the finished shelf matches the interior of the room.

The most relevant and simple option is a shelf for shoes made of wood. To install it, it is enough to take several boards that were left after repair and finishing work. As already mentioned, first of all it is necessary to decide on the dimensions, functionality and design of the product. After selecting all the tools and fasteners, you can begin assembly:
- From the prepared lumber it is necessary to cut out all the elements in a given quantity: support bars, cross beams, side posts.
- To prevent injury, all prepared parts are treated with fine sandpaper.
- Using self-tapping screws and a screwdriver, the frame is fastened and the shelves are installed.
- The finished product is coated with varnish or paint.
An old cabinet or shelf can serve as the basis for making a shoe rack. In this case, the whole procedure is greatly simplified.

An equally simple option that you can do yourself is a combination of wood and metal strips. Can be used as regular boards, so fiberboard sheets, but the thickness should not exceed 1.5 cm. The planks should have a cylindrical shape with a diameter of 2 cm. Ideal option will stainless steel, which is not afraid of moisture. Don't forget about fasteners.
For convenience, it is better to draw a sketch of the future product on paper. This will help avoid errors or defects. The side and back walls. All edges must be smooth. Used for convenience Sander or sandpaper. Before fastening all prepared elements, it is necessary to apply markings. Nails and screws can serve as fasteners.
It is best to place such a shelf on the floor. In order for a large structure to be held on the wall in the corridor, it must be securely fastened.
So, creating a shelf for storing shoes yourself is quite simple. You need to have the desire and also allocate some time. By showing your imagination you can get not only necessary thing, but also original item decor that can harmoniously fit into the interior of the hallway.
You might be interested in the following materials:
Video
From the provided video materials, you will learn about two simple methods making a shoe rack for shoes:
Photo
Below are a bunch of photos from different ideas for making a shoe rack with your own hands:


When entering a home, a person finds himself in a hallway, which should be functional. It is not easy to equip it correctly because small sizes, but it is necessary to provide a place to store shoes. To do this, you don’t have to buy expensive furniture - you can make shelves for shoes in the hallway yourself. Lack of space forces owners to choose multifunctional solutions. For example, a clothes hanger can be combined with a shoe rack.
Every owner wants his home to look perfect, and for the pieces of furniture to combine and complement each other. To do this, from the huge variety of shoe stands that can be seen in the photo, you need to choose suitable option. The main requirements for them are versatility and compactness.
Types of shelves
The choice of shelves depends on the number of shoes, area and style of decoration of the room. They should be simple and reliable, they should be easy to make with your own hands. This universal solution, which saves space and has an attractive appearance. Shelves are placed at the bottom of the wall. An ordinary hanger consisting of a row of hooks and a small shelf-bench, under which shoes for daily use are stored, will perfectly complement the interior. A good solution is a rack, the upper part of which will become a bench. It is usually equipped open shelves(example - in the photo).
Externally, such shelves in the hallway resemble cabinets, but do not have doors and often they also lack side walls. There are drawers or doors under the seat, and a stylish hanger can stand next to it. The rack will allow you to put things in order, it is practical and universal option. Models with open and closed shelves, in which the shoes are placed on the entire sole.
A slim cabinet with folding doors is suitable even for a very small hallway. Shoes will not gather dust, but they should only be placed in the cabinet when they are dry and clean. The open hanger with shelves and seat is practical and convenient. It will fit clothes and shoes used every day. To store shoes not used this season, provide closed systems. Special stands are made from ordinary cardboard boxes, they are covered with material that does not get wet and covered with pebbles. Shoe shelves in the hallway can be made horizontal, multi-tiered, or vertical. Creating own design products can be made combined option, combining several types in one design.
Shelf materials
There are a huge number of materials suitable for making shelves and racks for shoes. Please note the following before starting work:
- budget for making shelves;
- the number of people who will use the shelves;
- will this model of rack or shelves be combined with a hanger;
- Is a seat (bench) on top required?
The following materials are used to make shelves: metal, wood, plastic, etc. Narrow and corner models are made from chipboard. Shelves of the simplest design are attached to the wall and take up minimal space. They look quite original and do not reduce the space of the hallway.
From natural wood make shoe racks for classic interiors. Wood is an affordable and environmentally friendly material and is easy to process.
A DIY shoe rack made of metal will provide natural ventilation. Her distinctive feature is that the metal will not absorb odors. This shelf can be decorated additional elements and add personality. The metal does not rot and does not get wet. If it is treated with an anti-corrosion compound, it will not rust. Metal shelf, as a rule, is mounted on a wall or mounted on racks.
How to make a shoe rack with your own hands
The easiest way is to make shoe racks with your own hands. For this you will need ordinary tools and materials:
- wooden bars – 6 pcs.;
- self-tapping screws (3 mm – diameter, 25 mm – length);
When making a shoe rack with your own hands, you need to start by making the side parts. To do this, prepare 6 identical bars 33 cm long (33 cm is the required depth, which will allow you to place shoes of any size on the future shelf). Then evenly distribute the 4 remaining bars on the workpiece and make cuts on them of the required depth.
The universal width of the shelf is at least 62 cm. It will allow you to place several pairs of shoes in one compartment at the same time. Each shelf is made from two blanks, which are attached to each other with self-tapping screws. After all installation work sharp and rough parts of the shelves are sanded using special paper.
The height of a shoe rack made with your own hands will be approximately 80 cm. Its lower part is located at a distance of at least 25 cm from the floor, which will allow you to place boots and other types of high shoes.
Racks for shelves can be made from planks 80 cm long. Special cuts are made on them the size of the thickness of the timber (in in this case– 16 mm), the distance between cuts should be 25 cm. The shelves are inserted into four prepared racks with pre-cut sections.
The upper part of the rack is made from the materials that remain after preparing the shelves and racks for them. To do this, 33 cm bars are sanded, varnished and fastened with self-tapping screws to the finished structure.
Note! If you use 4 screws for each shelf, then you will only need 2 screws to secure the top part.
Remember that you can create any structure for storing shoes with your own hands, be it a rack, a cabinet or a regular hanging shelf on the wall. You can find quite a few ready-made options on the Internet, but if you have the time and desire, experiment. This way you can get an exclusive piece of furniture that all guests will admire. Everything you need to create shoe shelves in the hallway with your own hands - it’s a little imagination and basic consumables.
Practical and versatile products are very popular. We recommend choosing multifunctional models that can easily change their appearance. When choosing a shoe storage option, focus on your habits and the ease of use of the rack or shelves in your hallway. For example, for large quantity shoes, you can choose a high rotating stand.
From the materials available in the house, which, for example, remained after renovation, it is quite easy to create original shelf or a DIY shoe hanger. A wire hanger will become in an interesting way solving the problem of storing house shoes in a small hallway.
Often in small corridor special holders and hanging containers are installed. Hanging furniture will be a great way to place shoes in small room. Wall shelf will give the room additional volume and save space on the floor. We recommend hanging doors on the shelf to hide its contents. In this case, the room will look tidier. If you place a multi-tiered structure along the wall, it will fit not only shoes b, but also, for example, umbrellas with bags.
The carousel shelf is assembled from several round parts. It provides a separate place for each pair of shoes.
Old wooden or metal staircase Easily converts into a convenient storage system. The ladder is very easy to attach to the wall. Additionally, it can be painted in the desired color, and hooks can be attached to the crossbars.
Autonomous systems, like the one in the photo below, can be used to sort shoes. Ordinary pallets, decorated with paintings or appliqués, will become reliable storage containers and decorate the interior of your hallway.
Using your imagination, you can simply create an original shelf for storing shoes that for a long time All household members and guests will admire it.