DIY bridge at the dacha - drawings. Decorative bridges on a personal plot - ideas, tips, practice
Not everyone has the unique opportunity to acquire their own personal summer cottage. But those who have become the happy owners of a dacha constantly strive to improve and decorate their dacha. You can get great pleasure from this creative process, and it’s not just the creation process that pleases you, but also the end result.
Dacha in in capable hands becomes not only a place where it is necessary to work on the land and grow natural products, but also a place where there is the opportunity to relax in a variety of ways. For some, work at the dacha itself becomes a vacation, but others are trying to arrange their dacha in such a way that, while admiring the beauty, there is an opportunity for moral rest.
Depending on how developed the imagination is in a summer cottage, the most original flower beds with bizarre shapes, various figures from scrap materials. Very beautiful among flowers and greenery, in landscape design the bridges look.

What is a garden bridge for?
For many, the bridge evokes associations associated with the river flowing between the two banks. Where there is a bridge stretching from one bank to the other, across which you can cross to one side or the other. Each nation has its own definite opinion regarding bridges. For some it is a transition from one world to another, and for others it is a kind of symbol of spirituality.
A bridge at a dacha will look especially beautiful and original next to a small lake or stream. Nowadays, a bridge at a dacha can be built without a reservoir. It acts as an independent decorative element. If you do not want to deviate from the principles that the bridge should be in harmony with the water, then in this case you can independently organize an artificial reservoir over which to place the bridge itself.

Location of the garden bridge
If you are really thinking about how to make a bridge on a pond with your own hands, then you need to carefully consider where exactly this composition will be located.
If you have a natural reservoir on your site, you need to place the bridge in the place where the width of the riverbed is smallest. This will allow for a more compact and stable design.
If there is no reservoir and you have no desire to make an artificial river or pond, then you need to think about where else you can make a bridge in the country. It is quite possible to place it over a small flowerbed in the garden or over a ravine. You can put it in any place you like. The main thing here is that it fits perfectly into the overall picture.
Determining the shape of the bridge
In order to move on to radical action and make a bridge at the dacha, you need to first think about what exact shape it should be. Of course, you can come up with anything, it all depends on the flight of your imagination. The most important thing is to choose a form of construction that you can actually do yourself. The simplest bridges for a summer house are those that have an even shape. Even those people who do not have construction skills will be able to make such a structure.

Fans of oriental culture may like the zigzag shape of the design. Since ancient times, there was an opinion that this form helps protect against evil spirits who endlessly walked around the corners of the zigzag and could not find a way out.
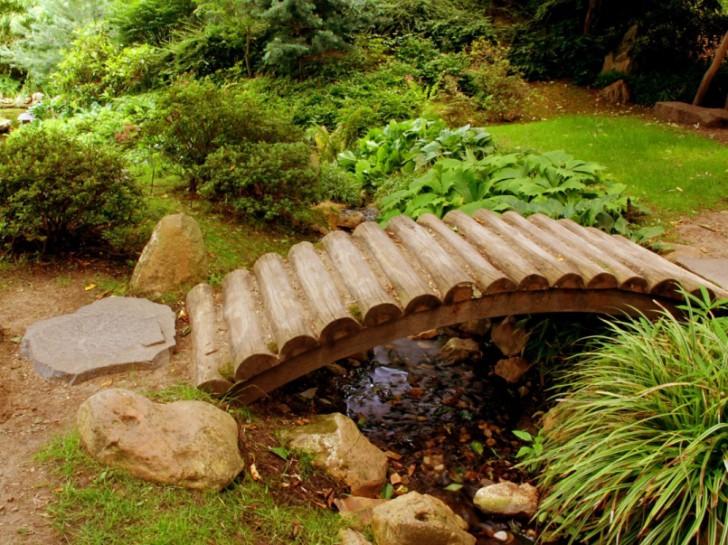
Bridges in the dacha in the form of an arch will look great. Despite simple design, arch bridges never lose their relevance. They can be decorated very beautifully. For example, make a railing along the edge of the bridge on which you can place hanging pots with flowering plants. In reality it looks very beautiful and original.

It should also be noted that the bridges are of a stepped type. This design for a summer house managed to combine the familiar staircase and the bridge itself.
Advice! If you approach the process of creating this type of bridge in a non-standard way and do it in the form of an observation deck, then from it you can admire the beauty of your dacha.
This option is relevant only when there is an elevated place on your summer cottage where you can actually make a bridge. Also, this bridge is most suitable for large garden, because in small areas there is nothing much to admire.

Choosing building material
For the bridge it is necessary to select only high-quality building materials.
Wooden bridges at the dacha look very beautiful and natural. Because nowadays there is no shortage building materials, then there is always the opportunity to choose the most suitable option material. You can take windbreaks, logs and ready-made boards.
For piles, you should use only those types of wood that have the ability to be very long time stand in the ground without losing its structure and strength. Nice views wood must also be selected for flooring.

It’s not enough to just make a bridge and admire it. It is necessary to systematically carry out the procedure for its processing using special means, which help prevent loss of structure and the development of fungal infections on the surface of the board. If desired, the wood can be given a variety of colors using the desired shade of varnish.
Attention! If you plan to use the bridge regularly, then it is necessary to equip it with special pads that will prevent slipping and falling.
It is worth noting that working with wooden materials is quite simple and easy, this allows you to make a bridge of any shape.
If the task is to organize a landscape design for the courtyard of a private house with bridges in classic style, then you can use concrete bridges.

Bamboo bridges will look great if the dacha has additional elements and details decorated in Japanese style.
The construction of a stone bridge gives a unique and majestic look to the landscape. Here it largely depends on the type of stone that is used, be it marble, granite or any other type of stone. But in in this case it will look beautiful when there is a large pond at the dacha.
Quite often you can find bridges made of metal and this is not at all surprising, since metal is a very durable and practical material.

Let's start construction
Before you make a bridge at the dacha with your own hands, you must first take care of preparing the place where it will actually be located.
If you plan to make a bridge over a reservoir, then it is necessary to carry out a procedure for strengthening the banks. After this, two beams are laid, the distance between them will determine the width of the bridge.

Attention ! The entire surface of the bars that will come into contact with the soil must be treated with special antiseptic agents, and this part must also be insulated using roofing felt or similar materials.
When the bars are placed in their place, they should be secured as best as possible with metal rods.

After securing the bars, you can safely begin attaching the cross boards. Their thickness should be at least 3 cm. Do not forget that all measures must be taken to reduce the level of slipperiness of the boards, since this is very unsafe.

Once the process of attaching the boards is completely completed, it is necessary to proceed to the stage of creating the railings. The design of the railing can be chosen based on your personal considerations. They can be made from several longitudinal bars or from small components that will be attached between the lower part of the bridge and the upper beam. For greater safety, it is important that the railings have a high level of strength.

The finished bridge structure must be decorated with various decorative elements, painted, or simply left in its natural form. In this case, it all depends on your imagination and what style you are trying to maintain.
Conclusion
If you have a dream of making a bridge on your summer cottage, then you shouldn’t put it off because you’re worried that you won’t be able to make a bridge on a pond with your own hands. Everything is extremely easy. The main thing is to follow a certain algorithm and everything will work out.
For those areas where there is no artificial reservoir, you can make a dry river. What is a dry river and how to make it we will find out in the next video
It's nice to create beauty garden plot. Where else, if not at the dacha, can you show your design aspirations? One of wonderful opportunities Add personality to your garden by creating a decorative bridge with your own hands. Its task may be to connect the two banks of a reservoir or divide the site into zones. In any case, before choosing the style and type of bridge, you need to decide on its purpose and get acquainted with interesting options.
It is important to correctly place the bridge on the plot
We hope that you have already chosen a suitable option for yourself, and now you need to decide where you plan to place the man-made bridge on your summer cottage. Many people believe that a decorative walkway is only possible over a large area, and they are mistaken.
It is enough to choose the right design, material and location - and such a decorative structure will harmoniously fit into the landscape of even a small area.
It is common for walkways to connect the banks of a stream or pond, but landscape design experts offer other options for their placement:
- dry (stone) streams;
- flower beds;
- ditches and holes;
- paths leading to arches and gazebos;
- ravines.

An important condition for creating country decoration is a combination of it appearance with other garden elements, durability and safety for owners. Of course, if there is a stream or pond on the site, it makes sense to build a bridge definitely over the stream. This design is especially appropriate in a rock garden. Japanese style. According to Eastern philosophy, it is the “humpbacked” bridge that allows you to feel the greatness of the deity.

When creating a landscape in landscape style the building should be placed in the narrowest part of the reservoir. This solution allows you to divide the reservoir into parts of different sizes or to delimit the area between the garden and the recreation area.

In a regular type landscape, you should adhere to the corresponding rule of symmetry and plan to place the building in the center of the site. In this case, it will perform a functional role and act as a mini-observation platform. For a country-style site, a good-quality wooden bridge without decoration or frills, with wide and durable railings, is suitable.

Choosing a place for decorative design, don't forget about proportions. There should be a certain distance between the surrounding elements and your creation. If placed in close proximity to country houses or large trees, it will get lost.
Let's evaluate garden bridges by shape and purpose
Choose the appropriate form garden decoration follows, based on harmony with the surrounding landscape, on one’s own preferences and focusing on possible options execution. The following types of bridges can be identified by their shape:


In the simplest case, you can use a very small bridge in the form of a craft to decorate the area. Moreover, its design can be relatively large, and the product can be used by storks, frogs and other animals, with the exception of humans. Choosing a place for a small craft in the country is much easier. 
While you are carried away by the charm of designer products, you should not forget about their direct purpose: to overcome obstacles in the form of a stream or ditch. In this case, an inexpensive and reliable design with minimal requirements for external design, which, of course, can be done with your own hands.
Material for creating bridges
The choice of product material largely depends on its type, features of the design you like, surrounding landscape elements and budget. To create it with your own hands on personal plot fit: 


Regardless of the chosen material and design, a bridge will be appropriate if its design fits perfectly into the surrounding space. At the same time, than smaller area plot, the more simple the shape and color, you need to arrange a walkway.

Quite often, climbing plants are located next to the structures, as well as lighting elements that provide mesmerizing illumination in the evening. Such design will support the romantic direction in the landscape design of your plot.
A wonderful series of designer walkways
Probably one of the most enjoyable stages in acquiring your own bridge at the dacha is getting to know the already existing options. We will comment on some interesting models with the hope that one of them will win your heart. In any case, it is very useful to study photos of successfully implemented projects.

This bridge is made for flowers that, in a friendly group, cross the stream. The load-bearing elements are steel, and the flooring is made of halves of logs. On the wood there is a sheet of waterproofing, soil and flowers. The bottom of the structure is lined with a sheet of metal.

When it rains, wood becomes slippery. A simple solution is a strip of carpet. Its color is coordinated with the surrounding elements. It is better to attach the material to the base with self-tapping screws.

Don't be afraid of bold colors! The fencing of the building is wonderfully combined with bright flower buds. The decking boards do not need to be fitted tightly and the gaps can be covered with slats that will resist slipping during rain.

The bridge can be asymmetrical in color, design, and material. Another great trick for a designer!
Ordinary halves of logs - and what a beauty! In this case, the design fits perfectly into the landscape.

This example suggests that you should be bolder when choosing material for your own handmade work. The result was a completely inexpensive and original product.

There is another hint hidden in this example: the combination of materials for crafts can be very different. Look carefully at what you have and try to connect with environment own design.
You can make a metal bridge yourself
The metal bridge attracts with its openwork and light shapes, as well as its reliability and durability. Having studied the models presented above in the photo, you may think that it is unrealistic to do something like this yourself. However, blanks of forged elements come to the rescue, which are available in abundance, for example, in the LEROY MERLIN construction supermarket.
 We have specially selected for you several easy-to-repeat designs. They all have a minimum number of elements that need to be bent. So, having welding machine and having certain experience welding, you can make a charming metal bridge with your own hands.
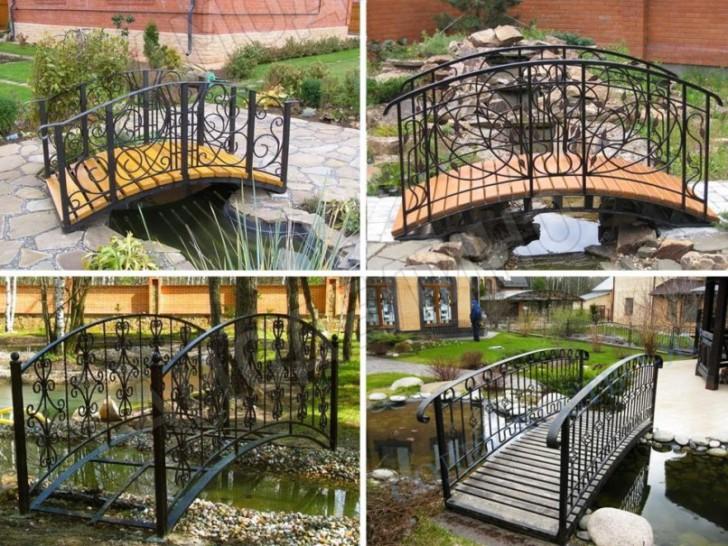
Of course, if possible, it is better to contact familiar plumbers and use their pipe bender to shape the longitudinal elements. In this case, the railing can be made from a strip of metal, which can be easily bent “in place” without special tools. In the end, the base of the building can be made in the form of rectangular pipes welded in a “step” and closed on the sides with wooden overlays.
The metal structure should be thoroughly cleaned of rust and the welded joints should be cleaned. Next, the surface of the product is degreased with white spirit, covered with metal primer and two layers of weather-resistant paint. Every year the product must be inspected and the damaged coating restored.
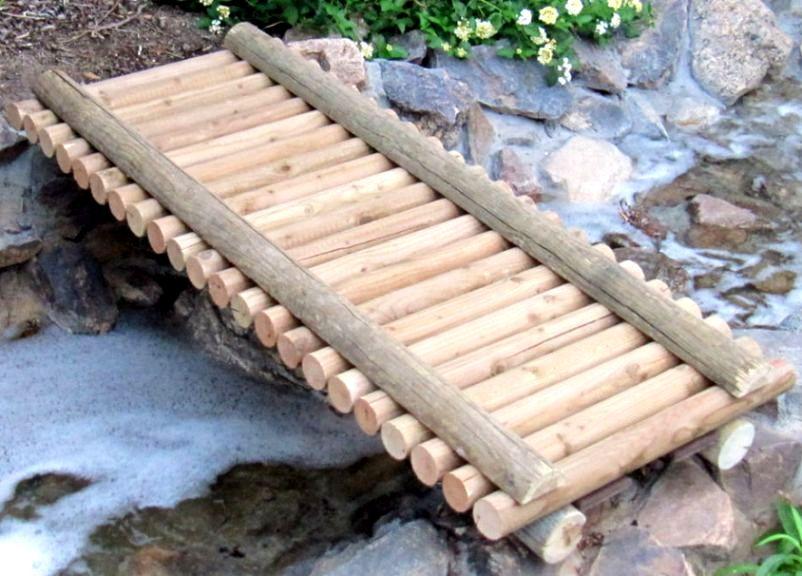
Assembling a wooden bridge with your own hands
The easiest way to make a walkway for a summer cottage is from wood. Oak construction will last the longest. A compromise option for price is larch. For crafts that are hidden in a barn for the winter, pine is also good. The use of decking will provide a reliable, durable and non-slip flooring.

The design of a homemade wooden bridge is clearly visible in the above photo. A 25 mm thick board can be used as longitudinal supports for decorative crafts that cannot be stepped on by humans. At the same time, its width should be sufficient to cut out elements in the form of an arc. If there are no boards of the required width, they can be joined at the place where the railing balusters are installed.
The base of a product that is used infrequently can be made from 4 longitudinal boards only 30 mm thick, located at a distance of no more than 50 cm from each other. Moreover, every linear meter Cross members should be installed to prevent the bridge from swinging to the sides when walking.
It is better to mount a pedestrian bridge 3 m long on longitudinal elements with a cross-section of 50x150 mm or 100x100 mm. The cross-section of the longitudinal beams should be maximum in the middle of the structure and can be proportionally reduced as they approach their edges. The easiest way to assemble the base of the building is to use self-tapping screws. The fastening of the pedestrian bridge elements is reinforced by the use of galvanized corners. If the bridge length is more than 6 m, intermediate supports are installed.
Decorative flooring can be made from boards 25 mm thick. If the distance between the joists is no more than 50 cm, a 30 mm board is suitable for a pedestrian bridge with a minimum load. A permanent bridge is covered with boards 40-50 mm thick. The narrowest pedestrian bridge must have a width of at least 0.6 m.
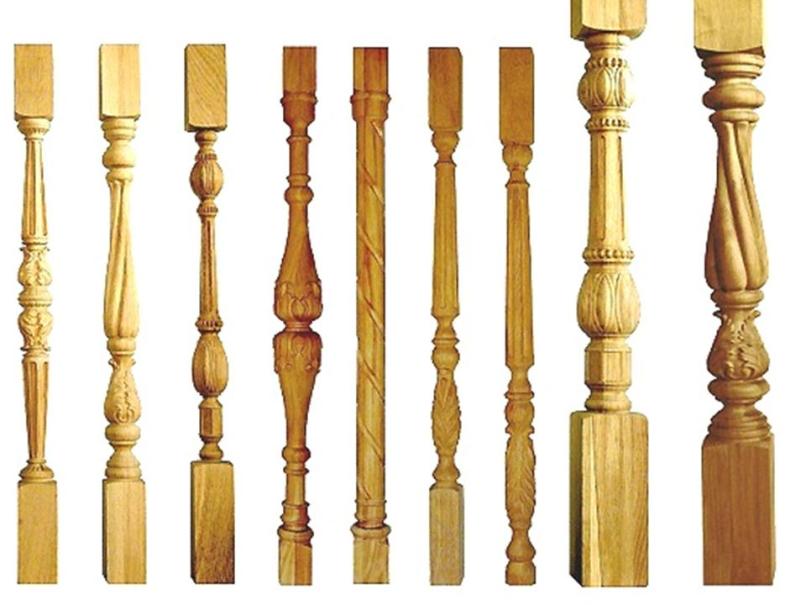 It is most convenient to use ready-made balusters for stairs, the range of which is widely available in the trade. IN decorative crafts they are attached to the base with wood screws, and in “human” bridges the balusters are mounted using furniture bolts with nuts and washers, two sets per fastening unit. A convenient railing height is 0.7-1 m.
Curved railings are not easy to provide and are best done as separate straight elements between the balusters. A simple solution is a flat-laid board that can be easily bent “in place.”

A separate issue is the supports for the building. Their execution is determined, on the one hand, by the design, load and dimensions of the bridge, and, on the other, by the composition and mobility of the soil. In the simplest version, when placing the structure over a “dry stream”, a cushion of crushed stone will be sufficient.
On soft ground, four large sunken stones can be used. To prevent the supports from slipping, they should be attached to the stones using dowel-nails; one element per support is sufficient. In some cases, the structure may rest on the curbs of the paths leading to it.
The most reliable option is reinforced concrete shoes of sufficient area, buried 0.5 m into the ground. It is advisable to provide waterproofing pads made of rolled material between the supports and beams of a wooden bridge.
The wooden structure must be impregnated with protective materials and painted. Only weather-resistant paints and varnishes should be used. It is necessary to monitor the coating annually and, if necessary, restore it.
Garden bridge made of stone and concrete by craftsmen
Here is a modern reproduction of an ancient Roman arched stone bridge. A team of several people worked on its construction for about a month, and it took up to
15 tons of stone.

It’s not difficult to make a bridge at the dacha with your own hands. If there is a ravine, stream or ditch on your summer cottage, then you can make a decorative bridge to give it an aesthetic appearance and to simplify movement. If there is an artificial pond at the dacha, then if it is stocked with fish, the bridge will also be a fishing bridge. They will look most impressive garden bridges, used to transition between artificial islands on a dacha pond. The cheapest way is to build a bridge at your dacha with your own hands. If possible, you can order forged metal garden bridges. Country bridges are always an excellent decorative element for gardens.
A decorative bridge can be made from various materials: boards, concrete, pallets, metal rods, plastic, thick tree branches.
Preparatory work
Before construction, the functionality and type of bridge should be determined. The bridge should not be built on level ground, otherwise it will cause confusion among visitors. A bridge in the garden must be built over some landscape object: a flower bed, a ravine, a ditch, over a decorative pond (lake), bridges over a stream. To improve the landscape design, paths or paths should be laid to the bridge.
Bridges can be of various types:

- Direct. The easiest one to make yourself.
- Arched. They have an aesthetic appearance and will decorate the site.
- Hanging. The most difficult to manufacture, require precise calculations and careful preparation.
- Stepped. Similar to stairs with a common landing.
- "Zigzag". Asian type.
- Step by step. They are smooth flat stones, which are laid at a step distance (0.8 m). Construction is not difficult at all.
It is worth determining the main material for making the bridge. Wooden bridges are less labor-intensive; stone bridges have a monumental appearance (but stone is heavy, so they are most often used artificial stones) and so on.
After determining the type and location of the bridge in the garden, you should draw a sketch of it and put down dimensions for calculation required quantity materials.
Tools and materials
For work you will need the following tools and materials:

- shovel;
- plane;
- screwdrivers;
- hammer;
- Grinder;
- saw;
- drill;
- file;
- measuring instruments (ruler, level, protractor);
- paint brush;
- cement;
- sand, gravel (crushed stone);
- nails and screws;
- varnish and paint;
- timber, boards (from 4 cm thick);
- marker for marking;
- waterproof wood glue.
All wooden materials worth taking from coniferous species, because they are more durable.
Preparing the site for installing the bridge
After determining the type and location of construction, preparatory work should be carried out. All beams and boards should be treated with an antiseptic and waterproof solution. You cannot build a bridge on a damp surface, as dampness will start rotting processes and it will deteriorate in 2-3 years.

Drawing of a humpback bridge: 1-3 - location of the bases.
At first preparatory work space should be cleared for the installation of the bridge. There should be no trees or large plants with a strong root system at the intended installation site and 0.5 - 0.7 meters from it.
After cleaning the area, the bridge supports and the place over which the bridge is installed (the bottom of a lake, stream or ravine) should be strengthened. If the bridge is installed over a pond, then the latter should be drained. Then strengthen the edges (banks) and the bottom.
Bottom strengthening is being done in the following way: all silt is removed from the bottom and banks, sand is poured with a height of 5-10 cm and a width equal to the width of the bridge plus 0.3 - 0.5 m, after which approximately the same layer of gravel (crushed stone) is poured on top of the sand and compacted. Concrete supports should be placed where the bridge rests. Concrete supports are made as follows: holes are dug for the foundation, into which a cushion of sand and crushed stone is poured, and after compacting the cushion, formwork is made and the remaining volume is filled with concrete.
Before pouring concrete, bridge piles should be installed. Beams of 150x150 mm or 200x200 mm are used as piles - this depends on the dimensions of the bridge. Then you need to wait for the concrete to dry.
Assembly of the structure

Construction of a wooden bridge: 1 - logs, 2 - flooring, 3 - railing posts, 4 - railings, 5 - crossbar (dimensions in cm).
Logs (guides) are attached to the piles. Before installing the guides, markings should be applied to them for attaching the flooring.
Beams of 0.2x0.35 m are used as logs. Further actions depend on the type of bridge, for example, for an arched bridge, the logs must be bent. To bend the beams, you need to cut off the edges, soak them in water, and then bend them according to the sketch. The log beams should have the same shape after soaking. They are treated with an antiseptic and waterproof solution after drying. It makes sense to fix the guides in several places metal profile. This will prevent the lags from shifting.
Pipes or fittings can be used as logs for an arched bridge - they are easier to bend.
If the length of the logs is less than the expected length of the bridge (or end to end), then additional piles should be driven between the banks. Additional piles will also need to be driven in for the stepped bridge.
Next, according to the markings, the flooring is filled onto the guides. The size and location of the deck depends on the size of the obstacle over which the bridge is thrown. The distance between flooring boards can be from 10 to 35-40 mm. The flooring should protrude beyond the supporting beams by about 0.5 m. You can fill the flooring using nails or self-tapping screws. Fastening the flooring with self-tapping screws is more preferable. Before nailing the deck boards, it is recommended to drill holes at the fastening points twice the diameter smaller diameter nail. This is done to prevent cracks in the boards and beams.
After fixing the flooring, the wooden bridge is ready. Observation platforms can be provided on the long bridge. For them, before packing the flooring, additional guides (logs) are fixed perpendicular to the main ones, onto which the flooring is packed in the same way as on the main guides.
When building a stepped bridge, additional beams are placed on the guide beams. The dimensions of the beams depend on the size of the “steps” of the bridge.
If garden bridges will serve not only a decorative function, but will also be actively used, railings should be installed on them to prevent injuries.
DIY installation of railings on a garden bridge

In addition to preventing injuries, railings installed on garden bridges also have significant decorative functions. Therefore, it makes sense to use not primitive grilles, but figured balusters. Can be used under balusters wooden beams, which with the help grinder You can give it a beautiful shape, or you can buy ready-made products.
The most effective height of the railing is 0.7 - 1 m, so the balusters are selected to the selected height minus 10-15 cm (margin for the handrail).
To simplify the installation of balusters, grooves should be made in the flooring boards. The size of the groove depends on the length and width (or diameter) of the base of the baluster. The depth of the grooves should be 5-10 mm. After cutting out the grooves, balusters are driven (or screwed) into them using glue.
After installing the balusters, handrails are placed on them. Bars can be used under the handrails. Before installation, the beams are processed with a plane and grinder. To install handrails, you need to measure the length of the beam and determine the balusters on which the two handrails will meet, then use a ruler to divide the top of the baluster in half. Before installation, the top of the balusters is coated with glue, after which a handrail is placed on them. After the glue has dried, the crossbars should be screwed on with self-tapping screws; it is advisable to attach the handrail to each baluster: due to the fact that the handrails are often touched, they will become loose, and additional fastenings allow you to evenly distribute the load and extend their service life.
Installation of the structure can be carried out either on site or in a workshop with further removal to the garden and installation of the finished bridge.
If necessary, you can make a railing from ropes; a parachute lanyard or climbing ropes are perfect for this.
Final stage
After filling the decking and installing the railings, it should be sanded finished design and varnish. Wooden version, varnished, will look great surrounded by garden trees.
If there is a rock garden on the site, then the bridge should be painted to look like stone. Modern industry produces a huge amount paint and varnish materials, allowing you to paint wood like marble, wild stone, and so on.
The iron bridge should be treated with an anti-corrosion solution. Some time after installing the bridge in the garden, it will begin to darken slightly - a patina will begin to form on it. Patina will give the structure a more aesthetic appearance.
To give more decorative look The concrete foundation of the bridge can be covered with stones. On the bridge you can organize a flower bed with climbing plants, then the railings will become “alive”. It is also worth installing lanterns on the bridge for illumination - they will give the structure additional charm.
Decorative bridges can be used not only to decorate the pond and garden. They can also perform different functional loads. Possible methods for using decorative bridges in the garden include planting climbing and flowering plants. A properly designed bridge for a pond can become a specific support structure for additional lighting, as well as for the installation of flower containers. Below you can find out how to make a bridge over a stream with your own hands.
Small bridges and larger bridges are structures or structures with which you can overcome some obstacle, for example, a ravine, stream, river, pond. Some argue that bridges are only possible in large gardens, but they can also look beautiful in small area. By representing an extension of the path, this design not only makes it possible to cross something awkward or watery, but also makes the walking route more intriguing and interesting.
Bridges can be built through a quietly murmuring or rapidly flowing stream, to connect the islands, which are located in the center of a large pond, with the shore, with the help of bridges they also cross the water space or some inconvenient wet places. Of course, bridges in the garden are primarily of practical value, but they can also enhance the impression of a stream or pond.
Decorative bridges for the garden in landscape design will look more stylish and fit organically into the space if their design has been well thought out in advance. How smaller garden, the simpler the bridge design should look and the more neutral its color should be.
Choosing a location and style
 Materials and structures for bridges must be selected based on the style of your garden and dacha; they must be ideally combined with appearance lanterns and gazebos, which are located nearby.
These designs are indispensable in areas flooded in spring, where it is necessary to lay a route from a building or cross a ravine. Sometimes bridges are built to highlight some object on the site or to give the site completeness; you can also design a wooden path in the form of a bridge that will lead to the gazebo.
The bridge can be placed both over a river and pond, and over a dry reservoir or stream.
Requirements
Before building a bridge on your summer cottage, you need to study some requirements:

 The bridge is thrown from one bank to the opposite, so it is logical to place it in the narrowest part of the stream or reservoir, while the bridge will divide the area of the water surface into two parts, unequal in size, the ratio of which is recommended to be calculated according to the golden ratio rule. In this case, the purposes of both parts of one body of water can be different, for example, on one side there can be a bathhouse for people, and the other will serve as a place where nymphs will thrive. One part may also be deep, while the other will become shallower.
Paths are also an integral part; the bridge in this case plays the role of an observation deck over the water surface. From this place it will be convenient to look at the trees that grow along the pond and are reflected in the water, admire a waterfall or fountain, blooming nymphs or beautiful fish in a pond.
The garden bridge is mandatory element Chinese and Japanese garden. Coastal vegetation, the sky, and the first rays are reflected in the water mirrors. rising sun. IN chinese style It is simply impossible to imagine a pond without graceful stone or wooden bridges.
Do it yourself
 Surely many owners suburban areas are interested in making a bridge for their garden with their own hands. Structures for a pond can be monolithic, or it can also be made in the form of step-by-step slabs from natural stones, boulders or huge plank circles, squares.
To decorate beautifully small pond, a bridge can be organized for it in the following way: Place several stones in the water, after walking on which a person will find himself on the other side. It will look especially impressive if such stones are combined with the material used to decorate the shore of the reservoir. Stones should be selected for this purpose of approximately the same type and size. Such a crossing is constructed at a depth of no more than 45 cm. The outer surface of such a structure should be approximately 10 cm above the water surface . Minimum diameter stone or slabs should be about 60 cm so that you can stand on them confidently.
The stones are laid firmly and carefully, so that there is a distance of about 60 cm between their centers, that is, it is equal to the step size.
When constructing a bridge, it is interesting to use unusual boulders of irregular shape, but with a flat top, as a passage through shallow water; such structures are especially good over streams, where the water forms small eddies around the stones. You can also use non-natural boulders, as well as those emitted with concrete.
Step-by-step instruction making a decorative bridge with your own hands from improvised means:

Building a bridge across a pond
Build a wooden one bridge over the pond possible using various available materials. Before starting the process, you need to prepare everything necessary tools and materials. Below you can find detailed instructions how to build a bridge with your own hands on the shore of a reservoir at your summer cottage:
- All water must be drained from the reservoir, each boulder must be placed upward on a thick layer of thick mortar flat surface. The height can be leveled using a solution or concrete slabs, which are laid inconspicuously under the stone. Top part the stones should be located on the same horizontal plane.
- Wait two days for the solution to dry.
 It is worth noting that the bridge should not appear in a certain place by chance; there should be some kind of path leading to it. This design will successfully connect paths of different textures in the garden. If the pond or stream is not very beautiful and interesting, the bridge will distract attention from it, making it more impressive.
This garden element is so attractive that sometimes bridges are built in the absence of practical necessity, for example, a wooden bridge on a dry site leading to some kind of gazebo, indicating the way and giving a sense of unity of style.
Bamboo bridge
 These structures can be built from literally any materials, for example, garden bridges made of metal, wrought iron, and wooden suspension bridges look quite attractive. You can also make a garden bridge from bamboo. To do this, it is necessary to lay bamboo sticks across the supports and tie them together with a rope. Such structures can be supplemented with railings in the form of a hanging rope, which is attached to bamboo posts. Bamboo structures span real streams or gravel stylized ponds.
A Japanese one installed near the edge of a bamboo structure will look quite attractive. stone lantern.
When creating a pond, it is necessary to make sure that you can get quite close to the water. Small bridges or a small number of flat large stones, along which you can cover the distance from the shore deep into the pond, will allow you to look into a completely different world. The pond is a habitat for various animals and plants, which will be extremely interesting for a person to observe.
Floorings and platforms
 Spacious wooden structures, which most likely can be called a deck or platform, help to create a recreation area by the pond: a couple of chairs and a cozy table by the water look great, from here you can enjoy a beautiful view of the area. Decks that hang over the surface of the water create the illusion that there is water underneath, making the pond appear larger in size. On a large platform you can place guests, enjoy the garden and sunbathe on a sun lounger, you just need to equip it with a suitable garden furniture.
As a rule, the platform is built on the basis of wooden boards; it is advisable to select boards with a ribbed surface so that they do not slip in the rain. The length of the board should be 4 m and the width about 20 cm. For production, you can also choose stacked square slabs with a side of 60 cm, made up of boards located diagonally or at right angles to the edge. The minimum thickness of the boards should be about 3 cm. Wood of a wide variety of species is used for flooring.
If you have the opportunity, it is best to choose expensive hardwood, as this type of flooring will last longer and is also considered to be of higher quality. Please note that the surface of the deck will have to be brushed regularly to remove algae and dirt.
The size and location of the deck should be determined depending on the location and size of the pond. Of course, it will be much better if the area is large. Configuration wooden structure It can be the most intricate, it can be tightly adjacent to the pond, or you can build a deck in such a way that the water will be completely located inside it. If you make rounded bridges over a small round pond, then such a repetition of the correct forms will only enhance the impression of the garden.
 Some people prefer to locate a sauna or bathhouse near a large, deep body of water. In such cases, it is necessary to install a bridge opposite the entrance to the bathhouse near the water, which must be equipped with reliable railings. A thick plastic mesh with 20x20 mm cells must be attached to the steps so that a person does not slip after the bath.
Since ancient times, people have used primitive types of bridges to cross streams, rivers, and ravines. A tree trunk thrown from bank to bank was the simplest type of beam bridge. A suspension bridge woven from tree branches over a wider obstacle is a primitive type of suspension bridge.
With the development of civilization, bridge designs became more and more advanced, increasingly differing in their functional purpose. However, wood, as before, remains the most common material for the manufacture of bridges of simple construction. For the independent production of small bridges, wood is all the more irreplaceable material, since it is quite easy to process manually and mechanically, and connecting parts together wooden structures is not particularly difficult.
Bridge construction material
In the construction of wooden bridges, coniferous wood is predominantly used, primarily pine, since it has the most straight and even thickness of the trunk, is less knotty, has good physical and mechanical properties and high resistance to decay.
The construction of wooden bridges requires both round and sawn timber of various sections. The wood grade used for this has the following names:
- Log – round wood, cleared of branches and bark, having a natural thickness of the tree trunk in the thin part of at least 12 cm, with a length from 4.0 to 9.0 m;
- Podtovarnik– round timber with a diameter of 8.0 to 12.0 cm at the upper end;
- Poles– thickness from 4.0 to 7.0 cm;
- Plates(cut) – these are logs sawn along the axis into two halves;
- Quarters– a log sawn with two longitudinal cuts into 4 parts;
- Sill- a log hewn into two edges;
- timber– a log hewn into 4 edges;
- Boards– lumber, the width of which exceeds the thickness by more than 2 times;
- Bar– lumber, the width of which is not more than twice its thickness;
- Gorbyl(obapol) - an incomplete plate obtained as waste when sawing logs into boards and beams.
Beam bridge
The simplest type of wooden bridges are beam bridges. They are arranged to cover small spans not exceeding 8–10 meters. The main elements of a beam bridge are supports And spans in the form of beams (purlins) covering the distance between supports. The bridge roadway is laid on top of the purlins, which serves to carry the moving load.
Thus, the main thing load-bearing element such bridges are runs, supporting the roadway of a bridge and operating under permanent or temporary bending load, like beams. That is why such bridges are called “beam” bridges. Design beam bridges can be different and depends on the size of the spans to be covered, the load, and the intensity of traffic on the bridge.
Let's consider the design of the simplest beam bridges. The bridges shown in Figures 1, 2 are intended for pedestrian traffic and travel passenger transport through small obstacles.
Construction of a bridge across a ravine 5 m wide, shown in Fig. 1, begins with the breakdown and determination of the longitudinal axis of the bridge and the location of the tracks (see Fig. 5). The breakdown is done in a primitive way using a special template. The template is made from planed and tied in the form right triangle boards and is necessary for breaking right angles. The size of the triangle is 1.5x2.0x2.5 m.
The longitudinal axis of the bridge is outlined by hanging (installing poles) and driving in pegs. The width of the bridge is noted to be 3.0 meters (1.5 m from the longitudinal axis). The bridge girders will be laid along these lines. Lezhny located at a distance of 2.7 m from the transverse axis of the bridge.
Before laying the beds, soil is selected on both sides of the span to be covered and strengthened with compacted crushed stone. Then, to protect the bed from subsidence and rotting, it is backfilled with crushed stone or gravel 40–50 cm thick. The soil surface is cut with a slope of at least 1:20 to drain water seeping through the crushed stone (see Fig. 6).
The beds are laid on the bedding, made of logs with a diameter of 30–32 mm, hewn into two edges, 4 m long. To prevent shifting, the bed is reinforced with stakes that are driven into both sides.
Runs bridges made of logs cut into two edges with a diameter of 30 cm and a length of 6 m are laid on the beds along previously marked lines. The ends of the purlins are protected from rotting by tarred boards. A continuous flooring of plates made of logs with a diameter of 28–30 cm is laid on top of the purlins. The plates are fixedly fixed on the purlins with pressing logs with a diameter of 24 cm, sewn with barbed nails. Pressure logs serve to protect cars from falling from a bridge and are called wheel guards.
Bridge on piles
If it is necessary to carry heavier loads across a bridge or to cross a small river or stream, bridges must be built on supports made of piles.
Construction of a 5.5 m wide bridge with a design span of 4.25 m, shown in Fig. 3 and 4, also begins with a breakdown (see Fig. 5). Using a template, the longitudinal axis of the bridge is outlined, the middle is marked on it and the position of the supports, consisting of piles connected by a nozzle, is marked with pegs.
The first stage of bridge construction is the construction pile supports. Driving piles for the simplest type of bridge, such as the bridge we are constructing, can be done by hand from simple scaffolding on trestles, barrels, boxes, if the pile is driven in a dry place. If the piles need to be driven into the water, the work is done from boats or rafts.
The piles are made from logs with a diameter of 30–32 cm. The central ones are driven along the intended longitudinal axis of the bridge (span distance 4.25 m). On both sides of them, another pile is driven at a distance of 1.8 m. The depth of driving the pile into the ground should not be less than 3–3.5 m. Bottom part piles should be treated with any antiseptic composition to protect them from rotting. After driving the piles, their ends are trimmed and finished.
The ends of the piles should be cut at the same level with a margin of 2–3 cm for settlement. Spikes must be cut out on top of the piles, which will then fit into the sockets selected in the nozzle connecting the piles. The dimensions of the sides of the tenon are equal to 1/3 of the diameter of the piles, the height of the tenon is equal to its side, the shoulders of the piles are beveled so that water does not stagnate in them. The nozzle is made from logs with a diameter of 30–32 cm and a length of 5.5 m. Sockets are cut out in the nozzles, the depth of which should be 0.5–1 cm greater than the height of the pile tenons, so that the pressure from the nozzle is transmitted not through the tenon, but across the entire area contact of the nozzle with the pile (for more details, see).
The sockets in the nozzles must be fitted to the spikes of the corresponding piles. To do this, the marking of each nozzle should be done separately, in relation to the tenons of the row of piles on which the nozzle will be placed. Sometimes the nozzle is also secured to the piles with clamps made of strip iron. The clamps wrap around the nozzle and are bolted to the pile.
Purlins with a diameter of 30 cm and a length of 5.5 m, located above the axes of the piles, are placed on the nozzles. The purlins are made with a diameter of 26 cm. Cuttings are made in the support areas in the nozzles and purlins. Cuttings in the runs should be done on the shore, trying to mark them as accurately as possible.
The embankment adjacent to the bridge is supported by 24 cm diameter fence walls, which are sewn to pre-driven short piles (driving depth 1.5 m). A deck of 26 cm plates is laid on top of the purlins. If desired, a top deck of boards of any size located along the bridge can be nailed on top of the plates, within the width of the passage. This is done so that the boards distribute the pressure from the load moving along the bridge across several plates.
Along the edges of the roadway at a distance of 3.5 m, fender bars are laid from plates with the flat side facing the roadway, which are sewn on with barbed nails.
This bridge design provides for the creation of a pedestrian zone (sidewalks), fenced along the edge of the bridge with railings. The sidewalk in this case will be the distance between the side of the fender facing the roadway and the railing. Its dimensions should not be less than 0.5 m. The bridge railing, 1 m high, consists of a handrail mounted on railing posts using spikes. The dimensions of the tenons and grooves are 5x5 cm, and the depth is also 5 cm.
The posts and railings are made from a block measuring 14x14 cm. Their lower ends rest on the extended ends of the crossbars using a cut into half a tree (for more details, see) and are fixed with bolts. The distance between the railing posts is 2–2.5 m. One or two slats (5x8 cm in size) are sewn flush to the railing posts (in height), forming a railing filling necessary for the safety of pedestrians. At the ends of the bridge, the railings are adjacent to those dug into the ground at an angle pillars with a diameter of 26 cm, which serves to protect the railings from impacts from cars entering the bridge.