Box for product photography. Product photography at home
Using a photo box helps illuminate your subject more evenly to get rid of hard shadows and unpleasant glare. Universal photo boxes are a necessary solution for product photography, guaranteeing high-quality shooting of any objects. big size. Despite its pretty simple design, photo boxes for shadowless photography are by no means cheap. For product photography at home, you can do without purchasing a photo box if you know how to make such a device with your own hands from available materials.
Option #1
So, if you want to make a simple photo box for product photography, you will need following materials. First of all, you will need to find a regular cardboard box suitable size - depending on what subjects you plan to shoot and what the power of the light source will be. In most cases, a medium-sized cubic box that can be found in the backyard of a shopping center or store will suffice. It is preferable to choose a box made of thick material.
Next you will need white fabric medium density, for example, white muslin. It should be enough to cover all the walls of the box. You will also need tape or adhesive tape to secure the fabric. You can’t do without a sheet of Whatman paper or white thick cardboard. It will be glued in strips to the inside of the box to make the surface white. Lastly, you need lighting for your photo booth to ensure you get the picture you want. A sufficiently powerful one is suitable for this. desk lamp. Moreover, it is advisable not to use incandescent lamps, which have a yellow tint of light. From the tools you will need a tape measure, glue, ruler, scissors, a stationery knife and a pencil.
- The photobox manufacturing process begins with markings. With the cardboard box side up, use a ruler and pencil to measure about two inches from each edge. Connect the resulting dots so that you get a square from the inside of the box. This marking will also need to be repeated on the two adjacent sides of the box. We do not touch the bottom and the top.
- The next step is to use a sharp utility knife to cut out “windows” in the box according to the markings you made. Also, cut off the top of the box, leaving the bottom. Thus, you should have four windows.
- An additional sheet of cardboard or whatman paper should be placed on the bottom of the box, cut to size. It is also necessary to cut several strips of approximately five centimeters wide from whatman paper and a length corresponding to the size of your box. These strips will need to be pasted over the inside surface of the box to make it white.
- Next, you will need to take the necessary measurements and cut a sheet of whatman paper so that it completely covers the back wall and bottom of the photo box. You should carefully glue this sheet into the box.
- Take white fabric and cut pieces of it to the appropriate size for the sides and top of the box. Secure the fabric to the sides of the box with duct tape or duct tape. The fabric should cover the windows of the box from the sides, top and back, except for the front wall.
- On last stage You will need to install the light above top part boxes so that the subject is evenly illuminated from all sides. Your photo box for product photography is ready for use. To change the light pattern, you can use several lighting fixtures or change the position.
Option No. 2
If it is not possible to use a cardboard box, you can make a lightbox using packaging foam from a monitor or laptop. The best packaging foam for this purpose is one in which the sides are thick and the center remains thin. In this case, you will only need to carefully squeeze out or cut out the central part. Here you will also need a sheet of Whatman paper. We spread it so that the smaller side faces us. In this case, the long sides of the sheet will serve as the basis for gluing the entire structure.
The essence of this option for making a lightbox is to glue the packaging foam with whatman paper. Packaging foam is installed on whatman paper and glued to it using simple tape. During gluing, we create a fairly strong structure in which the density of whatman paper and the lightness of the foam ensure the rigidity of the platform and, at the same time, the ability to conveniently carry the future photobox.
Lightcube (light from English “light”) or as it is called lightbox (lightbox), is intended for shadowless subject photography. Widely used in photo studios to create high-quality photographs of objects with close range. This kind of photography is well suited for photographing goods from online stores, photo-video chronology of actions when preparing master classes.
In a lightbox (photobox), objects are well illuminated from all sides, which allows you to achieve good quality photos even when shooting on a budget digital camera or telephone. With this type of photography, it becomes possible to eliminate the presence of a shadow from an object in a photograph or make it almost invisible. In such devices, photographs of both jewelry and interior items of impressive size are taken, which are then placed in catalogues, booklets and magazines.
In today’s master class on creating a home mini photo studio, I will show you how to make a collapsible lightbox (photobox) with your own hands for shadowless subject photography. You can easily find the materials for its manufacture in a hardware or construction store, as well as in a fabric store.
For the lightbox we need:
- wooden slats;
- white lining fabric;
- PVA glue and pushpins;
- screws, wing nut (nut with lugs);
- small nails.
Tools you will need:
- drill or screwdriver;
- wood hacksaw;
- pencil, tape measure and square.
We will also need to find or purchase bright lamps white glow and lamps for them.
Let's do the first thing wooden slats. We will need 12 slats, each 50 cm long. Next, we apply markings to our tongue-and-groove slats, as shown in the figure (stepping back 1 cm from the edge and marking our segment into 3 equal squares). We apply the same markings to both ends of each rail. To connect the tongue and groove on 4 slats, we mark the middle square with a cross, on the remaining 4 slats we mark the outer squares with a cross. We do not touch the last 4 slats; they will be needed later to connect our lightbox.

Using a hacksaw, cut out the squares marked with a cross. We connect the finished blanks together at right angles into a frame. If necessary, we customize each connection individually. Thus, we get two square frames.

Now we cut out 8 triangles from the timber to strengthen the connections of our slats. Using PVA glue we glue our triangles, additionally securing each with two nails. Our frames are almost ready.


If the tongue-and-groove connection is not adjusted correctly, gaps may appear that can be filled by mixing sawdust and PVA glue.
We mark and drill two holes for each rail, and don’t forget to make holes on the frames. All that remains is to clean the frames using sandpaper and cover with white paint. We leave our frames until the paint is completely dry and start working on the lining fabric.


Let's prepare two canvases measuring 50x50 cm, they will be needed for attaching to frames, and one long canvas 150x50 cm. First, let's put the sections of the long fabric in order. Fold the edges twice and iron them. Let's sew it on a machine. If necessary, we will iron our fabrics.

The paint has completely dried and you can continue working with the frames.
We will attach two pieces of fabric 50x50 cm to the frames. To do this, we will use pushpins. We stretch the fabric and fasten it to the frame with buttons. I decided not to fix the long canvas on the removable elements of the cube.

Let's assemble our cube. We insert screws into the holes of the frames and use wing nuts to connect the four slats.
All that remains is to find lighting. We insert powerful lamps into the lamps and place them on all sides of the cube, thereby illuminating the cube. I only had one good lamp and a table lamp, this was enough to take good pictures without using a flash.

The subject for photography was my collection of my favorite Volkswagen Transporter T1 cars.
For the background, you can use fabric of any color, but keep in mind that it should transmit light in the same way as the lining fabric.


About the author:
Greetings, dear readers! My name is Max. I am convinced that almost everything can be done at home with your own hands, I am sure that everyone can do it! In my free time I like to tinker and create something new for myself and my loved ones. You will learn about this and much more in my articles!
If you don't want to spend money on something you can do yourself, then you're like me. One day I was in a store and saw pictures of these accessories. They consisted of a folding base covered with white fabric with a hole in the front wall. Photo boxes are used to capture subjects in a photo studio (like this chocolate reindeer).
I was going to buy a photo box until I saw the price of $100. Spending $100 on a few pieces of sheer fabric and a frame?! All this can be done much cheaper. So, I built my own similar light tent (that's what they are also called), and it turned out quite well.
Necessary materials:
1. Cardboard box.
It can be of any size, depending on what subjects you are going to shoot and what the power of the light sources is. I prefer boxes that are cube-shaped or close to it. Boxes can be found everywhere for free. I brought mine from work, where they throw them away anyway. You can also find boxes in the backyard of various shopping centers, shops. Boxes made from thicker material are better.

2. Fabric
You can use any white fabric. For this box I used white muslin. You need to buy enough to cover all the walls. I spent $4 on fabric. Some people use other fabrics such as nylon or white fleece. It is better to use one type of fabric from one cut, otherwise there may be slight color variations and the end result may disappoint you.
3. Adhesive tape
I use duct tape to secure the fabric to the sides of the box. Thus, you can easily change the fabric to another if necessary. I use masking tape ($1 a roll).
4. Glue
You can use any glue to glue the strips of paper inside the box
5. Thick white paper (Whatman paper)
Dense White paper or whatman paper will be glued in strips to the inside of the box to make the surface white and will also be used as a background. I suggest buying 2 or 3 sheets so you have enough for both. Whatman paper is sold in office supply departments and is used for drawing or drawing. If you want to use colored backgrounds, you will need to purchase similar colored paper.
6. Lighting
The most expensive thing you need for a photo box is lighting. It's good if you already have a fairly powerful table lamp. In my opinion, lighting is the most important component - without it you won't get the picture you want. I went to the nearest store household appliances and looked at what I could buy for this purpose. I ended up buying a light fixture with a 90W equivalent energy saving bulb. Beware of using incandescent lamps as they give off a yellow tint. It is better if the lamp has a round reflector.
7. Other tools
You will also need a tape measure, ruler, scissors, knife and marker.

Step by step
1. Mark up.
Take a tape measure, ruler and marker. Leave the edges of the box about 2 inches (5 cm) Draw lines to create a square inside.

2. Cut out the windows.
Repeat the markings on all sides except the bottom and top. Then use a sharp knife to cut out the windows in the box according to the markings. Remove the top cover flaps. Do not touch the bottom of the box. You should now have four windows.
3. Cut strips of paper.
Mark lines on the Whatman paper every two inches. Then cut the strips to size internal sides boxing
4. Glue strips of paper.
Place strips of paper on the inside of the box to cover the cardboard and make the inside white. Make sure the side of the strip of paper where you marked the lines is facing the cardboard.

5. Making the background.
Cut out a blank for the background from whatman paper. The width should be the same as inner size boxes, and the length is much longer than the box.
6. Place the background inside.
Place the strip of paper in the box so that it curves smoothly. Do not bend the sheet or crease it, as this will be noticeable in the photo. Trim off any excess paper at the top.

7. Cover the windows with cloth
Mark and cut the fabric so that it covers the sides and back of the windows, except for the front wall. Then cut a piece to cover the top.
A photobox is a box for storing photographs and memorabilia. Can be used as unusual idea as a present. A person sees a beautiful box, opens it, and there are your common pleasant memories. A wonderful gift loved one, parents, friend. They are often used instead of a children's photo album. There are options for boxes with cells, you can label each one by month, and you will get a wonderful memory of the first year of your baby’s life. A great idea also for those who are into photography. You can place large orders in such boxes, which will business card masters and will make good advertising. Moreover, making a photo box with your own hands is not at all difficult, especially some of its variants.
Box with a secret
First, you need to decide who we are making the photobox for - as a gift or for yourself. If this is a gift, then for what occasion, what design and form will the recipient of the gift like. At the same stage, we think about the materials from which it will be made.
A photo box can be made from a box. In this case, you can take a ready-made box (cardboard, wood, iron), or you can make it yourself from the same cardboard. How to glue it, we look in detail in the video:
The shape of the box can be square, rectangular, curly, even round. Choose the one that seems most interesting and suitable to you.
The interior design is also different:
- just put the photos in the box;


- we make cells for each or for several pieces at once;

- glue the photo onto a long folding piece of cardboard;


- We come up with an unusual arrangement of photos in the box.

The material for decorating the box can be paper, cardboard, fabric, leatherette, genuine leather. You can simply decorate an iron box and not paste it with anything; you can burn or cut out a design on a wooden one. For decoration we use the scrapbooking technique. You can use both special sets and improvised materials: ribbons, stickers, bows, buttons, beads, sparkles, rhinestones, lace, shells, pebbles, small watches, pendants, etc. Next, we decide how the photo box will be closed. For example, you can tie it with a ribbon or use magnets.
In the latter case, we take into account that a small recess must be cut out of the base for them, and also positioned correctly so that they attract each other and do not repel each other.
After all the materials have been collected, we begin collecting tools. You need to think about what materials you will work with. What is suitable for working with paper will not be suitable for leather or wood. Standard set of tools:
- pencil;
- ruler;
- scissors, including those with curly attachments;
- regular hole punch and with a figured template;
- heat gun or glue.
This instruction will show you a simple, inexpensive and quick way how to make a light box with your own hands, which will help you get the same results as a softbox for product photography that costs several thousand rubles. The only difference is that this box can be assembled for pennies. For those of you who don't mind spending a little money or for some reason don't like recycled items, spend a little more money on Additional materials, but the photography box will still be cheap and will cost much less than the “official” lightboxes.
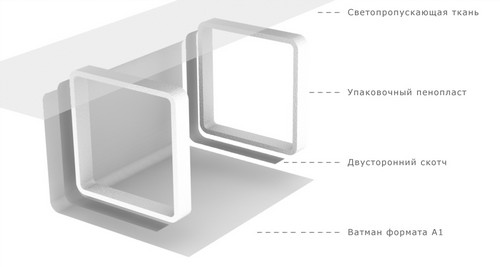
Step 1: Materials

The list of materials is shown in the picture.
Keep in mind that you plan to shoot photographs, so it's a good idea to first decide on the size of your lightcube for product photography. The two colors I would recommend using for the background are white and black, but it will certainly help to experiment. I find blue and red also make a good background. Use any colors you want. The color sets the “mood” of the picture, a black background will be ideal for watches and expensive things, White color might be good for a vase of flowers or something “light” and “airy.”
Step 2: Prepare the box

How to make a photo box with your own hands? The first thing you need to do is prepare a box to attach the translucent screens to (in my case, a vinyl shower curtain).
You only collect bottom part boxes, leave the top of the box flaps open, secure the bottom with tape. Try to secure the valves tightly together to prevent excess light from entering.
Now lay the box on its side, and assume that the side that is now facing up is your new top of the box. Your box will be oriented this way when you take photos.
Make sure the open end of the box is facing you and cut off the top and bottom flaps, but leave the left and right ones.
Next I used a carpenter's square, but I'm guessing most people don't have a 90cm square on hand and all you need is a straight edge. Take a marker and draw straight lines parallel to all edges, creating square shape on each side of the box on the left, right, top and bottom. Make sure to leave about 5cm of space between the lines and the edge of the frame. If you have a large box, I would indent 7-10 cm from the edges - make indents at your discretion.
Now using something like metal ruler and a utility knife, cut out squares on each side of the box along the drawn lines. Be sure to keep the former bottom of the box, which is now the back wall, intact - do not cut off the back of the box that you taped together.
The picture should clear up all your doubts. Areas highlighted gray, represent the areas of the box that must be cut out.
Step 3: Cut out and paste light-diffusing material onto the cut-out areas

This step involves cutting material, in my case a vinyl shower curtain, to fill the open spaces on the sides of the box.
Take a ruler and measure the dimensions of the squares on the sides of the box to get an idea of how big they are. The key here is that you must extend the diffuser material beyond the edge of the window. So if your open rectangular space is 45cm by 45cm, then the piece of diffusion material should be 55-57cm.
The appearance of the box is not important, so you can sloppily stick the material on tape. You can still make the job neat by gluing the material from the inside of the box. The 5cm or more of space left around the edges is where you will attach the diffuser material, regardless of whether you do it from the inside or outside of the box. As you can see, I simply taped my material to the outside.
The bottom of the box does not need to be covered with light-diffusing material; leave the hole as is. The background material will obscure it.
Note: Try to glue the material taut, so to speak, so that you don't have any slack that can create shadows and light distortions. No folds of great importance As you can see, my shower curtain is covered in wrinkles and I didn't notice any nasty effects in my photos.
Step 4: Buy background material and light sources
Now your box is almost ready. All we need now are light sources and backgrounds. You can use your work as a background if you are one of those types creative people who can make things play with new colors.
I find poster boards (look up poster board) to do the job very well. Make sure that the intersection of the bottom and rear walls box is located under the curved part of your background. This is essential for creating a crease-free photo and creating the illusion of an endless background behind your subject.
The smoother the background curve, the smaller the shadow gradient will be. You'll need to experiment, but you'll find it works well even on your first try.
You can also use lamps that you already have or buy new ones.
Step 5: Light Settings


Now that the photography lightbox is ready, you can take some photos. The only thing you can do now is learn more about lighting and still life composition. The placement of light sources, along with various other factors, can radically change the effects or mood of your photos. There are many articles and teaching aids, which go into detail about still life and studio photography, a Google search will turn up a wealth of professional information.