Box for product photography. Product photography at home: lighting, equipment
Many photographers, especially beginners, for some reason believe that it is possible to engage in product photography only in a good studio, and even then, if it has special equipment. But this is absolutely not true. They are deeply mistaken. Even at home, you can perfectly organize a small photo studio in order to photograph objects. This is exactly what our article today is dedicated to.
So let's get started.
Stage number one. Equipment we will need
Option one. Creating a stage
This option is probably one of the simplest. It is well suited for photographing small objects and even still life photography. It’s not at all difficult to build such a home object table. Any photographer can do this, even a beginner and inexperienced one. For this we need a sheet white cardboard enough large sizes, approximately like a sheet of Whatman paper. We will also need a support for our stage. Anything can serve as such a support: for example, some large thick book, some dishware, a children's toy, or even an old shoe or felt boot. All the same, this support will not be visible in the frame; it will remain outside its boundaries.
Such an impromptu place for subject photography is best organized at wide window sill your home. It is very important to pay attention to sunlight. If the subject you are photographing appears in a streak or patch of bright sunlight, it will cast deep, rough, dark and ugly shadows on the walls of your specimen table. And this, you understand, will not decorate your photo at all; you will not get the desired result. It is for this reason that it is best to arrange a subject table on a window facing shadow side. Or, as a last resort, wait for another time to work, such that the sun goes to the other side of your house.
Option 2. Homemade photo box for product photography
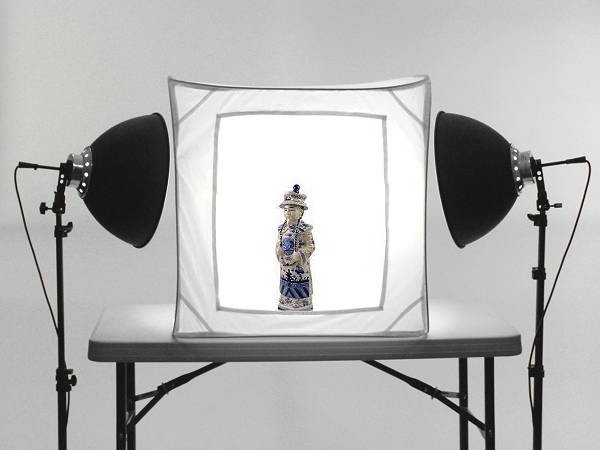
Modern special photo boxes for product photography are quite expensive, and buying them for one-time work at home makes absolutely no sense. Let's try to make such a photo box with our own hands from what can be found in every home. Well, at least from the ordinary cardboard box and a sheet of Whatman paper. In this photo you see one of the options for making such a homemade photo box.


Some amateur photographers manage to build similar photo boxes right on their computer desk. They do it all from the same sheet of Whatman paper. True, to work with such a photobox you will need quite a lot of lighting devices.

Option 3. Just a background
In some cases, it is possible to photograph objects, especially small ones, not on the windowsill. It’s not even necessary to build a stage or photobox. You can do without them. Some Photographers do it much simpler. To do this, you need to choose the brightest corner in your room, or at least a well-lit section of the wall. If the wall in your room is not a single color, then you need to hang a background on it. The same sheet of whatman paper or a piece of fabric can serve as such a background. suitable color. The object that you decide to photograph must be placed on a stool. This stool, you understand, needs to be covered with the same material from which you made the background for photographing your subject.
I would like to give one more clean practical advice. If you decide to photograph jewelry at home, for example, your wife’s favorite ring or her most beautiful earrings, these items can be placed on a polished granite tile for shooting. The reflective surface of this noble stone will further highlight the beauty of the jewelry itself.

Stage number two. We organize lighting
Lighting for home subject photography primarily depends on what equipment you will use for shooting. If you decide to photograph objects on a window, your main light source in this case will naturally be sunlight. A reflector can be used as an additional light source. It is also very easy to make yourself from cardboard and foil. As a last resort, for this purpose - illuminating an object with reflected light - you can simply use a sheet of ordinary A4 writing paper, or cardboard. Any light surface can serve as a reflector. Even an ordinary newspaper or... a friend in a white T-shirt.
If you decide to use homemade photobox, you will need at least three light sources. These sources will illuminate your subject through the walls of the photo box from the top and sides. This will help you create very good lighting in your photo without harsh or harsh shadows. In some cases, if you try hard enough, shadows can be avoided altogether. As such light sources, you can use table lamps or any other lamps that you can easily find in every home.
Stage number 3. Photographic equipment necessary for product photography
In order for your pictures to turn out clear and sharp, and this, you see, is very important in product photography, you must use a tripod. This simple accessory will allow you to avoid camera vibration when shooting at long shutter speeds. As a last resort, the camera can be mounted on some fixed support. You will also need a remote control remote control camera, or at worst, a cable in order to release the shutter without contact.

Stage number 4. The subject photography process
Well, we have everything prepared to start work. Now we need to beautifully arrange the subject that we will photograph on our improvised mini-film set, in other words, shoot at beautiful composition future photography. Also at this stage you need to set up the camera correctly.
Naturally, subject photography is best done in manual mode. If you take photographs in automatic mode, exposure errors are most often inevitable. Especially if you are shooting an object that is bright in color and placing it on a dark or even black background. It is also important to correctly set the white balance and light sensitivity of the matrix. The ISO value should be no more than 200 units. How less value ISO, the less noise there will be in your image. In product photography this is also important. After all, the subject should be shown in the photograph as natural as possible.
Don't forget to turn off the flash on your camera. In order to get a high-quality photograph of an object, light from a window or a table lamp will be quite enough.

Well, it's time to take the first test shot. Look at it carefully and analyze the result of your work. If you see exposure errors, unclear sharpness, lighting, or anything else in your photo, correct all these flaws by changing the camera settings or lighting scheme and shoot again. And if everything turned out well, as you planned, feel free to continue working. Everything should work out for you.
For shooting at home, a home mini photo studio can be very useful. This wonderful thing will be very useful for any photographers, both beginners and more advanced, for shooting all possible small objects, food, when you shoot in macro mode. Having found out the cost of such a photo studio in a store, you are unlikely to want to buy it, but after analyzing the macrobox itself, you can make it yourself.
Necessary materials
Here is a list of materials you will need when creating a macro camera housing:
1) Box. The box can be of absolutely any size, the main thing is to take the one that would be more convenient for you to work with, and also think about the size of the things that you want to photograph in it. You can simply ask for such a cardboard box in one of the grocery stores, or find a box left over from purchased office equipment at home. If you try really hard, you can make it yourself, not from cardboard, but from chipboard, it will be more reliable and will last longer.
2) Textile. It can be any fabric. The example used regular white fabric, which can be purchased at any craft store.
3) Adhesive tape. Adhesive tape, or adhesive tape, is needed if you want to try taking photographs with different backgrounds, so you can always replace the fabric with another one, if your plans do not include all possible experiments with backgrounds, then you can attach the fabric to something more durable, for example, on furniture clips or glue.
4) Glue. Glue will be needed to glue the bottom of the box.
5) Paper. This sheet will be located on back wall boxes in a semicircle and will serve as the main background. The paper should be relatively thick, but not so thick that wrinkles and cracks appear when bent. You can buy several sheets at once, different colors in a regular art store.
6) Lighting. For normal operation your photo studio needs to organize proper lighting for it. Without it, you won't get the image you want. As lighting fixture A table lamp with a fluorescent light bulb is suitable.
7) Other materials. To work you will need scissors, a ruler and a pencil.

Macro box manufacturing process
Now that you have everything necessary materials, you can start working.
Step 1. Take a box, pencil and ruler. Mark with a pencil the points on the box that will become its boundaries, then draw lines with a ruler. The boundaries are outlined.

Step 2. Cut out the excess, strictly following the outlined lines, so that you get a box with windows. Leave one side untouched - this is the bottom of the box.

Step 3. Take the paper prepared for the background and adjust it to the size of the box, insert it into the inside of the box and secure it. Remember, the length of the paper must be greater than the height of the macrobox.

Step 4. Take the fabric and cut out rectangles from it, such that they could cover the windows in your photo box. Adhere this fabric using duct tape. Your task is to cover three side holes and one top hole with fabric.

Ready!
Well, congratulations, your photobox for product and macro photography is ready. Take photos for your own pleasure.

Process of working with macrobox.

There are many options for how to use a photobox for product photography. If you have unwanted shadows, illuminate with an additional flashlight from the desired side. If you want to achieve a vignetting effect, place the lens as far into the box as possible. You can always come up with something new, play with lighting and backgrounds.
Subject photography at home is possible not only in fantasy, but also in reality. Many photographers, especially beginners, think that subject photography can only be done in a specially equipped studio. But they are completely wrong. Even at home, it is quite possible to create a small but effective photo studio to take high-quality photographs.
Necessary equipment
A table for product photography is the simplest option. You can use it to photograph small objects or shoot still lifes. This table is very easy to build by hand. Even an inexperienced photographer can cope with this easy task. First, you need to purchase a large enough sheet of cardboard white. Secondly, you need to find. For this you can take any thick book, vessel or any other thing. big size, since the support will not be visible in the frame. It is better to place a table for product photography on a wide windowsill. Particular attention should be paid to the incident light from the sun. After all, if the subject being photographed is located in a bright strip of sunlight, it will cast rough and deep shadows on the table, which will not lead to the desired result in the picture. That is why a window that faces the shadow side is best place for organizing the object table.
How to make a photobox?
There are special professional photo boxes for subject photography. Their price is quite high, so there is no point in purchasing such structures for one-time work. A high-quality photo box can be made at home. To do this you will need a cardboard box and a sheet of Whatman paper. It is desirable that the selected cardboard box has a cubic shape. Next, the bottom of the box is removed, leaving the back intact. Large cutouts must be made on the top of the drawer and on its sides. square shape and seal them with whatman paper. The inside back of the box and the bottom itself should also be covered with a sheet of white paper. Based on the above steps, making a photo box at home will not be difficult at all.

Ordinary background
Product photography at home does not require the photographer to work with a photobox or table. It is quite possible to do without these things. Many amateur photographers choose the simplest method of shooting. Before starting work, it is necessary to determine which section of the wall of the home is the lightest. If the wall is not a single color, it needs to be covered with a background (for example, a sheet of whatman paper or a piece of fabric). The subject to be photographed must be placed on a stool, which is covered with the same material from which the background is made. It is better to photograph various jewelry on polished granite, then the beauty of the jewelry will be clearly visible in the photo thanks to the reflective surface of this aristocratic stone.

How to properly organize lighting?
A great activity for a novice photographer is product photography at home. Light, correctly selected for the upcoming work, can radically affect the result of filming. Lighting directly depends on the selected equipment for work. If subjects will be photographed on the windowsill, then the main sun will be. If additional lighting is needed, a reflector can be used. You can make it yourself using cardboard and foil. If such items are not at hand, then even ordinary White list paper can serve as additional illumination. In addition, absolutely any surface light color can act as a reflector.
Lighting in a photobox
Product photography at home, which uses a photobox, requires a minimum of three light sources. Thus, the object will be illuminated through the walls of the photobox from all the necessary sides, that is, from above and on the sides. The result is a great looking photo with no harsh or unsightly shadows. If you pay attention to the production proper lighting With more attention and time, shadows in the photograph can be completely avoided. Additional light sources can be table lamps or any lamps that can be found in almost any home.
What photographic equipment should be used?
In product photography, clarity and sharpness of the subject is of paramount importance. To get beautiful and contrasting photos, you need to use a tripod. This is a simple accessory that will help avoid camera vibration when shooting at long exposures. If there is no way to purchase a tripod, then you can use some kind of fixed support instead. In addition, without a camera remote control, the shooting process can become quite difficult. In extreme cases, the remote control can be replaced with a cable to perform a contactless shutter release.

Correct composition
Product photography often involves painstaking work with composition. After all, it is not always necessary to place only one object in the frame. To correctly arrange several objects, you need to create a multi-level space. For this, various stands are used, which can be either visible or hidden under some background material. If you need to highlight one object among many others, then you need to emphasize it with the help of light or the location of the object in the foreground.
Product photography at home on a white background is the most The best decision for the beginning photographer. After all, white color will help create a clear and contrasting image. For uniform illumination, the background is usually illuminated from the front and back sides. To create a clear reflection effect, glass mirrors should not be used. They make the reflection double. For this purpose it is necessary to use polished material. If you need to secure a small product while working, you can use a miniature hot glue gun. First, glue is applied to the object itself, and only then the object is attached to the background.

Beginning of work
To make product photography at home enjoyable excellent result, it is necessary to pay attention not only to work equipment, but also on the subject being photographed. The subject should be beautifully located on an improvised mini-site for filming. At this stage, you need to make all the necessary settings in the camera. Manual mode - the best choice for subject photography. In photographs taken in automatic mode, exposure flaws are often visible. If the object selected for work is colorful and bright, and the background is dark or even black, then manual mode will become excellent choice for filming. A rather painstaking process is subject photography at home. White balance and sensor sensitivity settings are also extremely important. The ISO value should not exceed two hundred units. To reduce the noise level in a photograph, you need to lower the ISO number. This action has great importance in the work of a photographer. After all, as a result, the object in the image should look natural and harmonious.
First shot
To get a high-quality photo, you need to turn off the flash on the camera. For good results, enough light from a window or table lamps. After the first test shot, you need to pause the photographing process. The resulting image must be carefully examined and analyzed. If there are visible problems in the photo such as exposure errors, unclear sharpness, incorrect lighting, then you need to correct all the errors by changing the camera settings or the light. If the repeated subject photography turned out well, then you can safely continue working.
A few secrets
Quite often, photographers are faced with the problem of lifelessness in their photographs, although at first glance everything looks perfect. If the photo needs to be creative, then you can make the image more dynamic. For example, you can add small sprays from a spray bottle that will create volume. An interesting addition could be confetti, feathers or even It is important that the auxiliaries do not fall on the camera lens. These secrets of product photography will help you achieve the necessary “air” in the final image. If the photo should be full of colors, you can try placing a New Year's garland near the subject. Thus, by choosing the flickering mode, it is possible to achieve interesting color accents. It is necessary to take a series of frames, and then select the most harmonious ones from them. As you work, you must constantly brush off dust from the objects you are photographing so that they look perfect in the photo. Product photography at home without expensive studio equipment is real. You just need to use the above tips and a good result will not keep you waiting.
For photographing objects in good quality it is necessary to observe the conditions of proper lighting, without the slightest shadow falling. One of the main additional elements In the work of a photographer, there is a photobox or lightbox with your own hands.
The design of the photobox is a square with fabric sides. The design has a very rigid and stable wire frame. The left, right and top sides of the square have a translucent surface, and the front wall is completely absent. Thanks to the photobox, light rays from the lighting source pass through the walls of the structure and are scattered.
Photographers use lightboxes to prevent shadows and highlights from appearing in photographs. However, despite the simplicity of the design of the photo box, this element is not cheap at all. That is why many photographers and craftswomen are looking for ways and methods of making such special design with your own hands from improvised means and materials.
We study a detailed description of the process of creating a photobox with your own hands
This version of the photo box is perfect for product photography, for example, products using the scrapbooking technique.
To make such simple option photo box, you will need to prepare with your own hands a cardboard box of the size that you ultimately want to get a design for photography. It is worth giving preference to boxes made of dense and thick cardboard material. You will also need to purchase a large piece of fabric medium density white. A good option would be to use muslin fabric. Don't forget to buy a wide one duct tape or tape with which you will secure the fabric.

You will also need a sheet of white Whatman paper or thick white cardboard for work. To illuminate your photo booth, you will need a powerful table lamp. Use light bulbs with pure white light.
In order to make an original lightbox with your own hands in our master class, you will need the following tools:
- roulette;
- glue;
- ruler;
- sharp scissors;
- a simple pencil;
- stationery knife.
First you need to mark up your future design. Step back about five centimeters from the edges of the cardboard box. Draw lines so that you get a square inside the structure. Repeat the markings on all sides except the bottom and top. Next, using a sharp utility knife, cut out the windows in the box according to the markings made. Remove the top cover flaps. Bottom part The boxes should not be touched. You should have four windows in the photobox design.

The next step is to glue strips of paper to the inside of the cardboard box to cover the material and make the inside white. Make sure the side of the strip of paper where you marked the lines is facing the cardboard.
Now you need to make a background for your design. Cut out a blank for the background from a sheet of whatman paper. The width should be the same as inner size boxes, and the length is much longer than the box.

Place the strip of paper in the box so that it curves smoothly. Do not bend the sheet or make a fold line. Trim off any excess paper from the top of the design.
Now you need to mark and cut the white fabric so that it covers the windows from the sides and back, except for the front wall of the photo box. Then cut a piece to cover the top.
Secure the fabric to the sides of the box with adhesive tape. Then cover the top and also secure the fabric by wrapping the tape around without going over the front wall.
Now you need to install table lamp lighting above top part boxes and you can begin the photography process.

There are many options for shooting. If you are missing one light or have problems with shadows, use additional lights to shine through other sides of the box. If you experience vignetting or flare, use a lens hood or move the camera further into the housing. Photoshop also helps remove some imperfections, such as specks of dust on the matrix.
Video on the topic of the article
We invite you to watch several thematic videos on the topic of the article. In them you can see in more detail the process of creating a photo box for high-quality photography with your own hands. We hope that the proposed material will be useful to you. Enjoy watching.
High-quality photography of objects is a very difficult matter. We need special tables, backgrounds, diffused light sources - softboxes.
But there is a device that makes life a lot easier for a photographer. This is a lightcube, aka a photobox, aka a shadowless tent. Of course they are on sale ready-made solutions, but a lightcube is such a thing that it’s much easier to do it yourself.
Structurally, the device is a frame covered with diffusing fabric with a background inside, and illuminated by 1-3 light sources. The simplest lightcube can be put together in literally twenty minutes from a cardboard box and tissue paper, but if you want something more substantial, you will have to work hard. Luckily, various photo blogs have detailed instructions.
Most authors recommend making the frame from PVC cable-duct boxes. Ok, Bartimaeus said to himself and went to the hardware store.
So at first I had:
- a sheet of Whatman paper size A1.
- PVC box 16x16 - 4 pieces, 2 meters each;
- jointing block 15x20mm - 6 pcs. 1.2 meters each;
- spunbond, aka geotextile - 1 pack vka, 1.6 x 10 meters.

I cut 12 pieces of box 35 cm long. In four of them I made a slot on the side, in another four I spread out the “ears”. Looking ahead, I note that this is a very clumsy job. The cable channel is not intended at all for creating structures from it, and it certainly does not forgive such an attitude.

To cut the box, I thought of using garden pruners. :) And for connection - use construction assembly adhesive Lacrysil "Tougher than nails", in the hope of compensating for uneven profiles and cutting flaws. Looking ahead, I note that hopes were only partially justified.

However, pretty soon I became the owner of two 35x35 cm frames. All that was left was to connect them into a cube, with “eared” pieces.

The task turned out to be so difficult that help liquid nails I had to call in the usual...


Who's whispering "nightie"?? Leave the audience, you prankster! :))

Forgot something? Surely! The most important thing is light!
This is what a lightcube looks like “in combat positions.” For lighting I used two table lamps Ultraflash UF-301. These are the first pictures. As you can see, they look more than decent. Despite the fact that it was not possible to completely get rid of the shadows (the spunbond is still too thin, at least two layers are needed), the quality of the photos is an order of magnitude higher than those that I took with the light from the window.

However, when the initial excitement subsided, I wanted... to make version 2.0. Because in the process, annoying design flaws were revealed.
I was already thinking about buying more boxes and connecting them correctly, cutting off all the irregularities and adjusting the parts as accurately as possible, when during another meditation in a construction market I saw THIS.
Remember and don’t say you haven’t heard! Best material for the lightcube frame - this is a “corner” profile made of PVC, white, 20*20 mm, thickness 1.5 mm. Sold in pieces of 2.7 meters, it costs a penny, or at least cheaper than a box. And it is rigid enough to build a cube of at least 60x60x60 cm...

Excellent cutting with a hacksaw for metal...


My lightcube 2.0 is a parallelepiped 30x35x45 cm. Looking ahead, I’ll note that I missed a bit - the length of the module should have been 42.5-43 centimeters. I will explain why below.

I made another important addition to the design - I glued it to the inner surface of the upper corner LED strip. For front lighting. I found this solution from the Chinese from Aliexpress.
The power of the tape is 14.4 watts/meter, with a piece length of 35 cm (this is 7 LED modules, each 5 cm), the power consumption will be 5.04 watts, with a supply voltage of 12 volts, the current will be 420 milliamps. What allows you to use it for powering regular block direct current 12 V with a current of 500-700 mA!
While the glue is drying, you can build the diffusers. According to the new concept, they should be removable. I made 2 stretchers from a crossbar. 30x35 cm and 1 pc. - 35x45cm. I put PONGS ceiling fabric on the sides, and two layers of spunbond on the top. For fastening I used power buttons with caps, but regular ones will do.

As we see, this time all the efforts paid off. A piece of whatman paper fit inside like a glove, if my photo box was shorter, 43 centimeters, then I could easily use the ready-made A2 format. The ceiling fabric diffuses light well, despite the fact that I installed powerful Gauss 15W light bulbs, 1400 lumens each, into the “tabletops”. For the overhead lighting I used a clothespin lamp"Svetkomplekt" E50N with a 590 lumen lamp, although a regular socket on a tripod will do.As you can see, results have been achieved. The highlights and shadows are gone, the only thing that needs to be worked on is correcting the white balance, but that's another topic.

A visual demonstration of the results of LED strip illumination. The "without backlight" option is on the left. As you can see, the result is very much worth a couple of extra rubles spent on the tape and block.

Summary. Lightcube is an effective tool for a subject photographer. It’s easy and simple to make it with your own hands, the main thing is to decide on the size and choose the right material for the frame.
P.S. All I have to do is wait until Santa Claus brings me an “adult” camera, and then I can try my hand at photo stocks...
P.P.S. The original article was originally posted on the Otzovik website, but due to administration policy it had to be moved here.