DIY computer desks – drawings and diagrams. How to make a corner computer desk with your own hands Make a computer desk with your own hands
The design looks complicated. In fact, its structure is quite simple and minimal skills in handling tools are required - cutting chipboard and screwing screws. Moreover, even cutting can be entrusted to specialists in a hardware store.
First of all, you need a table design. It could be finished drawing, found on the corresponding website, and with suitable dimensions, or maybe a personal project, taking into account all the features of the room and your own needs. In any case, the future table must comply with sanitary standards and ergonomic requirements.
Materials for a computer desk you will need:
- Laminated chipboard or MDF, the first will cost less. Certainly, computer desk made from wood with your own hands will look much more interesting, but will also cost significantly more;
- melamine edge - more convenient than PVC trim, as it is easily fixed with a hot iron;
- glue and furniture wax;
- confirmations, dowels and screws.
The following tools are needed:
- hacksaw or Circular Saw if the material is supposed to be cut independently;
- electric drill and screwdriver;
- You will need a jigsaw if some parts have a curved shape;
- sander;
- hex wrench for confirmations, chisel, square, tape measure and ruler.
And the edges are matched to the interior. The number of add-ons is determined by needs and experience.
Photo of a stylish DIY computer desk
How to make a computer desk with your own hands?
By finished project count on required amount materials. When purchasing, it is recommended to increase the volume of chipboard and fasteners by 15% in anticipation of possible defects and shortcomings during assembly.
Straight
The prototype of a straight computer desk is a desk, but zoned in height and depth to suit the requirements for the equipment. Therefore, its parameters must satisfy not only the size of the room, but also the position of the operator and the dimensions of the equipment.
The optimal model dimensions for a PC without complex peripherals are:
- depth – 60 cm, or 50 cm if the monitor is on a stand;
- The length of the table top consists of the operator's seat - 60 cm and no less, the width of the compartment for the system unit - 25 cm, the width of the cabinet, if there is one - 40 cm and tolerance. As a rule, this is 130 cm. But if at least a scanner appears, and no add-ons are made, then the length of the tabletop increases;
- height – 75 cm or slightly more, depending on the user’s height. The exact formula is: the product of the operator's height and 75 cm is divided by 175, and the result is the recommended tabletop height;
- The height of the monitor stand determines the viewing angle. It is 0–20 degrees from direct view. At large sizes the screen may not need it;
- The height of the keyboard shelf is 50–70 cm below the line of best vision. The position of the keyboard in which the operator types text with his elbows hanging and his wrists raised is unacceptable;
- a combined computer-writing desk will have larger dimensions, since it should, in fact, include another operator’s seat - the same 60 cm of free space.
Mandatory accessories should include a pull-out shelf for the keyboard - especially if the depth of the table is small, and a compartment for the system unit - there is nothing worse than constantly bumping into it with your feet. A straight table necessarily includes an element such as a back crossbar, as it ensures the rigidity of the entire structure. Its width is at least 1/3 of the height of the table, the thickness should be as large as possible. Made from the most common chipboard.
If, in addition to speakers, you need to place other equipment - a printer, scanner, MFP, you cannot do without add-ons. Moreover, most devices are simply inconvenient to place below. So, you should immediately abandon the various lower shelves, which also interfere with the operator.
- Patterns are made according to the drawing or the pattern is immediately transferred to chipboard sheets. The parts are cut out with a hacksaw or saw. A jigsaw is used to cut curved elements.
- The ends can be covered with PVC film if necessary.
- Assemble or blind compartment for the cabinet. The box consists of 3 walls, a bottom and a front. The walls are assembled into a kind of box with confirmations, for which holes are pre-formed at the fastening points. Bottom – thin fiberboard sheet, simply put on top and secure to the ends of the product. The workpiece is then set aside.
- They assemble the cabinet - the sides and the bottom, also for confirmations. If there are not drawers, but shelves, then they are screwed to the sides. If drawers are being built, then slats and guides are attached to the sides at the required distance from each other. Better Kulkov balls, not rollers.
- The compartment for the system unit is mounted in the same way: the side of the table, the compartment and the bottom are assembled. Then the finished compartments are fastened together with a rear cross member.
- Guides for the pull-out shelf are secured to the sides with self-tapping screws. Better are Kulkov ball guides or metaboxes - the latter are more expensive.
- Cut out the tabletop and shelf. Their ends are covered with melamine film. The tabletop is secured to the ends of the vertical parts with dowels, since the confirmations will protrude above the surface of the table. The dowels are installed with glue.
- The drawers are finished either after installing the countertop or before. The fact is that in order to properly secure the facade, the box must be in a finished cabinet. The façade is fixed after “trying on”. To do this, tape is attached to the edge of the facade, a ruler is placed on the bottom of the cabinet, and the panel is applied to the ends of the walls of the box. Then the ruler is placed on the top edge of the half-finished box and the same procedure is repeated with the top one. This ensures that there is a gap between the facades, and there are no difficulties when pulling out the drawers.
- If everything is in order, the facades are fixed from the inside with self-tapping screws. The handles on the facades are fixed before installation.
- If the project includes add-ons, then their installation begins after the table is manufactured. The structure is first assembled into confirmaments, and then fixed to the tabletop.
Assembly is not so much complicated as it is time-consuming and requires care, especially when drilling the ends. Also, if you lack experience, difficulties may arise with wooden dowels. You can use plastic ones, although their service life is shorter - 5-7 years.
However, you can make such furniture in more simple version- from an old table you have. The video below will tell you how to make a computer desk with your own hands:
Angular
A small triangular table is even more popular than a straight one. Firstly, it takes less space, secondly, it is more stable and does not require reinforcement of the structure, and thanks to its great depth it allows you to easily place speakers.
However, a closed corner leaves a person alone with virtual reality, and with psychological point From a perspective this decision is unsuccessful. The operator literally has nowhere to take his eyes, which does not contribute to concentration, but, on the contrary, to rapid fatigue. Having an open space in front of your eyes is much more useful, especially when working for a long time, 8-9 hours.
- The standard size of a corner model is the length along the outer edge of the tabletop is 120 cm. Such a table is cut literally from one sheet of chipboard, since there are enough scraps to cut out the sides and even shelves. Increasing the edge to 160 cm provides a great advantage: there is room for elbow support and free space for a shelf with a scanner, for example, or a narrow cabinet.
- The system unit is installed on a shelf or even on furniture corners, although the first option is more reliable. The guides for the pull-out shelf are fixed with screws to the tabletop.
- Otherwise, the assembly of the corner model is no different from the straight one. Self-tapping screws and dowels are used for installation.
An L-shaped corner table will require longer calculations, and its design is more complex. Here you will need additional support and a rear cross member.
Photo DIY corner computer desk

Small
The small table is distinguished not so much by its simple design as by its size.
- The depth of the tabletop is reduced to 50 cm, or even less.
- Width – up to 70 cm, excluding the compartment for the system unit, especially the cabinet. For the system unit you can do mobile stand on casters, which can be positioned with outside sidewalls.
- Whether or not a monitor stand is needed is determined based on sanitary standards and screen size. If the conditions are met when placing the monitor on a tabletop, a stand is not needed.
- A pull-out shelf is a must.
To increase the functionality of the model, it is often made in the form of a combined table-rack. In this case main detail there is a shelving box 1.3–1.5 m high and always with a back wall, or rather, the third component of the frame. The third wall is made of the same material. Rollers are often attached to the base. The tabletop is essentially a protruding deep shelf. You will most likely need a monitor stand here. A top shelf appears - for a scanner or printer, possible side external shelves for speakers, for example.
The product is installed in the same way. But here they immediately begin assembling the case, and then installing the shelves. In principle, the system unit can be located on the base, but if it is inconvenient during operation, it is still advisable to move it to its own stand.
To know how to make a corner, simple straight or small computer desk with your own hands, you should look at the drawings and diagrams presented below.
Do you still have chipboard scraps left and have a great desire to make a computer desk on your own? Then carefully watch the following video:
Drawings, diagrams and photos
The value of a drawing when assembling furniture is difficult to overestimate, especially in cases where an incorrectly calculated value can lead to complete non-functionality of the item.
Drawings can be found on construction sites, and are quite detailed and even indicate the appropriate fasteners for each part. Diagrams with photographs of each stage of assembly will be more informative. In this kind of work, an image is more useful than text.
More difficult is assessing how suitable the found drawing is. To do this, it is necessary to correlate the height of the main user and the size of the monitor. Only provided that the distance from the eyes to the screen is sufficient, that the viewing angle is appropriate, that the operator’s hands when working with the keyboard are not raised too high, that there is room to stretch out the legs, and so on - only if all these requirements are met can it be recognized model is suitable.
Drawings and diagrams of computer desks
 Corner small
  Angular wavy
  Straight with drawers
 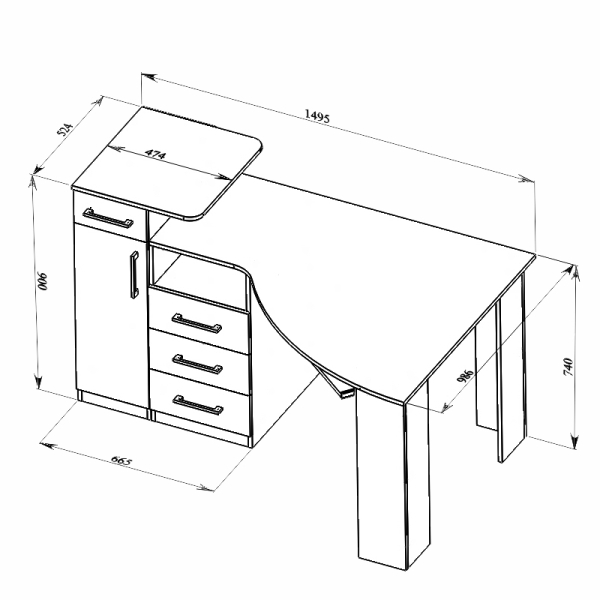 Angular letter P
Personal working space largely determines the quality of the work performed, because it determines how comfortable and productive the work process will be. To a large extent, this applies to the desktop, which should be user-friendly. Constructors and designers involved in the development of office and home buildings offer a lot original ideas, but you can try to bring your own ideas into reality on your own.
What do manufacturers offer?
Before you start working on your own project, you should familiarize yourself with the offers on the furniture market, among which you can learn a lot for yourself interesting ideas. Let's take the IKEA hypermarket as a platform for finding inspiration, where there is always a huge selection of products from different price categories. The work tables available in the catalog of the largest furniture retailer look laconic and high-quality, but lack any special “zest.”

Other manufacturers are doing no better - either the design frankly “smacks” of the last century, or the design is too bulky for modern interiors. However, among all the variety there are also original models that are not overloaded with unnecessary parts and are easy to use. For example, a tabletop adapted to accommodate a laptop, tablet and other gadgets looks very stylish and ergonomic, but not all users can afford its price. However, this is not yet a reason to refuse the table you like, because you can build something similar with your own hands.
Drawing up an engineering project
The first thing you should decide on at the design stage is the functionality of the future table. Among the proposed options may be placement on the tabletop of a contactless phone charger, a built-in pilot with an extension cord passed through the table leg, areas under marker board and glass for notes, holes for different types gadgets and much more.For our future table, we will focus on the following functional elements and details:
- central holes for removing wires from the laptop and additional passive cooling;
- deep recess for a coffee cup;
- places to place a tablet and smartphone with holes for connecting a charger;
- small stands for various little things- pencils, pens, flash drives, etc.


Prototype making

After drawing up a virtual layout, an idea may come to mind to use a ready-made, inexpensive table, for example, from the same IKEA, to implement it. However, this trick will not work, since almost all inexpensive countertops are hollow inside, and it is technically impossible to make the necessary grooves and holes in them.

Another option is to purchase a shield of specified dimensions (1200 mm x 600 mm x 40 mm), made from solid wood. Here we need to understand that not all tree species are suitable for our purposes. For example, pine will be too soft for a countertop, as a result of which chips and cracks may appear on its surface during processing. To prevent this from happening, experts recommend choosing hard wood types such as beech, oak and ash.

Next comes the most difficult stage of making a table - searching for a company engaged in milling and laser engraving of wood. Despite the apparent simplicity of the task, not all craftsmen are ready to take on its implementation, so you will have to spend time finding craftsmen who will not “raise” the price for their services to a cosmic level. We managed to find such wonderful guys who, moreover, helped with finalizing the project and gave useful recommendations and advice.
Tabletop processing stage
After all the holes, grooves and recesses have been implemented according to the original plan, the tabletop must be processed accordingly to bring it into working order. First, all surfaces are sanded using sandpaper, including internal sides holes. To achieve ideal smoothness, you will need different types of sandpaper grit - 100, 280 and 360. The manual sanding process can take several hours, as it requires special care when performing.
After obtaining a smooth surface without roughness and burrs, you can begin the final processing of the wood. To do this, you can use varnish, paint or oil, depending on the user’s personal preferences. We chose the latter option, inspired by the numerous benefits of the oil:
- absence of harmful fumes, environmental friendliness;
- resistance to impact high temperatures and moisture;
- quick drying in a few hours;
- preservation of the natural structure of the wood surface;
- ease of use and subsequent operation.
Each layer of oil coating should be dried for two hours, after which you can begin installing the support legs. For our model, we used ready-made IKEA legs, and installing them was perhaps the easiest step in the whole table-making venture.


Summarizing
One month was spent on implementing the idea “from scratch”, during which the following tasks were consistently implemented:- 1 week - registration own ideas, creating a list of necessary functions, drawing up ideas about appearance future table;
- Week 2 - making a 3D model and drawings using computer programs, search suitable craftsmen, professionally engaged in milling;
- Week 3 - performing milling and engraving work;
- Week 4 - carrying out work on finishing tabletops, installation of legs.
The experience gained in independently manufacturing a modern computer desk allowed us to draw a number of important practical conclusions:
- V retail sales difficult to find suitable model desktop;
- when purchasing a furniture panel for a table top, you need to give preference durum varieties wood;
- when searching for milling cutting services, you may encounter difficulties;
- oil coating - good view finishing for wood.
If you have a desktop computer, then in the apartment, along with the obligatory pieces of furniture, there must be a table of a special design that allows you to place full set personal PC equipment. Moreover, very often it is not always possible to purchase a table ready for use, since many of the offered models simply do not fit into the decor of a particular apartment. The simplest way out of this situation is self-assembly a PC table made taking into account the characteristics of the room allocated for it. But before you make a computer desk with your own hands, you definitely need to familiarize yourself with the known versions of these prefabricated structures, as well as the features of their manufacture.
Design selection

All the variety of well-known models of computer desks used in living conditions, can be reduced to the following three types:
- corner;
- with a direct tabletop arrangement;
- combined.
When self-made table selection of the appropriate option for you should be made taking into account the following requirements:
- ergonomics;
- correct choice of location, taking into account the quality of natural light, depending on the location of window openings;
- availability of raw materials and ease of manufacture.

The first of these requirements means creating conditions that ensure ease of use of the computer environment (mouse, keyboard, system unit and monitor). The possibility of their implementation should be provided for by the design of the future product itself.
As for choosing a place for a computer desk, the first thing to take into account here is the protection of the display screen from direct solar radiation, which can lead to burnout (fading) of its cells, and working in such lighting is very inconvenient. That is why the display stand included in the product should be positioned in such a way that light from the sun does not fall on it directly, regardless of the orientation of the windows in the room.
Choosing a workplace with low level illumination (windows are located on the north side, for example) is also undesirable, since this complicates working with paper documentation and in this case additional lighting will be needed even during the day.
The most convenient option is the western or northwestern arrangement of windows in the room reserved for the PC. The choice of a specific desktop option (corner, straight or combined) depends on a number of factors, which will be discussed below.

The peculiarity of corner structures, which occupy a minimum of space in the room, is their compactness and the ability to fit organically into limited spaces. In addition, such tables are cheaper in terms of total material costs and easier to manufacture than all other models and therefore can be easily made even by a novice in plumbing.
The shortage of usable space in such a structure can be compensated by increasing its number of floors, i.e. due to the manufacture of an additional retractable panel for the keyboard and a separate shelf for the speakers. In a simplified version of such a product, the system unit is installed directly on the floor of the room (under the desk).
Full straight table

The difference between a straight computer desk and a regular desk is that its individual sizes and shapes are adjusted to meet ergonomic requirements. In addition, when organizing its free space, you can choose any zoning depth convenient for you. In other words, this design allows you to implement the most various options arrangement of equipment, starting from allocating a separate place for a display on the tabletop and ending with a complex multi-level organization that allows you to place everything you need for professional work.
The materials for making such a table will require approximately twice as much as for arranging a corner structure. In addition, its self-assembly will require the performer to have carpentry skills related to processing various types wood material.

The combined table combines the advantages of computer and simple desk and is ideal for professional work at home. However, you will need significantly more materials to make such a table (about 30–40%), since the manufacture of complex structural elements is associated with the formation large quantity waste. In addition, for preliminary sawing of these elements, carried out immediately before their assembly, you will need a special cutting tool (electric jigsaw or a hand cutter used to select shaped grooves).
The simplest and most accessible for self-production is the corner design, which allows, with a minimum of material and physical costs, to ensure the required ergonomics and ease of placement of the table within small room. It is this option that we will consider further.
Manufacturing procedure

For the manufacture of corner table Typically, a dense laminated board (chipboard) is used, which provides the required reliability and durability of the structure assembled on its basis.
Frame making

To make it you will need the following raw materials and tools:
- chipboard blanks;
- jigsaw and screwdriver;
- a small sketch with instructions on the dimensions of structural elements;
- pencil and ruler;
- aluminum corners;
- wood glue

Assembly of the frame base is carried out in the following sequence:
- First of all, according to the sketch, all the main blanks from chipboard are cut out, used to design the two back walls, sidewalls and the tabletop itself.
- Then they are directly assembled, for which you will need previously prepared corners and small wood screws (to avoid splitting the slab, their length should not exceed 1.5 cm).
- During the assembly process, first of all, the tabletop is fixed to the outer sides, and only after that the back walls, giving it the necessary rigidity.
- After the supporting frame of the table is assembled, it will be possible to proceed to the installation of intermediate partitions, through which several work compartments are created (for the system unit, keyboard, as well as for placing literature, documents, etc.).
Mounting Features

In the process of manufacturing a computer desk, we recommend that you pay attention to the following subtleties of assembly operations regarding the design of fasteners:
For fastening, it is best to use confirmations, but you will also need to purchase a special drill for them. If the design is simple, then fastening can be done with self-tapping screws.
- Before screwing the screw into the slab, first prepare a hole at the attachment point with a thin drill (to a depth corresponding to the length of the screw).
- To increase the strength of the structure and ease of assembly, individual attachment points can be strengthened by pre-processing them with a special adhesive composition. In this case, the glue can be applied both to the area where the self-tapping screw is screwed in (directly into the hole) and to the contact areas of the workpieces being joined.
- When screwing in self-tapping screws, the screwdriver should operate at low speed; At the same time, it is important not to overdo it with tightening the fastening (that is why for these purposes it is most convenient to use special models of devices equipped with so-called ratchets).

Installation of the retractable panel under the keyboard begins with fastening it to the adjacent side racks metal profiles, used as guides. (They are usually installed about 20 cm below the tabletop level).
Small rotating rollers are attached to the panel itself, through which it moves along with the keyboard.
Upon completion of all the procedures described above, the resulting structure is necessarily checked for strength, after which it will be possible to proceed to placing on it the entire set of objects from the computer environment.
Video
See how you can make a computer desk with your own hands from chipboard scraps:
An interesting solution is a transformable computer desk:
Photo


It's hard enough to imagine any house modern man without any technical equipment. The leader in this regard is, of course, the computer. Those who prefer compact netbook models do not need to worry about choosing furniture to place them. But if a computer is needed not only for entertainment, but primarily for work, then naturally more powerful stationary equipment will be required. In this case, making a computer desk with your own hands is a rational solution.
Before you make a large or small computer desk with your own hands, you must first of all approach the organization of the process correctly.
Therefore, make an accurate list of all the elements that will make up the entire system. The standard is:

Select suitable material for designing a table. Most often, chipboard-type materials are used for this. 
How to choose a place for a computer desk?
The next step in your work is determining the correct location of the table. Naturally, the less space the computer desk takes up, the better, since the usable area will not be cluttered. But at the same time, it is also not worth greatly minimizing it, since then this piece of furniture is unlikely to fulfill its multifunctional purpose. 
Among the basic rules of placement, mandatory conditions are the following:

How to design a computer desk?
Once you have decided on a room and a specific location, it's time to start more interesting work— designing a computer desk. To do this, you will need to carefully analyze all the initial data, study the rules below and draw up your drawing.
Important! Accuracy and an extremely attentive approach will allow you not only to arrange workplace With maximum comfort, but also significantly reduce money spent on Consumables, so take this stage responsibly. In addition, the speed of assembly and the amount of nerves spent on it will depend on how correctly you determine all the parameters.

Which computer desk to choose?
The first stage of design is choosing a suitable design. There are several criteria in this regard:

The following types of structures are distinguished:

How to determine the length of the table?
The required length of the table is determined by a certain number of factors, which include:

How to determine the depth of the table?
Calculating the depth of a computer desk is also easy. IN in this case be guided by the following conditions:

How to calculate table height?
Calculating the table height indicator is also no more complicated than the previous parameter. Standard level- 75 cm from the floor. It may vary if your height is far from average, and you will be the only one using the computer desk. In this case, calculate the height you need as follows:
Height*75/175 cm
Important! To clearly understand how to perform the calculation, read following example: with a height of 1.82 m, 182 * 75/175 = 78 cm is required.

How to determine the dimensions of a monitor stand?
Many people consider it unnecessary to have such structural element, and at the same time it will provide a more convenient viewing of all the necessary information on the monitor and free up some space. 
Depending on the form, these modules are of the following type:

How to properly design a keyboard shelf?
The keyboard shelf is another integral element of the computer desk design. Such a module will provide a number of advantages in terms of PC usability:

To enter data into a drawing of a computer desk with your own hands, select the type of design that suits you from the 2 existing ones:

Niche or shelf for a system unit?
The smooth operation of a PC is ensured by a properly functioning system unit. Therefore, it is extremely important to create favorable conditions its placement to ensure long service life and the absence of the need to carry out frequent repair work. 
The basic placement rules include:

To understand why exactly it is necessary to design a special compartment in a computer desk for a system unit, let’s outline the advantages:

Advantages of stands:
- mobility;
- autonomy;
- a small amount of consumables.
Important! As a disadvantage, we note the fact that you can only use it for its intended purpose. Use casters with guides or adjustable furniture supports as supports for the stand. The parameters of such stands of the simplest design are 280 mm wide, 500 mm long and 120 mm high.
Pros of niche design:

How to design a cabinet for a computer desk?
Use as additional element designs of computer desk cabinets are not only practical solution, but also a sign of good design taste. It can be used for:

According to the method of installation, cabinets are divided into:

How to design an extension for a computer desk?
Increasingly, when choosing a PC table design, preference is given not to simple, but to more complex options with add-on. This decision is not accidental, because the useful space expands significantly, and the vertical is used for this. The add-on can be an excellent option for installing a scanner, printer, storing books and documentation in an orderly manner. 
The main requirements for an extension relate to two factors:
- attractiveness and originality of design;
- practicality of the size and arrangement of shelves.
In terms of dimensions, be sure to take into account the location you have determined for installing the monitor and its diagonal:

Take into account some additional recommendations extension design:

How to assemble a computer desk with your own hands?
So that you can more clearly imagine the assembly process, as an example, below is a diagram of a drawing of a computer desk made of chipboard (pine) with a stand for the system unit, pull-out shelf for a keyboard and an additional shelf at the bottom, a cabinet with 3 drawers and an extension with sequential instructions for its installation.

Materials and tools
To complete the whole job you will need:

Assembling the table - sequence of work

Drawings of computer desks
View additional drawings of different computer desks that you can also assemble yourself.


Video
View another example of assembling a computer desk budget option in the video below.
Conclusion
Drawing up a drawing and assembling a computer desk with your own hands at first glance may seem like a time-consuming task that you cannot cope with. In fact, rest assured that this is more of a creative process that you will certainly enjoy, and upon completion of the process will bring pleasure not only from convenient work at the computer, but also moral satisfaction from the work done independently.