Laying new tiles directly on top of old ones: a proven method. How to lay tiles on old tiles and is it possible to do this? How to lay new tiles on old ones
The widest selection of floor ceramics does not affect basic rules its installation. There are many characteristic features, technological nuances, without knowledge of which you may not get what you expect.
Absolutely all ceramics manufacturers insist: it is necessary to start not with testing the base for compliance with standards, but with checking ceramic finishing and developing a plan for its installation.
Your first priority is to choose the right design and caliber of the product. As a rule, in stores, stands are tiled with tiles from one collection in the optimal layout, in the opinion of the plant designers. Approximate variations can be viewed in professional catalogs on manufacturers’ websites or in sales areas.
You can change, supplement or completely redesign the proposed design to your taste. To do this, ask to provide you with several samples of the main tiles and their components (borders, decor, panels, etc.) and create a layout suitable for your room.
But keep in mind - upon entering the room, the first thing that catches your eye is the center of the room or the area that is completely free of furniture and equipment (the so-called free patch). IN small kitchens and bathrooms are, as a rule, no more than 1-2 m². Therefore, laying tiles on a concrete floor should be planned in such a way that the center falls exactly on the visible square meters area. Thanks to this simple technique, solid elements will be glued to the “empty” area, and cut ones will be glued only around the perimeter. This is especially important if there are uneven walls.

Design planning with offset.
The next stage is the choice of installation scheme for floor ceramics. There are several basic types:

Thanks to the wide variety of formats and types of tiles (elongated planks, polygonal, oval products, etc.), installation of floor ceramics can be carried out according to parquet patterns (herringbone, wicker, deck, squares), chaotically or modularly (a combination of different format claddings).
If you intend to use decorative elements or a combination of colors, then don’t be lazy to make a drawing to scale. You can also request the development of similar sketches from ceramics of the same series, thickness or manufacturer from consultants in shopping centers, specializing in ceramic cladding. As a rule, factories provide not only the appropriate computer programs, but also special devices (outwardly reminiscent of ATMs), on which even an inexperienced user can create his own floor design, in two or three dimensions. BUT! If you want to combine tiles from different manufacturers and calibers, be sure to ensure that the thickness matches perfectly, down to the millimeter. Otherwise, you won’t be able to lay the tiles absolutely straight without any flaws.
It is better to think through the layout in advance in order to purchase required amount facing material. The required quadrature is calculated based on:
Surface area
This value must be divided by the area of one element, taking into account the tile joints. If the tile has a complex shape or multi-format ceramics are used in one design, then it is better to draw a drawing.
Tile sizes
The number of whole and trimmed elements in one row depends on this. To calculate the first value, you can ask consultants to make calculations in special programs (provided to sellers by manufacturers) or use the formula:
If, in accordance with the project, it is necessary to lay a frieze and a trim around the perimeter (a wall section of the main or complementary tiles), then the overall pattern must be designed in such a way that the border strip is laid from whole elements, and full-length or cut tiles can be used on the trim border.

The floor is made of tiles with a border frieze.
When buying ceramic tiles, be sure to take a small supply, that is, you need about 10-15% more than required. Partial finishing material will be scrapped, possibly destroyed, or will be useful in the future for repairing damaged elements.
Styling techniques
In what cases are tiles laid with a gap or seamless method, with a straight or zigzag seam? It depends not on your desire, but on the characteristics of the flooring material. Firstly, monolithic canvas It looks, of course, beautiful, but it is made only from rectified porcelain stoneware. That is, the most stable and resistant to temperature changes cladding with edges processed on special machines. It is very difficult to lay this material yourself without solid work experience.
Secondly, almost all ceramic flooring products must be installed with a gap. The larger the size of the products, as well as the load, the wider the seam should be, otherwise in the future due to seasonal deformations various defects (cracks, etc.) will appear. Recommended values:
- For tiles of caliber from 5x5 to 30x30 cm - 1-1.5 mm;
- For ceramics with dimensions from 30x30 to 60x60 cm - 2-5 mm;
- For large format products from 60x60 cm and more - 5-10 mm.

Tile joints: zero, narrow and wide.
The choice of seam option - straight or curved - also depends on the shape of the tiles and design features. Some collections involve laying a base with inserts, joining a pattern in a certain order, etc. Similar information is available on the box.
So, we have come to the finish line. The cladding has been selected, the layout option has been approved, you can begin last stage– selection of flooring materials for quality. Please note the following when purchasing:
- Tile premium grades must have the same thickness, width and length (maximum deviations, as a rule, do not exceed 0.5 mm), as well as the same shade, without streaks, stripes, foreign inclusions, stains, chips, small cracks, scratches, unevenness and other design defects .
- The glaze should be uniform, without drips or sagging, the surface should be as smooth as possible with a minimum of negative (concave) or positive (convex) deviations from the plane, and the side edges should be free of burrs, irregularities, and chips. This is easy to check - connect two tiles together at the ends and front sides, and carefully inspect. Any deviations negatively affect the evenness and aesthetics of the future floor.
- The purchased set must be from the same batch and the same tone, which guarantees the absolute identity of all elements in color, size and other parameters. This information is indicated on the box.
- Tiles should be cleaned of packaging and paraffin or wax protective coatings, which are applied to the surface of some collections to protect against scratches during transportation.
Tools and materials

To install the tiles yourself, prepare the necessary kit.
Including tools:
- tape measure and metal ruler;
- rack and moisture meter;
- level and square;
- marker for applying markings to facing elements (main and complementary tiles, decors, borders, etc.);
- marking dye cord;
- an electric tile cutter or a manual tile cutter, special ceramic saws for forming shaped cutouts, or a drill with cup attachments for drilling round holes for pipes;
- a plastic bucket and a construction mixer for mixing glue;
- trowel and notched trowel for applying the solution. The choice of the number of the last tool depends on the dimensions of the tile, and the larger the facing element, the larger the size of the trowel teeth;
- pliers;
- mallet and spatula for grouting;
- sandpaper for processing tile cuts;
- assembly gloves and knee pads;
- bucket, sponge and soft fabric to remove excess adhesive that has emerged.
Materials you will need:
- Ceramic tiles with a full set of shaped elements;
- The adhesive mixture is cement or polymer, corresponding to the specifics of the base (mineral screed, wood, plywood, etc.), as well as the operating conditions of the cladding. That is, allowing you to put tiles on the floor in a heated or unheated space, on a heated base, in showers or swimming pools;
- Primer emulsion;
- Waterproofing suitable type(in wet areas);
- Cement or polymer grout and water-repellent impregnation for seams;
- Silicone sealant. It will be needed to process joints, internal and external corners;
- Crosses for tile joints or tile leveling system (SVP).
Because for interior works Mostly non-frost-resistant ceramics are used; manufacturers recommend installation at a room temperature of at least +5 °C and no more than +30 °C with a humidity of 40-60%. Exterior decoration, including cladding of facades and steps, is carried out only in the warm season.
Step by step instructions

The service life and ease of use of floor ceramics depend on the quality of installation work. This axiom, unfortunately, is often neglected, and the result is a fragile, unaesthetic or defective coating. Therefore, we recommend that you follow all the rules, from preparing the base to the curing period of the grout.
The process can be divided into 6 stages:
Preparing the base
The quality of the subfloor should ensure the possibility of creating a layer under tile covering from adhesive cement mortar with a thickness of 2-15 mm, for mosaic - up to 20 mm. Therefore, the following actions are necessary:

There must be a basis;

Before the start of work, pipelines and other types of communications laid in the ceilings must have outlets in accordance with the design of the room. Don’t forget that large areas require uniform expansion joints to compensate for thermal and hygroscopic deformations of the base. When laying tiles on concrete or mineral screed indoors, it is recommended to install thermal gaps every 20-25 m² of area, for external cladding - 16 m².
IN small rooms The role of temperature-shrinkage joints is played by a gap of 4-5 mm wide around the perimeter between the ceramic coating and the walls.
Let us remind you once again that the floor must be monolithic. Many craftsmen believe that unevenness can be easily leveled out with tile adhesive - the layer will be thicker than expected. However, they forget that the cement-polymer mortar shrinks, so a perfectly even coating will not work. All recesses, cracks and bumps larger than 5 mm must be eliminated - filled with repair mixtures or chipped away, and dust and debris removed. Treat the surface with primers with the required properties - strengthening, adhesive, etc.

Applying primer to concrete base.
If you are thinking of laying tiles in a shower, bathroom or toilet, pay special attention to waterproofing. To create a reliable water barrier, you can use polymer paints, penetrating coatings, impregnations, membranes or any other material available to you. The main thing is to form a layer correctly, extending it onto the walls 10-15 cm in height and carefully sealing the corners.
Marking
When marking, the center lines of the room serve as the basis. Connect the midpoints of more closely spaced walls to obtain a longitudinal axis, and center points distant ones to calculate the transverse line. Make marks on the walls for the level of the future finished floor. This will help correct minor flaws during the tile laying process. It is better to apply the marking drawing with an alcohol marker or using a paint cord.

First, check the correct geometry of the room. This will allow you to adjust the plan for tiling the floor with ceramic tiles and significantly speed up the work.
To make sure that the walls are mutually perpendicular, pull two cords diagonally from opposite corners and measure their length with a tape measure. If the angles do not correspond to the ideal 90°, and the sides have different lengths, then you can use various tricks to visually level the effect. For example, move the picture or lay friezes around the perimeter, and between it and the wall - fo new tiles with trimming.
The principle of marking formation depends on the chosen design.
Standard seam-to-seam or corner installation
If the room has an even rectangular shape, then installation begins from the corner. The first element is mounted in the corner of the room, the rest - in different directions from it.

Corner laying pattern.
In a run-up or with a shift
For tiles produced in the form of elongated planks, it is incorrect to use the simple corner method. Installation should be done from the center of the room. The method is quite labor-intensive and requires care and precision in work.
First, the reference point (central) is calculated, the first row is laid from it, then subsequent lines are formed as shown in the figure below.

Laying pattern with offset or from the center.

Scheme of laying tiles of different calibers from the center.
The displacement coefficient of each subsequent row relative to the previous one depends on your desire - by 1/2, 1/3 or more. Since this is not a laminate or parquet board, no stitching is required here. This is more of a decorative effect, allowing you to create a decking, brick or typical for laminate.
Along two perpendicular rows
To lay tiles in a room with irregular wall geometry (including various projections, bay windows, etc.), this method is used. We mark the center of the room and install the first element from it. In relation to this cladding, we draw two perpendicular central lines, along which we lay the floor covering up to the wall. From the finished rows we lay the remaining ceramics. This is very convenient for creating panels and various decorative or accent inserts.

Diagonally
In addition to the finished center lines, you also need to draw diagonal ones from opposite corners. The layout is carried out either from the center or from the far corner of the room. The pattern can be anything.

Scheme of diagonal tile laying.
After the necessary marking lines have been drawn, lay the ceramics on a dry floor surface. This is necessary for precise adjustment of the overall layout scheme, as well as for cutting edge tiles or shaped elements with a tile cutter (including for forming curly cutouts for various plumbing fixtures, water supply pipes and other communications).
Instructional and technological map for facing works, developed back in 1973 and updated in 2003 by the Design, Construction and Technological Institute of Industrial Construction, recommends craftsmen to make landmarks for themselves over large areas: either from a mooring cord stretched between the extreme support points (for example, along long wall or diagonally) or install so-called lighthouse tiles. These are singles ceramic elements or a series of facings laid along an extended surface, which allows you to control the level of finish and the correct formation of stripes.

Preparing the adhesive mixture
The solution must be perfectly homogeneous and fluid enough so that it can be easily applied to the surface and distributed. The dry mixture is mixed with water in the proportion recommended by the manufacturer, thoroughly mixed with a mixer until a homogeneous mass without lumps is formed. Remember that ready-made glue can be used for a certain time (20-60 minutes), so for large laying areas it is better to prepare the solution in portions.

Elastic polymer mixtures for ceramics come in one- and two-component types. They should be mixed thoroughly before use and should be applied with a notched trowel.
Installation of the cladding begins from a reference point located in the corner farthest from the entrance, or from the center of the room. It is recommended to finish the floor in strips or small squares, gradually moving towards the doorway. If the design assumes the presence of a frieze and panels, then installation should begin with decorative elements.

Laying from the corner and from the center of the room.
Some types of tiles with a highly porous structure are recommended to be soaked before use. This is done so that the ceramics do not “pull” moisture from the solution before it polymerizes. But most of the products on the market do not require such an operation, so before starting work, carefully study the information on the packaging.
If you are laying floor finishing material with a thickness of more than 12 mm or with a side of more than 50 cm, then carefully follow the manufacturers’ recommendations. Glue solution it must be applied not only to the base, but also to the back surface of the tile with pre-moistening.
Do not lay ceramic tiles on the floor with the heating on or when the room heating system is running. It should be turned on only after the adhesive solution has completely “set.”
Apply the adhesive mixture to the base with a spatula with an average thickness of 2-5 mm (polymer - in a layer of 2-3 mm) and spread over a surface of 1 m² or in an amount covering one row. Next, lay out the tiles in accordance with the chosen pattern, align them, lightly tap them with a mallet or press them down with your fingers. Clean the seams from excess glue and insert spacer crosses or SVP. Next, apply glue to the surface as needed and install the cladding, periodically checking the evenness with a hydraulic level, as well as the geometric correctness of the installation - horizontal, pattern, installation pattern.

Applying adhesive mixture to the floor and installing tiles.
If required according to the plan, at the end mount a wall plinth from border elements or cut tiles of the main background using dividing crosses.
Grouting joints
Filling gaps can only be done after the covering has been completely laid and the adhesive has hardened. As a rule, 24 hours is enough.

Mix dry cement grout with water in accordance with the manufacturer's instructions, apply with a spatula and fill all joints without exception. After 15-30 minutes, remove the remaining color mixture with a damp sponge. After an hour, wash the surface again with a wet cloth, and the next day treat the seams with water-repellent impregnations.
Cleaning the coating
A ceramic-tiled floor after finishing the grouting work has a whitish coating, which must be removed with a solution of special acid-based ceramic detergents (Pramol Ceracid, Pufas Glutoclean acidic, Italon A-CID), then rinsed with clean water until all foreign liquids and dirt are completely removed. In the future, it is recommended to use neutral detergents or a weak soap solution, and to remove stains or heavy dirt, purchase professional concentrates that do not damage the surface and do not leave streaks (Litokol Colored Stain Remover, Bellinzoni Mangia Macchia, etc.).

Do not use abrasive cleaners, which may cause scratches, especially on polished, lapped or high-gloss ceramic surfaces.
The finished coating can be loaded with furniture and other household items within 48-72 hours.
Advice! If you need repairmen, there is a very convenient service for selecting them. Just send in the form below a detailed description of the work that needs to be performed and you will receive proposals with prices from construction teams and companies by email. You can see reviews about each of them and photographs with examples of work. It's FREE and there's no obligation.
In the process repair work With your own hands you have to deal with many difficult questions, the correct answers to which will determine the quality and service life of the new finish. One such question is, can you lay tile on tile? Let's see if we can use old tile as a basis for a new coating or is it better to dismantle it to avoid possible problems.
Features of preparation various types surfaces. How to rub seams. Criterias of choice tiled covering and flooring patterns.
How to remove old grout from tile joints
Quite often you have to deal with a situation where the condition of the old tile is quite satisfactory, but in order to use it as the basis for a new coating, it is necessary to replace the grout for the joints. It is quite possible to carry out this procedure, however, it requires attention and time. Let's look at how to remove grout from tile joints correctly.

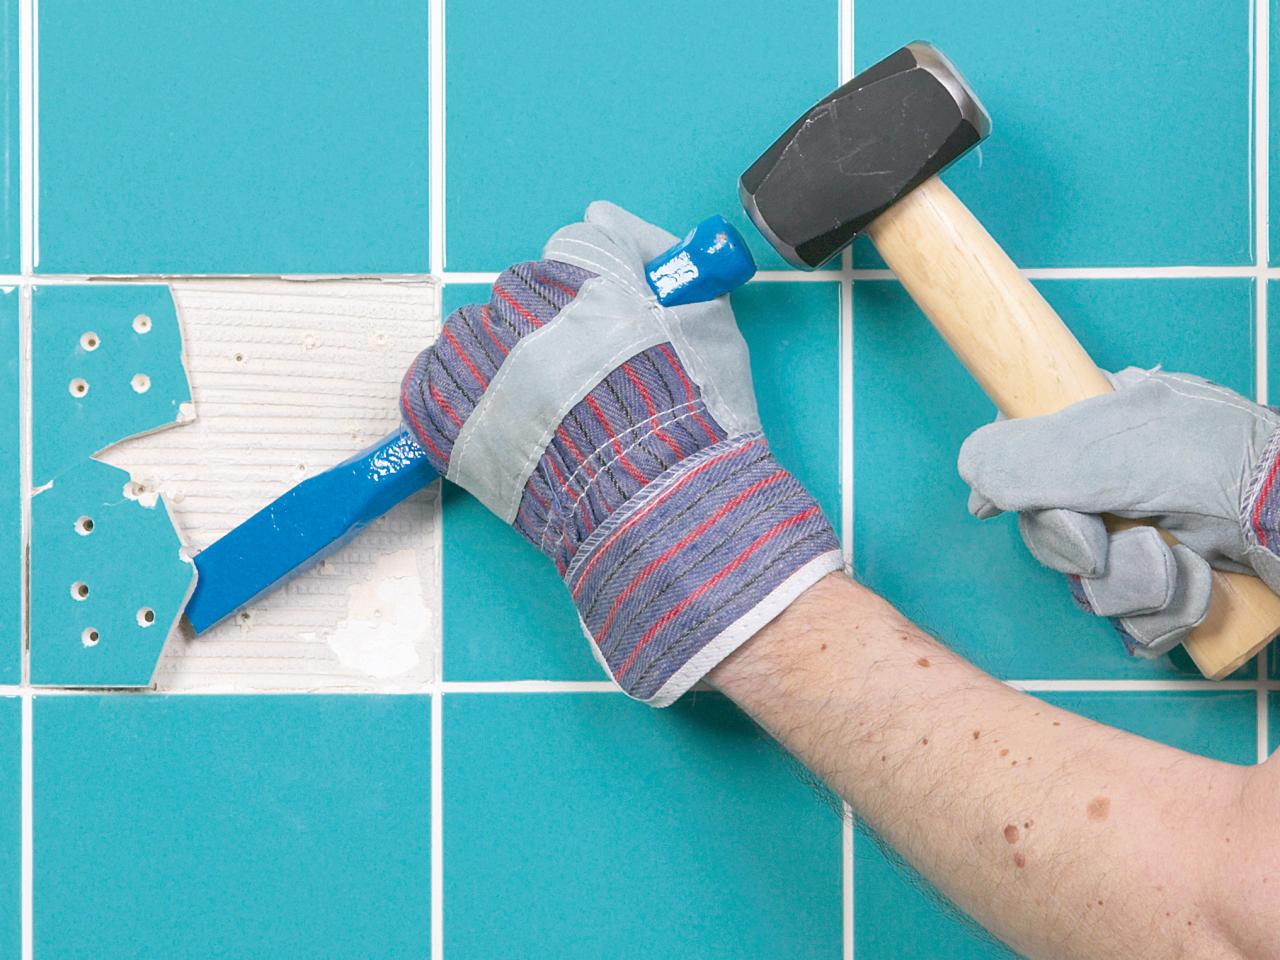
In order to remove old grout, there is a special tool called a “grout remover.” It can be used to remove grout mechanically. By itself, it is a blade with a comfortable handle, but as an alternative, you can use a regular knife.
The blade of a knife or embroiderer must be passed on both sides at an angle and straight. When doing this, you need to be careful not to chip the edges of the tiles. It is worth noting that this cannot be done quickly “by hand”, so you can use a drill with a thin drill bit or an electric chisel.
Important! If, in the process of removing the old grout, the tiles also begin to crumble, it is better to abandon the idea of laying another layer on top, even if there is new grout.
How to remove old grout from tile joints if it is silicone
Silicone grout also requires dismantling and replacement, especially if the room has not been provided with high-quality ventilation. Very often you have to deal with the fact that the seams are affected by mold, which is almost impossible to remove. Therefore, before laying new tiles over old tiles, you need to take care of the hygiene of the joints.

Removal silicone sealant carried out using a sharp knife or a special scraper. After this, additional cleaning is carried out using a vacuum cleaner.
Helpful advice! Exist special means, allowing you to remove silicone faster and with less effort. Such compositions are applied using mounting gun, after which you must wait at least 24 hours. Then the seams are wiped with a rag or paper.
Is it possible to lay tiles on tiles on the floor: features of the work
Floor coverings, unlike wall coverings, are not subject to gravity. Therefore, in a sense, installation is easier. But in this case, another difficulty arises - the new coating will regularly be subject to serious loads.
Before gluing tiles to the floor, you need to carry out an equally thorough check of each element of the lower layer. To do this, you can use the same hammer for tapping, but you can try another approach: an object with a flat base (a box works well), you need to smoothly drag it across the surface, carefully observing that not a single tile falls even a few millimeters. It can be difficult to do this in a small bathroom or toilet, but for larger rooms this is a very effective way.

In general, all the recommendations provided in the previous section are also relevant when working with floors. It is only advisable to give preference to mineral compositions. Thus, the surface will be provided with greater elasticity, which will allow it to withstand heavy loads and temperature changes.
Helpful advice! Before laying floor tiles over old ceramic coverings, you may not need to carry out such intensive preparatory work, as in the case of the wall surface. But it’s still worth moistening the base before you start applying glue, as this will have a positive effect on adhesion.
Is it possible to make a self-leveling floor on old tiles?
As a basis for a new coating, you can also use a self-leveling floor, which is installed directly on the surface of the old tile. As in all previous cases, mandatory procedure– thorough check of the quality of fastening of the lower layer. All loosely fitting elements must be dismantled.

It is worth paying attention to the fact that in cases where we are talking about working with a glossy surface, upper layer coverings are removed to ensure required level adhesion between the solution and the tile. Pouring and further work are produced according to a standard algorithm.
Helpful advice! Laying a new layer of tile does not require a thick layer of self-leveling floor. Its thickness should not exceed 5 mm. The main thing is to distribute the composition evenly over the entire surface.
Taking into account the opinion of experts, we can say that installing a self-leveling floor on top of tiles is possible only in extreme cases. In this case, the area of the room should be small, and the requirements for operational characteristics surfaces are minimal.
Is it possible to lay tiles on tiles outdoors?
A very interesting question that may arise is whether it is possible to lay a new layer paving slabs on top of the old one. Of course, such a procedure is often unjustified, but still, in some cases, this technology is resorted to in the process of arranging garden paths, terraces and summer areas.

As in the case of tiles laid on old flooring inside the house, the main criterion is the quality of fastening of the lower layer. You can check it using a pry bar or a strong knife. Using such tools, you should try to remove one of the elements.
Important! If the tile was able to be moved using a knife, but this required serious physical effort, then such a coating can be used as a base. If the tile comes off easily, this may later cause deformation of the top layer.
A new cushion is poured on top of the old layer of tiles, which should consist of three layers - loose soil, gravel, sand. In this case, compaction of each layer must be carried out separately. On top, according to standard technology, a new layer of paving slabs is laid.

Thus, the answer to the question of whether it is possible to lay tiles on tiles on the floor in the bathroom or even on the walls is rather in the affirmative. Of course, during the work process you will have to follow many rules and recommendations, and the end result can almost always be unpredictable, but in principle, this is quite possible.
During renovation work, we try to simplify some stages, and therefore we ask ourselves: is it possible to put new tiles on the floor and walls on top of the old ones? The approach is very non-standard, opinions vary. Let's try to understand this issue.
This method of installation is used extremely rarely
Feasibility of the operation
In addition to the possibility of gluing tiles onto old tiles, another question arises - why leave the finish from the previous renovation? There is a rational explanation:
- There is no need to dismantle the previous cladding, which is labor-intensive and sometimes costly.
- The amount of construction waste and dust is reduced.
- There is no need to level the surface, which reduces material consumption.
- Preparation time is reduced. This factor is relative, since, while saving on some operations, you have to perform other actions, sometimes no less labor-intensive.
Before acceptance final decision, consider the other side of the issue. If the cladding is laid on old tiles, then you will inevitably encounter the following problems:
- Hiding the area. The tiles and mortar already occupy a layer of several centimeters. Additional application of glue and tiles will further reduce the area of the room and raise the floor level.
- Defects in old masonry. It is important to check the previous finish for voids and loose parts. Otherwise, there is a risk that the new cladding will collapse along with them, since the coating will not withstand the additional load.
- Tile processing. Before installation, the old material is carefully processed. Such preparation will take no less effort and time than simple dismantling.

When tiling old tiles, many requirements must be met.
To summarize: in general, laying tiles on tiles is possible, it all depends on the specific situation. But if you are worried about at least one problematic point, it is better to abandon the idea.
Preparation
It is very important to properly treat the surface, since the strength of the future coating depends on its quality. To do this, a number of manipulations are carried out:
- Removing chips. It is advisable to check all old finishes for fragile areas and, if serious defects are identified, get rid of them in advance.
- Cleaning. A layer of grease and other dirt will inevitably accumulate on the surface of a wall or floor that has been in use for a long time. You definitely need to get rid of this, since laying tiles on a dirty surface simply won’t work. There should be absolutely nothing left that will reduce the quality of adhesion between the coating and the adhesive.
- Removing the glaze. The main problem is glossy surface. If you lay tile on top of tile with a smooth, shiny glaze, chances are the new finish will start to peel off immediately. To prevent this, the coating is cleaned. It is best to use a grinder with a sanding attachment. Be sure to wear glasses and a respirator as the glaze creates a lot of dust and small glass shards. If you do not have the above-mentioned tool, walk along the tiles sandpaper or make frequent notches. The last option is quite unsafe, as it violates the density of the previous masonry.
- Degreasing. Glue tiles only to a clean surface. Additionally, the ceramics are primed.

Stages of preparation for cladding
Glue selection
The quality of laying tiles on old tiles largely depends on the mortar used. In this case, it is important to ensure reliable contact between the materials. The adhesion of ceramics and glue is inferior to adhesion to concrete. Therefore, it is important to open the water-absorbing layer of the tiles by removing at least 60% of the old glaze. It is also recommended to use special concrete-contact primer mixtures intended for such work.

Reinforced highly elastic compounds
To reliably fix tiles on the walls, it is important to choose the right glue. For flooring It is also permissible to use conventional mixtures or cement-sand mortar. For walls, dense and at the same time elastic compositions are selected.
It is best to glue tiles using quick-drying solutions. Accelerated drying will prevent the finish from slipping, as it sets to the surface and increases density. Remember that if you glue the material to a layer that is too thick, the speed of setting of the glue decreases, and the risk of delamination of the masonry increases.
Rules for performing installation work
Be sure to use a stopper to prevent the cover from slipping. The tiles are laid in several stages. Don't glue too many rows at once, especially if we're talking about about dimensional products.
Let's look at how to properly stick tiles onto tiles:
- First, apply a small amount of glue to the old cladding.
- Then the mass is leveled with a notched trowel.
- Next, the tile is applied and pressed against the mortar.
- The position of the element is corrected and the width of the seam is set. Same with the next tile.
- After the initial drying of several rows, work on repairing the upper part of the wall continues.
- Having covered the entire area, wait until the solution dries well. It will take 1-2 days, if high humidity premises - increase the time to 4. Only after this, start grouting the joints and cleaning the coating.
As you can see, the principle of finishing such a base is no different from the usual technique. Is it possible to lay ceramic tiles over old ones? Yes, this option is possible, but only if all preparatory measures are followed. In general, it is better to turn to a more traditional method and not take risks.
Typically, renovations in a room involve dismantling the previous finish, after which everything is done anew. But there are exceptions when “cosmetics” are produced, designed to update one of the interior elements. Cosmetic measures include laying tiles over old tiles on the floor if the condition of the previous floor cladding allows for half-measures.
Benefits of cosmetic floor covering with ceramics

Ideally, ceramic floor tiles (tiles or porcelain stoneware) are laid on a solid monolithic base, which is usually cement-sand or concrete screed. If, for example, there is already lining in the bathroom, toilet or kitchen, but it is damaged or lost appearance, there is a desire to update it by laying ceramic coating on top of old tiles. At the same time, avoiding such labor-intensive processes:
- dismantling of the old coating, accompanied by the formation large quantity construction waste, dust;
- eating with the risk of damage to plumbing equipment (bathtub, toilet, hydrobox, etc.);
- disconnection of water and sewer lines, their revision, replacement of some parts;
- repair old screed or refilling the base, which is inevitable after dismantling the floor cladding;
- physical and financial costs associated with the removal of construction waste;
- the possibility of damage to the wall decoration when dismantling the floor, which will also entail costs for its restoration.
In a word, completely replacing floor tiles entails a lot of hassle, expense and headaches, so the desire to make a new cladding over the old one is understandable. But is it always possible to move away from generally accepted technology and re-tile the floor over used ceramics?
When should you not lay floor tiles over old ones?

The condition of worn-out floor coverings varies, from tightly held, securely glued tiles, which are difficult to remove even with a hammer drill, to “walking” tiles that fly off without significant effort. If the second option occurs, it is better to abandon the idea of laying new tiles over the old coating immediately. Moreover, if the used cladding peels off on its own, there will be no difficulties in dismantling it. When the coating is strong, no significant voids are revealed when tapped, the tiles do not flake off or fall off on their own, there is a chance that a new cladding over the old tiles is possible.
In addition to the strength of the used cladding, it is important to determine the degree of curvature of the surface. Even on a monolithic base, it is not recommended to lay ceramics on an adhesive layer exceeding 15 mm.
If the curvature of the old tile is significant, there are two ways to solve the problem:
- remove the lining and fill smooth screed(repair or fill from scratch);
- Use self-leveling solutions after proper surface preparation.
You need to be prepared that the cosmetically tiled floor will become higher from 1.5 to 3-4 cm. If you are not happy with this state of affairs, you will still have to start dismantling, not only the lining, but also the screed.
If the floor tiles are too old (have not been changed for 20 years or more), covered with a web of cracks and severe organic contamination, such coating must be dismantled without any reservations.
Previously, the cladding was laid on a regular cement mortar, which is significantly inferior in strength and degree of adhesion to currently used tile adhesives. With a significantly increased load after laying another layer of tiles and mounting mortar, a conventional cement binder may well become untenable in terms of strength. Dismantling will also have to be done if fungal growth is found on the tiled floor - it will not be possible to completely remove the microflora, especially in the tile joints, by any means.
Another factor that determines whether to completely replace the cladding or be content with half measures is the condition of the plumbing and communications. If plumbing fixtures, water and sewer pipes are obsolete and require replacement, it is better to do major renovation in the bathroom or toilet, which provides complete dismantling ceramic floor finishing.
In the situations described, it is better to abandon the idea of tiling with tiles or porcelain stoneware over old tiles on the floor in the bathroom or any other room. A cosmetic option for finishing the floor is possible only with a strong and even previous cladding, and then only after proper and thorough preparation.
Preparing the surface of old tiles for cladding
If the strength of the used ceramic floor covering is beyond doubt, it can be re-covered with a similar material. But before finishing with new tiles, it is necessary to carry out some preparatory procedures to make the surface suitable for gluing ceramic tiles. In order for the adhesion of the tile adhesive to be sufficient for strong adhesion to the base, the latter must meet the following requirements:
- roughness;
- porosity;
- moderate ability to absorb moisture.
If the old ceramic coating is covered with a glassy glaze or polished, the adhesion of the adhesive to such a surface will be minimal. Glue will not stick much better to porcelain stoneware that does not absorb moisture well. To improve the properties of the mounting surface, carry out the following preparatory activities.
- First of all The tiled surface should be thoroughly cleaned to remove grease and oil stains. Alkaline agents are used for this. household chemicals solution baking soda or laundry soap.
- The next step is to remove the fugue from the tile joints. Fungus often grows in the grout; dirt and grease deposits collect in places where the suture material has crumbled.
- If the used tile is covered with glaze, it should be removed. For this, a grinder with a coarse grinding attachment is used. The purpose of the operation is to remove the hydrophobic glassy layer and open ceramic pores that can absorb moisture.
- Increase the adhesion of tile adhesive Multiple notches on the ceramic surface will help with old cladding. Making cuts easier and faster with a hammer drill. If you do not have this power tool, you will have to spend a little more time and effort using a chisel and hammer.
- Finishing touch in preparing the surface of old tiles for cladding - treatment with a priming solution. For these purposes, it is better to use a primer from the “concrete contact” category, which is produced by most leading brands specializing in the production of building materials. For example, the well-known Ceresit offers a product labeled ST-19. This type of primer is saturated quartz sand, which makes the surface as rough as possible. You can make a similar mixture yourself using a regular acrylic primer by adding fine sand to the liquid.
There are situations when, against the backdrop of a good overall surface, one or more tiles turn out to be cracked or not held firmly enough. In this case, it is more advisable to remove them so as not to jeopardize the strength of the newly installed cladding. Unreliable elements of used cladding must be carefully destroyed and removed so as not to damage adjacent tiles. The resulting nests are leveled flush with the general tile surface, filling the recess with tile adhesive or ordinary cement-sand mortar. It is not recommended to use gypsum-based mixtures for such purposes - they are not moisture-resistant and the strength of such solutions does not correspond to the loads on the floor surface.
When it is necessary to restore the tile cladding on the floor by replacing the damaged element. There is no need to try to remove the destroyed tile entirely or in large fragments - it is much more convenient and faster to split it into small pieces and dismantle the individual fragments.
If there are no contraindications to installing floor cladding over old tiles, and the disadvantages of this method do not cause concern, you can begin directly laying porcelain stoneware or tiles on the floor.
Laying ceramic tiles over floor cladding

Laying a floor over existing tiles is not fundamentally different from a similar process carried out over a more suitable cement base.
The difference is in surface preparation and taking into account some specific nuances, such as:
- It is desirable that the newly laid tile be larger than its predecessor - this way the created lining will be insured against destruction in the event of possible detachment of more than small element in the subject ceramic finishing;
- the layout of new tiles is calculated in such a way as to minimize the likelihood of old and new tile seams matching - it is necessary to ensure that the new cladding binds the worn-out ceramic elements as much as possible;
- It would be better to lay the new cladding using specialized adhesive (for installing tiles on tiles).
According to technology, ceramic cladding must be laid at a base temperature of at least 5 degrees. At the same temperature, primer mixtures and grout for joints begin to work effectively. Installation of tiles begins after the primer or self-leveling solutions (if any were used) have completely dried.
The first step before laying tiles with adhesive should be the “dry” layout of the facing elements, when the tiles are laid out on the surface in the desired location. This move makes it possible to calculate the correct direction of the tile rows and symmetry relative to opposite walls. Direct laying of ceramic tiles differs little from the process when installing on a concrete base and is carried out in the following sequence.
Also, during the renovation process, you may need to choose an invisible hatch for the tile.
- Preparing tile adhesive by mixing the dry mixture with water in the proportions recommended by the manufacturer. To prepare the solution we use a construction mixer.
- We begin installation from the floor area at the wall farthest from the entrance or from the middle of the surface (depending on the chosen layout of the facing elements).
- Apply the solution to mounting surface and level it with a notched trowel, after which we place the tiles in the glue and lightly press them under control of the level and direction.
- The next floor covering element install in the same way next to the previous tile, install in accordance with with total area finishing. We separate adjacent facing elements with spacer crosses of a certain caliber (2-5 mm).
- Near walls adjacent to the floor We cut the tiles to fragments of the required size using a tile cutter or grinder equipped with a diamond blade.
- Upon completion of installation new ceramic cladding over the entire area, let the glue set for about a day, after which we do the grouting, filling the tile joints with a special polymer cement grout.
A material for interior decoration, the demand for which there is no doubt, is decorative tiles made from ceramic materials. With its help, the design of a bathroom, kitchen, or hallway will be not only practical, but also beautiful.
Laying high-quality tile floors is not an easy task, the implementation of which requires special training, experience and certain knowledge. In order for the work to turn out neat and aesthetically pleasing, you need to act carefully and carefully. You also need to know whether it is possible to lay tiles on tiles. A positive answer will reduce repair time and costs.
Often during repairs a situation arises when there is a clear need to replace old material, but removing it is quite difficult. The inability to remove dust and debris and lack of time stop the owner and force him to postpone repairs. In this case, it is quite appropriate to lay tile on tile.
Possibility of use
Dismantling the old coating takes a lot of effort and time, so the question of laying new material directly on the old one arises quite often.

Removing tiles is a rather labor-intensive process
This is possible if the situation is as follows:
- the old coating has no defects, its condition is close to ideal - the tiles lie tightly, the grout does not crumble;
- the process of removing the coating may cause irreparable damage to the premises or part of it;
- dismantling is hampered by installed plumbing equipment;
- with complete removal of previous finishing materials there will be a significant drop in floor level.
Coating entails re-pouring the floors and covering the walls liquid waterproofing. The time spent on repairs will increase, and the cost estimate will become significantly higher. To avoid this, you can put ceramic tiles on old tiles, but only if the outdated coating is in good condition and can withstand the load.
Substrate quality
If the old coating is wobbly and the grout material falls out of the seams, laying a new one without removing the previous one is impossible.
Unreliability of the base will cause carelessness in laying the new coating. To understand whether it is possible to put new ceramic tiles on old ceramic tiles, it is better to carry out an audit.
The steps should be as follows:
- Careful inspection of the surface of the walls and floor.
- It is necessary to show maximum attention, pay attention to every crack and other defects.
- A thorough inspection of the seams between the tiles and their condition is also important.
- Tapping the surface with a hammer.
If the sound changes from dull to voiced, this is a direct indication of tile delamination. Laying new tiles without removing the old ones is strictly not recommended.
Using a building level, check the spatial arrangement of walls and floors. In case of severe deviations, the previous coating must be removed and then the coating must be leveled with a special compound. This is difficult to do with tile adhesive.
If upon inspection of the surface no defects are revealed that do not allow gluing, you can begin work, but first the ceramic tiles must be prepared.
Lay new tile on top of old one
Surface preparation
The technology used to lay new tiles over old ones is somewhat different from traditional ones. The difference is that the tile covering on which the adhesive is applied must be rough. To achieve this effect, you can use the following methods:
- Removing the top glossy layer. If it is absent, nothing will interfere with the clutch.
- If it is difficult to completely remove the glazed coating, you can apply notches to the previously laid tiles.
- In some cases the best option is to apply a good primer to the surface of the old coating.

Applying a primer over the tiles will help make the job better.
All options are not high-tech processes. Anyone can do all this. If the first two methods are not suitable due to a large amount of dust during work, the third method is perfect.
It, unlike the first two, will require certain investments, since a good primer composition is not cheap. In any case, such surface preparation will improve the adhesion of already laid tiles to the new surface.
How to put it correctly
There are some technological requirements for the tile laying process.
Treatment of chipped and damaged areas. It is ideal if cement-sand mortar or tile adhesive is used for such treatment. After the solution has completely dried, you can move on.
Complete cleaning of the surface from contaminants in the form of adhesive residues. First you need to clean them, then thoroughly wipe the surface.
Application of concrete-contact primer.

A roller or regular brush works well for this. Drying time – up to 4 hours. To process bathroom tiles correctly, you need to carefully read the instructions.
If a mechanical method is chosen to enhance adhesion, it is necessary to make notches using a grinder or remove the top layer of coating. The body and face must be carefully protected so that parts of the tile do not get into the face.
After all the preparatory activities are left behind, new tiles are laid. Further installation steps are carried out according to traditional scheme. It is important to remember that when installing this way, the adhesive will take longer to dry, so finishing stitches will become possible no earlier than after 3 or 4 days.
When not to put
There are cases when laying tiles on top of old ones is not recommended.
The presence of a ringing hollow sound when tapping the tiles. Even if no damage is found on the surface of the tile, it is better not to install it. Air gaps under the tile will prevent the two layers of coating from holding together, and the tile will simply fall off after a certain time.
Small room dimensions or uneven surface.

In case of a small room area, it is necessary to remove the tiles, since the second layer will lead to an even greater reduction in area
In both cases, installing without removing old material will help reduce space in a room that is already small.
If the old coating was laid out a very long time ago. Minor damage that is not visible to the eye will lead to the destruction of the new tile.
Availability sewer pipes under old tiles. If there are no special hatches, the old tiles must be removed and the layout of the room being finished must be reconsidered.
If the floor level changes significantly, it is also advisable to completely remove the coating. New tiles are laid after leveling the surface. If all the rules are followed, the new coating will delight the owners of the premises for a long time.