Beds for the lazy: photos and recommendations for creating a vegetable garden. Beds for the lazy: photos and recommendations for creating a vegetable garden Beds made of different materials
Traditional cultivation of the land requires a lot of time and physical effort, and the harvest does not always correspond to expectations. That is why more and more gardeners are setting up high beds on their plots, allowing them to special effort get an excellent harvest of vegetables every year. Anyone can make raised beds with their own hands, because this does not require special skills or special equipment.
Benefits of raised beds
Compared to conventional beds, bulk beds have many more advantages:
- a vegetable garden can be planted even in an area completely unsuitable for farming;
- Digging and weeding of the garden are replaced by light loosening of the soil;
- in a limited space it is easier to remove weeds;
- the high bed is easy to install and just as easy to disassemble;
- You can lay out paths between the beds and walk along them in any weather;
- plants ripen faster, which is especially important for cold regions;
- when arranging a high bed, good drainage is ensured;
- crops in the beds can be easily protected from frost by covering them with tarpaulin or agrofibre.
In addition, a vegetable garden made from raised beds can be very decorative, so you can plant it next to your house.

Fencing materials
A high bed is a frame of certain dimensions, inner space which is filled with soil, compost and fertilizers. Most often, the frame is made of a rectangular shape, and it is assembled from boards, slate, branches, plastic and other materials.
Wood is the most affordable, easy to install and environmentally friendly material. To assemble the beds, boards, timber, and small logs are used. Disadvantages: wood requires wood, quickly darkens and loses its attractiveness, and is short-lived.

Vine and twigs - inexpensive and original solution. Wicker walls look very attractive; you can give the bed any shape. Disadvantages: weaving vines requires skills; the service life of such a frame is very short.
Stone and brick are an option for areas with classical architecture. Very reliable and durable material, gives the beds decorative look. Disadvantages: high cost, it will take more time to create a bed, difficult to dismantle.

Plastic is an excellent alternative to wood. Sheet plastic is easy to assemble and disassemble, it is quite durable, has an attractive appearance, is very durable and relatively inexpensive. Flaws: individual species plastic contains harmful substances, so they are not suitable for the garden. Ecologically safe material has a corresponding certificate, which must be presented upon purchase.

Metal is a convenient and durable material, ideal for shaped beds. If necessary, moving the metal frame will not be difficult, as will dismantling it. The appearance of the metal walls is neat; they can be painted in any color or decorated with ornaments. Disadvantages: welding skills are required to assemble a metal curb, the price of sheet metal is quite high, and high-quality surface treatment is required to protect against corrosion.

– an excellent solution for multi-tiered beds or arranging a vegetable garden on a slope. The walls can be made monolithic or assembled from separate ones. The concrete surface is easy to decorate, it is extremely strong, durable, and has a neat appearance. Disadvantages: lengthy installation process, high cost of materials, Additional requirements to the installation of a drainage system.
Decorating beds with slate is a completely budget-friendly and simple option. The walls can be installed very quickly, this material lasts a long time, and for decorative purposes the slate can be painted in any color. The main disadvantage is the fragility of the material, so it should be handled with care during installation.


Each gardener selects the size and shape of the bulk bed at his own discretion. And yet, there are optimal parameters under which the bed will be most effective:
- height from the ground 15-50 cm;
- width 90-120 cm;

If the bed is placed on fertile soil, it is made 15-20 cm high. This is quite enough for a good harvest. If the soil on the site is not suitable for farming, the bed is raised to 30 cm. Compost beds are made even higher - up to 0.5 m. Sometimes the walls are raised very high, which allows you not to bend over while cultivating the soil and planting plants, but this increases material consumption and requires more time to arrange a garden. In addition, with a large frame width, it is inconvenient to cultivate the soil at such a height.

The width of the bed should be sufficient for two rows of plants. With this planting, all plants will receive the same amount of air and sunlight, which has a very positive effect on yield. More rows result in the average plants receiving less air, being shaded, stretched upward, and yields falling. Cultivate the bed standard width is also much easier than being too wide.
The length of the bulk bed does not play a special role, therefore it is limited only by the size of the plot. The most common option is beds with a length of 1.5 to 3 m; They are compact and look neat in the garden.
Proper arrangement of high beds
For example, a bed with a fence made of boards is taken; This option is the most convenient and inexpensive.
During the work you will need:
- bayonet shovel;
- roulette;
- drill or screwdriver;
- building level;
- circular saw or jigsaw;
- self-tapping screws;
- boards 50x200 mm;
- timber 50x50 mm;
- primer;
- construction mesh.
Step 1. Wood processing

The boards are cut to fit the frame and then covered on all sides. antiseptic impregnation. You can use used oil for these purposes, and to prevent harmful substances from penetrating into the soil, after treatment it is recommended to cover the tree with film on one side. The lower edges of the boards, which will be in contact with the ground, are treated especially carefully. The timber is sawn into pieces 50 cm long and also impregnated with a protective agent. After this, the building material is laid out to dry.

Step 2. Site preparation
The area for the garden bed should be illuminated by the sun for at least 5 hours a day. They mark the boundaries of the bed, remove stones and branches, and dig up perennial plants. If desired, you can dig up the soil together with fine grass - this will increase the permeability of the soil. If the soil is very dense and trampled, it is enough to remove the layer of turf around the perimeter of the marking to a small depth to make it easier to position the frame.
Step 3. Assembling the frame for the bed


The dried boards are knocked down in pairs into panels and connected to each other using bars. The height of the shields is equal to the height of the bed, the long sides of the frame are additionally reinforced with transverse bars in the center. Since the length of the bars is greater than the height of the walls, they should protrude 10 cm above the frame. These will be the legs of the frame. To improve the appearance of the structure, boards laid flat, the edges of which are cut at an angle of 45 degrees, are placed around the perimeter of the frame. Finally, the frame can be painted on the outside.

Step 4. Installation of the structure

The finished frame is transferred to the installation site; align the structure according to the markings, make recesses for the legs, check the location of the bed using a building level. If necessary, place pegs or, conversely, remove excess soil. The structure should be as level as possible, with all corners at the same level. Finally, add soil around the perimeter of the walls and compact it so that there are no gaps left.
Step 5. Filling the bed
First the bottom is closed construction mesh and nail it along the edges to the walls of the frame. The mesh will protect the structure from the penetration of moles and mice. Then geotextiles are laid, which will not allow weeds to grow. Next, the beds are filled in layers:
- small branches, bark, large shavings, leaves;
- bird droppings, rotted manure or;
- fallen leaves, branches, bark, grass;
- mineral fertilizer;
- fertile land.

The thickness of each layer is 10 cm. There is no need to mix the layers, but it is necessary to level and compact well. If the soil on the site is not very good good quality, it is better to use purchased soil. After filling, the bed is well watered and left for a couple of days. During this time, the layers will settle a little and become denser. It is recommended to cover the frame with black agrofibre, which provides better soil heating and prevents weeds from germinating.

It is recommended to make high beds in the fall or at the end of summer, so that the layers are well rotted and the roots of the plants get the maximum useful substances. If the beds are installed in the spring, it is necessary to fill them at least a month before planting and pour plenty of water several times to compact them. It is easy to turn such a structure into a greenhouse: to do this, plastic or metal arcs are installed above the frame, the ends of which are secured to the walls with bolts. A polyethylene film or special agrofibre is attached to the arches on top.

Prices for various types of construction boards
Construction boards
Construction of beds made of slate
To create bulk beds, you can use both flat and wavy slate. The technology for installing beds using this method is very simple and anyone can do it.

Table. Wave slate

To work you will need:
- slate sheets;
- Bulgarian;
- bayonet shovel;
- a piece of chalk or pencil;
- roulette;
- level;
- rubber hammer;
- drill;
- wooden pegs or metal rods.
Step 1. Marking
In the selected area, the boundaries of the beds are marked and beacons are installed. Narrow grooves are dug along the perimeter to the depth of a bayonet. If the soil is good, then remove the entire fertile layer inside the marking, pouring it near the future beds.
Step 2. Preparing the material


Sheets of slate are laid on a flat surface, the required length is measured and a chalk line is drawn across the waves. After this, the slate is cut along the lines using a grinder. The pegs are soaked bitumen mastic or waste oil, and if scraps of metal rods are used as racks, they are treated with anti-corrosion compounds.
Step 3. Installing the frame

The first sheet of slate is installed vertically in the groove from the corner of the marking. Next, place the next sheet with an overlap in one wave, level it, and beat it on top with a rubber hammer so that both sheets are at the same height. Check the location of the upper edge of the slate with a building level; if necessary, add or remove soil from below. The walls are reinforced with metal rods or pegs, which are driven in on both sides to a depth of 0.5 m. So, all the sheets of the frame are placed one by one, the trench is filled up and the horizontal level is checked again. After this, the soil near the walls is compacted and the excess is removed.
Step 4. Filling the bed

At the very bottom you can put old newspapers, cardboard, pieces of wallpaper, the next layer is chopped brushwood, tree bark, sawdust. After this, small shavings are poured in, plant waste, peat or compost are laid. And all this is sprinkled on top with the soil that was taken out at the very beginning. Apply plenty of water to the bed to wet all layers and leave for several days. When the bed is compacted, you can begin planting.
Garden bed care
When the plants sprout, the plantings should be well watered and mulched. Weeds that break through the mulch layer are immediately removed. After harvesting, the surface is loosened and sown with green manure. Before the onset of cold weather, all vegetation is mowed down, leveled on the bed, covered with a layer of earth on top and covered with black film for the winter. Periodically it is necessary to inspect the walls of the frame, replace or repair individual sections.
The soil between the beds is most often covered with small crushed stone, gravel, straw, and sometimes seeded lawn grass. In such conditions, the garden always remains well-groomed, weeds do not grow, and dirt does not stick to shoes. If desired, you can use tiles and bricks, or pour concrete.
Video - DIY raised beds
Video - Raised beds made of slate
Modern man needs a dacha not only to satisfy the instinct of a peasant and provide his family with vegetables and fruits, but also as a place to relax from city problems and bustle. And no one doubts that it is always more pleasant to relax in a conveniently equipped beautiful area. The topic of our article is “smart” beds from the point of view of organic farming.
The main goal of organic farming is to maintain and increase soil fertility. And the technology for constructing “smart” beds will help us learn how to properly plan and decorate personal plot.
Organic farming beds can look different, but the basic principle behind their formation is to make the most of small areas.

“Smart” paths should have a width of at least 40 centimeters - so it will be convenient to walk on them, carry a wheelbarrow, carry water, and so on. The most inconvenient thing in the garden is right angles. Therefore, when laying “smart” beds and “smart” paths, you will have a wide field for experimentation and creativity. You can arrange oblique, triangular, radial beds, in this case everything depends on the ease of use and maintenance.
“Smart” beds can be raised above the ground or deepened into it, they can be “edged” and filled with humus. The height of raised beds ranges from 20 to 80 centimeters, and the width can be different, it all depends on what is planned to be grown in such a bed.

Organic farming is constantly evolving. Practicing gardeners from year to year improve methods of creating “smart” beds, come up with various shapes and configurations. The main thing here is to understand the basic principles, understand the essence of the process, and then everything will depend only on your desire and capabilities.
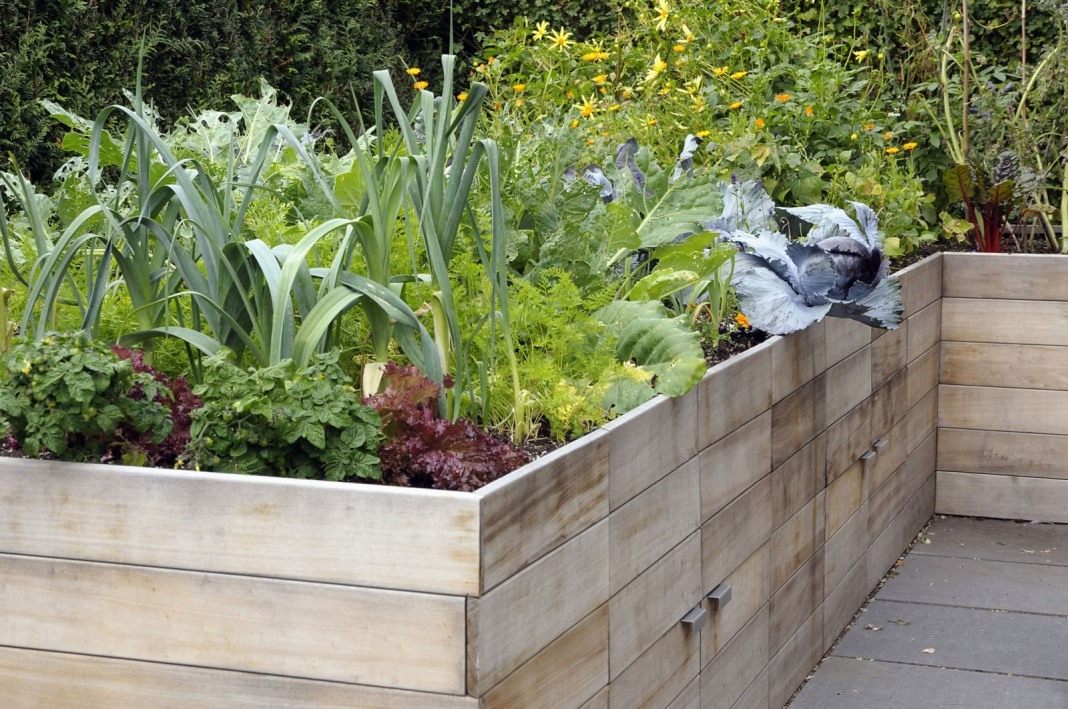
Raised container beds
A vegetable container is a type of raised bed that is used in organic farming. The width of this structure is usually about a meter, any length, and height - from 30-40 cm to 70-80 cm. Such beds are convenient to organize directly on the lawn, and decorated with tiled masonry, they will give your garden a unique design - sort of flower beds for vegetables . In the center of the bed you can install a trellis for climbing crops. Ideally, such a “flowerbed” should be covered with a transparent roof, this will protect the vegetables from various diseases.

Thin materials (plywood, slate, thin boards, and especially iron) are not suitable for the walls of a vegetable container, since such a bed will become very hot in hot weather. But you can’t set it up in the shade - there won’t be a good harvest. In this case, the frame needs to be completely rebuilt, because it can be damaged strong winds, and the weight of plants during the fruiting period is not small (50 kg per linear meter). It is best to use timber or logs, brick or wild stone.
The lined vegetable container is filled in layers only with organic matter. At the very bottom you can put rotten large tree branches, shavings, and wood chips. Next, coarse, unrotted organic matter is placed, which is watered with bacterial fertilizers to speed up maturation. We will talk to you in more detail about these fertilizers in the following articles. Unrotted organic matter is sprinkled with humus and soil. Next, the bed is filled to the very top with a layer of ready-made compost. It is important that this layer is at least 15-20 cm. Do not mix sand or soil with the finished compost, as this will compact it and settle. There is no need to loosen such a bed; in the spring you just need to add a layer of ready-made humus on top, and when the planted plants grow up, the soil needs to be mulched with straw or other suitable materials.

Watering the vegetable container is best done internally. To do this, when laying a bed, you need to evenly dig in several containers with holes (pipes or plastic bottles), which should be filled with water as needed. Under the humus, you can also bury holey hoses wrapped in nylon stockings or other synthetics that allow water to pass through. The end of the hose is brought out and connected to a water source. The main thing is not to forget to turn off the water after 15-20 minutes so as not to over-wet the bed.
It is best to make a vegetable container with a roof made of transparent materials (polyethylene film, cellular polycarbonate). This, of course, slightly increases the cost of the structure, however, the roof reliably protects the plants from diseases. There is practically no dew under it, which provokes the appearance and development of late blight, downy mildew and other dangerous diseases.

The vegetable container is raised quite high above ground level, so the soil in it warms up and ripens earlier. Any heat-loving crops can be sown in such a bed earlier than usual. If you correctly calculate the time and location of the plants, then here you can first harvest radishes and watercress, then build a trellis in the middle for tomatoes or cucumbers, and plant beets, onions or carrots in place of the radishes. After collecting root vegetables in the fall, you can again sow radishes and lettuce in a vegetable container.
As you can see, the vegetable container is convenient and beautiful. Such a bed saves space in the garden and allows you to harvest various crops within one season. A large volume of nutritious compost allows you to minimize watering, fertilizing, weeding and loosening. There are a lot of advantages, however, there are also disadvantages.

A vegetable container needs to be built, and for this you need to find strength, time and money. Such a bed requires a lot of organic matter, which also needs to be taken somewhere and ensure that it is of good quality. These three noticeable shortcomings determine the fact that vegetable containers are rarely found in personal plots.
Experienced gardeners, taking the arrangement of a container bed as a basis, came up with simpler and cheaper options, but no less effective and convenient. For example, some crops can be grown directly on a compost heap. To do this, an additional compartment is attached to the place where the compost ripens. In the spring, half-finished humus that has lain under the film all winter is thrown into this compartment. You can plant zucchini, cucumbers, pumpkins and tomatoes in such a bed.
Box beds
Raised bed boxes are very popular among followers of organic farming due to their ease of arrangement and high efficiency of use.
A box is a stationary bed, the sides of which can be made from available material. In this case, any boards, slate, plywood, etc. will do. The height of such a bed is usually 15-20 centimeters, the width is 1-1.2 m, and the length can be adjusted at your discretion. The box bed is filled with organic matter: a layer of half-ripe manure or compost is poured on the bottom, and ready-made high-quality humus is placed on top, in a layer of at least 6-7 cm.

If the box is wide, then the rows can be located both lengthwise and crosswise. In order for the plants to receive more sunlight, the rows in such a bed should be placed in the north-south direction.
In the middle of the box bed they make a trellis for climbing crops; such a bed can be covered with a roof. That is, simply put, a box is a low container. And its main advantage in this case is that you don’t need a lot of organic matter to fill the bed. However, a thin layer of compost quickly loses nutrients and moisture, and in hot weather such a bed needs to be watered more often. This can be done using a hose or buckets made of large capacity. To retain moisture, you will need a fairly thick layer of mulch. To feed crops growing in a box, it is recommended to use various organic fertilizers, which will be discussed in detail in the following articles.

If the soil on the site is good, then loosening the box is not necessary. The earth will loosen under it on its own to a fairly large depth (in the first year already about twenty centimeters). As we already found out in the article “Stop destroying the soil by digging and weeding”, the soil inhabitants will take up the work of structuring and loosening - earthworms and bacteria. Next spring you will just need to pour several wheelbarrows of ready-made compost onto the garden bed and plant vegetables directly in it. If the organic matter is of good quality, then there will be few weeds, and those that appear are removed quite easily.

With help simple frame or wire arches, a box bed can be quickly turned into a greenhouse, in which it is convenient to grow seedlings of various crops in the spring.
When using this type of “smart” beds, the main thing is to fertilize them correctly and water them in a timely manner. Then in boxes, as in a vegetable container, you can grow three or four crops of different vegetables per season.
Deep trench beds
As you have already noticed, our list of “smart” beds is built according to the principle - from expensive and productive to cheap, but no less effective in use. Practicing farmers on their plots combine the advantages of all types of beds, reduce the cost of planting them and adapt them to the conditions of a particular plot.
If the groundwater in the area is low enough and it is never flooded, a narrow compost bin can be deepened into the ground. Thus, a kind of garden trench is obtained.

The main advantage of deep beds is that they can be dug directly in virgin soil. To do this, a trench is dug in the turf, two spade bayonets wide and a bayonet deep. The length, as in previous cases (vegetable containers, box beds), depends on your desires and capabilities. Even board sides are not needed here. Half-ripe manure is placed directly at the bottom of the trench, and on top is a layer of finished compost, at least 6-7 centimeters high.

In such beds you can plant tomatoes, cucumbers, peppers, cabbage, beans... After the plants have started to grow, the trench must be mulched with any available material. We will discuss in detail what materials can be used as mulch in the following articles.
In the future, all care will consist of timely watering as needed. And you will also have to mow the grass between the rows with a sickle a couple of times a season. To avoid this, you can cover the row spacing with burlap and cover it with gravel - it’s beautiful and the weeds don’t grow.

The main advantage of deep trenches is that they retain moisture remarkably well, and plants grow well here, even with moderate watering. And the main drawback is that there is certainly no escape from the classic gardener’s posture when caring for such a bed.
Basics of a decorative vegetable garden
As already noted, a dacha is needed to modern man not only to grow vegetables and fruits. Most people use their vegetable gardens as a place for the whole family to relax. Let's figure out how to decorate your garden plot without spending a lot of space, effort and time.
Structures such as gazebos, fences, and southern walls can be used to create garden beds. If the fence is made of mesh, then it itself will be an excellent trellis for tall climbing crops. You just need to dig a trench nearby and fill it with organic matter. This bed is ideal for growing cucumbers and beans. The advantages are obvious - you don’t need to build a trellis, and it doesn’t take up space, but flowering plants, with skillful care, are also a wonderful decor.

In the same way, you can surround the gazebo with a trench. You can plant in this bed different kinds decorative pumpkins and beans blooming with red, white, and even purple flowers (hyacinth beans). A gazebo decorated in this way will become the highlight of your dacha and a favorite place for family gatherings. It should be noted that it is not recommended to plant a gazebo with cucumbers; sometimes they get sick and lose their decorative properties.

The southern and eastern walls of various country houses are able to warm up well during the day and give the plants reflected light and heat, which helps accelerate growth and development heat-loving crops. Such walls can provide an excellent support for cherry tomatoes, and underneath you can plant attractive cabbage varieties such as kohlrabi and broccoli.
In order to give your garden plot a well-groomed appearance, all free spaces between the “smart” beds need to be mowed regularly - this will turn the weeds into a mixed-grass lawn.
We are mastering virgin soil
You are the proud owner summer cottage plot. But here’s the thing: the land on it has never been cultivated or has been cultivated for a long time, and you don’t see any possibility of growing a crop in the first year, since developing virgin soil is an unusually labor-intensive task. Do not despair, on the contrary, you are lucky - you have received a plot of living soil and, with a skillful approach and proper cultivation, you will be able to maintain its fertility for many years. What should you do to be able to grow your own crops this season?

Experienced gardeners, in the process of studying and understanding the principles and techniques of organic farming, came up with several ways to use virgin soil for garden beds in the first year. We have already talked about deep trench beds.

Using the principle of deep beds, you can arrange a place for growing various melons and melons. You don't even need to dig trenches for this. To create such a bed right in the turf, it is enough to dig a hole about a meter in diameter and two bayonets deep. We fill the hole as usual - half-ripe manure will go to the bottom, which can be mixed with coarse, unripe organic matter. On top, in a layer 6-7 centimeters thick, pour fully ripened humus. Pumpkins, cucumbers, zucchini, melons and watermelons grow well in such pits.
All subsequent care for such a bed will consist only of timely watering. In order to prevent weeds from growing here, the virgin soil around it needs to be covered with burlap or some other material (cardboard, old rugs, etc.), and covered with organic mulch (straw, sawdust) on top. Under such a carpet the weeds will die, and next spring All you have to do is loosen the soil with a flat cutter.
Another great way to simply and effectively treat turf is a special mulch for developing virgin soil and controlling weeds. This technique is considered one of the smartest techniques used for many years by permaculture gardeners and organic farmers. Its essence is as follows.

At the beginning of May, fresh weeds filled with juice are trampled down - this is wonderful food for soil organisms. A layer of unripe humus mixed with manure and a small amount of compost are scattered over the weeds. To speed up the process, all this can be treated on top with special bacterial fertilizers. Newspapers and magazines are placed on humus with manure in 2-3 layers; you can use packaging cardboard for these purposes. A layer of nutritious organic matter, 10-15 cm thick, is poured directly onto the paper (this can be unripe manure and unripe humus). On top of this entire “pie” is covered with straw, leaves or hay. With this covering, paper or cardboard cuts off weeds, and a layer of organic matter retains moisture well and provides nutrition.
Of course, you cannot sow seeds in this bed in the first year - so seedlings of large plants (tomatoes, peppers, eggplants, as well as various melons) are planted here. They plant in a certain way - they dig up a little straw and manure and pierce a layer of paper with a shovel, and the roots themselves will find their way down. Then water and again bury with a layer of mulch. If it rains relatively often, then there is practically no need to water such a bed.

Next year, this whole “pie” will settle and turn into high-quality compost, the soil below will loosen, and the happy gardener will have a new, fertile and weed-free bed. All that remains is to add humus every year - and you can sow whatever your heart desires.
So, let’s summarize our conversation about planting organic beds. What is needed to plan and organize a comfortable and beautiful garden plot for a long time and without significant time and financial costs? Let's highlight a few basic principles:
- we always use the geometry of narrow beds;
- in dry areas we lower such beds into the ground, and in flooded areas we raise them above the soil surface;
- We fill any beds with organic matter and then mulch them well;
- We periodically mow all the paths between the beds to prevent the growth of weeds.

By following all these not very complicated rules, you can not only grow good harvest, but also turn your garden into a conveniently organized and a nice place for a relaxing holiday for the whole family.
Do you know what innovation is, how raised beds came to our country from Canada. The land there has been cultivated in this way for many years. Such planting options can be used not only for growing vegetable crops, but also to create original ones. Let's find out how to make beautiful and practical raised garden beds with your own hands. Photos, descriptions of technological processes and diagrams will help you with this.
Do-it-yourself raised beds at the dacha: photos of structures and main characteristics
The size and shape of the beds determine the rate of gas exchange, soil moisture and the presence of beneficial microorganisms. All these parameters affect the quality of the soil.
Raised beds can be used to grow big harvest berries, vegetables and fruits. At the same time, you can get good results even from a plot of land that is not very fertile. The peculiarity of high beds is that they warm up faster than low structures.

There are several types of vertical beds. They differ not only in material, but also in functionality. Some options are made from building materials, and others are simple.
Here are the types of beds that exist:
- trapezoidal structures;

- multi-tiered beds;

- structures with a triangular cross-section.

When creating isolated beds, you can take into account factors such as lighting, soil composition, and its structure. At what height such beds will be placed depends on the volume of the root system, soil characteristics and your own preferences. The minimum height is 15 cm, but to provide better insulation, you can raise them by 30-40 cm. Warm raised plantings can be higher than 50 cm, since a layer is still laid on the bottom. Narrow beds can be up to half your height.

The length can be very varied. Most often it depends on the length of the garden. If the bed is too long, then its sides need to be further strengthened. When arranging any garden bed, remember your own comfort and convenience. The best width is when you can reach the middle of the structure. The optimal value is 90-120 cm.

Can be grown in raised beds different cultures. It is not recommended to use plants with tall stems, as they will be inconvenient to collect fruits from. Root crops, strawberries, peppers, herbs and cucumbers are often planted on bulk structures.

For your information! Raised bed filler is particularly useful. It is made from organic ingredients. Wherein root system located in fertile layer, which promotes the development and growth of plants.
Related article:
Let's find out how to make original beds and what materials they can be built from. Interesting ideas Our review will help you create a variety of designs.
Features of raised beds: pros and cons
The main advantage of raised beds is that they can be placed on small area lots of vegetables and plants. Raised beds are especially popular for strawberries, aromatic herbs and cucumbers. Such designs also have other advantages:
- bulk beds can be filled with specially prepared soil. In this case, the quality of the soil on the site is not of great importance;
- it is possible to regulate the thickness of the soil layer for any plants;
- raised gardens are easier to weed and dig up;
- raised beds can be set up anywhere, even when difficult terrain terrain;
- Seedlings can be planted on high embankments earlier, since the soil in them warms up faster;
- in raised gardens the soil is looser, which promotes better gas exchange;
- can be used for those that will hang over the edge of fences for high beds;
- depending on the material, you can create not only practical, but also beautiful designs. Some options can become a design masterpiece for your garden;
- high beds with sides are practically not susceptible to attack by weeds, and are also well protected from mold and fungi;
- Installing beds is not a complicated procedure; they can also be easily dismantled. The planting location can be easily changed;
- inside such structures you can create a convenient one;
- the soil on raised beds is protected from freezing as much as possible. During early frosts, you can cover this planting with polyethylene;
- the construction of high plantings is protected from erosion during rainstorms.

Such designs also have certain disadvantages, but there are not many of them. First of all, fertilizing with mineral fertilizers will be required. It is also important to monitor the mole cricket invasion.
For your information! Before you start work, treat the wood parts with an antiseptic and special impregnations. This will prevent rotting processes and protect materials from destruction.
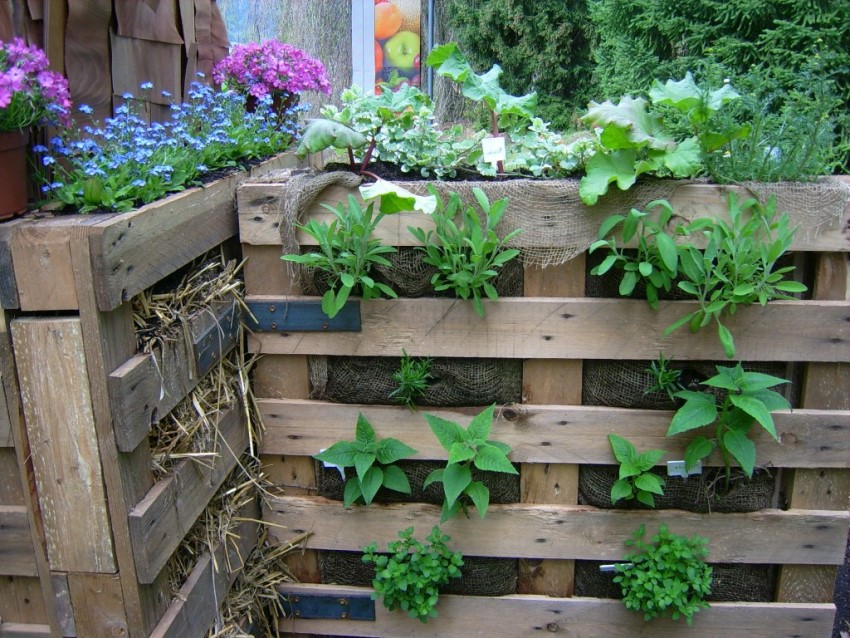
Creating vertical beds with your own hands: photo options
You can also create warm raised beds or vertical structures. They are popular because appearance and saving usable space. In addition, this is an excellent solution for protecting crops from various pests. Vertical structures are great for growing flowers, strawberries and herbs. You can not only make such structures from available materials, but even purchase ready-made options. How to do warm designs you can see in the video:

Why you should buy a vertical bed for strawberries: prices
You can see different variants design of vertical beds, but their most important advantage is their miniature dimensions. Such structures can be built from any materials, even from plastic bottles.
Vertical products do not require special care. They are on optimal height, in order to process them conveniently.

You can see how to make a raised structure for strawberries in the video: To increase the rigidity of the pyramidal bed, you need to install an additional post as a supporting element. In this case, the boards are mounted on a horizontal surface and attached to each other. A rail is installed in the base. The resulting side is fixed vertically, and then the second and third sides are attached to it. After installation frame system
the length of the slats is measured. They are placed at intervals of 25-30 cm. To make the shelf raised, its ends should be cut at an angle of 30 degrees. After assembly, the structure is filled with soil, which is compacted.
Technology for arranging vertical beds for strawberries from plastic pipes To grow strawberries, you can build a vertical bed from. In this case, you need to prepare, plastic pipes steel rope and a special knife for cutting. The volumetric section allows you to place the required amount of soil inside. The cut should be made along the structure. To fix the bed in a horizontal position, you need to make a hole in each half. Then a fishing line or cable is pulled through them. The parts are then placed one on top of the other. In this case, you can make different levels of beds from pvc pipes

For your information! with your own hands.
If you plan to place structures in a suspended state, then you need to take into account that they can sway. Therefore, it is better to install them in places that are well protected from the wind.
Constructing vertical beds with your own hands using a construction mesh A compact structure can be built for crops such as strawberries, greens, flowers or potatoes. A good solution would be a vertical bed. To do this you need to prepare, straw, special soil and necessary tool for processing the material.

To create a bed you need to bend the mesh into a pipe. In this case, the cross-section should be 0.9 meters. The edges are secured with wire. Straw is laid on the sides, and the free space is filled.
To plant potatoes, such beds should be placed at a height of 50 cm from the surface level. 10 cm gaps are left between the plants. Then the first layer should be shed, then the soil should be laid and the seedlings should be planted.
Features of arranging a vertical bed for strawberries with your own hands: using pots
To grow strawberries, you can also use ordinary ones. Such designs allow you to create an attractive external design. You can use both plastic and clay pots. In this way, you can create a multi-level composition.
Pots need to be selected so that their diameters become smaller towards the top of the structure. In this case, the difference between pairs of pots should differ little.

The largest pot is placed in the chosen location and filled with soil. After this, a smaller pot is placed in it, etc. When the structure is ready, plants are planted in the soil and watered. The largest pot is installed at the base of the structure. A rod of a smaller size than the diameter of the container is placed inside. The pot is filled with soil, and the remaining products are strung on rods one by one. After filling with soil, plants are planted. The pots are mounted on a pole or high stump.
The nuances of creating vertical beds for strawberries with your own hands from tires: photos of products
Exist different ways growing cucumbers in open ground. In this case it is possible to build vertical beds. This option is also suitable for planting strawberries.
The tire structure is mounted according to the same principle as pot structures. Tires of different sections are suitable for this. But keep in mind that old products are not particularly environmentally friendly material.

Before mounting, tires should be cleaned, dried and, if necessary, painted. The largest tire is placed down, and a part is cut off from the side. The hole is filled with soil and planted with plants. In this way, other elements are also laid out. Tires can be beautifully decorated with patterns or even unusual cuts.
Article
The dacha and garden, instead of a place of relaxation, often become a place of exhausting work. Water, weed, loosen, water again, weed, loosen, and so on in a circle. At the same time, the harvest is not always pleasing. The situation can be changed. There is a special technology - a smart garden. The cultivated area is reduced significantly, the amount of water required for irrigation is reduced, and the yield increases. This is not a fairy tale. Many people have already switched to smart beds and they are all happy with the results.
What is a smart garden or smart beds
A smart garden allows you to obtain maximum yields with minimal labor costs. How? There are a few basic rules and technician: proper planning of plantings, rotation of planted plants, special growing technologies (in high beds, trenches), drip irrigation, mulching or the use of covering material. All this has been known for a long time and, probably, is already used by many. But it is precisely in combination that all these measures give what is called a “smart garden”. Because everything on the site is done wisely.
A smart vegetable garden is formed, often raised or high beds in which the necessary conditions for plant growth
The main task of this technology is to make sure that working in the dacha is not a burden. This is possible if you approach the organization of the process wisely. And it’s completely in vain that this technology is called “a garden for the lazy.” At the stage of arrangement you will have to work hard, but then everything will grow almost on its own, but the first stage requires hard work.
It’s worth starting with site planning. It is necessary to choose the location of the beds taking into account the lighting. Then develop a scheme for laying water pipes along the section and lay them. At the same time, you can build beds. Roughly in that order. All this requires time, significant effort and money. Material costs may not be too large.
Planning a vegetable garden
If you already have a summer house or a plot of land near your house, you have probably already encountered a situation of an overabundance of fruits, vegetables and berries. When the harvest has to be distributed to relatives, neighbors, and colleagues. But in order to grow it, a lot of effort had to be made. To avoid such a situation, it is necessary to plan the harvest. It’s clear that you won’t get great accuracy, but results close to the planned ones are possible.

A smart vegetable garden is also a decoration of the site
We count the area of the beds
The first thing to do is sit down and think about what and how much you want to grow. The specific quantity is in kilograms. How much do you need to “eat” and “close”. Write a list of plants (in a column) and the desired harvest.
Having decided on the list of plants that you want to grow in your home, we sit down and look at the average yield that can be achieved when grown in smart beds. It is given in the table. Since you are still an inexperienced “lazy gardener”, reduce it by half. We put numbers next to each of the plants. It must be recorded in kilograms per square meter of area.

Now it’s easy to calculate how much area you need to allocate for each type of plant: divide the desired yield in kilograms by the average yield for each type of plant. We get the square footage for vegetables, berries, herbs, etc. If we add up all these areas, we will find out how many beds you need in total. These are the beds that should be placed on your site.
You're probably surprised by how little space you need for garden beds. And it's really not enough. Many times less than what we are used to! You will have very little land to cultivate. The vacated space can be taken under rockeries, and other decorations.
Where to place
When planning smart beds, you need to take into account the degree of illumination. Almost all the plants you need prefer sunny places. In partial shade you can grow rhubarb, sorrel, and onions (including feathers). Perhaps that's all. There are no garden plants that grow well in shaded areas. Or rather, they will grow, but the yield will decrease by 3-4 times. Shaded areas should be set aside as a recreation area or a flower bed with shade-loving plants should be placed there.

Another principle for placing beds: the more care (read watering) a crop requires, the closer to the entrance to the house it should be located:

Why arrange the plants this way? Because at the beginning of the watering/weeding work, gardeners are full of enthusiasm and the plants receive more water, weeds are removed more thoroughly. Gradually, the fervor subsides, less and less water is available per square area, and processing becomes less thorough. And with the approach proposed above, the amount of water will be “just right” and everything will be fine with soil cultivation.
Orientation to cardinal directions and precise location determination
If you want to get a harvest from the entire area of the lazy bed, the location is north-south. Strictly. This is the only way the entire area will bear fruit. Also place trellises for climbing vegetables. Although, they can be planted along the southern and eastern walls of buildings.
For a smart garden to also be beautiful, you need to think about where to place the beds. To do this, take a scale plan of the site indicating the direction to north/south. On it we draw all the buildings and main paths, water supply (we pay special attention to the position of the taps), trees and shrubs. On the plan we immediately outline the shadow zones - we will not place vegetables here, this is a place for flowers and fountains.

We cut out the beds from paper (on the same scale as the site plan). Moreover, we make them in the shape that we plan: rectangle, square, circle, triangle, etc. The shape is selected based on the area planned for the crop. And it doesn’t have to be a boring rectangle. Since there will be enough free space (you remember that you need much less beds), rationalism fades into the background, and the main emphasis is on aesthetics. After all, few people work in their dachas “so that they have something to eat”; mostly it’s also a pleasure. And what could be more pleasant than the beauty of a cultivated plot?
So, we sign each piece of paper indicating a smart bed - we put the name of the crop or crops (you can grow two, three or more on one bed). Now we are looking for a place for each, taking into account the rules described above. Along the way, you can change the shape of smart beds: for the sake of beauty or convenience. When you have found the places, trace the contours and transfer the inscriptions. All that remains is to implement our plans.
Irrigation system
A significant part of gardening work is watering the plants. If you use lazy beds, you will have to water much less often. But even in this case, it is better to route the pipes around the area correctly. You already have a plan for the location of the beds in your garden. Now add flower beds, bushes and trees. Get a plan for the placement of plants that need to be watered. Now you should think about how to ensure that any “irrigation object” is no more than 2-3 meters away. If you do this, then you will have to pull a small hose to each bed, which is much simpler.

Homemade system drip irrigation from polymer pipes, water source - barrel
It’s even better if a hose for drip irrigation is installed in the smart garden bed. This will reduce water consumption and increase yield. Yes, at the same time. A drip irrigation hose is a polyethylene tube with small holes through which water drips drop by drop. When planting, plants are planted next to the holes. As a result, water is supplied to the root, the plant receives a sufficient amount of moisture, and the spaces between plants remain only slightly moist (due to the redistribution of moisture in the soil).
When using drip irrigation, you will have very little work. You open the tap, wait a certain period of time, close the tap. All. Hoses for drip irrigation are available for connection to a water supply (sold by the meter), and are available in the form of kits with a small pump that will pump water from the container. The price range for hoses for drip irrigation is significant - prices differ significantly. No matter how limited your finances are, do not buy the cheapest hoses - they will last no more than one season. It’s better to pay a little more for a quality product and use it for several years. When choosing kits for drip irrigation, you must also consider the area to be irrigated. But, most likely, it will suit you, since lazy beds are rarely large. Read more about drip irrigation kits and manufacturers.
How to make smart/lazy beds
The principle of constructing smart/ lazy beds in what needs to be created ideal conditions for plant development and ease of processing for yourself. What do plants need? Nutrients, adequate light, air, moisture and lack of large quantity weeds.

Oxygen and nutrients
We provided them with a sufficient amount of sun by arranging the beds from north to south. Next task - nutrients and air to the roots. We lay all this when forming the beds. Depending on the type of soil, we select components that are missing in the “source material”. IN Middle lane In Russia, the main soils are clay and loam, so humus of varying degrees of “maturity” is usually added (one, two and three years). This is both for fertilizing and for lightening the soil - for better access of oxygen to the roots. Along with humus, bacteria and worms enter, which continue processing, enriching the soil and loosening it for you.

Productivity with square meter it will be wow...
If necessary, you can add other fertilizers - into the holes when planting or when watering. Depends on the crops or the richness/poorness of the source soils. The most common natural fertilizers are chicken manure and cow manure, and ash. If you apply only cow manure, mole crickets will annoy you. If you add a little chicken manure, there will be no mole crickets and the soil composition will become richer.
Moisture retention and weed control
Some of the moisture will be supplied by rain and dew, and some will have to be added by irrigation. And so that less water is required, fill the entire space of the bed that is not filled with plants with mulch. Mulch, by the way, also reduces the number of weeds - there is not enough light for them under it.
Straw, mown grass, sawdust, fallen pine needles, and special mulch made from wood chips can be used as mulch. All this can be used to mulch lazy beds. But all materials are imperfect. Here are their advantages and disadvantages:

There is another good solution: cover smart/lazy beds with a special black covering material. They completely cover the surface of the beds, sometimes in two layers. Small holes are made under the plants. Watering is carried out directly on the material - it does not retain water and air, does not allow weeds to grow, and protects the soil from overheating. In general, it’s good for everyone, except that you have to buy it.
How to make them
WITH general principles We've figured out how to create a smart vegetable garden, now let's look specifically at how to make beds. You cannot walk on them, so they must be fenced - with stones, slate, iron, logs cut in half, boards... It doesn’t matter what, but the beds must be separated from the paths. And since you cannot step on the beds, their width should be such that you can freely cultivate the soil.
Now about the width of smart beds. It depends on the type: will they be of normal height or raised. If the beds are made at ground level, their width is 80-100 cm. You can work this width while squatting or bending over. If the beds are raised at least half a meter, it will be even more convenient to work. They make not only high beds. You can use all possible growing technologies:

Now let’s talk about whether regular height beds are better or raised ones. For a really lazy garden, raised ones are better: when cultivating the soil you will have to strain less. But it’s a troublesome and slow task. So, to begin with, you can acquire high beds only for the most difficult to maintain crops. You can also use various containers/containers - for herbs, salads, herbs. Large barrels and boxes sawn lengthwise are suitable. Available for sale plastic containers, which are produced specifically for smart gardening. They can generally be placed on paths, near the entrance to the house.
The only crop that should not be grown in raised beds is potatoes. It grows well in trenches, and making them is much easier and faster.
Between the beds
The beds in the smart garden are separated, the distance between them is at least 60 cm (preferably 90-100 cm or more). A significant gap that needs to be filled with something. Weeding between the beds is not the best best idea. Why then bother with separate beds in order to fight the weeds between them... Therefore, you can either lay out/pave or sow with lawn grass. The best herb for our lawn - poa shoots and bentgrass. They grow quickly, form dense greenery that does not get trampled and can even withstand cart handling.

The grass will need to be cut, so you will need a lawn mower or trimmer. And the cut grass can be used for mulch. Then, by the way, the weeds will come out - they cannot withstand frequent cutting.
Some tricks
The technology is called smart gardening for a reason. You can test different approaches, new products, and the experience of “colleagues.” There are several tricks that come with use. We have already talked about one - about covering material. It really makes maintenance a lot easier and there is no need for mulch. There are other interesting ideas:

Surely there are still tricks in processing a smart vegetable garden. If we find out about them, we will definitely update the article.
Most often, a dacha is not only flowers and relaxation, it is also a harvest. These are seedlings in the spring, seedlings, transplanting into the ground and other concerns. If you are one of the summer residents who care not only about the harvest, but also about a neat, well-groomed area with fences, then you have probably wondered more than once how to design and beautiful beds at the dacha with your own hands?
Beautiful garden at the dacha with your own hands


If you started a dacha not only for flowers and fruit and berry trees, then you definitely have beds. And usually the hardest work is their improvement. Because you need to provide so much important nuances so that you can fully enjoy the harvest. That is why we want to figure out with you what beautiful and proper garden beds they are?


Vertical beds - how to create, what are their features, pros and cons
If you have a small area and want to use it to maximum advantage, then you should think about creating vertical beds. Thanks to them, with small areas you can get an excellent harvest, only once putting in enough effort.

These beds are great if you want:
- save space,
- grow more in a limited area,
- grow in open ground,
- simplify your care and reduce the number of possible weeds,
- make watering and harvesting easier.
Thanks to their simple design and mobility, such beds are easy to assemble and move. And at the same time, you can choose how many bushes or seeds you need for seedlings.
Varieties of vertical beds
There are several types of vertical beds:
ladder type– are created from boxes of different sizes, stacked on top of each other according to the principle of a ladder,

tubular– are plastic pipes of selected diameter, filled with soil, with holes for seedlings,

hanging– where the beds are located one above the other, being suspended or installed on a structure similar to a stepladder,

pyramids- are created according to the principle of stairs, but each new tier is smaller than the previous one on all sides and is located in the center, ultimately creating the appearance of a pyramid.

Clear instructions for creating different types of vertical beds
Creating a vertical bed is not difficult, but it all depends on your skills, the tools in your arsenal and the materials you have at your disposal.
Most often they are made from boards in order to extend the life of their structure and get maximum benefit. After all, wooden beds last longer, are more stable and harmless to future seedlings. But their arrangement requires more knowledge and experience in using tools such as a drill, screwdriver and jigsaw (if you need to cut the boards to the intended size).

In general, the basic set of materials for creating a wooden vertical bed is the same:
- boards,
- beam,
- nails,
- screws,
- priming,
- seedlings or seeds.
First, decide on the size of the largest and smallest beds. Saw the boards into the sections you need, and then assemble them into boxes, stack them on top of each other and fill them with soil.
Don't forget that even experienced craftsmen use a pencil and tape measure so as not to make a mistake with the size. And to protect your hands, wear thick gloves.
Take advantage of the very clear, step-by-step master class by Ekaterina Komkova, who talks about how to build a very neat pyramid for your seedlings.

And if you like a place near a fence or wall country house, then it will be more suitable for you, as in the master class by relena75:

They take up little space and fit perfectly into small areas, and due to their design they are also very mobile. After all, they are so easy to move from place to place or put away for storage at the end of the season. And they are made no more complicated than their more massive friends. See for yourself by following the instructions from the video tutorial by the Country Expert:
However, a pallet can also become a bookcase.

Tubular beds do not require much effort to make at all. And they take up much less space compared to the previous ones. And the harvest will be worthy of a full-fledged garden bed.

To create it, just cut pipes of a suitable diameter, make holes on them using a special drill attachment, dig into the chosen place, fill with soil and your garden bed is ready!
They are great for growing strawberries or cucumbers.
If you want to understand the intricacies of creating such compact beds, then you should pay attention to the master class of a country craftsman with the nickname Adek.
Disadvantages of vertical beds
But, like everything else related to the dacha, vertical beds are not a panacea. After all, due to the same design features, they also have disadvantages.
- the soil in them is quickly depleted,
- the soil has to be watered frequently due to drying out and the volume of the bed itself is small,
- if your region has harsh winters, the ground will freeze, which has a bad effect on perennial crops,
- you will need effort and patience, as well as tools to create them.
Moreover, due to limited space Not every crop will take root in a vertical bed - plants with a strong root system will not be able to fully develop.
Therefore, it is best to grow in such beds:
- salad,
- basil,
- cucumbers,
- strawberries,
- dill.
Warm and high beds - basic requirements, pros and cons
As you can see, vertical beds are not suitable for pumpkins, corn and potatoes. Therefore, it is worth thinking about other options for growing garden crops. For example, if you have enough space, but the ground is cold, then you will like the option of raised, warm beds, perfect for delicate, heat-loving crops.


In essence, a high bed is a mound of fertile soil, limited on four sides by a fence. She:
- easy to assemble and disassemble,
- does not require much care and attention,
- well suited even for rocky terrain,
- gives an excellent harvest.


In addition, due to the closedness of the ecosystem, there are many times fewer weeds in such a bed, which means weeding will require less effort.

They are divided into permanent and temporary. And, as the name implies, some can be used for several years in a row, while others are more often collected for growing seedlings. But both of them essentially remain ordinary garden beds.
And the most important thing is that if you have the idea of creating a warm garden bed with your own hands, then you don’t need to put in a lot of effort.

Very impressive and convenient...

...and can be made from scrap materials!
General rules for designing and assembling raised beds
The optimal height is considered to be 15-50 cm from the ground (depending on the root system of the crop you want to grow.
The width varies from 90 to 120 cm.
The required composition of each bed includes soil, drainage and biofuel (which will become humus, which provides the main fertilizer for the root system).

But fencing materials can be completely different:
- boards,
- plastic boxes,
- pallets,
- metal profile,
- wooden boxes.
Everything will depend only on your idea and what is currently at hand.
The most common and stable are beds made of boards. If you line them with roofing felt before covering them with soil, they will last a very long time, since they will be insulated from moisture and rot.
Fencing with boards...

...metal...

...and again with boards
And creating them is quite simple if you follow the detailed instructions of Evgeny Afanasyev given in the master class.

If you are not comfortable with tools or do not have enough time to organize a permanent garden bed, then you can solve the issue differently. After all, such beds are good because they only require a high fence. Plastic vegetable crates or pallets stacked vertically and hastily nailed together to form a square, and even concrete blocks may be the best solution.
Pallet fencing…

... and concrete blocks.

Yes, you don’t need to have a carpentry background to organize a garden bed. It can even be made in a used barrel.
Or even weave it altogether!
If you want to plant a couple of seedlings as an experiment, then you can get by with pocket beds.

Here you don’t need to be able to saw and plan, but the skill of sewing and stitching will come in handy. After all, such a homemade product for the garden and garden, created with your own hands, will appeal to every needlewoman.
Take an old organizer for small items, combs or other household items, put film, soil and fertilizer into the pockets, sew on strong loops so that it can be hung on any wall or fence, and that’s it - your miniature garden bed is ready!

As you can see, do-it-yourself garden beds for your garden and garden are created from a variety of different materials and of varying complexity. For some, you will need an impressive set of tools, but the result will give you a good harvest or, for others, only a few boxes and a couple of barrels will be enough, although the result will also be joyful and very pleasant. The main thing you should know at the beginning of the season is that any idea for a summer house can be brought to life with your own hands - from a garden bed to a personal garden with the most exotic flowers.
