Do-it-yourself basement of a house on screw piles. Lining the base of a pile foundation
Hello! On the website we got a lot of ideas for finishing and building a residential building and today we decided to repay our favorite website by presenting to the readers our version of the answer to the question: “how to cover a pile foundation frame house outside?"
When we started construction, we, like many other people, decided to build a house with our own hands at the minimum possible cost Money, chose the most a budget option foundation that allows you to quickly “get down to business” - a foundation on screw piles. And once we’ve built it, we’ll think about what we’ll use to cover it with.
Time passed unnoticed. A year has flown by, the frame house is standing and blown by all the winds, siding has been ordered to finish the house, but as it turned out, another 50-60 thousand rubles need to be spent on the basement siding. according to the most conservative estimates. At that time, we did not have such funds, but after installing the fence we had sheets of corrugated sheets that were exactly the color of our metal tiles. We decided to use these sheets for closing from the outside pile foundation.
Stages of work on finishing the basement of a frame house on screw piles
We had sheets measuring 1200 mm by 1800 mm (you can take 2000 mm), the clearance between the ground and the house is standard for dry areas of 500 mm. Therefore, it was very convenient to cut one sheet across the stiffeners into 4 equal parts of 1200 mm by 450 mm (just the ventilation gap remains), using metal scissors. Cost 475 rub. per sheet, thus linear meter Our plinth costs only 99 rubles, while the cheapest plinth siding will cost 480 rubles. per linear meter, not counting the cost of the necessary sheathing.

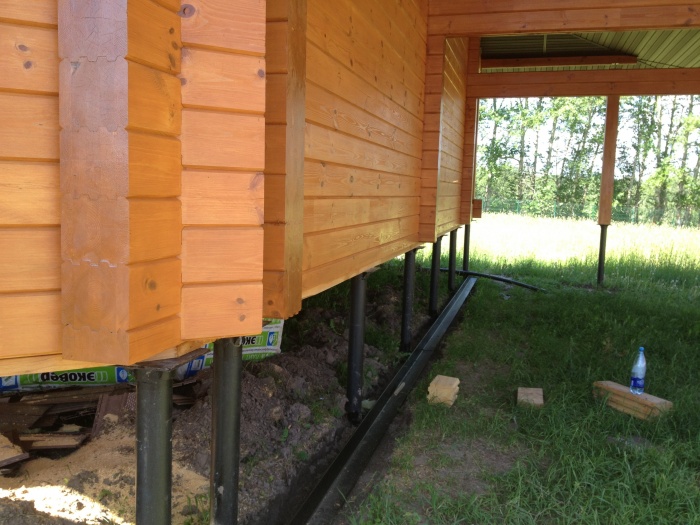
This is what the gap between frame house on screw piles and earth before installing homemade plinth panels.
The cut parts of the profiled sheet were screwed with self-tapping screws directly to the wooden frame of our foundation.

In order to avoid the need to do ebbing from the base, it was decided to place the corrugated sheeting under the level of the main siding, i.e. It was necessary for the corrugated sheeting to be located on the same level as the still unfinished wall. In some places on OSB sheets I had to put in “liners” to make it flush with the wall.


The lower edge of the sheets was tied with a bar using self-tapping screws. The result was a fairly stable structure that did not require attachment to the piles themselves.
Theoretically, it can be secured to piles in the future.
The sheets were bent at the corners, this gives additional rigidity. You need to bend in certain places so that the corner profile fits, not on the stiffener.


Already attached to the sheets starting bars main façade siding.
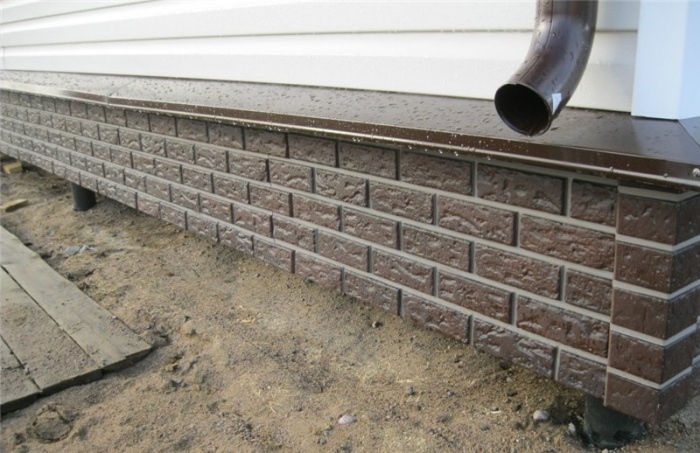
In the end it turned out like this:

In our opinion it is beautiful. All that remains is to make a blind area.
Comparative analysis with other methods of constructing the basement of a house on stilts that we considered:
- Protruding base - requires the installation of ebb linings to protect from precipitation.
- Pouring the strapping cement mortar– formwork is required, it is too labor-intensive and time-consuming, and there is no further access to the space under the floor.
- Base finishing artificial stone, tiles or plinth panels various types– lathing is required, expensive and time-consuming. As it turned out, it is difficult to buy plinth panels suitable color, all the hardware stores in our city, having a huge catalog of colors, in reality could supply all shades of red, but we needed exactly brown.
- Finishing the basement of a house on a pile foundation using corrugated sheets is cheap, quick and durable, because it is not subject to corrosion and one person can handle the installation. There remains a possibility easy access to communications running under the house. We also want to make part of the base with a “door” for storing long items: gardening tools, so far unclaimed building materials.
Pile foundations are a fairly common phenomenon in our country with its unstable soil type over a large area. It is easy to install and does not require large construction costs.
But appearance a finished foundation with a house on it is not particularly decorative. This does not affect the quality of operation in any way, but from an aesthetic point of view it is better to cover the piles. This can be done different ways and using different materials, since the construction market offers a huge range of finishing materials. This article will present the main types of finishing of the base of a pile foundation, and also present the technology for installing finishing materials.
Features of a house on a pile-screw foundation
A structure based on piles can be erected much faster than a similar one on a concrete foundation, since the piles do not need time to harden and gain strength. Screw piles may have threads along the entire length or only at the end, but this does not change their function - transferring the load of the structure to denser soil. There are also piles with blades at the end. They have one advantage over the other two types - the ability to compact the soil around them.
The advantages of a house on a pile-screw foundation are:
- Easy to install
- Possibility to build a foundation on any soil
- Low cost relative to other types of foundations
- Possibility to build a house even on a very relief site
- Possibility of work in winter
- Destruction due to ground movements is excluded
But, the finishing of the base is pile- screw foundation mandatory, which will be discussed further.

Variety of basement finishes for pile foundations
It doesn’t matter what material the basement of a house on a pile foundation will be finished from, you need to take care in advance to build the sheathing. The best material will be for the sheathing profile pipe, which will not only simplify installation finishing material, but will also connect all the piles with each other.
Important! If the lathing is mounted on wood, then it must be impregnated with special solutions and covered with several layers of primer mixture.
Depending on the height of the base and the selected material, you need to calculate the number of horizontal beams on the sheathing. The minimum number is three, but if the base is higher than 1 meter, then it may be necessary to install additional ones.
Basement siding
This modern material At the moment it is the most popular for finishing the base of not only a pile house, but also structures on other types of foundation. Benefits of this material are:

Facing brick
This method is difficult to construct and one of the most expensive for a screw foundation. In addition, it is impossible to do the masonry with your own hands without skills, so you will also have to pay a professional builder who will carry out the installation.
Advice! In order for the masonry to be most reliable, it must be connected to a pile foundation. To do this, several metal pins are installed on each pile, which are embedded in it during the laying process.
The advantages of this finish are:
- Brick prevents the house from freezing.
- Cladding type brick does not need to be repaired or restored after a few years.
- Brickwork helps strengthen the pile structure of the house.
- This plinth is ready for long-term use.
But there are several disadvantages that I would also like to explain:
- High cost of materials and installation work.
- Installation of brickwork takes too long.
- There is no way to choose exactly the color and texture you need. The assortment is limited.
Flat slate
At the moment, this is not the most popular way to finish the foundation; moreover, slate is dangerous to human health, as it contains a large number of asbestos in its composition. This material has few advantages:
- Available self-installation due to the simplicity of the technology.
- Long service life.
- Resistant to rot and impact environment.
The main disadvantages of this material are:
- The fragility of the material, which often leads to its destruction.
- Cost is higher than alternatives modern options finishing.
- Limited choice.
- Difficulty in securing to a pile foundation.
Corrugated sheet
This roofing material is now used everywhere and has truly become universal. Work on installing it on the base of a pile foundation can be done independently in a relatively short period of time using a minimal set of tools.
Advantages of using corrugated sheeting for finishing the base:
- No additional load on the foundation due to the light weight of the sheets.
- Variety of colors.
- Relatively low cost.
- No additional processing required.

Corrugated sheeting, despite all the advantages, has a number of disadvantages that sometimes stop it from being used:
- Instability to mechanical damage, which can lead to damage to the outer layer and corrosion.
- In those places where corrugated sheeting is in contact with the soil, it can quickly rot.
- During its service life, the appearance of the material is lost - it fades and ceases to shine.
Installation of a suspended foundation
A suspended foundation is precisely the finishing that closes the air space between the house and the soil. It is necessary in order to limit the escape of heat from the house through the floor, to exclude the presence of various animals under the house, and to dampen differences atmospheric pressure, humidity and temperature, thereby creating the correct microclimate under the house, which has a positive effect on the condition of the piles.
Installation technology
The first step in creating a suspended foundation is creating the sheathing. As mentioned earlier, it should be made of metal or wood. If metal guides are used, they are welded to the piles in pre-designated places, and wooden guides are screwed onto self-tapping screws.
After the sheathing is ready, you can hang the panels. For this purpose any sheet material from the list that was presented earlier or some other depending on the wishes of the owner of the house.
Important! Before closing the base of the house, you need to fill the place where the material comes into contact with the soil with sand, in a layer of 4 to 7 cm.
During the installation process, when it comes to the corner, you need to mount the panels in such a way that the corner is straight and even. This process is called cutting corners.
After the material has been installed along the entire perimeter, you can proceed to finishing, or rather to attaching additional elements, such as corners, drips and other additional accessories. These elements will give the base a finished look and neatness.
Conclusion
A house on screw piles is one of those buildings that, after construction work Additional steps are required to finish the base. Of course, it is not necessary to do this, but external finishing will become more presentable. In addition to appearance, finishing the plinth will have a lot of positive effects. It is possible to install the finishing material on the base yourself, unless it is brickwork. And a huge range of materials will help you choose exactly the one that suits your needs. quality characteristics, appearance and cost.
Upon completion of the main stages of building the house, finishing of the basement begins pile-screw foundation. Decorative cladding for such a base is important, as it gives the appearance of the house aesthetic completeness, and also fulfills protective function. The screw foundation is exposed to the weather, the wind blows under the house and water flows in. This affects both the comfort and durability of the structure if the base is not covered with finishing.
There are 2 common cladding methods:
- installation of a suspended plinth;
- construction brick walls foundation.
The first method is much simpler - you just need to install decorative panels on a wooden or metal sheathing attached to the stilts or walls of the house. In the second case, you will have to do a little concrete base. What both methods have in common is that even an inexperienced person can handle the job.
Wall-mounted plinth finishing materials
Advantages of decorative panels:
- efficiency;
- high speed and ease of installation - even when working alone, the task can be completed in a day;
- ventilation of the foundation, thereby protecting the piles from condensation.
To finish the base of a screw base using hinged technology, various decorative panels are used. Which of them is better to use - we will consider later in the article.
Siding
Basement siding- This is the most common finishing material for pile foundations. Popularity due to low cost, high mechanical strength, resistance to moisture and temperature changes. Biological destruction (mold, rot, insect damage) does not threaten such a base. In addition, there is a wide range of siding colors - from simple monochromatic options to panels that imitate a natural stone.
Thematic material:
They are made from different polymers - polystyrene foam, polyurethane foam and others. They are distinguished by a wealth of colors, textures and shapes. In addition, they simultaneously play the role of insulation.

The plastic is quite durable, insensitive to atmospheric and biological influences, and belongs to economical options finishing. However, the panels look less attractive compared to siding.
Corrugated sheet
Such metal sheets are easy to process, durable, resistant to moisture and temperature changes. Installing them is no less simple than other options for finishing materials. The only drawback is the narrow scope of application. Sheathing the foundation with corrugated board can only be done in combination with certain types of wall decoration. For example, to wooden house This type of base will not work.
You can also sew up the subfloor with cheaper materials - slate or DSP sheets, covered with painted plaster.
Installation technology for suspended plinth finishing
Installation begins with assembling the sheathing. To make it, use either wooden slats, or metal profile. In the first case, the frame elements are screwed to steel brackets, which are welded to the piles in advance. The profile is welded directly to parts of the screw foundation.

As a rule, the lathing consists of two parallel boards, one of which is attached directly under the wall of the house, and the second at a height of 150–200 mm from the ground. This distance may vary depending on climatic conditions in the region. It is necessary to ensure that 50–70 mm remains from the edge of the decorative slabs to the ground surface - this is necessary to compensate for the thermal expansion of the soil.
After installing the parallel elements of the sheathing, vertical slats or a metal profile are mounted. This is done to ensure greater structural strength if the base is too high. In this case, the installation step is 400–450 mm.
A shallow trench 30 cm wide is dug along the perimeter of the house and filled with sand. Then they are mounted on the sheathing insulation material. A roll of waterproofing is fixed on top of it, the end of which is lined with sand. The edge of the roll is compacted into sand. Paving slabs are laid on top. This design is called a blind area and plays a role drainage system, protecting the base from excess moisture.

If siding is chosen as the finishing material, a starting profile is installed at the bottom of the base on top of the insulation. Decorative panels are inserted into it, which are then mounted to the sheathing through the thermal insulation using self-tapping screws. The corners of the structure are reinforced with special profiles that come with the siding. To protect the base from precipitation flowing down the walls, metal flashings are installed on top of the finish.
Mount the hinged panels following several rules:
- the wooden elements of the sheathing are carefully treated with antiseptic and antifungal impregnations;
- slabs decorative material installed with small gaps to ensure ventilation of the space under the house;
- The drainage area is constructed at a slight slope from the building (no more than 5°).
If instead of siding to finish the foundation you use plastic panels or corrugated sheets, the technology for installing the material is even simpler. A starting profile is not needed; the trim is attached directly to the sheathing, maintaining a gap between the lower edge of the sheathing and the ground surface.
Such capital finishing gives the building an aesthetically attractive appearance and ensures reliable protection underground space. If necessary, the plinth can be converted into basement. However, brick finishing is more expensive than installation hanging panels, and the work requires more time and effort.

There are two options for installing a brick masonry plinth:
- On the tape from reinforced concrete. The possibility of using this method depends on the characteristics of the soil - if it expands greatly when freezing, this option is not suitable.
- On metal profile, which plays the role of a shelf for bricks.
Installation using the first method is carried out in the following order:
- Dig a trench around the perimeter of the building (there is no need to make it too deep, since the mass of the base is small).
- The walls are covered with rolled waterproofing material.
- A reinforcing band is formed in the trench.
- Pour cement-sand mortar.
- Laying bricks. Ventilation holes are provided in each wall of the base.
- Execute decorative finishing masonry - plaster or any other material is used for this.
In the second case, the work will take less time and effort. A metal equal angle corner is welded to the piles at a height of 50–70 mm from the ground to ensure ventilation. The length of this profile is 6 or 12 m - you can choose any one depending on the length of the walls of the house. The thickness of the steel is selected to match the height and weight of the base.

Thus, there are several ways to close a pile-screw foundation. Choose the most appropriate option based on the complexity and cost of the work. Covering the base will add attractiveness to the house and extend the life of the screw piles, so there is no need to delay finishing.
In contact with
Classmates

The pile-screw foundation remains one of the most inexpensive and simple solutions when building houses from “light” materials: wood, frame panels, etc.
But in order for screw piles to last as long as possible, it is important to carefully finish and close the base if available.

The main element is piles made of high quality steel.
They are screwed into the ground manually or using special equipment, always below the freezing level.
At the end of the pile products there is either a combined thread for deepening into the soil, or special blades.
Reference! Screw piles equipped with blades are considered a more reliable solution, since during drilling they better compact the ground, giving the foundation even greater stability.
Pile-screw foundation is suitable for all types of soils, excluding rocky ones, easily withstands both compressive longitudinal and transverse loads and is not afraid of soil heaving.
One of the most important stages it turns out, which is most often made with boards, timber, channels and some other materials, as well as finishing the foundation on screw piles and closing. Particular attention should be paid to this if you want to make a basement in your house.
You can also check out, or his.
Finishing methods

The finishing of the base of a pile-screw foundation is traditionally done two ways:
1. Installation of a suspended plinth. This is the easiest and economical solution on a limited budget.
You can make a hanging plinth quite easily, without resorting to the help of professionals, literally in a day.
In addition, such an element looks aesthetically attractive and provides good ventilation of the underground space, preventing the formation of condensation.
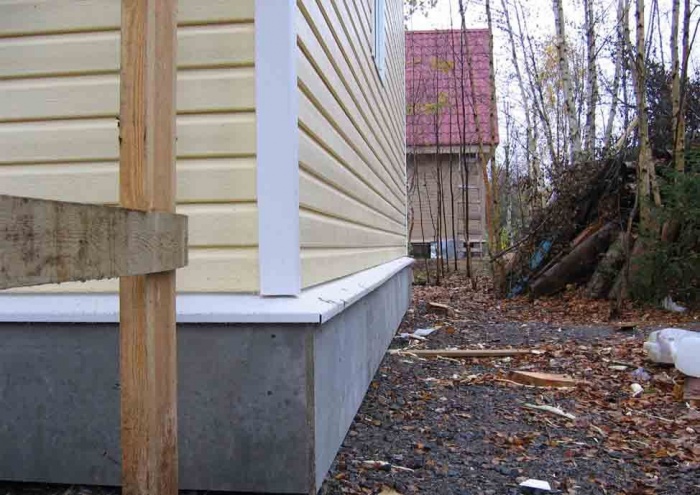
2. Installation of a shallow base belt type , in which the lower part is a concrete strip poured between piles with a slight recess into the soil. This guarantees the foundation increased strength and resistance even to significant deformations and mechanical loads.
It can be easily combined with a blind area and allows possibility of arranging a large and spacious semi-basement room, allowing you to expand the usable area of the building.
The shallow strip plinth looks quite attractive, however It should not be done on heaving or unstable soil.: The risk of rapid destruction and deformation is very high. In addition, its installation will cost significantly more than a mounted one.
Important! To create a suspended plinth, any lightweight materials are suitable: tiles, siding, thermal panels, thin-layer plaster, terrazzo and others.
Advantages and disadvantages

If you still decide to build ground floor during the construction of the foundation on screw piles, it has certain pros:
- finishing the screw foundation of the house allows reliably protect the basement from moisture, temperature changes, strong winds and other climatic factors, so that expensive repairs will not be required soon;
- the finished plinth represents a sufficient difficult obstacle for rodents and other small animals that often enter private homes in search of food and shelter;
- the base serves as additional protection from the adverse effects of the environment and does appearance buildings more harmonious and attractive.
However, we should not forget that many materials, especially the budget segment, have their own flaws:
- toxicity, which may lead to health problems for those living in the house;
- high degree of flammability(for example, decorative panels): this is quite dangerous in case of fire.
Important! The use of low-quality materials or improper work often entails the gradual destruction of the base, which is closely connected to the base. In some cases it may be required.
Materials

Finishing of a pile-screw foundation is possible in different options. The modern market provides a fairly wide range of materials for finishing the base.
TO the most common relate:
- Siding(decorative panels made of fiber cement or polypropylene). If you are wondering how to cover a foundation on screw piles, then this option will be the most obvious: siding is relatively cheap, high degree protection from a variety of mechanical loads and resistance to extreme temperature changes, high humidity and biological influences. This material has a wide variety of appearance: you can buy it to look like brick, natural stone, granite, etc.
- OSB boards. They are made on the basis of polymer resins, which makes such cladding less susceptible to high humidity or leakage groundwater at a shallow depth from the soil surface. Such slabs are even do not require preliminary priming during installation and are distinguished by their high strength coefficient. Therefore, the choice of this material when deciding how to sheathe a pile-screw foundation often falls.
- Asbestos cement slabs(flat slate) . This is one of the most inexpensive options, which is easy to attach and looks quite presentable, but characterized by increased fragility.
- Facing brick. It will ensure the strength of the base finish for long years, has increased frost resistance and allows you to choose a wide variety of colors and textures to suit your taste.
- Natural or artificial stone. This is an environmentally friendly material, distinguished by a unique range of color shades. He has increased hydrophobicity and excellent heat and sound insulation properties. This finish will last you a very long time without deterioration. performance characteristics, but it won't be cheap.
- Decorative tiles. Its undoubted advantages are excellent moisture insulation, unique appearance and heat resistance. But the price for it remains quite high, and the heavy weight and the inability to provide ventilation for the base can be attributed to the obvious disadvantages of the material.
Important! If you prefer brick as a facing material, be prepared that finishing will take significantly longer due to the use of cement-sand mortar. To ensure a uniform color of the facade, you will have to use bricks exclusively from one batch.
How to close the base in a pile-screw foundation?

If you plan to build on a pile-screw foundation hinged plinth, you must do the following:
- Any finishing of the base begins with arrangement of sheathing made of wood or metal. It is produced in the following way: at a height of 150-200 mm from the ground level, an initial plank is installed, and then a vertical sheathing is mounted on it (the distance between the metal slats or wooden planks should be about 400-450 mm).
- The starting strip is securely fixed at the bottom of the sheathing and placed under the panels, sometimes additionally strengthened with a perforated corner.
- Then produce installation of horizontal panels, corners from the outside and inside. They are fastened with self-tapping screws, making sure that they fit into the material as evenly as possible. Do not tighten them too much, leaving a small compensation hole of 1 mm.
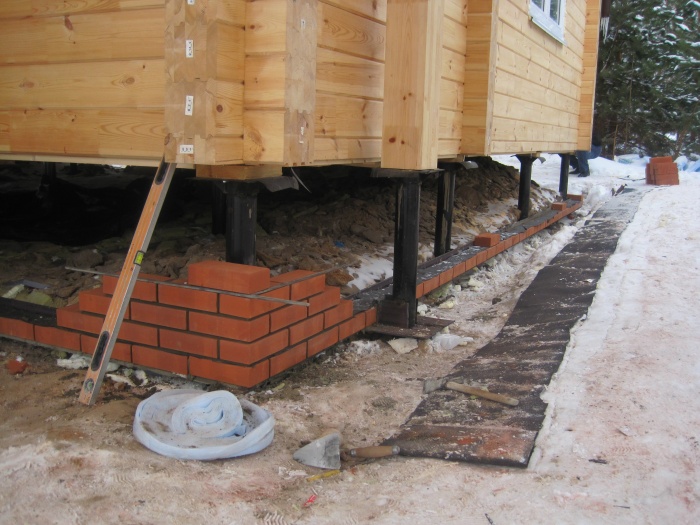
How to cover a pile-screw foundation using plinth cladding decorative bricks ? Perform the following steps in this way:
- A few centimeters are removed from the thermal insulation layer to ensure ventilation and start laying out the first layer bricks using cement-sand mortar.
- The inner wall of the cladding is made of at least 2 rows of masonry, and it is recommended to do dressing every 2-3 rows of bricks. It is best to lay out the first row with a poke, and the next two with a spoon. The height of the masonry is leveled by means of additional bricks fixed above the rows laid in the butting method.
- At the end of the load-bearing and facing wall tie up anchor bolts or dowels for maximum durability.
Attention! When finishing the base of a foundation made of piles with bricks, it is important to start work at a time when all other parts of the building are already completely ready and closed.
Finishing the base of a pile foundation using a stone consists of the following steps:
- The surface is leveled and primed.
- The stone is cut on the ground in such a way that when laid it forms a kind of mosaic.
- To fix the material on the surface, use glue with high adhesive ability.
Creation shallow strip base accessible even to a beginner. To do this, they dig a trench, fill it with cement mortar, build the basement walls using brick and cinder concrete masonry, and finish the basement with thermal panels, siding or any other materials.
It is worth noting that if you have chosen screw piles: a foundation with a basement floor, then all these methods make it possible not only to decorate beautifully, but also protect it almost 100% from adverse weather conditions and mechanical influences.
Insulation

Insulating the base of a pile-screw foundation is a stage that should not be neglected, since when installing such a foundation, a fairly large empty space remains under the house up to the soil level. The disadvantage of this is the cold floor, which is very uncomfortable to walk on.
You can avoid this by creating thermal insulation layer between floor covering interior spaces and the foundation, for example, by insulating a pile-screw foundation wooden house using one of the modern industrial insulation materials.
Reference! Some of the most common materials are mineral wool, polystyrene foam or penoplex, but they all require additional waterproofing due to increased sensitivity to moisture. Waterproof polystyrene foam and foam glass do not have this disadvantage.
Do-it-yourself insulation of a screw foundation is done as follows: algorithm:
- Starting to solve the problem of how to insulate a pile-screw foundation on the base wall eliminate all irregularities and treat it with a primer for more secure attachment of insulation sheets.
- Insulation sheets are glued from the inside using adhesive composition or special adhesive foam. In the latter case, the insulation is temporarily attached with special umbrellas to avoid damage to the sheet when the foam swells.
- The joints of the sheets are worked out especially well to prevent cold from entering the house.
- From the inside to the wall of the insulated base add a little soil or expanded clay to avoid blowing.
Important! How to insulate a foundation on screw piles efficiently? The insulation is usually glued in two layers and installed on top of it metal mesh– protection from rodents.
Blind area

The blind area of the screw foundation helps prevent the penetration of rain moisture from the soil and the seepage of shallow groundwater into the underground. For this reason, the floors in the house always remain dry and the microclimate is comfortable. It protects the foundation from plants growing through it and gives it a more well-groomed appearance.
When creating a blind area, it is necessary to take into account following:
- It should have the widest possible width, ideally 60-100 cm (for heaving soils).
- The blind area includes a large number of layers, which are laid at an angle to the foundation (minimum - 1.5 0).
- The bulk layers of the blind area usually include dense clay(thickness 15-20 cm), crushed stone and sand (each layer takes approximately 5 cm). When the soil freezes deeply, layers of foam plastic are laid underneath.
- Where the blind area is adjacent to the house, it is necessary to make an additional insulating seam, for which two layers of bitumen or roofing felt are used.
- The top layer of the blind area must have waterproof properties. Suitable materials include asphalt, reinforced concrete, paving slabs, all types of stone or just cement pouring. It would not hurt to install trays on the blind area as elements of storm drainage.
Useful video
Visually familiarize yourself with the option of finishing the base of the foundation on screw piles, as well as the finishing facing bricks in the video below:
conclusions
Finishing the base of a pile-screw foundation (including cladding, blind area and insulation of the foundation of a house on screw piles) is a very important stage of construction, which determines both the duration of operation of the building without major repairs and its appearance.
In contact with
The pile-screw foundation remains one of the most inexpensive and simple solutions for the construction of houses from “light” materials: wood, frame panels, etc.
But in order for screw piles to last as long as possible, it is important to carefully finish and close the base if available.
general information

The main element of a pile-screw foundation are piles made of high-quality steel.
They are screwed into the ground manually or using special equipment, always below the freezing level.
At the end of the pile products there is either a combined thread for deepening into the soil, or special blades.
Reference! Screw piles equipped with blades are considered a more reliable solution, since during drilling they better compact the ground, giving the foundation even greater stability.
Pile-screw foundation is suitable for all types of soils, excluding rocky ones, easily withstands both compressive longitudinal and transverse loads and is not afraid of soil heaving.
One of the most important stages in the installation of a screw foundation is the strapping, which is most often done with boards, timber, channels and some other materials, as well as finishing the foundation on screw piles and closing. Particular attention should be paid to this if you want to make a basement in your house.
Finishing methods

The finishing of the base of a pile-screw foundation is traditionally done two ways:
1. Installation of a suspended plinth. This is the simplest and most economical solution for a limited budget.
You can make a hanging plinth quite easily, without resorting to the help of professionals, literally in a day.
In addition, such an element looks aesthetically attractive and provides good ventilation of the underground space, preventing the formation of condensation.
2. Installation of a shallow tape-type base, in which the lower part is a concrete strip poured between piles with a slight recess into the soil. This guarantees the foundation increased strength and resistance even to significant deformations and mechanical loads.
It can be easily combined with a blind area and allows possibility of arranging a large and spacious semi-basement room, allowing you to expand the usable area of the building.
The shallow strip plinth looks quite attractive, however It should not be done on heaving or unstable soil.: The risk of rapid destruction and deformation is very high. In addition, its installation will cost significantly more than a mounted one.
Important! To create a suspended plinth, any lightweight materials are suitable: tiles, siding, thermal panels, thin-layer plaster, terrazzo and others.
Advantages and disadvantages

If you nevertheless decide to build a basement floor during the construction of a foundation on screw piles, it has certain pros:
- finishing the screw foundation of the house allows reliably protect the basement from moisture, temperature changes, strong winds and other climatic factors, so that expensive repairs will not be required soon;
- the finished plinth represents a sufficient difficult obstacle for rodents and other small animals that often enter private homes in search of food and shelter;
- the base serves as additional protection for the pile foundation from the adverse effects of the environment and makes the appearance of the building more harmonious and attractive.
However, we should not forget that many materials, especially the budget segment, have their own flaws:
- toxicity, which may lead to health problems for those living in the house;
- high degree of flammability(for example, decorative panels): this is quite dangerous in case of fire.
Important! The use of low-quality materials or improper work often entails the gradual destruction of the base, which is closely connected to the base. In some cases, repairs with screw piles may be required.

Finishing of a pile-screw foundation is possible in different options. The modern market provides a fairly wide range of materials for finishing the base.
TO the most common relate:
- Siding(decorative panels made of fiber cement or polypropylene). If you are thinking about how to cover a foundation on screw piles, then this option will be the most obvious: siding is relatively cheap, has a high degree of protection from various mechanical loads and is resistant to extreme temperature changes, high humidity and biological influences. This material has a wide variety of appearance: you can buy it to look like brick, natural stone, granite, etc.
- OSB boards. They are made on the basis of polymer resins, which makes such cladding less susceptible to high humidity or the flow of groundwater at a shallow depth from the soil surface. Such slabs are even do not require preliminary priming during installation and are distinguished by their high strength coefficient. Therefore, the choice of this material when deciding how to sheathe a pile-screw foundation often falls.
- Asbestos cement slabs(flat slate) . This is one of the most inexpensive options, which is easy to attach and looks quite presentable, but characterized by increased fragility.
- Facing brick. It will ensure the durability of the base finish for many years, has increased frost resistance and allows you to choose a wide variety of colors and textures to suit your taste.
- Natural or artificial stone. This is an environmentally friendly material, distinguished by a unique range of color shades. He has increased hydrophobicity and excellent heat and sound insulation properties. This finish will serve you for a very long time without deteriorating performance, but it will not be cheap.
- Decorative tiles. Its undoubted advantages are excellent moisture insulation, unique appearance and heat resistance. But the price for it remains quite high, and the heavy weight and the inability to provide ventilation for the base can be attributed to the obvious disadvantages of the material.
Important! If you prefer brick as a facing material, be prepared that finishing will take significantly longer due to the use of cement-sand mortar. To ensure a uniform color of the facade, you will have to use bricks exclusively from one batch.
How to close the base in a pile-screw foundation?

If you plan to build on a pile-screw foundation hinged plinth, you must do the following:
- Any finishing of the base begins with arrangement of sheathing made of wood or metal. It is produced as follows: at a height of 150-200 mm from the ground level, an initial plank is installed, and then a vertical sheathing is mounted on it (the distance between metal slats or wooden planks should be about 400-450 mm).
- The starting strip is securely fixed at the bottom of the sheathing and placed under the panels, sometimes additionally strengthened with a perforated corner.
- Then produce installation of horizontal panels, corners from the outside and inside. They are fastened with self-tapping screws, making sure that they fit into the material as evenly as possible. Do not tighten them too much, leaving a small compensation hole of 1 mm.
How to cover a pile-screw foundation using plinth cladding decorative bricks? Perform the following steps in this way:
- A few centimeters are removed from the thermal insulation layer to ensure ventilation and start laying out the first layer bricks using cement-sand mortar.
- The inner wall of the cladding is made of at least 2 rows of masonry, and it is recommended to do dressing every 2-3 rows of bricks. It is best to lay out the first row with a poke, and the next two with a spoon. The height of the masonry is leveled by means of additional bricks fixed above the rows laid in the butting method.
- At the end of the load-bearing and facing wall tied with anchor bolts or dowels for maximum durability.
Attention! When finishing the base of a foundation made of piles with bricks, it is important to start work at a time when all other parts of the building are already completely ready and closed.
Finishing the base of a pile foundation using a stone consists of the following steps:
- The surface is leveled and primed.
- The stone is cut on the ground in such a way that when laid it forms a kind of mosaic.
- To fix the material on the surface, use glue with high adhesive ability.
Creation shallow strip plinth accessible even to a beginner. To do this, they dig a trench, fill it with cement mortar, build the basement walls using brick and cinder concrete masonry, and finish the basement with thermal panels, siding or any other materials.
It is worth noting that if you have chosen screw piles: a foundation with a basement floor, then all these methods make it possible not only to decorate beautifully, but also protect it almost 100% from adverse weather conditions and mechanical influences.

Insulating the base of a pile-screw foundation is a stage that should not be neglected, since when installing such a foundation, a fairly large empty space remains under the house up to the soil level. The disadvantage of this is the cold floor, which is very uncomfortable to walk on.
You can avoid this by creating thermal insulation layer between the floor covering of the interior and the foundation, for example, by insulating the pile-screw foundation of a wooden house using one of the modern industrial insulation materials.
Reference! Some of the most common materials are mineral wool, polystyrene foam or penoplex, but they all require additional waterproofing due to increased sensitivity to moisture. Waterproof polystyrene foam and foam glass do not have this disadvantage.
Do-it-yourself insulation of a screw foundation is done as follows: algorithm:
- Starting to solve the problem of how to insulate a pile-screw foundation on the base wall eliminate all irregularities and treat it with a primer for more secure attachment of insulation sheets.
- Insulation sheets are glued from the inside using an adhesive composition or a special adhesive foam. In the latter case, the insulation is temporarily attached with special umbrellas to avoid damage to the sheet when the foam swells.
- The joints of the sheets are worked out especially well to prevent cold from entering the house.
- From the inside to the wall of the insulated base add a little soil or expanded clay to avoid blowing.
Important! How to insulate a foundation on screw piles efficiently? The insulation is usually glued in two layers and a metal mesh is installed on top of it to protect against rodents.

The blind area of the screw foundation helps prevent the penetration of rain moisture from the soil and the seepage of shallow groundwater into the underground. For this reason, the floors in the house always remain dry and the microclimate is comfortable. It protects the foundation from plants growing through it and gives it a more well-groomed appearance.
When creating a blind area, it is necessary to take into account following:
- It should have the widest possible width, ideally 60-100 cm (for heaving soils).
- The blind area includes a large number of layers, which are laid at an angle to the foundation (minimum - 1.5 0).
- The bulk layers of the blind area usually include dense clay(thickness 15-20 cm), crushed stone and sand (each layer takes approximately 5 cm). When the soil freezes deeply, layers of foam plastic are laid underneath.
- Where the blind area is adjacent to the house, it is necessary to make an additional insulating seam, for which two layers of bitumen or roofing felt are used.
- The top layer of the blind area must have waterproof properties. Suitable materials include asphalt, reinforced concrete, paving slabs, all types of stone or simply cement pouring. It would not hurt to install trays on the blind area as elements of storm drainage.
Finishing the base of a pile-screw foundation: how to close it yourself, insulation and blind area
After installing all the piles, there remains final stage– finishing of the base of a pile-screw foundation. How to sheathe bottom part ground floor of a wooden house? To do this, you need to select a material and perform a sequence of work, which also includes insulation and construction of a blind area. Read more about how to close the base with your own hands in our article.