Liquid wallpaper for the ceiling: silk, cellulose and cellulose-silk types, application technology. How to apply liquid wallpaper to the ceiling: advice from professionals Liquid wallpaper for the ceiling how to apply
Currently, there are many finishing materials that significantly contribute to bringing the room into the desired state. Previously, it was believed that minimal attention could be paid to the ceiling, but now the situation has changed radically, so various options for finishing it.
One of the most original ways decoration is considered liquid wallpaper. Of course, their application will require some effort, because the work is carried out in an unconventional way for such a product.
Liquid wallpaper on the ceiling is a relatively new solution that allows you to achieve an impressive effect. The material has many different advantages:
On a note! All of these properties contribute to the fact that the decorative coating is very durable: the service life is up to 10 - 15 years, after which all characteristics begin to decline.
 High quality and durability of the coating is guaranteed only if you use a product from a trusted manufacturer
Existing types of liquid wallpaper
Sometimes it mistakenly seems that there are many types of this kind of material. This is due to the fact that construction stores offer various decorative variations. It must be taken into account that the application technology liquid wallpaper does not depend on the base from which they are made.
In reality, there are only three types of material:
- Based on cellulose. You can even make this option yourself. This coating is considered not the most durable. If there is a lot of space in the room window openings, which actively transmit the sun's rays, the material quickly loses its decorative properties. But the main advantage of ready-made compounds is that they are cheap enough not to greatly affect the repair budget.
- Based on silk inclusions. They are very resistant to fading, which makes this wallpaper the optimal solution for bright rooms. We must not forget that the surface turns out beautiful, somewhat elegant. But the cost of such products makes you think about its use.
- A combined option that includes the basics described above. This is the most popular option, offering a balance between price and quality. This mixture is very resistant to ultraviolet radiation, which preserves the coating for a long time.
 Each type of material has high quality, but they reveal their best aesthetic characteristics only in combined decor
 To decide which option is most preferable, they compare together all the characteristics of the material, financial capabilities and the place where such a ceiling will be created.
Nuances of working with the material
It is necessary to prepare a tool that is suitable for working with putty or plaster.
You will need tools from the following list:
- spatula - it is better to prepare three main ones: wide, medium and small (much depends on the ceiling itself);
- primer composition, roller and brush;
- a brush with stiff bristles;
- a set of rollers for working with the decorative layer;
- trowel;
- drill with mixer attachment.
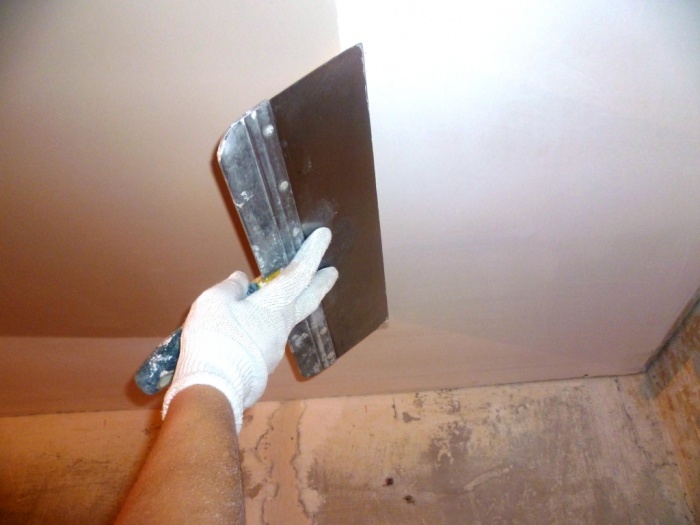
 The main and most important tool for working with liquid wallpaper is a plastic transparent trowel.
 Advice! Many craftsmen advise using an electrical appliance only at the first stage. If you overdo it, the mixture will not turn out as desired. It is better to knead by hand.
Application technology
The general technology of work is divided into three main stages, which are inherent in all finishing activities. So, the complex is initially performed preparatory work, which should provide the required quality of coating. Next, the presence is checked necessary tools, the solution is diluted. The final stage is the cladding process itself, which must be approached with all responsibility.
Preparation
This event includes the following actions:
- It all starts with assessing the surface of the ceiling. It is wrong to believe that liquid wallpaper can correct unevenness and defects. Indeed, the composition is capable of hiding some shortcomings, but not correcting sins. If there is an old decorative layer, it must be completely removed, especially when oil paint, enamel or whitewash was used on the ceiling. It is important to check that no peeling areas remain.
- It often happens that floor slabs have joints that need to be properly sealed with putty. You need to give everything time to dry thoroughly.
- Next, they begin to apply the primer. The composition is selected depending on what type of material will be used. It is better to lay two layers - this will help to complete the wallpapering with the highest quality.
 For any type of ceiling contact finishing, the preparation steps are identical
 It happens that the surface has significant unevenness, then you have to use a large number of plaster. But there is optimal solution- the use of drywall sheets, which will help complete the work much faster.
Preparation of the solution
Present on the market different variants material:
- Ready to use. They are mixtures that are in special plastic containers. They just need to be moved first.
- Dry formulations. Often packaged in bags. They already include everyone necessary components. The preparation process consists of mixing the substance in the required amount of water, which is indicated in the instructions.
- There is another type of dry material. The composition, in addition to dilution in water, requires the addition of various additives, which are presented in the form of textural inclusions and mineral-based additives.
Of course, the price of each option is different. Any composition has its advantages and disadvantages, which must be taken into account in each specific situation.
 Preparation of the dry composition takes at least 8 – 12 hours
 The material is diluted as follows:
- The required amount of water is poured into a container that should be convenient for work, and dry matter is added. The exact proportions must be specified by the manufacturer. Mixing is done thoroughly - you need to ensure that all components are well mixed. Next, the solution is left for some time, from 6 to 12 hours. This is necessary for complete swelling of all components.
- When the time is up, the material is mixed. If necessary, water is added to obtain a paste-like mixture.
The kneading itself is carried out using a mixer, but the tool can damage the components. It is better to use it for initial mixing.
Advice! To prevent the composition from losing its properties, the container is tightly covered with plastic wrap.
 It is advisable to knead liquid wallpaper by hand; the machine method is used only for initial stage, and very dosed
 Working with the ceiling
It should be taken into account that applying liquid wallpaper to the ceiling is carried out in two ways: manual and mechanical.
The general technology is as follows:
- Manual application technology assumes that a spatula, trowel and roller with a textured cloth will be used. The layer should be laid with a thickness of no more than 5 mm. Initially, the composition is applied and smoothed with a spatula - it is better to do this work on convenient adaptation to cover a larger area. The coating is even and smooth. The texture is obtained if after some time you use a special roller, which is moistened in water during operation. A trowel is also used.
- The mechanized method can cause a lot of trouble. The fact is that the process is carried out using a spray gun. Indeed, the operating time may be significantly reduced, but there is a high probability that the device’s nozzles will often become clogged.
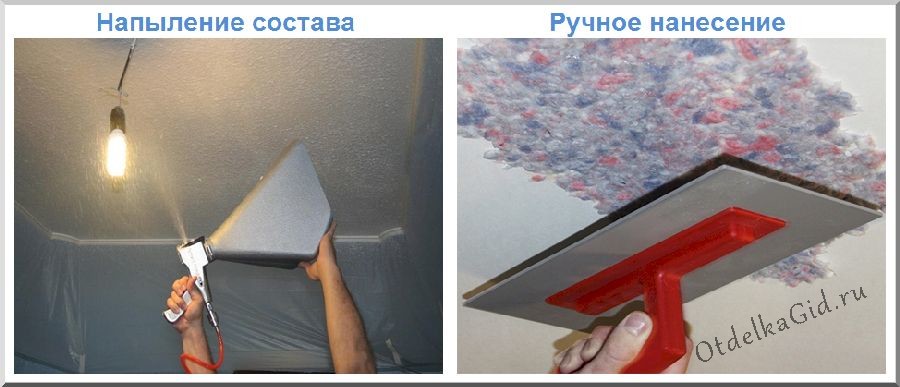 It makes sense to use machine application when arranging large, monochromatic areas; decorative work is carried out only by hand
 Drying of the coating takes several days, during which the decorative layer should not be exposed to any influence. It would be a mistake to decide to use a thermal gun.
Thus, the work is not so difficult, but quite labor-intensive.
Drawing technology
The ceiling covering is significantly transformed when various patterns or textures are applied to it. Liquid wallpaper provides this opportunity.
So, a magnificent panel can be created if you follow the following rules:
It is important to consider that all layers must match. You can use sparkles and beads as decoration.
VIDEO: how to apply liquid wallpaper to the ceiling
The topic of today's article is liquid wallpaper on the ceiling, live photos in the interior, as well as a description of the material and instructions for applying it yourself.
What is liquid wallpaper made of?
Some people believe that liquid wallpaper is plaster, it’s just quite non-standard type. In fact, this is almost true, but this “plaster” does not contain the main component – sand.
Liquid wallpaper is a mixture of binders, adhesive substances and plasticizers (mainly cellulose) and decorative filler, mainly of natural origin. For example: silk fibers, glitter powder, mica particles, and dyes.
In dry form, it is an ordinary building mixture that must be diluted with water until the required consistency is obtained. Then the mixture is applied to the walls using a spatula. Almost anyone can cope with this, since, unlike natural plaster, this fibrous mixture is more pliable and less capricious.
The result is a coating that feels like fabric wallpaper, has a structure, but is completely devoid of seams.
What types of liquid wallpaper are there?

There are two main types: professional mixtures and amateur ones. The first ones are without dye, but they are much more affordable. But the master needs to know exactly how much paint to add to the mixture.
The second option is completely ready for use, has a specified color. That is, just add water.
In addition to this division, liquid wallpaper differs in the types of main filler:
- Cotton
- Cellulose
- Blend of silk and cellulose
That is, than more natural material, the more expensive these coatings are. Silk ones are the most expensive, but they are worth spending money on. This is a fairly durable coating and the cotton version is much inferior to it.
Cellulose mixed with silk - Alternative option, is more affordable, has all the advantages natural fillers, but is not a completely natural substance. However, this option is no worse and can also be considered an environmentally friendly solution.
What are the advantages of liquid wallpaper for the ceiling over paper wallpaper?
Liquid wallpaper has many advantages over conventional coatings, such as wallpaper and simple putty.
Firstly, they look much more interesting, and secondly, finishing the ceiling with liquid wallpaper is possible on any plane, even convex. They are very suitable for multi-tiered ceilings and places with corners that are very difficult to trim with paper without getting bends, distortions and other defects.

The coating looks solid, cast and completely smooth.
But these are all only external advantages. There are also practical ones.

But that's not all. Liquid wallpaper good from an environmental point of view. They are hypoallergenic and suitable for people who have reactions to chemicals and dust.
What can you say about the cons? Yes, they don’t exist; in fact, it’s difficult to come up with something. The only thing is that the colors are very much for everyone. But, if you are satisfied with just such effects, then don’t look for shortcomings, there are none.
With a lot of creaking, the disadvantages include a long hardening time, about two days. But... What's the difference? What's the hurry?
Options for using liquid wallpaper on the ceiling
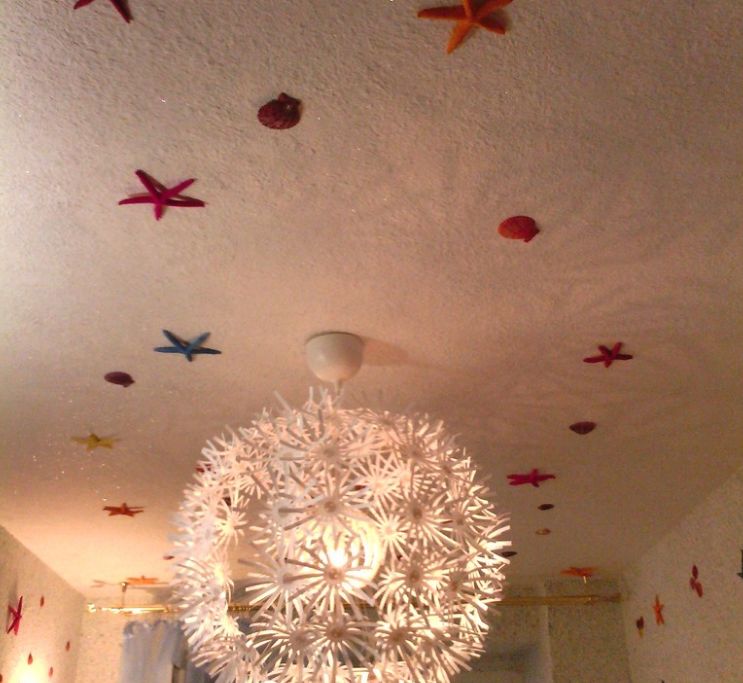
Now, let's move on to the practical part and see how you can use this material on the ceiling. The scope for imagination here is simply unlimited. Not only can you play with the difference in textures, you can also make drawings with them! Look at this photo, this is how it looks in the interior.


The rose is made from one type of mixture, and the background is made from another. And most importantly, almost everyone can do all this with their own hands.


It also looks interesting when liquid wallpaper is combined with a smooth, painted surface. Let's say you can decorate the box around the perimeter of the room smooth, but inner part make it textured.


It looks no worse than suspended ceiling! And what’s good is that the application technology is simple, but the appearance is very solid. The main thing here is to choose the color well.


You don’t have to mix textures, but create contrasts only with liquid wallpaper.

I would like to note that it would be very nice to duplicate the volumetric texture of the ceiling somewhere on the walls. For example, decorate columns or arches with liquid wallpaper. Then the ceiling will look very organic.
Technology of applying liquid wallpaper step by step
You already know what liquid wallpaper is and what it looks like. Now let's look at how exactly to use them and where to start finishing.

1. The ceiling needs to be prepared. There is no need to heavily smooth the surface of the putty, but the level must be leveled as well as possible. Although, it must be admitted that the colorful and variegated colors of liquid wallpaper visually even out minor defects.

2. Buy a primer and go over the ceiling. This is a mandatory step that cannot be avoided. If you do not use a primer mixture, then putty particles will not allow the liquid wallpaper to adhere well to the surface.

You can dilute the primer, or you can apply it directly to pure form. It all depends on the volume of your ceiling. If one container is enough for the entire surface, then you don’t have to dilute it, but if not, then it’s better to dilute it with water in order to save money.
But here, again, everything depends on the initial layer of putty. If he is fat then better soil Do not dilute, because otherwise there will be a slight absorption.
Do not use Ceresit ST17 primer, as it produces a slight yellow tint that may appear on a colored background.
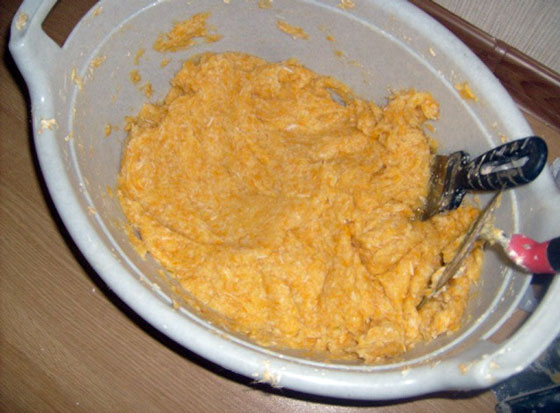
3. Place liquid wallpaper as written in the instructions. In general, in principle, it is better not to rely on the instructions, but to add water gradually stirring. The consistency should be approximately the same as thick plaster.

An important point: first pour the dry mixture into the container, and then add water. Once the mixture reaches the desired consistency, add a little more and set aside to swell for 15-20 minutes.

4. Take large spatula, made of plexiglass or stainless steel. Apply the mixture onto it with a second spatula. Then treat the surface of the ceiling, being sure not to press too hard.
The layer should not be excessively thin, let it be voluminous and at least 2 mm thick.
5. Try to immediately avoid unevenness between the new portion of liquid wallpaper and the previously applied mixture. Smooth out these places immediately, do not leave them for later.

6. When you completely cover the ceiling, look critically and find differences and shortcomings. The mixture will still be quite plastic, so it needs to be leveled right away.
7. Leave the ceiling to dry for approximately 48 hours. It is advisable not to create drafts, as this may cause cracking of the surface.

That's all the technology is. As you can see, it is elementary, but the design of the ceiling at the exit is very original.
In conclusion, we can say one thing: the material is good, the reviews online are positive, so take it boldly and act!
Liquid wallpaper for the ceiling is a universal material that allows you to create smooth and even surfaces without seams or transitions.
Covering the ceiling with liquid wallpaper
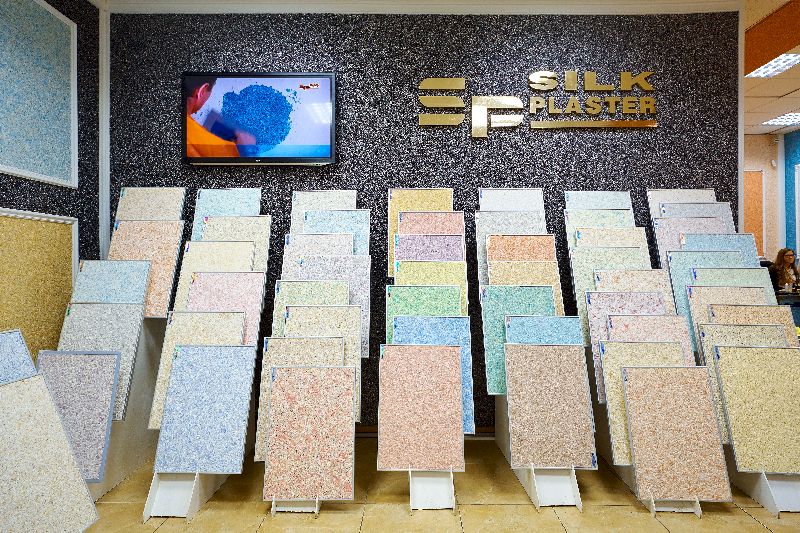
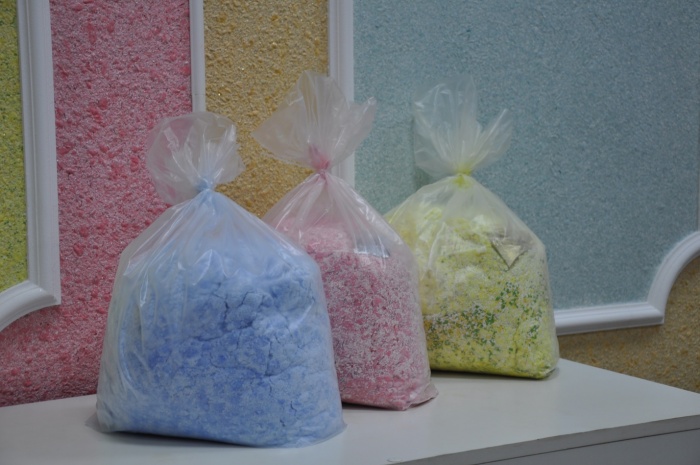
Types of liquid wallpaper
Specifications, appearance finished ceiling and duration service life decorative coating depends on the composition of the material. Liquid wallpapers are:
- cellulose;
- cotton;
- silk;
- mixed.
Pulp
 Photo cellulose wallpaper on the ceiling
 The main filler is cellulose fiber, so this type of wallpaper has the shortest service life compared to others. Another disadvantage of the coating is its instability to UV radiation; wallpaper quickly fades when exposed to sunlight. The advantage of the material is its reasonable price.
 Cotton wallpaper composition
 A significant part of the composition (98%) comes from natural fibers and 2% from adhesive binders. The result is pleasant to the touch, soft covering, environmentally friendly, which is used for finishing ceilings and walls in bedrooms or children's rooms. An additional plus is the heat and sound insulation of the room.
 Texture of silk liquid wallpaper
 They are presented with strong and durable coatings that do not fade in the sun. Often used to decorate the ceiling surface in spacious rooms with sufficient natural light. Thanks to decorative additives, silk wallpaper allows you to reproduce an imitation of fabric, patterns, and marble. The main disadvantage is the high price.
Combined
 Using different textures in the living room
 Combines the properties of the three previous types. The result is a coating that is not expensive and has high decorative qualities. For the price of mixed liquid wallpaper direct influence provides a percentage of the dry mixture of silk or cotton fibers
Advantages and disadvantages
Liquid ceilings are used for finishing interior spaces and for other reasons:
- ease of preparation. To prepare the material for work, you do not have to spend a lot of time and effort. So, when using conventional roll wallpaper, they need to be measured and joined correctly. Liquid formulations are simply poured with water and waited a little before applying;
- ease of use. The material is applied to the ceiling surface as ordinary plaster or putty. By consistency ready-made compositions similar to cotton blends. Distributing such a substance will be much easier than gluing rolled sheets;
- does not require careful preparation base foundation. Liquid wallpaper will reliably disguise minor flaws and defects draft ceiling, as a result the surface will be even and smooth;
- seamless. After finishing, there will be no seams or transitions left on the ceiling, while the use of rolled wallpaper requires careful adjustment of the joints;
- liquid wallpaper can be applied to ceilings painted with water-based or oil paint, and there is no need to remove the previous finish;
- Such compositions are used for repairing ceiling surfaces in small rooms, premises non-standard sizes and forms;
- the material is completely safe for health, made from environmentally friendly components, does not cause allergic reactions, and is odorless;
- Having finished the ceilings with liquid wallpaper, you don’t have to worry if damage occurs somewhere. They are easy to eliminate: just moisten the defective area with water, remove the previous layer of material, apply a new one;
- repeated use is another plus to the benefits of liquid wallpaper. To remove the finish from the ceiling, the coating is generously moistened with water, then removed in small pieces, soaked in warm water, mix and apply again. In this case, dry storage of dismantled wallpaper is allowed for up to 6 months.
 Raw material
 As for the disadvantages, liquid wallpaper also has disadvantages. These include:
- Compared to paper alternatives, they are more expensive. But the service life is 7-10 years, while for most paper analogues the operational period is limited to five years;
- poor color range. However, this minus can be easily compensated for by using colored pigments, glitter and other decorative components, with the help of which it will be possible to obtain the desired shade and design;
- Liquid wallpaper must not be washed. If any area is heavily contaminated, it is removed and a new layer of composition is applied to the cleaned area. Due to low moisture resistance, liquid wallpaper is rarely used to decorate ceilings in bathrooms and kitchens. If the material is used to decorate these premises, on top liquid ceiling covered with a layer of colorless varnish.
- fresh finish takes a long time to dry. Drying speed is affected by air humidity and temperature. On average, the complete drying time of the composition is 2-4 days. You can speed up the process by using a heater or drafts, leaving windows and doors open.
Interesting information: (step-by-step guide).
 DIY application
 The technology for applying material to the ceiling is similar to the process of finishing walls. Before you begin the repair, you will need to prepare:
- container for diluting the composition;
- spatula for applying thinned wallpaper;
- rubber or foam roller;
- a grater made of metal or plastic;
- spray bottle with water;
- relief roller.
 Surface preparation before applying liquid wallpaper
 Finishing ceilings with liquid wallpaper begins with preparing the base base:
- remove falling off fragments of the previous finish;
- if previously they were glued to the ceiling paper wallpaper, the material is completely removed;
- deep cracks are filled with putty or sealed with liquid wallpaper in the process decorative finishing, but then the repair time and its final cost will increase;
- primer is applied to the cleaned surface deep penetration, preventing the penetration of moisture deep into the ceiling, improving the adhesive properties of the decorative material;
- in the presence of metal parts on the ceiling, they are coated with PF enamel or water-dispersion paint to prevent the formation of rust and corrosion;
- The ceiling base is roughened using a primer emulsion with quartz dust or by adding fine sand to the primer.
 Selection of colors and shades of material
 To ensure a uniform shade of the decorative finish, prepare the composition immediately to cover the entire ceiling surface of the room. But first you need to calculate the amount of material.
Typically, manufacturers indicate a layer thickness of 1-1.5 mm on the package with the dry mixture. A standard package of dry wallpaper weighing 1 kg is used to finish 3-6 m² of ceiling. If there are defects, cracks or differences in height on the base base, the thickness of the applied layer will be greater, therefore, the material consumption will increase.
To calculate the number of bags of dry mixture you will need to buy, divide the area of the room by the minimum area indicated on the packaging. For example, you need to finish the ceiling in a room with an area of 25 m². Accordingly, we divide 25 by 3 and get 8.3 packages, round the value up to a higher number (9).
On a note! There is no need to skimp on repairs and finishing. Immediately purchase material from one batch for the entire ceiling, since even the same manufacturer sometimes has different shades in different batches of material.
 Mixture preparation process
 Before use, liquid wallpaper is prepared as follows:
- The bags are shaken vigorously to prevent the appearance of lumps;
- pour the contents of the package into a clean container. One package will require a bucket or basin with a volume of at least 8 liters. Coloring pigments are also added here to give color;
- add 5 liters to the dry composition clean water temperature 20-30°C;
- mix the mixture by hand or construction mixer at low speeds. If the consistency turns out to be too thick, add water a little at a time and stir the composition again;
- lumps are immediately removed from the solution;
- leave the diluted wallpaper to infuse for 25-30 minutes.
 Applying liquid wallpaper to plasterboard ceiling
Before applying the material to the surface to be finished, check the readiness of the mixture. To do this, cover with diluted wallpaper small area ceiling. The composition must adhere reliably and not fall off. If the mixture is thick, add water and stir again. A substance that is too liquid will have to be given time to evaporate excess moisture.
Apply the finished mixture to the ceiling with a wide spatula or trowel. The solution is evenly distributed over the surface in a circular motion. For final leveling, take a spatula, which is used to apply putty. Before ironing the wallpaper-covered surface, the tool is dipped in clean water.
A paint roller is also used to apply wallpaper. In this case, the mixture is glued to the ceiling in portions, and the surface is smoothed with a moistened tool. To obtain a textured relief, relief rollers are used, but they work with tools after the wallpaper has dried (after 6-7 hours).
When the finishing is completed, check the quality of the work done by illuminating the areas with a lamp at an angle of 45°. Thus, it will be possible to examine defects and correct shortcomings.
 Homemade wallpaper by decorative properties no worse than store bought
 If you wish, make such wallpaper yourself. For this:
- take 40 sheets of A4 paper, cut into small pieces;
- pour over paper base V suitable container, pour in 1.25 liters of water;
- leave for one hour to swell;
- mix with a construction mixer;
- add two caps of color suitable color, stir again;
- pour 40 teaspoons of gypsum mixture into the resulting composition, pour in 200 ml of PVA glue, stir, give the wallpaper time to set.
When properly diluted, homemade wallpaper in terms of decorative properties they will not be inferior to purchased ones.
Liquid wallpaper will help make the interior interesting and sophisticated. At the same time, preparing and applying the composition will not cause difficulties even for a beginner. With help this method finishing will be possible to reproduce reliefs, ornaments, drawings on the ceiling surface and quickly update the room. The main thing is to carefully read the instructions before work and follow the recommendations.
Video on the topic
Liquid wallpaper on the ceiling is no longer news. Consumers have realized the advantages of this finishing material, so they are increasingly using it in interior design. In addition, liquid wallpaper is easy to apply; making the ceiling beautiful with your own hands is not a problem. And if we talk about applying it to walls or ceilings, then there is practically no difference. It is simply recommended to bring the ceiling surface to the maximum level of evenness.
Why? It's all about the lamps installed on the ceiling. The light rays are directed at the surface at a low angle, so all its flaws in the interior of the ceiling will be clearly visible. This is especially true for bulges. And if the unevenness of the walls is allowed up to 3 mm, then the ceiling must be very smooth. Therefore, although applying liquid ones is simple, you will have to tinker with the surface in terms of its preparation.
Ceiling preparation
Start off preparatory stage it is necessary to identify all defects. And if a suspended or tension structure was installed at the top, then you will have to get rid of it. What else needs to be done.
- Remove all bulges with a spatula.
- Expand (widen) cracks.
- Clean the ceiling surface from dust.
- If there are smudges, clean them up sandpaper. It would be optimal to deepen these areas, that is, remove part of the material.

And now the most important stage- This is to treat the surface with a deep penetration primer. This mixture strengthens the surface by penetrating into the material, where it polymerizes. The outer layer of the ceiling becomes durable and does not crumble or crack.
Now you can proceed to leveling operations. For this it can be used gypsum plaster or putty. Plaster is usually used if the surface has a sufficiently large difference. Putty if the difference is insignificant. In this finishing operation, the most important thing is to correctly apply the solution to the surface. Doing it yourself is not always easy, especially creating an even layer on the surface in one horizontal plane. Therefore, experts recommend applying putty or plaster in several thin layers. Last layer should be the thinnest, as they say, finishing.
Attention! Plaster or putty is applied only to a dry surface, so each layer must be dried naturally.
So, the ceiling is leveled, now it must be treated with a primer. And the last thing is to apply white paint, preferably water-based paint. At this point we can assume that the preparation of the ceiling for liquid wallpaper is complete.
Preparing a plasterboard suspended structure
Often, in order not to bother with a large amount of dirty work, the ceiling is finished with plasterboard. Moreover, it is possible to build multi-tiered structures, thereby making changes to the interior of the room.
Preparing a plasterboard ceiling is not as difficult as a regular one concrete ceiling. This is already an almost leveled surface, which has its own flaws - these are sheet joints and places where screws are installed. These are the ones that need to be puttied. Putty is applied to the joints, followed by a special fastening tape. After which another layer of putty is applied. The screw caps are simply covered with leveling compound. But leveling the ceiling does not end there. It is necessary to cover its entire surface with a thin layer of putty.
Is a plasterboard ceiling primed? Necessarily. This applies to both the gypsum board sheets themselves and the putty layer. After which decorative silk plaster is applied, that is, finishing is done with liquid wallpaper.
Last stages of preparation
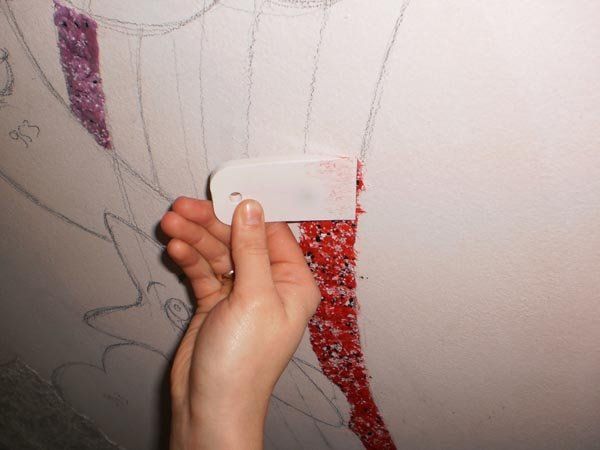
So, before applying liquid wallpaper to the ceiling, all that remains is to do a few small efforts. If any patterns or drawings will be placed on the surface, then it is necessary to draw a sketch or mark the boundaries.
Often used in ceiling interiors different materials, therefore it is worth strictly defining their boundaries. Typically, chalk is used for these purposes, and construction tape is installed over the applied line. Decorative silk plaster must not be allowed to fall on the adjacent surface.

If you decide to make a complex figure on the ceiling, then for these purposes you need to cut out a template from thick paper. It is installed at the place where liquid wallpaper will be applied, where it is secured with double-sided tape. As soon as the operations on decorating areas of the ceiling that are not intended for finishing with liquid wallpaper are completed, the template is removed and open area Decorative silk plaster is applied.
How to prepare liquid wallpaper
Method for preparing this finishing material simple enough. To do this, you will need a clean container (bucket, basin) into which the material itself is poured. After which water is added to it. The serving ratio is six liters of clean water per kilogram of material. Now you begin to press the mixture with your own hands, stir it until a homogeneous mass is obtained (see photo and video). After which the almost finished silk mixture is placed back into a plastic bag (in a container), where the silk plaster should, as they say, mature, that is, be completely saturated with water and swell.
And a few more tips:
- You cannot use any tools to mix the mixture with water; everything is done by hand.
- If the wallpaper comes with decorative additives, then first pour water into the container, then add the additives, where they mix well. And only then the cellulose material is laid.
- Worth purchasing decorative plaster more, despite manufacturers' recommendations (one kilogram per five square meters). The thing is that it is much more difficult to work upstairs under the ceiling, and it will be simply impossible to maintain an accuracy of 2-3 mm in the thickness of the applied layer. And there is a high probability that at the beginning of applying decorative plaster, peeling of the material will appear, which will lead to overuse.
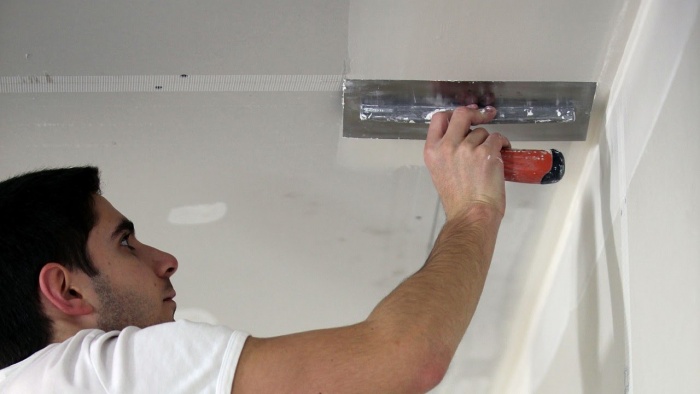
Application process
Applying liquid wallpaper to the ceiling requires only two tools: a grater (two types) and a wide metal spatula. The first is the actual application and distribution of the material over the surface, the second is the final leveling (see photo and video).
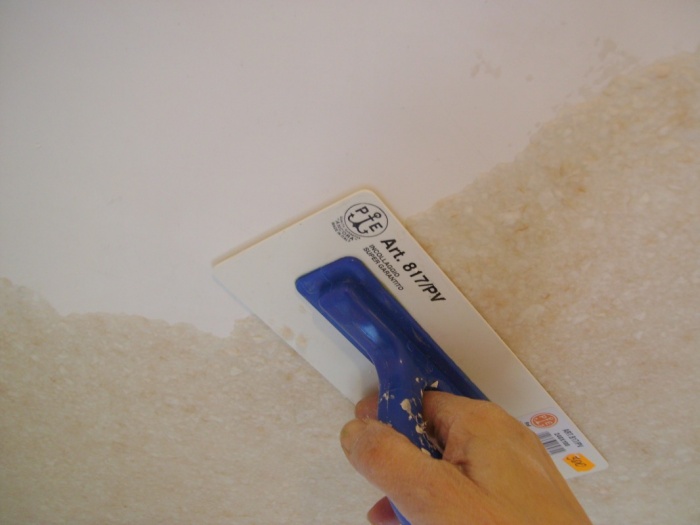
Decorative silk plaster is applied in a small volume, which is distributed over the ceiling area with a grater. In this case, it is necessary to carry out circular and chaotic movements. This is done for one purpose - to distribute the cellulose fibers in different directions. This will give the interior of the ceiling a more beautiful structure.
Then you take a plastic grater into your hands; it is made specifically for applying liquid wallpaper, with the help of which the finish is brought to a thickness of 2-3 mm (see video). And now it remains fine finishing where a wide spatula is used. Its working edge is pre-moistened in water and passed along the almost finished ceiling. In principle, this can be said to be the end of the process of finishing the ceiling with liquid wallpaper. It is better if you check the evenness of the surface again. Therefore, it is worth climbing right up to the ceiling and looking at it from an acute angle. This is how you can identify small differences, which you can get rid of by running a wet spatula across the surface.
And some useful tips:
- Keep the ceiling covered with liquid wallpaper for drying in some unique conditions not necessary. Decorative silk plaster is not afraid of drafts, high humidity and temperature changes. So such a ceiling will dry out in any case.
- Remaining material should not be thrown away. They can be dried, placed back in a plastic bag and placed in a dark, secluded place. Suddenly there will be a need to use it, for example, if some area becomes dirty or damaged by mechanical impact. You just need to wet this area and remove the applied plaster, after which the residue is mixed with water and applied using exactly the same technology as the bulk.
December 12, 2016
Specialization: master in construction plasterboard structures, finishing works and styling floor coverings. Installation of door and window units, finishing of facades, installation of electrical, plumbing and heating - I can give detailed advice on all types of work.
In this review, we will figure out whether it is possible to apply liquid wallpaper to the ceiling, and what nuances need to be taken into account when carrying out the work. You do not need to involve specialists in the work and pay significant amounts. Just read the article and follow simple recommendations to achieve a good result.


Workflow Description
In order for anyone to easily understand the technology, the process is divided into 3 main parts:
- Ceiling preparation;
- Preparation of the composition;
- Application to the surface.
Each stage will be described in detail below. You need to do it in order simple steps. No special skills or equipment are needed.

Stage 1 – preparation
Without proper preparation Do not apply liquid wallpaper. This part of the work consists of the following actions:
- If there is old coating on the ceiling, it should be removed. The old wallpaper is soaked and separated, the whitewash is removed using a scraper. If the surface has been painted with water-based emulsion and it holds well, then it is not necessary to remove the composition;

- If there are pockets of mold on the ceiling, be sure to treat all the pockets with an antiseptic solution. The composition must be applied 2-3 times so that it penetrates as deeply as possible and kills the fungus not only outside, but also inside the materials;
- The surface is inspected to determine whether there is damage or cracks. If some areas of plaster and putty are cracked, then they should be removed. All problem areas are sealed with putty, it is applied so that the surface is smooth;

- If there is no noticeable damage to the surface, it still needs to be checked with a rule or level. If the plane is uneven, then it must be completely leveled;
Minor scratches and damage are allowed on the surface. All minor irregularities can be eliminated with liquid wallpaper without any problems. The main thing is to eliminate large irregularities.
- To strengthen the surface and improve the adhesion of the decorative coating, a deep penetration primer is used. The composition is prepared as recommended in the instructions, after which it is applied using a roller or brush. The treatment is carried out in 2 layers, if the base absorbs strongly, then it is better to apply even 3 layers. In areas adjacent to the walls, a brush is used for application;

If the ceiling is dark, then in order to prevent the base from showing through from under the coating, I recommend using paint instead of one layer of primer. Or you can initially purchase a composition with a coloring pigment to make the surface light.

Very often, several types of liquid wallpaper are used on the ceiling. You can make a frame around the perimeter, or you can create a real picture. Ceiling preparation in this case includes another type of work:
- Decide what the ceiling will ultimately look like. It is better to draw a rough sketch of the decorative coating on paper;
- Measurements are taken on the surface to make initial marks. If the lines are straight, then you can use a level or a tapping cord to outline. Circles are drawn with a pencil and a thread of the required length. Pictures and compositions are drawn either manually or using pre-prepared patterns.

Stage 2 - preparing liquid wallpaper

Those who prepare the composition for the first time very often admit serious mistakes. Because of this, the quality of the mixture decreases and the appearance deteriorates. To avoid this, follow these simple recommendations:
- For work, use a container of a suitable size. You can mix several bags at once, the main thing is that the container capacity allows you to do this. We will mix the mixture by hand; if you don’t want to get your hands dirty, buy rubber gloves;
Never mix liquid wallpaper with a mixer or other electrical appliances. This degrades the quality of the composition.
- Carefully read the instructions from the manufacturer, they are always on the label. Most often there is even a diagram that shows the workflow step by step. The main thing is to clarify required amount water per package of dry mass;

- First of all, you need to pour the required amount of water into the container. The temperature of the liquid should be room temperature, do not take hot or cold water, this may ruin the liquid wallpaper;
- The contents of the package are carefully poured into the container. Mixing begins, the work is done manually, carefully crush all the lumps so that the water saturates the entire composition evenly;

If you add decorative components (glitter, etc.) to the composition, then they need to be poured into the water first. This way they will be distributed evenly throughout the mass.

- If you need to prepare a lot of ingredients, and large capacity no, you can mix the wallpaper in several buckets. After their preparation, the mass is mixed to avoid differences in shades. This can be done even on a piece of polyethylene;
- Most often, liquid wallpaper should sit for 12 hours. But there is more modern options, which are ready for use within 1-2 hours after mixing;
- The finished mass is mixed well again, after which you can begin work.
Stage 3 – application process
To do the work yourself, you need a simple set of tools.

The work is carried out in the following order:

- First of all, you need to check whether the composition fits well on the surface. Liquid wallpaper for the ceiling should stick well; if it falls off, it means there is too little water in the mixture and you need to add it to make the mass more plastic. If there is too much water, then you should leave the composition for half a day or a day so that the excess moisture evaporates;
- To avoid staining the walls and other elements on the ceiling, you need to cover all junctions with masking tape. Before gluing it, do not forget to wipe the surface from dust;
- If there are protruding structures on the ceiling, then first of all you need to trim them. The composition is applied to the surface with a grater and distributed over it in a layer of 2 to 4 mm. It is important to cover all areas so that the base does not show through, after which all excess is carefully removed;

- The composition is applied to the ceiling from any area convenient for you. First, spread it in a thick layer. Then the mass is stretched over the surface so that the layer is uniform. Do not press the iron too hard so as not to deform the fibers or compress them; the coating should have ;

- The area is approximately square meter checked by light. If there are no significant irregularities on the plane, work continues. If there are irregularities, they are immediately eliminated by adding the mixture or removing its excess;
- If two or more colors are used on the surface or a drawing is made, then the work is carried out in several stages. First, the main background is applied, after it dries, a different color is used, and so on.

If you do not have time to use up all the mass at one time, then you should place it in plastic bag. It is tied and the composition is preserved optimal humidity, it can be used the next day.

Drying of the composition takes about a day, during which time you can open the windows; drafts are not a problem for this type of coating.
