Do-it-yourself fence made of willow twigs. How to make a fence from branches
Today, many craftsmen make their own wattle fence for the dacha. IN Lately this has become most common due to the fact that the rustic style is gaining popularity in the exterior of country landscaping. If you want to get the effect of natural naturalness, then you should use a wicker fence when decorating the area; it will go well with decorative benches and Making your own wicker fence in the country with your own hands for a flower bed is quite simple, anyone can do it.
Types of wicker fences
Before you make a fence with your own hands for your dacha, you need to think about what type of fence you will have installed. A specific height can be selected and a functional value can be determined. Thus, it is necessary to make a low fence, the height of which is equal to or less than 1 m, if there is a need for decorative element landscape design on the site. This fence will allow you to protect a path or flower bed. The fence may be slightly higher. This element is created for zoning the territory. A medium-height fence is usually used to emphasize the boundaries of the territory, but the illusion of enclosure will not be created. But higher fences, the height of which is 2 m, are created as full-fledged fences. They are installed along the external boundaries of private territory.
Selecting material for wicker fencing
Before you make a fence at the dacha with your own hands, you need to select the material. This must be done correctly, since the lifespan of the fence depends on this. Thus, if you choose cattail or reeds for weaving a fence, you must be prepared for the fact that the structure will last no more than 4 years. But if there is a desire to make a more durable fence, the service life of which will reach 10 years, then it is necessary to use vine, as well as willow or hazel. However, these periods of use of the fence can be extended by using a method of treating wood with antiseptic compounds. In addition to the material, you also have to choose a weaving method, which may involve the use of vertical or horizontal weaving techniques.
Choosing a basis for a future design

Do-it-yourself wickerwork for the dacha must begin after the base has been selected. Sections can also act as it. To perform them, it is necessary to use thin twigs or branches that are previously well intertwined. To construct a fence, it is permissible to use wooden stakes or steel supports. But it must be remembered that if wood is used for this part of the structure, it will rot faster and shorten the life of the fence. In order to install stakes, it is necessary to use the method of initially preparing holes, at the bottom of which sand is placed. This will protect the wood from prolonged exposure to water, which can linger in the ground. Whereas the sand will begin to act as a layer through which moisture will begin to penetrate deeper within a short time. This will prevent the wood from rotting.
Features of installing stakes

The do-it-yourself wattle fence for the dacha will be made on the basis of stakes, the surface of which must be treated with a chemical antiseptic composition before installation. In order to increase the stability of the fence, the stakes must be buried at least 0.5 m. should be used when there is a need to build a high fence, the height of which is more than 2 m. But if you have to work on a low fence, then the stakes can be made of wood. It is necessary to choose those that have a thickness of at least 5 centimeters. They must be installed vertically using a level.
A do-it-yourself wattle fence in a dacha should be made with decorative intent in mind, which is why all accompanying elements should be painted in the color of the vines or branches used in the work. The step between supports or stakes should be 0.5 m. As practice shows, the mentioned distance is most suitable for weaving flexible and rigid branches. However, the master can choose the distance independently, taking into account the flexibility and thickness of the rods. Individual design ideas are also important.
Along the trench, the supports should be located at the same spacing, while closer to the edges of the fence it is preferable to install them more often. This technique will allow you to get a kind of lock for fixing the ends of the rods.
Features of preparing rods before weaving

Do-it-yourself wattle fence in the country is usually made from willow, hazel or willow branches. However, if it is not possible to buy or stock up on flexible vines, you can use thin annual branches fruit trees, planted in the garden. If you decide that you will make a high fence, then it is permissible to use branches whose thickness is 3 cm, while low fences intended for decorative purposes are preferably made from 2 cm rods.
You need to cut long shoots that are fairly even. They are initially dried and stored in bundles, tied. This way the workpieces can last long enough for a long time. To make a fence, it is permissible to use freshly cut rods that have green leaves.
Preparatory work

If you decide to make a fence at your dacha with your own hands, it is advisable to watch the master class or read more carefully the information in this article. The branches that you have prepared for weaving should be soaked very well. This will make them more flexible. Such blanks are easy to weave. To steam the workpieces and make them more flexible for a certain period, it is recommended to arrange a “steam bath”. After this procedure, the branches will dry out and regain their former strength. However, the described procedure can only be used in the case of untreated and unvarnished rods.
Weaving features

If you decide to make a fence at your dacha with your own hands, you can read the master class in the text. Weaving must begin from the bottom row, rising to the top of the fence. The rods are held alternately between support pillars. The blanks should wrap around the support stakes, resulting in a figure of eight. In order to ensure that the fence does not move to the side during the work, and that it remains perfectly level, the supports in their upper part must be fixed to even strips, and after the weaving is completed, these elements can be removed, and the fence will take on a complete look. When braiding the rods, make sure that the ends of the workpieces are located strictly along inside fence, otherwise appearance fencing will not be attractive. Before you make a fence at the dacha with your own hands, you need to prepare the wire that will be used to secure the ends of the rods. But the tails need to be cut off with a knife. There is no need to tuck the ends in the last row; they are tucked along the stakes.
Decorating the fence
If you are thinking about how to decorate the wattle fence in the country with your own hands, then for this you can use varnish, which should be chosen to match the landscape design. It is permissible to use artificial sunflowers and other attributes that suit the rustic style as decorative elements. You can use various wooden exterior items. You can easily make a wattle fence in your dacha with your own hands, a photo of which is presented in the article.
Unthinkable without wooden fencing, the most colorful of which is wicker fence made of branches. Like any other, a decorative wicker fence consists of the following basic elements:
On your own and without extra costs can be built DIY wicker fence made from branches for every taste, guided by detailed instructions.

Harvesting vines
To make a real rustic fence, young shoots of any trees and non-thorny shrubs are used. Best suited for these purposes:
A low-cost method of harvesting vines is to go to the nearest planting or to the bank of a river.


Vine for weaving can be collected at any time of the year, but it is better to do it in winter or early spring before the sap begins to flow.
The most popular and available material is a willow tree. Since many species grow in the middle zone, it is better to choose twigs of a juicy green, yellow or reddish hue for weaving. To make a wicker fence from branches, annual shoots with a diameter of 1.5-5 cm and a length of 2-3 meters are suitable. The thickness depends on the designer’s intention - low fences can also be made from thin branches. Using a sharp knife, the branches are cut at an angle and tied into tight bundles.


If harvesting is carried out in winter, the vine must be thawed at room temperature for several hours before processing.
Then the bark is removed. This is done in order to extend the service life of the structure. If desired, a fence woven from debarked vines can later be painted or varnished.
There are several methods for removing bark:
If the vine is harvested at the beginning of sap flow, the bark is removed well and without additional effort.

The prepared vines are stored in bundles on special supports or in a suspended state.
Construction of the base
Depending on the height of the fence, metal rods, wooden stakes or posts are used for supports. Used for high fences metal pipes, and in small decorative fences wooden pegs will look more natural.
The disadvantage of using wood is its susceptibility to rot, so before starting work bottom part treated with any antiseptic. You can use bitumen, resin or firing over a flame.
Then the future fence is marked - pegs are driven in at control points and string is pulled. The marking follows the contours of the fence.

The pegs are cut to the height of the desired fence with a margin of 10-15 cm at the top and at least 40-50 cm at the bottom (the part that will be in the ground is treated with anti-rotting agents). It is convenient to make holes for stakes using a crowbar, driving it into the ground:


The distance between the pegs depends on the thickness of the vine and the height of the fence, and on average ranges from 30 cm to 1.2 m.
With a vine thickness of 2.5-3 cm, the optimal distance between the supports is 50 cm. The outer pegs are installed 2-3 times closer to each other - to create a castle. In our case, this distance will be 20 cm.
It makes sense to divide the prepared rods by thickness - in the lower part of the fence it is advisable to use thicker branches.
Fence weaving
You should start braiding starting from the thick end of the branch. The first rod is placed on the front side of the first peg and placed on the back of the second one. When the vine ends, they begin to insert the next branch into the previous peg. The second row is woven from the opposite end of the structure. The weaving of the second row will be a mirror image of the first:


If the branches are too thin, weaving in bunches looks impressive. You can use vines of different lengths so that the thin and thick ends are evenly distributed along the entire weave:


Over time, the vine shrinks and uneven gaps may appear between the rods, so each subsequent row is laid close to the previous one (you can compact the rows with a hammer). Every 4-5 rows, the last rod is screwed to the posts on the front and back sides - this will prevent the entire weave from falling down in the future. Excess, strongly protruding parts of the rods are cut off as we weave. The upper rod is also fixed to the pegs using screws or self-tapping screws - if the branches are deformed, the fixed ends will not rise.
If wicker fence made of branches tall, at a distance of 20-25 cm from the top, the three outer columns are tied with wire. Then, using a short piece of reinforcement, the wire is twisted. This technique will protect the structure from “pressing out” the outer support.
Unusual wicker fence made of branches
A type of wicker fence is a fence made of driftwood. Although the weaving technique is not used here, the bizarre shape of the material creates the illusion of openwork lace:


During production fairy fence It is important to follow the following rules:
The final touch in arranging a wicker fence made of branches will be its decoration. It is advisable to open the structure with an antiseptic composition. Some substances change the color of wood:
The protruding parts of a wicker fence made of branches can be trimmed flush with the main plane, or can be decorated with clay pots.
A wicker fence is an original decoration for a personal plot that can give a landscape design a unique rustic flavor. It’s not difficult to make a wicker or tyn with your own hands; you can use flexible vines, birch branches, peeled veneer, boards, and reeds. You can also use modern synthetic materials, characterized by increased strength and wear resistance.
Read also how to do it with step by step instructions, in our new article.
Video - How to make a wicker fence with your own hands
To build a real rustic fence, you can use many materials that are strong, durable and resistant to environmental influences.

Table. Material for making a wicker fence
| Material for making a wicker fence | Description |
|---|---|
| Willow | Properly prepared and dried material is flexible and durable. Of the wide variety of species of this plant, almost all can be used for the construction of wicker fences. Two types of fencing can be built from willow - living and non-living. Living fencing is the planting of young shoots in the soil, which as they grow form into a wattle fence. For non-living fencing, cut shoots of plants are used. |
| Reed and cattail | These natural materials characterized by fragility and fragility. It is not practical to use them to construct a full-fledged fencing of the territory. After a few years, the fence will become unusable and will have to be completely replaced. You can use reeds to create low fences for a flower bed or for zonal delineation of a personal garden area. |
| Vine | Long and flexible rods are easy to bend and can withstand temperature changes and high humidity. |
| Hazel | To make a hedge, flexible young shoots are required. Procurement of raw materials is carried out in early spring, before the appearance of the buds. |


Procurement of material
It is recommended to use freshly cut willow shoots, which have excellent flexibility, to make the fence. Optimal time- from September to March. If the rods were prepared ahead of time and became too brittle, you can make them flexible using hot water. To do this, it is recommended to soak the raw materials in warm water for several hours so that the shoots gain moisture and become more pliable.
Materials and tools for building a fence

- Willow branches, diameter from 1 to 3 cm.
- Support pillars. You can use both metal pipes and wooden beams. During the process of forming a hedge from shoots, the supports will be hidden under the weaving.
- Hand drill or gas drill.
- Garden pruning shears for cutting shoots.
- The wire that will be used for mounting the ribs of the canvas.
- Self-tapping screws.
- Screwdriver or screwdriver.
- Awl.
- Hammer.
Step-by-step instruction

Step 1. Installation of support pillars. After applying the markings, it is necessary to install support pillars. If the fence is high, it is recommended to place the supports at a distance of 1 meter from each other. Also, a high fence requires a large deepening of the supports into the ground. Optimally - a third of the total length.


Let's say the planned height of the wicker fence will be 1.5 meters. This means that the height of the supports should be 2.2 meters. If metal pipes are used, a support base is recommended. It is convenient to dig holes for supports using a hand drill.


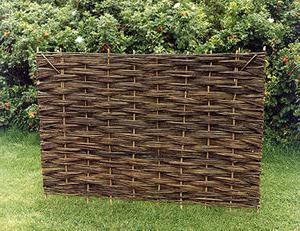
Step 2. Thick willow rods with a diameter of more than 3 cm must be dug into the ground 20 - 30 cm through 40 cm between the support pillars. These rods will be used to weave the fence fabric. The length of thick rods should be half a meter higher than the height of the fence. The protruding ends of the long rods form the smooth top edge of the fence at the end.

Step 3. To prevent the bottom of the fence from rotting during operation, it is recommended to place the lower strips 10-15 cm above the ground. You can use a thick one as the bottom strip willow vine. To strengthen the fence, you can pass wire along with the first vine through the rods dug into the ground. It is recommended to attach the wire to support posts. It is advisable to attach the first cross-bar made of wicker to the supports using self-tapping screws.

Step 4. Weaving. Checkerboard weaving is used to create the fencing fabric. The vine branches are passed through vertical rods along their entire length. It is advisable to extend the tips of the branches to the inside of the fence. If the fence is very long, then the vines are joined to each other. After 3-4 rows of vines have been passed between the vertical supports, you need to lightly tap the top shoots with a hammer, compacting the rows. To make the canvases strong, you can pass wire through 7-8 rows of vines.

When weaving a fence, you can use either one or several vine shoots for each row. With a single weave, the fence turns out to be lighter and more openwork. If bunches of plants are used, the fence will be more monumental and strong.


Step 5. The branches in the last panels along the edges need to be trimmed so that they do not protrude beyond the posts. You can secure the shoots using self-tapping screws, screwing each one to a support. You can use wire.


Step 6. The tops of vertical supports made of thick wicker can be trimmed so that they do not protrude over the canvases. If the vine is flexible enough, they can simply be bent to the inside of the fabric and passed through the weave.
Step 7. To keep the fence in rustic style has retained its original colorful appearance for many years, it is advisable to treat natural material stain or special impregnation. It is enough to use a spray bottle to treat the fence panels on both sides with protective materials.

Video - Construction of a wicker fence around a flower bed
Find out the most common options for how to do it from our new article.
Fence made of vertical weaving birch branches

Fence from on standing branches birch trees are, first of all, unusual decoration plot. It is also worth noting that such a palisade protects very well dacha area from outside penetration. Not every person will dare to overcome a high and rather dangerous-looking fence made of vertical birch branches. Do original fence It’s not difficult to do it yourself, the main thing is to find the right amount of material for construction.
 Wattle fence - a fence for a flower bed
 Materials and tools
- Fence supports. Most often, wooden beams or logs with a diameter of at least 10 cm are used.
- Cross bars. The length of the slats depends on the size of the fence. Each span requires 3 blanks. It is recommended to use wide slats measuring 25 by 46 mm.
- Birch branches. For vertical weaving, it is recommended to use material that is fairly thick in diameter - at least 3-5 cm. The length of the branches depends on the height of the fence. Optimal - 170 cm.
- Hammer.
- Self-tapping screws.
- Screwdriver.
- Rope and stakes for marking the fence.
Step-by-step instruction
Step 1. Preparation of branches for the fence. When constructing a fence, it is advisable to use fresh birch poles that have good flexibility. This will simplify the weaving process. Immediately during harvesting, it is necessary to completely clear the poles from the side branches. The length of all birch blanks must be the same.
Step 2. Installation of support pillars. Wooden beams or the logs need to be processed and dug into the ground 40-50 cm. If the fence is high, the supports can be concreted. The pillars need to be dug at a distance of 3 meters from each other.
Step 3. After the pillars are firmly fixed in the ground, you can begin installing the transverse strips. If the width between the supports is 3 meters, then the length of the planks should be 3 m, 10 cm. The planks are screwed with self-tapping screws to the posts: the first at the top, the second in the middle, the third at the bottom.

Step 4. Installation of birch poles between the planks. The first pole is inserted between the transverse slats from top to bottom. When weaving, birch branches bend between the crossbars. The second branch is attached between the slats in a mirror manner relative to the first. The third branch is attached exactly like the first. In this way, all birch branches are attached to the very end of the canvas. Using a hammer, you need to knock down rows of branches, reducing the gaps between them.

Over time, the damp birch branches in the canvas will dry out and stop deforming. Such a fence will last long years, decorating personal plot and protecting it from uninvited guests.
Find out tips from professionals in our new article.


A wicker fence made of boards looks much more interesting and original than a regular picket fence. That is why many owners of personal plots prefer to build beautiful and durable wicker fences on their territory. You can also use peeled veneer, MDF panels, plastic panels, but wood is considered the most affordable material.
Prices for various types of construction boards
Construction boards
Tools and materials
- Support beams. Since a fence made of boards is a heavy structure, it is recommended to use timber with a section of 100 by 100 mm. The length of the beam depends on the height of the fence. You also need to take into account the depth of immersion of the support into the ground when concreting.
- Planed boards for weaving. It is optimal to use blanks with dimensions of 150 mm by 20 mm. Length - 2100 mm.
- Vertical beams for strapping. The length of the workpieces should be equal to the length of the support beams. One vertical beam is required for each canvas.
- Tape or Circular Saw for cutting wood.
- Self-tapping screws and screwdriver.
- Bitumen for processing supports.
- Antiseptic and paint for wood.
- Drill for drilling holes.
Step-by-step instruction

Step 1. Marking and installation of support beams. The distance between supports should not be more than 2 meters. In order for the fence to last for many years, it is recommended to concrete the beams, carefully observing their vertical position. Those ends of the timber that will be immersed in the ground need to be well impregnated with bitumen mastic.
Step 2. Cut the boards. The lumber for horizontal strapping must be the same size.
Step 3. Installation of vertical posts from timber of a smaller cross-section for weaving. Between the supports, strictly in the middle, you need to dig vertical beams into the ground. They will perform the functions of the harness frame.

Step 4. Weaving needs to start from the bottom. The first board is passed through the beam, bending around it. The ends of the boards should overlap the support posts. Using a level, the exact horizontal position of the first board is fixed, then it is screwed to the posts with self-tapping screws. It is also recommended to screw the board to a vertical beam. The second board is superimposed on the first, only bent in the opposite direction. It is also fixed using self-tapping screws. This way the entire canvas is assembled.

Step 5. When assembling the second canvas, you must strictly ensure that the arrangement of the boards completely coincides with the location of the parts on the first canvas.
Step 6. After the fence is ready, you need to treat all elements with impregnation or covering paint.

Find out how to do it with step-by-step instructions from our new article.
Video - Construction of a horizontal plank fence
Among the wide variety of types and options for fencing, wicker construction stands out for its originality and aesthetics. This type of fence is relatively simple and quick to make. on our own and, most often, does not require expensive materials.
Wicker fence made of branches and boards
When wondering how to make a wicker fence with your own hands, you should first choose the right material. It must be strong enough to hold its shape and flexible enough to weave. Usually they take willow and alder twigs, birch and hazel. In addition, there are several schemes for making a wicker fence with your own hands.
Detailed instructions for installing a fence from branches

DIY wicker fence from branches - diagrams


To make a wicker fence from branches with your own hands, you first need to install supports. You can use metal pipes or fairly thick wooden stakes as posts. The thicker the rods chosen for the fence, the more solid the pillars must be, otherwise they may break under the load. Place supports at a distance of half a meter or sixty centimeters. Relatively thin ones are buried to a depth of thirty or forty centimeters, while thicker ones are dug to a depth of half a meter.

DIY wicker fence made from branches. Step by step photos

Before starting work, wooden rods should be soften. To do this, they are kept over steam for some time or lowered into salt water. After this treatment, the material becomes more flexible, there is no danger of breaking it, and the weaving process requires less effort. When the work is completed and all the elements are installed in their places, they will dry out, lose their elasticity and be securely fixed.

On the first post, the rods should be secured with wire. Next, they are laid in a snake pattern, going around the posts. The rows go around the pillars, first on one side, then on the other, alternating. If the fixation of the rods seems unreliable, then it is better to attach them to the posts with wire. It is better to leave five or ten centimeters between the ground and the lower edge of the fence. This will prevent moisture from entering and will prevent rotting. The fence will last longer.

how to make a wicker fence from branches with your own hands. Video
Wicker fence made of boards
To fence the area, you can make a wicker fence from boards with your own hands. It looks interesting and will serve as a good alternative to a picket fence or other fencing options.
The main materials are planed boards. Metal or wooden supports of sufficient thickness are placed at a distance of two or two and a half meters from each other. Their base is concreted to increase stability. The load from curved boards will be significant.

how to make a wicker fence with your own hands. Step by step photos
The boards are additionally secured to the posts with self-tapping screws. The wood must first be treated with antiseptic compounds to prevent rotting.

DIY wicker fence made from boards. Photo
The finished fence can be covered stain. In this case, the natural color and texture of the wood will be preserved. You can also paint such a fence in any color. suitable color, which is combined with color scheme other buildings on the site.

Vertical weaving fence
A vertical weaving fence made of birch branches can become not just a fence, but original decoration plot. In addition, it protects against penetration because it looks quite dangerous. Making such a wicker fence with your own hands is not difficult if you have a sufficient amount of suitable material.

DIY wicker fence master class. Photo
For construction you will need:

How to make such a fence: instructions
Below is a master class on a DIY wicker fence with vertical weaving. Let's consider the main stages.

After some time, the birch fence will dry out and all its elements will be securely fixed.
Options for wicker designs
. Wattle fence
Wattle fences come in a variety of varieties. Very low, enclosing small area, or tall, human height. Wicker fences are made using either simple horizontal interlacing of branches or more in complex ways weaving. Complex weaving creates a special aesthetics, but without experience it is not easy to make such a fence. A fence with vertical weaving can be decorated with a figured top.
. Wicker fence made of boards
A fence made of interlocking boards can be constructed in several ways. In the first option, the material used is relatively flexible and it is intertwined not with the main support pillars, but with additional slats, located more often. In the second version, the boards are thicker, their flexibility is less and the waves are long. In the third option, the fence is made of boards with vertical weaving, which also looks very interesting.
Fence Wattle
. Flowerbeds made of wattle
You can use wattle to decorate flower beds. The result is attractive. The shape of such a fence can be rectangular, round or multi-faceted. The size of flower beds can vary from very small, in the form of baskets, to quite large. Various options weaving allows you to create original designs. For weaving, you can use bundles of twigs or individual branches.
There are many types of fences from the most various materials. But lately, more and more often you can notice a beautiful, eye-catching fence made of intertwined vines - Ukrainian tyn. This type of fencing is used to decorate areas near cafes and restaurants and to divide zones into garden plot or simply fencing flower beds. Tyn can be made with your own hands from a variety of materials.
This is what a classic Tyn fence looks like
Colorful and fashionable wicker fence
Elastic, long rods made from any plant material. It is harvested in early spring before the juice begins to flow in the stems or in the fall, from the beginning of September until frost.
Properly prepared material is the key to beautiful and high-quality fencing
Most often, long annual branches of willow, hazel or willow shrubs are used. Best time to go to harvest material - early sunny morning. Cut the vine diagonally with a sharp knife, trying to keep the cuts smooth and even. When cutting the branches of a bush, they try to leave 3-4 leaves from the ground. This way, the bush will recover faster. 
Having cleared the branches of leaves, it is advisable to give them a neater appearance by removing the bark. This is done with a simple tool in the form of a split cone, which is better known as a pinch.
You can make it yourself by splitting a hardwood stake at one end. The unsplit end is strengthened by tying it with strong rope or wire. The rod is inserted between two chips and pulled from edge to edge. The bark from a fresh vine can be easily removed, but if it has been sitting for a while, it is better to put it in water for a while.

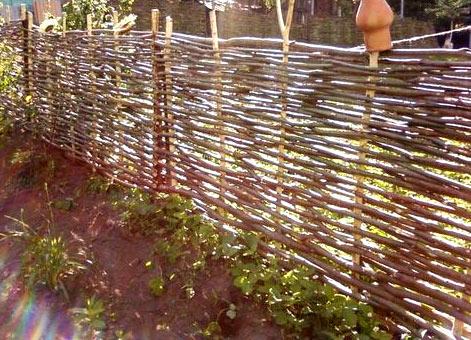
Wicker fence tyn using logs for posts
If the branches long time were stored and had time to dry, it is best to steam them or soak them for a week in large capacity with water. It is very important that the material is completely covered.
When the vine is ready for weaving, it is sorted by stem thickness.
Thicker rods are used at the base of the fence and at the very top. Thinner rods are woven closer to the middle. This trick allows you to build a stronger and more durable wicker fence.
Do you need a foundation for a wicker fence?
The place where it is planned to install the tyn in the future must be prepared in advance.

An example of a fence with a foundation
Typically, such a fence does not need, but more expensive options do not exclude a base made of stone or brick. Such fences are often installed in in public places, for example, in the open areas of restaurants or cafes, fencing their territory and creating unique comfort. They look quite respectable, but they also cost much more.
It is best to make a cushion of sand and gravel along the entire length for better drainage. This, of course, significantly slows down the construction process and increases the cost, but the fence will not soak in water during rains. Consequently, it will last longer.
The technology of such construction is very simple:
If you simplify the task of erecting a wicker fence with your own hands, you can simply level the site (in order to avoid stagnation of rain or melt water) and drive the bases into the ground to a depth of 30 cm. They must be treated with drying oil, resin or any other means that protects them from rotting .
Weaving a fence from a vine
Probably everyone has seen a finished wicker fence at least once in their life, so they have an idea of its essence.
An example of a wicker fence made of vines
Start weaving from the bottom, using thicker rods. The first rod is firmly fixed in front of the initial base with a hand from the butt side and carefully wound behind the second and so on, in strict observance of the order.
The rod must end at the back of the next stake. With the next rod, on the contrary, weaving begins behind the stake and bends around the next stake from the front side. And in the same way - until the end of the fence.  Do this decorative fencing It’s not difficult, the main thing is to have patience and know some tricks:
- Each rod must begin to be intertwined from the butt, thicker side;
- You cannot leave the end of the vine in the middle between the stakes, this will make the fence look untidy;
- It is necessary to regularly compact each row of weaving with a wooden hammer for greater strength and a beautiful appearance.
When the weaving reaches the top edge, the top of the protruding stakes can be cut off or, if desired, left as is. Then you can place them on various decorations as clay pots or hanging flower pot with a climbing plant.
Interesting options for wicker fences
In order to, you can use other, alternative, material options. Some may only last a few years, while others are very durable.
Reed weaving
For such a tyn, long bundles of reeds up to five centimeters thick are used. This decorative fence You can do it yourself using the same technique as. If the reeds were dried under the influence of sunlight, the tyn will turn golden. Light green reeds can be obtained by drying them in the shade of a canopy.
PVC weaving
Now you can. Such fences are sold as a ready-made set; their price is quite high, but they will last a very long time. PVC material not afraid sharp changes temperature, does not fade in the bright summer sun, and is easy to install with your own hands.

This is what a wicker PVC fence looks like
If the tyn is made not so much for decorative purposes, but to perform fencing functions, you can build it from veneer or thin boards. This type of fence is opaque.
Except decorative functions, it will also reliably protect the site from the curious glances of strangers.
The base for this type of fencing must be stronger, and it is installed at a distance of 1.5 meters or more, but not more than two meters.