Weaving from tree branches. Making a wattle fence with your own hands: photos, videos
At a country dacha, you want to do something with your own hands so that it turns out both beautiful and unusual. Where does the dacha begin? From the fence. And the most colorful wooden fence- wattle fence. If you wish, you can master the technology of constructing this picturesque hedge.
Wattle and its features
It is almost impossible to see the wattle fence in modern everyday life, but since in films and theatrical productions about the past rural life Since it is an indispensable attribute of scenery, everyone has an idea about this type of fence.
Appearance It is characteristic: stakes braided with flexible shoots are dug into the ground at a certain pitch. This design meets the definition of “cheap and cheerful”: it does not require a foundation, and building material in rural areas is easy to obtain for free. And any person can handle the construction alone. Therefore, in the old days, the fence was a popular version of the fence.
The main value of wattle fence lies in its artistry - the average person associates it with antiquity and national traditions. The impression will be especially strong if sunflowers grow near the wicker fence, the canvas is decorated with stems climbing plants, and an upside-down clay pot hangs on one of the stakes.
The wattle fence can be decorated with clay pots, ornamental plants and flowers
But it’s difficult to call such a fence good quality, so it won’t be appropriate everywhere. Fence with a fence suburban area with a private house it is possible if it is stylized as antique. In most cases, such a fence is used for zoning a courtyard, fencing a raspberry field, or for decorating a flower bed.
Photo gallery: where to use wattle fence
 The wattle fence encloses tall berry plantings and acts as a support for the branches along the perimeter
  A small wicker fence serves as a dividing line for flower beds
  The fence placed between areas in the form of a fence is made high
The contour of a wicker fence does not have to be straight, so it is suitable for round flower beds and areas.
Preparation for production
First, we think about what material we will use to build the fence based on personal preferences and advice from wicker masters.
Material for wattle
To work you will need:
- wooden rods (willow, grapevine, hazel, birch, etc.);
- wooden stakes or thick branches of any trees;
- racks, metal pipes;
- poles and wire.
Any flexible and fairly strong stems are suitable for it: grapevine, young shoots of hazel, birch branches; but traditionally such a fence is woven from willow twigs. They combine strength, flexibility and affordability: willow grows in abundance everywhere.
They also make a living wattle fence from it: the shoots are planted in the ground and, as they grow, they are laid in the canvas.
Cattails and reeds, despite their flexibility, strength and ubiquity, should not be considered successful material for wattle fence: after drying, the shoots become very brittle, so the fence will turn out to be very short-lived.
Blanks for weaving vary in color, thickness and structure of each type of wood
Take a measuring tape or stick with you to measure the rods to the required length. And it is equal to at least two steps between the supports, that is, each rod must tie at least three posts.
Choose plastic and even rods, from 1 to 3 cm in diameter. Specimens with branches or painful growths are rejected.
It is more convenient to work with freshly cut vines. But if time is lost after cutting, the branches have dried out - immerse them in water or hold them over steam. The quality of the plant material will be restored. If it is necessary to prepare twigs in advance for a long period, then the chopped vines are freed from leaves, tied into bundles and placed under a canopy for drying. To save space, build a temporary shelving unit. Being well dried, the material is stored for a long time.
For stakes, select thick branches (with a diameter of four centimeters). They are buried in the ground, so their length should exceed the height of the future fence by at least 0.5 m. If the height of the fence is more than one meter, it is advisable to dig in stakes a third of their length.
Rot-resistant pine, cleared of bark (contains a large amount of resin) or a metal pipe is well suited for this purpose - the posts will still be hidden by the canvas.
Calculate the number of supports based on the duration of the fence and the step between them. The posts are installed half a meter apart from each other, but the thinner and lighter the vine used, the smaller the distance between the stakes. You can also do this: dig stakes every 1 m, and between them install one or two intermediate supports made of thick willow twig, dug to a depth of 30 cm.
In addition to the above, long poles and wire will be useful.
Tool
You will need the following tools:
- garden auger (there are models with a motor);
- pruning shears, knife, awl;
- self-tapping screws;
- screwdriver or screwdriver;
- mallet;
Prepare everything before starting work so that you are not distracted from the creative part of the work later.
Types of weaving fences
A fence made of branches is woven different ways. The appearance of the fence directly depends on the functions that are assigned to it and on the selected material.
According to the direction of thin branches in the fence, weaving is divided into two types:

Vertical weaving fence - video
There are many ways to weave: use ready-made options or come up with your own. Let's consider three main ones:
- braiding - shaped framing of pegs with one or two rods at once according to the principle of braiding. The method is difficult for a beginner, since you have to hold several rods in one hand, move them between the pegs and not lose the pattern. Such a fence is placed in front of the beds so that no shadow is created, or used as a dividing strip;
A fence in the form of braided braids is placed so that sunlight passes through it well
- weaving in one layer - they begin to build their first fences with it, since this is the most easy way. The vine is wrapped around the pegs like a wave - first on one side, then on the other. It is secured at the edges with a metal bracket or screwed with wire. The fence has small gaps, so it can be used anywhere;
Weaving in one layer is the simplest type of weaving a fence, but if you add curly elements to it, it will decorate both a low flower bed with greenery and a flower garden.
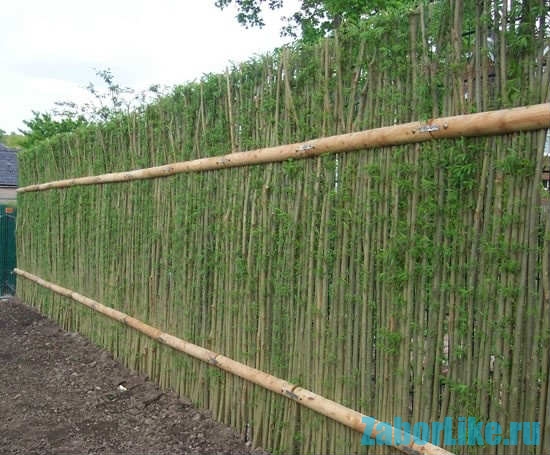
- multi-strand weaving is the most labor-intensive and complex method. The rods need to be very long, thin and pliable, otherwise they will break. This type of wattle fence turns out dense and massive. Placed on strong poles or framed in wooden frames.
Multi-strand weaving is used for fences that fence off other people's areas, or for recreation areas where they shelter from the sun
In addition to these methods, there are additional weaving options, but they are all based on the principle of braiding vertical or horizontal sticks, poles, metal pipes or thick rods in different directions.
In addition to these methods, there are many others - choose the one that you consider suitable for your situation
Methods for installing a fence
The wattle fence is convenient because it is installed in different ways, depending on the operating conditions. The external fence is mounted on metal posts and framed in a rigid frame. It turns into a real strong fence.
Wicker rectangular blanks are made separately and framed in a rigid frame and mounted on steel poles, used as a fence
The fence for zoning the space is woven into the gaps between the trees or pillars of the summer veranda.
The fence visually divides the space into certain zones and is attached between trees and other parts of the site
If you are going to protect a place to relax and shade it from direct sunlight, then the fence is woven into the finished metal structure installed at this location.
A weave woven into a metal structure will protect your resting place from the sun and protect you from the eyes of your neighbors.
Making wattle fence: step-by-step instructions
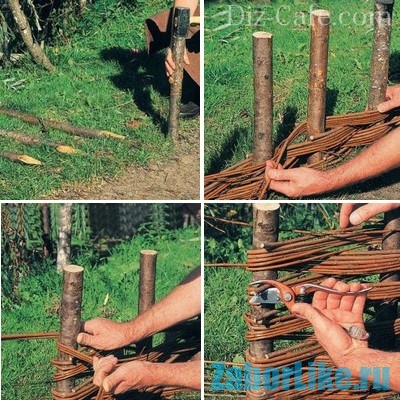
First, the area is cleared of debris. Then make the markings:
- Steel pins or pegs cut from wood are driven into the corners of the fenced area.
- A nylon cord, fishing line or twine is pulled between the corner pegs.
- Along the thread, the position of the intermediate posts is indicated (in increments of up to half a meter).
Installation is carried out sequentially:
- Holes are drilled in the ground at least half a meter deep so that the fence is securely held and does not fall down after the weaving is completed.
- Install racks. The bark is removed, impregnated with an antiseptic, and the buried part must also be coated with bitumen mastic, tar, or wrapped with roofing felt (fixed with wire or sewn with a construction stapler).
- They are lowered into the recesses first corner supports, but do not fill them up, but only fix them with wooden wedges or brick fragments. The cord is pulled over their tops and the horizontal tension is visually checked; If necessary, the immersion depth of the racks is adjusted, and the holes are filled with soil and sand and compacted. Metal posts can be concreted.
- Pull the cord again and, using it as a guide, install intermediate stakes. If they are wooden, then in order to avoid sagging during the braiding process, their tops are fastened with the help of even poles.
- If the vine is dried, it is softened by steaming, which gives the fastest effect, or by immersion in hot water (the process will take several hours), or by dipping only the ends into water (flexibility will be restored in 1 - 2 weeks).
- Using a two-pronged fork, the teeth of which converge in a wedge and have sharp inner edges, remove the bark from the twigs. If the bark is difficult to remove, it means the rods are not completely wet
You can make an emilka yourself by simply splitting a branch and wrapping it tightly in the place of the split so that it does not go deeper
- Weave the bottom row (15 cm from the ground), using a thicker vine. The individual rods that make up the row must be laid with overlap in one rack. That is, if the first rod goes around the first 4 posts, then start laying the second one from post No. 3. In the overlap area, the rods are tied with wire or tape.
Diagram of the fence structure: other diagrams can be used
- It is advisable to strengthen the bottom row - the vine is intertwined with wire and screwed to the supports with self-tapping screws. If the rods are thin, then metal staples are used to secure the row.
Horizontal weaving of a fence starts from the bottom - you can weave from single rods or encircle the stakes in a bunch at once
- Where the first row went around the counter in front, the second should be located behind it, and vice versa. This alternation is also observed when weaving subsequent rows. When there are 3 or 4 of them, you need to tap the wicker with a mallet and compact the rows. To strengthen the fabric, use wire weaving - every 7-8 rows with fixation on supports.
- The ends of each row are trimmed and drilled to the outer supports with screws.
The ends of each rod should be securely fastened to the rack by drilling them or wrapping them with wire
In a living wicker fence, the vine grows vertically. For this:
- Rods are tied horizontally to the posts - 25 cm apart.
- The top bar is brought to the tops of the hedge so that they do not stick out in different directions.
- The living vine is woven vertically between horizontal rods in the same way as between vertical pegs in horizontal weaving. In this case, the lower end of each rod is stuck into the ground so that the plant takes root. The upper edge of the canvas is trimmed.
Over time, the living wattle fence will strengthen. It is better to trim the tops of growing fences in early spring or late autumn.
The willow vine has taken root and the fence has turned green
The hedge provides shade, coolness and rustles the leaves.
How to make wattle durable
When exposed to air, dead wood either disintegrates or rots. Therefore, the finished fence is coated with a special varnish (furniture or yacht varnish).
To change the original color of the fence, it is painted with potassium permanganate, bleached with hydrogen peroxide or painted, renewing the color every year.
If painting the fence is not part of your plans, it should be treated with a good antiseptic. The lower part, which is most exposed to moisture, can be additionally treated with vitriol or heated bitumen.
You can also make Swedish paint. To do this you will need (per 10 liters of finished product):
- table salt 250 g;
- rye flour 800 g;
- iron sulfate 400 g;
- drying oil or linseed oil 300 g;
- iron minium 300–600 g;
- water - approximately 6 liters.
Recipe for making paint:
- Bring 2 liters of water to a boil and dissolve table salt and iron sulfate in it.
- In a separate container, rye flour is mixed with water to the consistency of slurry and this mixture is poured into brine.
- Cook for 30 minutes with constant stirring.
- Drying oil is gradually added, after which the broth must be mixed with vigorous movements (an emulsion should form).
- Add dissolved in hot water minium.
- The resulting concentrate is mixed well again and diluted with water to a volume of 10 liters.
The mixture tinted with red lead will have a golden color. Instead, you can use other alkali-resistant pigments containing iron (umber, ocher, iron oxide mummy). The paint will turn red or brown.
The composition is applied so that approximately 300 ml is spent for every 1 m2. The paint is rubbed in until the pores are filled. The best weather for painting work is calm and cloudy, then the paint dries for a long time and adheres better to the surface.
If the surface to be painted is particularly rough, add more flour to the paint. It acts as a leveling mixture and, thanks to it, paint adheres better to such surfaces.
Swedish paint is not suitable for wood planed to a smooth state.
Old fence in a new way
The forgotten wattle fence is finding a second life today in the form of blanks made from plastic products. This is a so-called polymer vine - a tube made of high-strength polyethylene with a diameter of 18 mm, the outer surface of which imitates a natural vine.
An artificial vine is a tube made of soft plastic, but looks like natural wood
Polymer rods are flexible, have high strength, do not rot and are absolutely indifferent to weather factors such as temperature changes, precipitation or drought. The service life according to the manufacturers is 20 years.
The color of the product can be white, ash, brown or gray. Green vines are also supplied upon special order, but they cost 10% more. The length of the whip is 3, 4 and 6 m.
We also offer ready-made sections of wicker fences, the frame of which is made of metal profiles with powder coating. They different heights, and the width is 1.5 m. There are options with continuous weaving, that is, without gaps, in which each row is formed by two vines. You can order a set with gates and wicket.
The appearance of a fence made of artificial material cannot be distinguished from a wooden one
The “branded” wattle fence looks presentable because it is perfectly smooth and neat, so it can be used to fence an area with an expensive cottage. At the same time, we can talk about the vandal resistance of the fence: the fabric is woven in such a way that it is impossible to simply pull out the rod - to do this you will have to disassemble the entire section.
The fence is mounted on strip foundation 200 mm deep. The racks are equipped with wide soles, screwed to the foundation, without deepening.
You can purchase the set separately and weave a round one instead of a straight one. Flower beds are also arranged in “baskets” woven from polymer wicker.
Video: weaving a fence in a simple way in one layer
It’s not for nothing that the fence for a long time remained popular among the people. Simple manufacturing technology, available materials and available tools, and at the same time, an interesting appearance that gives the site an unusual flavor.
On city streets, blank high fences are considered the norm. Homeowners strive to reliably protect their territory from uninvited guests, and if they want to communicate, they go to visit or invite loved ones to their place. Another thing is a village or country house. In a small village everyone knows each other. Many people are accustomed to greeting each other and communicating with each other without leaving the yard, but simply standing at the fence.
A decorative hedge made of branches, woven by hand, will become a real find for the dacha dwellers. The construction of the structure costs pennies, the fence looks very original, and it fulfills its purpose - highlighting the boundaries of the site.
Making a braided pattern, or Ukrainian tyn, is not difficult. For this purpose, use birch branches, flexible willow vine, reeds, peeled veneer and boards. More modern look have fences woven from synthetic materials. The main thing is that they have increased wear resistance and strength.
Types of wicker fence
A boring fence assembled from branches can be easily improved by a creative owner with the form of weaving and working material.
Let's consider several options for wicker structures that can transform the tyn into an interesting fence:

The service life of a wicker fence made of branches depends on the speed of work. Tyn, concocted in haste, will last no more than 2 years. Careful weaving followed by varnish or other coating prolongs the life of the fence up to 10 years.
How to prepare the material correctly
You can build a strong rustic wattle fence from various natural materials, as long as they are durable and resistant to aggressive conditions. environment. Most often, tyn is made from willow, and it can be living or non-living. In the first case we're talking about about planting young trees in the soil, which, as they grow, form a wattle fence. Non-living fencing is created by hand from cut willow shoots.

A good option for weaving is grapevine. Its thin rods are highly flexible and able to withstand unpredictable weather conditions. A hedge of grapes carries high humidity and temperature changes.
Reeds and cattails like Construction Materials More suitable for zoning a site or creating low fences for flower beds. These plants are fragile and short-lived. After a few years, the wattle fence deteriorates and requires complete replacement. Therefore, it is not recommended to install it as a full-fledged fence.
An attractive hazel wickerwork is created using young flexible shoots. The harvesting of this natural raw material should be done in early spring, when there are no buds on the tree yet.
Fruiting branches are also suitable for weaving:
- Pears
- Cherries
- Apple trees
- Plums
- Rowan trees.
If there is free time, the owner can wander through the copses near the holiday village and cut any suitable twigs. Cut the branches at right angles using sharp garden pruners. In order for a wicker fence made of branches to be solid, the vine must have a small diameter. Optimally – up to 2 cm.
structure increases the service life of the fence. Other tree species quickly lose their attractiveness and are destroyed.
The shoots are harvested in early spring or closer to winter. The thickness of the rods is 1 – 3 cm. To create fences up to 1.2 m high, the thinnest rods are used. Thick vines are harvested for weaving high hedges.
It is better to remove the bark from the rods, and the exposed material– cover with stain or special oil for wood. The brown color is obtained by soaking the twigs in a manganese solution. Copper sulfate gives the material a gray tint.
Unskinned shoots can also be used. However, over time, the bark will begin to peel off, and the fence will lose its attractive appearance. It is convenient to clean the hard layer with a split thick branch taken from any tree.
If the shoots are prepared ahead of time, and the fence itself will not be erected soon, they must be tied in bunches and stored in the basement. Shortly before use, the “bouquets” are placed in a container with water and liquid is added periodically. Swollen rods become more elastic and obedient in work - it is easier to remove the bark from them. Some craftsmen have adapted to keeping branches over steam, then the bark peels off like a banana peel.
Stages of making wattle fence in the country
In order for the process of weaving a country fence to proceed without delay, the owner must first ensure that there is a sufficient amount of material and auxiliary tools.
What will be required in the work:
- Garden secateurs.
- Hand drill for gardening.
- Willow vine with a diameter of 1 – 3 cm.
- Support posts made of corrugated pipes or wooden beams. At the end of the work they will hide under the wicker.
- Wire for mounting stiffeners.
- Screwdriver/screwdriver.
- Self-tapping screws.
- Knife, awl, hammer.
We will go through all the stages of making a wattle fence at the dacha.
Single weaving makes a fence made of branches lighter and more openwork. If the owner puts together a structure from tufts of vegetation, the fence becomes stronger and more monumental.
- Branch correction. The rods in the last panels are trimmed along the edge. At this stage, it is important to ensure that the material does not protrude beyond the pillars. Secure the shoots with screws or wire. The tops of vertical supports made from thick willow are also trimmed. Flexible pliable rods are bent onto inner side filled span and exited through the weaving.
- Fence protection. To preserve the colorful appearance of the wicker for as long as possible, thin wood must be treated with stain or special impregnation. The substance can be placed in a spray bottle and sprayed on both sides.
Weaving Basics
Real craftsmen who specialize in building fences from branches know several weaving techniques.

Features of horizontal weaving
The process preceding the weaving itself is always long and painstaking. To carry out the preparatory work, the owner needs a shovel and a screwdriver, pruning shears and a knife, an awl and a hammer. The marking is done by stretching the fishing line around the perimeter of the planned fence. The locations of the load-bearing parts are marked immediately.


It is recommended to take posts with a diameter of 4 cm. And it is better to use metal pipes for them, since wooden beams rot quickly. The supports should be deepened by half a meter. The interval between them should be 30 cm. But at the beginning and end of the fence, the step is taken a little less, which increases the reliability of the structure. The length of the post should exceed the fence by 20 cm.
It is better to weave tall hedges from thick rods. To ensure evenness of the weaving, a plank is placed on the support; as the work is completed, it is removed or left if the area is blown by the wind.
Weaving a fence from branches begins from the bottom, using the thickest vine and subsequently intertwining it with other pillars. The unused ends should only show on one side - this will make it easier to align them.
The weaving of the second row is carried out from the next support. As soon as the 4th row is created, the fence is compacted by tapping next to the post with a hammer. All work is completed by fixing the shoots with nails, protecting the shape of the fence from distortion by dampness, heat, cold and other weather phenomena.
Wicker fence decoration
A fence made from branches is already a decoration of the site. But if the owner wishes, she can make the tyn even more beautiful. Some homeowners place stones along the fence, creating fancy shapes from them. Romantic people will love the way of hanging flowering baskets with fragrant petunias, marigolds, violets and other pretty vegetation.

Clay pots, dry spikelets, and bright pumpkins will help highlight the country style. Sunflowers planted scatteredly also enhance the rustic flavor. Attention to the fence will definitely be attracted by a cart wheel or a house made of a huge dry pumpkin.
Living wicker hedge
A feature of a hedge is its gradual growth, which leads to strengthening of the fabric. Caring for a green fence is easy - you just need to trim the growing branches and give them the desired direction. The living fence is not a reliable defender of the yard, but over the years it strengthens and turns into a solid fence.
Let's look at how to make a wicker hedge with your own hands. When using willow, work begins in early spring before or after sap flow. The bark is not removed from the cut material; the shoots are placed in water in a warm room. temperature conditions. Cuttings take root in 3–4 weeks, so planting a hedge should be planned taking into account climatic conditions region.
Once the roots appear, the cuttings are planted in a row marked with pegs and rope and provided with sufficient moisture. The ideal option is to plant the shoots in a ditch, in which water will be stored during irrigation.
Like any fence, a wicker hedge requires a supporting part. Wells for posts should be dug every meter and a half. Thick rods with a diameter of 4–5 cm act as supports. They are stuck into the ground to a depth of 40–50 cm. To make work easier, the bottom of the sticks can be sharpened. Any pillars can be used to create a load-bearing part. Both metal and wooden supports after weaving they will disappear from view.
The cross sections are fastened by horizontally laying thin branches on the posts. For a fence no more than 1.5 m high, 3 rows of branched logs are laid. Weaving begins when the frame is completely ready. Branches Ø 3 cm are deepened into the ground by 30 cm. Between the shoots, voids of 10 - 30 cm are left.

As the willows grow, they will be filled with greenery. The shoots are placed at a slight angle to make it more convenient to combine them with neighboring branches and drag them between pillars and joists. Living wickerwork does not require additional processing or decoration. It is attractive in itself, because nature took care of the beauty of the willow.
Pros and cons of a wicker fence
Every owner who has worked on creating a wicker fence with his own hands must note the following points among the advantages of the fence::
- Easy to assemble.
- Environmental friendliness of the material.
- Originality of design.
- The ability to twist the fence in a curvilinear manner.
- There is no need for concreting supports and pouring strip foundations.
However, every sane person understands that twigs are not durable materials. In the event of a fire, they will quickly ignite, and over time they will simply rot. Another disadvantage is that fences only harmonize with rural landscapes.

It’s worth considering as an alternative to short-lived wattle fence plastic imitation dead hedge. The fence is constructed from PVC material, resulting in a fabric identical to real wicker.
What is good about a synthetic fence:
- Possibility of dismantling and moving.
- Longer service life compared to natural rods.
- The presence of a flat top and side frame makes the fence more perfect.
The disadvantage of a fence woven from synthetics is its cost. If a simple wicker can be created from branches cut in the garden or forest, then you need to pay money for the building materials. And if the owner is inexperienced in installing fences, then he will have to spend money on paying hired workers.
An eco-friendly fence made of woven branches is an archaic decoration of the exterior of country-style landscape design, which is gaining increasing popularity. Such structures are convenient not only for decorating flower beds and flower beds, but also for landscape zoning.
The main advantage of wicker fences is the ability to make them yourself from various available materials. How to do this is described in our article.


Peculiarities
The first fences appeared in the Stone Age. In the Neolithic era, fences made of young bushes acted as walls of simple residential or commercial buildings, and later acquired the functions of a fence.


These days, cute wicker fences are used for decoration. summer cottages and local areas.
Wicker fence is a lightweight fence, for the production of which shoots or flexible branches of a bush are used. Due to the use of natural materials after minimal processing (or even no processing at all), the wattle fence acquires a chaotic, artisanal structure. Therefore, such partitions look as natural as possible, becoming an organic continuation of the landscape design of a dacha or country house, made in a “rustic” style with its inherent eco-style elements.


The main advantages of wicker fencing include:
- Versatility of use. Wicker partitions are used to decorate flower beds and form supports for climbing plants. garden crops, mark the visual boundaries between adjacent areas, barbecue patios, dining areas, pools and relaxation areas.
- Visual appeal. A variety of artistic weaving techniques (from simple to rope and chess) allows you to create original masterpieces that make the design of a garden landscape truly unique, distinguishing it from others.

- The ability to create optimal conditions for growth and the development of shade-loving and moisture-loving plants, if earthen backfill is provided during the construction of the fence. In this case, installing an openwork partition that allows good transmission air currents, will be much more effective than a solid fence.
- Availability and low cost of raw materials. Considering that this type garden decor If you can do it yourself, using shrubs from your own dacha, then making a fence can be completely free.


Minuses:
- Short period of operation, which is limited to 3-6 years. This is due to the susceptibility of natural materials to the influence of natural factors.
- Poor maintainability- This is a problem common to all wicker products. Damage to one fragment of the fence will require dismantling the entire section or the entire fence.
- Brittle material eliminates the possibility of using a wicker fence as a reliable barrier fence.


- Flammability and flammability of dry branches.
- Pole fences are only appropriate in dachas and adjacent areas, decorated in country design.
Openwork fences with many slits will not be able to qualitatively limit the view of the site and maintain privacy.


Materials
Another significant advantage of wattle made from wooden rods is environmental friendliness, since natural or harmless materials are used for modeling synthetic materials. The quality of the future fence, its quality factor and wear resistance depend on the correct choice of raw materials. Let's take a closer look at the most popular options.


Ivnyak
Willow branches, which have high longitudinal strength combined with excellent flexibility, are considered one of the best materials for artistic weaving. Nature has awarded the willow with long, even, flexible branches, which guarantees a very beautiful and durable fence.
For the construction of a wicker fence, vines cut from any representative of the large family of these trees (willow) are suitable. Such woody plants are distributed almost everywhere in our country, which greatly simplifies the task of collecting material.


Hazel (hazel)
Twig-like branches of hazel (deciduous shrub or low-growing tree) are an ideal material for creating garden partitions, as they are distinguished by unsurpassed decorative qualities and durability. The picturesque vegetation of the local area and the clear lines of the graceful hazel hedge form a winning contrasting combination, without which it is impossible to imagine a landscape design in a rustic or alpine style.
As a complement to such a fence, you can use a vine to, over time, get an original hedge that is unlikely to leave guests indifferent. An alternative to hazel branches can be alder, birch, cherry or apple tree shoots.


Grape vine
This type of wattle fence is easy to manufacture, since the flexible, long grape stems can be wrapped at the desired angle without any problems.
The vine has increased resistance to sudden temperature fluctuations and excessive humidity conditions. Therefore, a hedge made from its shoots and sleeves will delight you with an attractive appearance for several years.


If grapes don’t grow at your dacha, you can get hold of vines at a reasonable price at a nursery.
Cattail or lake reed
Both representatives of coastal aquatic flora - reeds from the sedge family and cattails from the cattail family, which are often confused due to their external similarity, are also often used for weaving garden fencing. But the strength of the stems is not strong point These plants have an extremely fragile structure, so there is no need to talk about the wear resistance of these materials.
A fence made of cattails or lake reeds will become unusable within a year or two. For this reason, it is best to construct mini-fences from them to design flower beds, flower beds or mixborders, and then carry out landscape zoning.


Acacia
Yellow acacia is an ideal candidate for creating stunningly beautiful decorative hedges of regular geometric shapes. For this purpose, cuttings are rooted, which are cut from one-year-old shoots.
The optimal time for harvesting them is spring, before the buds and autumn begin to bloom. b, when the plants have finished their growing season. To avoid drying out, the cuttings are placed in the soil in advance.


Advantages of an acacia hedge:
- Has an aesthetic appearance.
- Provides wind protection.
- Produces oxygen. Like any “living” fence, an acacia structure acts as a natural filter.
- Creates additional sound insulation.


To create living fences they are used different kinds flowering, evergreen, deciduous and climbing garden crops.
Boards
By using planed boards as a building material for a wicker fence, protective functions are added to the decorative functions of such a fence. A permanent fence can restrict access to the garden area for outsiders.
Fence sections are formed from boards, and vertical supports can be concrete, wood or metal.


PVC
Although classic wattle fence is made from branches or young growth of trees and shrubs, PVC has now become an equally popular material for its manufacture. Polymer fences come in the form of border strips or sectional fences.


Design advantages:
- Durable. PVC is chemically stable. It is resistant to UV radiation, corrosion and rot.
- Mobile. Sectional fences are quickly assembled and disassembled, which ensures ease of transportation.
- Problem-free to use.
- Inexpensive.


Maintenance consists of washing the fence and treating metal elements with anti-corrosion compounds.
How to do it yourself?
The easiest way to create a decorative fence involves using any weaving technique from twigs. You can weave a partition by laying branches:
- Horizontally, when vertical supports are braided with long pieces, which ensures the best strength and density of the fence weave. The distance between adjacent pillars must be at least 0.3 m.
- Vertically. In this case, the base of the future fence is formed from horizontal veins installed on supports. The advantage of this technique is the ability to create wickerwork with different patterns.

- Inclined. This technique involves frequent placement of supports, which provides a step of up to 0.3 m, followed by filling the gaps with branches placed diagonally when weaving.
- "Chess", which makes it possible to create a beautiful checkerboard pattern on the fence. First, bunches of several branches are formed, and then they are arranged horizontally in a checkerboard pattern.
- Round. The supports forming a circle are braided with branches or bunches of thin shoots. This technique is most often used to decorate flower beds.


Let's look at a master class on creating a fence from twigs using simple horizontal weaving - anyone can master this technique.
Preparatory work
To make a wicker fence, any bendable rods are suitable. Their optimal length is 1.5 m. The favorable time for harvesting willow is spring, before sap flow begins, late summer and autumn. Preference should be given to smooth vines with the same thickness and without side branches. The rods are cut obliquely. They are formed into bunches and left to dry or used freshly cut.


The process of preparing material for weaving includes several stages:
- Soaking. The rods are placed with the thick end down in a bucket, poured with boiling water and left for a week. Exposure to water activates the movement of juice, due to which the material acquires the desired flexibility.
- Cleaning of buds, knots and bark. Remove the bark with a pincer in the form of a narrow conical fork with sharply sharpened edges inside.
- Antiseptic treatment to increase the wear resistance of the wattle.


- Drainage device. To do this, dig a trench up to half a meter deep. At the bottom they form sand cushion up to 15 cm thick. Its task is to quickly remove moisture, which prevents the development of rotting processes in the load-bearing part of the fence.
- Preparation of supports. For the role support pillars Wood stakes, thick rods, and steel tubes are suitable.


Making wattle fence
Sequence of work:
- Performing markup. The supporting stakes are placed at a distance of 0.3-0.5 m.
- Deepening the supports. Installation of thick pillars is carried out at a depth of 0.3-0.5 m. The length of the supports should be 0.2-0.3 m greater than the height of the fence.
- Weaving rods between supports. They begin to weave the thick end of the workpiece, alternately going around the pillars on one side or the other and stretching it along the entire length of the fence. The ends of the branches should remain on the inside of the fence.

After forming every 4-5 rows, tap tightly with a mallet, which helps compact the braid.
Before installing the last row of rods, the fixing bar is removed. The supporting stakes are fastened to the top row using wire.

Vertical laying is carried out in a similar way, but all the rods will need to be fixed at the top and bottom points of the supports to avoid loosening of the structure. The situation is more complicated with the manufacture of structures from boards.
To securely fasten the pillars, use two types of foundation in the form:
- Separate stands for supports.
- Monolithic strip base.


The construction of the base includes digging wells or trenches 0.7 m deep, forming a sand and gravel cushion 0.2-0.3 m high and filling with a cement mixture.
When installing supports can withstand steps of up to half a meter, after which they begin to form sections, placing the workpieces with the end parts down.
Border tape for garden decoration is sold in rolls. To install it, a groove is dug, the tape is partially placed inside and covered with earth. Then the soil is thoroughly compacted, after which the fence for the flower garden is ready.


- To increase service life wooden poles the supports are buried in the ground, placed in pre-clogged plastic pipes.
- For the manufacture of transverse logs and pillars, metal painted in natural shade natural hedge.
- To ensure protection of the lower part of the fence, it can be erected at a height of up to 10-15 cm above ground level. Alternative option– arrangement of a sand and gravel drainage cushion.


Among the wide variety of types and options for fencing, wicker construction stands out for its originality and aesthetics. Such a fence is relatively simple and quick to make on your own and, most often, does not require expensive materials.
Wicker fence made of branches and boards
When wondering how to make a wicker fence with your own hands, you should first choose the right material. It must be strong enough to hold its shape and flexible enough to weave. Usually they take willow and alder twigs, birch and hazel. In addition, there are several schemes for making a wicker fence with your own hands.
Detailed instructions for installing a fence from branches

DIY wicker fence from branches - diagrams


To make a wicker fence from branches with your own hands, you first need to install supports. You can use metal pipes or fairly thick wooden stakes as posts. The thicker the rods chosen for the fence, the more solid the pillars must be, otherwise they may break under the load. Place supports at a distance of half a meter or sixty centimeters. Relatively thin ones are buried to a depth of thirty or forty centimeters, while thicker ones are dug to a depth of half a meter.

DIY wicker fence made from branches. Step by step photos

Before starting work, wooden rods should be soften. To do this, they are kept over steam for some time or lowered into salt water. After this treatment, the material becomes more flexible, there is no danger of breaking it, and the weaving process requires less effort. When the work is completed and all the elements are installed in their places, they will dry out, lose their elasticity and be securely fixed.

On the first post, the rods should be secured with wire. Next, they are laid in a snake pattern, going around the posts. The rows go around the pillars, first on one side, then on the other, alternating. If the fixation of the rods seems unreliable, then it is better to attach them to the posts with wire. It is better to leave five or ten centimeters between the ground and the lower edge of the fence. This will prevent moisture from entering and will prevent rotting. The fence will last longer.

how to make a wicker fence from branches with your own hands. Video
Wicker fence made of boards
To fence the area, you can make a wicker fence from boards with your own hands. It looks interesting and will serve as a good alternative to a picket fence or other fencing options.
The main materials are planed boards. Metal or wooden supports of sufficient thickness are placed at a distance of two or two and a half meters from each other. Their base is concreted to increase stability. The load from curved boards will be significant.

how to make a wicker fence with your own hands. Step by step photos
The boards are additionally secured to the posts with self-tapping screws. The wood must first be treated with antiseptic compounds to prevent rotting.

DIY wicker fence made from boards. Photo
The finished fence can be covered stain. In this case, the natural color and texture of the wood will be preserved. You can also paint such a fence in any color. suitable color, which is combined with color scheme other buildings on the site.

Vertical weaving fence
A vertical weaving fence made of birch branches can become not just a fence, but an original decoration of the site. In addition, it protects against penetration because it looks quite dangerous. Making such a wicker fence with your own hands is not difficult if you have a sufficient amount of suitable material.

DIY wicker fence master class. Photo
For construction you will need:

How to make such a fence: instructions
Below is a master class on a DIY wicker fence with vertical weaving. Let's consider the main stages.

After some time, the birch fence will dry out and all its elements will be securely fixed.
Options for wicker designs
. Wattle fence
Wattle fences come in a variety of varieties. Very low, enclosing small area, or tall, human height. Wicker fences are made using either simple horizontal interlacing of branches or more in complex ways weaving. Complex weaving creates a special aesthetics, but without experience it is not easy to make such a fence. A fence with vertical weaving can be decorated with a figured top.
. Wicker fence made of boards
A fence made of interlocking boards can be constructed in several ways. In the first option, the material used is relatively flexible and it is intertwined not with the main support pillars, but with additional slats, located more often. In the second version, the boards are thicker, their flexibility is less and the waves are long. In the third option, the fence is made of boards with vertical weaving, which also looks very interesting.
Fence Wattle
. Flowerbeds made of wattle
You can use wattle to decorate flower beds. The result is attractive. The shape of such a fence can be rectangular, round or multi-faceted. The size of flower beds can vary from very small, in the form of baskets, to quite large. Various options weaving allows you to create original designs. For weaving, you can use bundles of twigs or individual branches.
Even in the recent past, wicker fences were the main method of fencing private territory. Availability consumables and its light structure made it possible to build a similar structure without serious financial investments. The wicker fence has not lost its relevance today. The emphasized archaism and natural material fit organically into the suburban landscape. Another advantage is the ability to make a fence with your own hands.
Features of a wicker fence
A traditional fence is a lightweight fence made from flexible branches or shoots. A characteristic feature of such a fence is its chaotic, makeshift structure, that is, the material is used in its “natural” form and is practically not processed. Wicker fences belong to decorative designs, since they rarely exceed 1.5 in height. High fences are still found today, but this solution does not justify its existence, since the dimensions do not compensate for the fragility of the material, and the cracks will not allow the area to be hidden from prying eyes.
It is customary to use fences to enclose relatively small private properties, or to use them as additional fences inside and outside the site, for example, to enclose flower beds, a vegetable garden, etc. It is also ideal for delimiting an area between neighboring areas, since a low structure will not greatly shade the adjacent territory.
Preparatory work
For getting positive result it is very important to properly prepare everything for further work. Making wattle fence is no exception.
Selection and calculation of material
Traditionally, willow (talnik), hazel and willow are used to form wicker fences. These long, straight and naturally flexible branches with a minimum number of transverse processes are ideal for such fences. This material is also symmetrical, which is a definite advantage. In some cases, weaving from wild reeds is practiced. Smooth and long stems bend beautifully, but such a fence will be very fragile. Bamboo wicker will be more durable, but in this case the material will have to be purchased.
Calculation of the required amount of vines is carried out “by eye”. On average, one armful of rods is enough to form a fence 0.5 m high and long. The value may deviate up or down, depending on the diameter of the rods and the density of the weaving.
Note! You can weave tyn from young shoots of any trees and shrubs, but provided that the branches are at least 1 m long. However, it should be borne in mind that when choosing this material, weaving will be chaotic, and the process itself will be more troublesome.
Large, even branches with a diameter of 4 cm or more are used as support pillars. The use of round beams, boards or metal rods is also appropriate, since this will extend the life of the structure, however, they will stand out strongly against the general background, and the wattle fence will lose its naturalness.
On average, the step between the load-bearing crossbars is from 0.5 to 0.3 m, from which the required amount of material is calculated. The more often the supports are located, the denser the weaving will be, and accordingly, the stronger the structure will be. When weaving vertically, you will also need longitudinal crossbars, at least five for the entire height of the fence.
Photo gallery: patterns for weaving a decorative fence
Horizontal weaving is traditional  There are other options for horizontal weaving
  Decorative weaving patterns can be used if you want to decorate your area
  The appearance of the fence depends on the weaving method
Procurement of material
Harvesting rods for wattle fence is carried out in early spring or autumn. During this period, the movement of sap is minimal, and the tree is not burdened with excess foliage. The straightest and longest shoots are selected. If the fence will not be made immediately after harvesting, the branches must be thoroughly dried. For standard weaving, rods with a diameter of about 1 cm are selected. Branches of larger diameter strengthen the structure, but at the same time make the structure less dense.
Immediately before weaving, the shoots are soaked in a container of water to make them more flexible and remove the bark. On average, this stage lasts about a week; for freshly cut branches, the period can be reduced to several days. Once the material becomes flexible and the bark begins to be easily removed, you can begin processing. Ideally, a pinch is used to remove the bark - a split branch of medium thickness with a limiter. IN normal conditions You can use wire cutters or pliers. The tip of the rod is inserted between the clamps of the wire cutters or pliers and pulled towards itself. If the branch is well soaked, the bark should be removed with almost no effort.
Completely cleaned rods can be coated with an antiseptic and stain to increase service life or change color. This operation is only appropriate if a small fence is being erected, since each branch must be processed separately. The lower part of the support stakes is impregnated with antiseptics and moisture-proofing compounds to protect them from rotting.
Video: how to properly process willow vines
Tools
In addition to preparing the material, you need to make sure you have all the necessary tools:
- pruning shears;
- hacksaws for metal;
- roulette;
- wooden hammer;
- large hammer or sledgehammer;
- wires;
- construction thread or fishing line;
- screwdriver.
How to make a wicker wooden fence from branches with your own hands
Horizontal weaving is traditional, as it helps to form a dense and durable fence. The vertical arrangement of branches will not provide the required density. Installation of the fence is carried out in the following order:
- Marking is being carried out. A thread or fishing line is stretched along the line of the future fence. Marks for supports are placed according to the established landmark. The distance between the supporting stakes with horizontal weaving can be from 0.3 to 0.5 m. The posts with vertical branches can be driven in every meter.
- Load-bearing supports for the fence are driven in to a depth of at least 0.5. When the vine is positioned horizontally, two posts are placed at the beginning and end of the fence so that the rod can be wrapped between them, thereby fixing it.
- If a horizontal fence is being assembled, the tops of the supporting pillars are fixed with a batten so that they do not “lead” during the creation process. When the branches are arranged vertically, transverse crossbars are installed. You can use nails or self-tapping screws to secure them.
- Rods are woven between the pillars. Work begins with the thicker end. Weaving is carried out according to the figure eight principle - the first post goes around the front, the second from behind, the third from the front again, etc. The lower rods are attached to the supporting stakes using wire. This will keep the fence from sliding to the ground.
- The excess is cut off. If the rod ends, for example, on the fifth pillar, then weaving continues from the fourth. This is necessary to ensure that the fence is uniform. You also need to periodically direct the rods in the other direction, changing the course of weaving. The protruding ends of the branches can be fixed with wire.
- Before installing the last row of rods, the fixing strip is removed. The top row is also tied with wire to the supporting stakes.
The recessed part of the supports is the weakest point of the fence, since it quickly rots and collapses due to the influence ground moisture. Therefore, it is recommended to install stakes in plastic pipes of suitable diameter that have been previously driven into the ground. This will increase the service life of the fence several times.
Vertical weaving is carried out according to a similar principle, with the difference that each rod is recommended to be fixed both at the top and at the bottom so that the structure does not wobble.
Video: how to make a wattle fence from hazel twigs in the country
Caring for finished tyn
On average, the service life of a fence does not exceed 5–7 years. After this period, the fence begins to deteriorate. The main "enemy" wicker fence is dampness, which causes the supports to rot and bottom part designs. To extend the life of this product, it is necessary to prevent water from accumulating underneath it. It is also undesirable for thick and tall grass to grow under the fence, since high humidity is created in the thickets.
For protection, you can use antiseptics or matte varnishes. They will protect the above-ground part from moisture. If you prefer a varnish coating, then it is advisable to use matte compositions, since gloss will look unnatural. Annual treatment with protective compounds will help maximize the service life of a wicker fence.
It’s easy to make a wicker fence with your own hands, even outside the city. In this case, financial costs will be minimal.