DIY floors made from scrap materials. DIY glass floor
The amount of garbage that each person “produces” is growing every year. The problem is becoming global, as flying plastic bags and plastic bottles lying everywhere have become an eyesore for everyone. I’m grieving, it turns out that you can help, and even for your own benefit. In any case, this applies to plastic bottles. You will be surprised how diverse and, importantly, useful crafts from plastic bottles can be done in literally minutes. Well, or a watch... Depends on the scale.
The buildings
PET (polyethylene terephthalate) is a thermoplastic from which bottles are made. It will be useful to know its physical properties:
- density - 1.38-1.4 g/cm³,
- softening temperature (t size) - 245 °C,
- melting temperature (t pl.) - 260 °C,
- glass transition temperature (t st.) - 70 °C,
- decomposition temperature - 350 °C.
Plastic bottles are very convenient to use, but are harmful to the environment, since the polyethylene from which they are made takes more than 200 years to decompose. This same property allows the use of almost waste raw materials as construction material. Craftsmen already even build houses from plastic bottles, as well as sheds, dachas, greenhouses, greenhouses, and fences. Worked out various technologies- the approach is quite serious.
How to build a house from plastic bottles
The basic idea is to pour bulk material into bottles, screw them on with caps and use them as bricks. Fill the bottles with sand and soil. Sand is preferable because there is too much plant debris in the soil that can rot. It must be sifted, dried, filled into bottles, compacted well, and topped up. The result is a kind of brick.

To build a house from plastic bottles, you will need a solution that fills the gaps between the “bricks”. There are options here too. This can be a regular mortar, which is used when laying brick walls, or you can make a clay mortar. To keep the “bricks” in the wall until the mortar sets, they are tied with twine on the side of the lids. Later, these “grids” will come in handy when you plaster the walls. They turn out uneven, so you can’t do without leveling.
We make a greenhouse, barn, greenhouse
You can build a greenhouse or greenhouse from plastic bottles. In this case, only transparent plastic is used, since it is necessary for sufficient light to pass through. For the construction of a shed, on the contrary, it makes sense to choose darker plastic - it will be less visible what’s inside.

The first technology - one to one
The second requirement for bottles as a building material is an even shape. This one, you know, without recesses. Otherwise, folding the walls so that they retain heat will not work - it will “siphon” into the curly cutouts. Remove labels from bottles and dry. You also need to prepare pins or rods - bottles are strung on them. Their diameter is small so that the neck passes freely. Now you can start building a greenhouse/shed from plastic bottles.
To build a greenhouse or shed, pillars are dug in the corners. Frames are assembled from timber according to the size of the walls. These frames will be the base for the bottle walls. We assemble them (the frames) on the ground and, ready-made, attach them to the dug-in pillars. When you make the frames, don't forget the doorway and windows.

We build a frame, cut off the bottom of the bottles, and string them onto a pin. From such “columns” we assemble walls, roof
The construction process begins with cutting the bottom. We string the cut bottles onto pins, pointing the necks in one direction. We insert the bottles with force so that they become very tight. Having collected a row of the required height, we attach it to the frame. You can fasten it with clamps, strips cut from metal, nails... In any way available to you. We press the second row against the first so that there is a slight deformation. We fasten it in this position. So, row by row, we assemble all the walls, then the roof.

Using the same technology you can make a gazebo. But here there is no need for tightness, so you can collect shaped and colored containers. This will make it even more interesting (example in the photo).
Second technology - sewing plastic
Bottles will also need to be smooth, transparent or yellow. The central part is cut out of them, obtaining a piece of plastic square shape. The pieces are sewn together into long strips. In the strip, the pieces are placed so that they curl in one direction. Then the strips are sewn into canvases. To make the canvas even, the strips are positioned so that they curl in different directions. As a result, they equalize each other. The finished canvases are nailed to the frame. This completes the construction of the greenhouse for plastic bottles.
This type of “cladding” for greenhouses withstands winters well; it does not need to be removed. Due to the firmware (many small holes), there is no absolute tightness, which allows you to regulate humidity. You won’t be able to heat such a greenhouse, but it will delay autumn for you and speed up the arrival of spring.
You can sew plastic for a greenhouse by hand, but it is not easy. It will be easier for those who have non-capricious sewing machines. Old Podolsk machines cope with this task. There may be problems with others.
Fence and enclosure
You can make a fence from plastic bottles different ways. If you need a serious monolithic fence, you can use bottles as bricks. The technology is the same as when building a house. To avoid plaster (after all, there is a high risk that it will collapse) - select the color of the plastic to obtain the required russian finish. But in this case you will have to look for “building materials” of the same diameter or from different sizes lay out patterns. In general, the process is creative, no matter how you look at it.

You can also make filling for the fence from plastic bottles. Make a frame, say, from wood, and create a beautiful filling from shaped containers and their parts.
Furniture from scrap materials: recycling plastic bottles
Not only can you make a house and a fence from plastic bottles, they are also used as the basis for upholstered furniture. The idea is to use plastic containers rather than wood for the frame. With the lids tightly screwed on, they have a high load-bearing capacity, and when assembled into blocks, they are quite capable of withstanding loads of up to 100 kg or more.

A bed made of plastic bottles... needed good mattress, and the base is not too difficult to make
Although the furniture is made differently, the general algorithm of actions is the same:
- Select “building material” that is the same height and tighten the lids well.
- Collecting blocks the right size, fastening them with tape.
- Having assembled the base of the required shape, sew the cover. For softness, adding furniture foam.
The trick is to ensure that the bottles fit very tightly against each other and do not move. The slightest play can lead to destruction of the structure. Therefore, assemble the blocks slowly, carefully securing them. You can stack bottles in layers, securing each layer in several places. For the inner layers, it is better to use double-sided tape - the fixation will be more reliable.
Ottomans/banquettes
The easiest way is to make an ottoman or banquette from plastic bottles. We proceed in the order described above. You need to find bottles of the same height. It’s better if they are the same shape - it’s easier to assemble. From plastic containers With the lids tightly screwed on, we assemble the base in the form of a cylinder. It is advisable that the radius of the base be greater than the height of the bottles - this way the bench will not tip over.

Next, you need to cut out two circles from fiberboard, which will be slightly larger than the resulting radius of the base - this is the “bottom” and the base of the seat. We secure them with tape. We take furniture foam rubber and, according to the obtained dimensions, cut out the necessary parts. We sew the cover from furniture fabric in a color that matches the interior.

Such a banquette can be not only round. It is quite possible to make it square. And so that this furniture is not too light, it can be made heavier by pouring water. But water is not very reliable. It's better to pour sand. Both heavier and more reliable.
Sofas, chairs, armchairs
If you need furniture higher than one bottle, proceed as when creating walls for a house. Find “material” of the same shape and height. Leave the first bottle intact, screw the cap tightly (you can add sand to prevent it from turning over). The bottom of the other is cut off and one is placed on top of the other. The bottle goes a certain distance and does not move further, no matter how much effort you make. If the resulting height is enough, great; if not, put on the next one. This is how you assemble rows of the required height, then fasten them into blocks.
There is another way. It is more reliable in the sense that the bottles are not held by compressed air, but due to mechanical stop. And they have double walls, which is also important. Minus - more work, more feedstock is needed. The whole process is illustrated step by step.

- Take the bottle, cut it approximately in the middle of the height ( top part with a smaller neck).
- We insert the upper part of the neck (the lid is screwed on) until it stops into the lower part.
- We take a whole one, the same size and shape, and insert it bottom down into the prepared structure.
- Cut the third approximately in half and bottom part put on top (with lid).
From such modules we assemble blocks of the required configuration, fastening them with tape. Don't skimp on scotch. You can first fasten two bottles together, then assemble larger blocks from the double ones.
As you understand, with this technology there are a lot of bottle tops left (half of the third bottle). They can be used to make other crafts from plastic bottles: flowers, more practical things for the household.
Flower making methods
The most common crafts made from plastic bottles are garden figurines and flowers. Read about garden figurines There are others interesting ideas, but there are a lot of collected interesting animals and insects. And we’ll tell you about flowers made from plastic bottles below - these are probably the crafts made from plastic bottles that bring the most pleasure. The process is simple, there are a lot of possibilities, the result is amazing.
You've probably noticed that the bottom of a PET bottle looks like a flower. All you need to do is find a bottle of a beautiful color and cut off the bottom. Now you have a nice flower. In the middle you can add petals cut from the central part, a core from plastic strips cut into noodles, or glue beads inside, but more on that in a little more detail.

Using the power of fire
To work, you will need a marker, a lighter or a candle (it’s more convenient with a candle). If available, take pliers, tweezers or pliers to hold the workpiece while processing. You will also need acrylic paints, glue and beads may be needed. The entire manufacturing process comes down to a few steps:

There are a lot of options here. Just start doing it. It may not work out perfectly right away, but you will understand what and how you can fix it. Check out some more pictures from step by step photos process of making flowers from plastic bottles.
The simplest
For beginner crafters, you can try making flowers from plastic bottles simple shapes for garden decoration. In this case, you can also use milk containers. To avoid painting plastic, look for colored ones. And it doesn’t matter so much whether they are transparent or not. They can be combined to produce flowers of different shapes.

To create such flowers, use the part near the neck. It is cut to form petals. Next - warm it up a little, giving the desired bend to the petals, a little paint, a core made of a melted piece with a thread (bottle smaller diameter, a pharmacy will do). So it turned out to be a buttercup.
Another option is to cut from the neck into strips of equal width - 1-1.5 cm, bend them (warm up a little at the base). Make a middle whisk from the side of a milk bottle or paint clear plastic with acrylic paint.

The middle is any bright. Here is a piece of cork, but you can cut it into thin noodles, roll it up and then heat it. You will get a shaggy core.
It's all about the form... Despite the imperfections, they decorate the area
The topic is actually inexhaustible. A variety of flowers are made from plastic bottles. From simple and uncomplicated to very realistic. It's not so much a matter of skill as different tastes and desires.
Useful ideas for the home
PET containers turned out to be such a good material that many useful things are made from them. In this section we have collected useful crafts made from plastic bottles that can be used around the house.
For the kitchen and more
If you cut off the bottom of a bottle with a capacity of 2–3 liters, you get a bowl or a bowl, and so that its edges are even, they can be melted on a heated iron. But so that you don’t have to clean the sole later, use a special silicone pad. If you don't have one, you can do this through a sheet of baking parchment.

Container for food. The plastic is food grade...
From the same bottle we cut off the threaded part. There should be 1-2 cm of plastic left around the thread (we melt the edges using a well-known technology). Now it won’t be difficult to seal any package hermetically: we pass it through the cut neck, wrap it outward, and screw on the lid.

The bottom of the bottles attached to the bar makes an excellent newspaper shelf (photo on the right). You can also store umbrellas.
From plastic cut into strips you can weave different shapes containers. Bottles need an even shape, with thick walls. They are cut into strips of a certain thickness. You need to cut in a spiral - the result is quite long strips. If their length is not enough, they are sewn perfectly.

Lampshades
You can even make a lampshade, but under one condition: you will use similar crafts from plastic bottles in lamps - only they hardly heat up. Plastic is incompatible with other lamps. We will describe three ways to make a lampshade from a plastic bottle.
First. Need a bottle large capacity. We draw it into strips of equal width. At the beginning and at the end of each strip, we make holes with a heated soldering iron or a nail heated on fire. We insert scissors into this hole and cut. The result is smooth stripes.

When the strips are cut, we also make a hole in the bottom, pass a thick fishing line through the neck, take it out through the hole in the bottom, and attach the decor to the back side. Maybe a button, maybe a pebble suitable color. Now, by pulling the fishing line, we get an interesting shaped lampshade. You can put a low power light bulb in it.
Another lampshade was made using a similar technology. But then they cut part of the bottle with the neck into strips, wrapped the strips and secured them to the neck. To give the desired shape The bend area can be slightly warmed over the flame of a candle or lighter. We attach the resulting “flowers” to the base. So we get an unusual design.

They also make lampshades from the bottoms. You need to find a sufficient number of identical bottles, cut off the bottom of them, and glue them together using universal glue (choose transparent). The main thing is that it glues the plastic and hardens quickly.
Flower vases
Making a vase from a plastic bottle - what could be easier... Just cut off the neck and you're done. But there is a technique that allows you to get patterned walls. You will need a soldering iron with the thinnest tip possible. Its power should not be too high. Then everything is simple: use a heated tip to burn out the patterns.

Magically! To make the drawing appear brighter, take acrylic paint and paint the resulting beauty. The paint can be in a regular can, but it’s faster and more convenient to work with a spray can.

These are the options...
Photo ideas
Crafts from plastic bottles are such a broad topic that it is impossible to talk about everything. What’s nice is that if you know a few tricks, you can easily find out how and what to do just by looking at photographs. So here we have collected a few ideas that we found interesting.


You can even make a boat...

And this is just decoration...


In this article we will tell you how to create crafts for your home with your own hands. Decor made from scrap materials gives your home a unique look and helps old things find a new life.
A craft starts with an idea. It shows individuality. You can make a craft for your home yourself. It is not necessary to have a designer's education. In creativity, it is important to be careful. This is the only way the crafts turn out to be of high quality and beautiful.
What to use for crafts?
DIY home decor from scrap materials enriches the interior. The kitchen is the place that brings the whole family together. In this room you can paint walls, hang photos, decorate furniture, kitchen apron and so on. If you don’t have a design education, you can use stencils. An empty wall is decorated with a panel or painting on a kitchen theme.
It is better to decorate the living room with the whole family. Ideas bring people together. We offer as an option to cut out the first letter of the family surname from thick cardboard and decorate it with paper flowers, pom-poms, and beads. The letter is framed like a photo and hung on the wall. Various words are assembled from such letters: love, family, home.
Decorating in the form of vases helps to transform the interior. Old bottles are used for decoration. The elements are wrapped with twine and decorated with flowers. To create room decor use sofa cushions, covers for which you can make yourself. Such things give comfort.
The bedroom is a place of relaxation. There is no need to overload it with decorations. A few elements will be enough. The wall of the room is decorated with family photos, and a homemade patchwork blanket is placed on the bed. The design of bedside rugs should be made in the same style. An original solution is the use of fabric birds, which are hung above the bed by satin ribbons.
The bathroom is a place of cleanliness and self-care. You can decorate it with shells and pebbles. A lot of things and accessories are stored in this room, so you can make homemade panel organizers. Wicker baskets screwed to the wall at the bottom can be used as storage shelves. Original towel hooks can be made from various materials: wood knots, wrenches. The main thing is not to get out of general design rooms.
The design of the nursery is determined by its size. To create the interior of a children's room, bright things should be used. She is decorated homemade toys, photos, bedspreads, wall paintings, unusual lamps.
You can find it on the Internet different ideas for the interior with your own hands from scrap materials. For inspiration, you just need to look around. DIY interior crafts from scrap materials can be created from:
- paper and cardboard;
- fabric scraps;
- colored threads and beads;
- unnecessary CDs;
- coins;
- satin or nylon ribbons;
- bottle caps;
- any elements made of plastic, wood, glass, etc.
Tip: you can also use larger things for crafts, for example, cabinets, wall mirrors, chests of drawers, tables.
Practical crafts
If you don’t like various trinkets, then you can make practical interior items with your own hands from scrap materials.
Shelving from an old staircase
Sometimes there isn't enough shelving at home. So why not make it yourself? This will be a truly practical craft. The rack is made from waste ladder. In addition to the ladder, you will need boards, paint, a jigsaw, a brush, sandpaper and glue.
Stages of work:
- prepare the frame of the structure: cut the stairs into equal parts and fasten them in the form of two pyramids;
- cut shelves from boards;
- attach the shelves to the frame with glue;
- polish the structure and its elements;
- paint the shelving.
On such a rack you can place books, original baskets, flowerpots with flowers, A4 size paintings and other beautiful do-it-yourself things for the home and interior using improvised materials.
We invite you to create another one practical craft for the home - a table made from unnecessary wooden boxes. Vegetables and fruits are often stored in such boxes. For this craft you will need 4 of these boxes, nails and a hammer.
Place the drawers on the side surface with the open side facing out and connect them together into a square. Fasten the elements with nails. It is possible to decorate the open space of the drawers with additional shelves. At the end of the work you need to paint the table.
Pallet spice rack
We invite you to create a unique spice rack from an old pallet. To do this, clean the tray with sandpaper. Use a jigsaw to saw off unnecessary elements. You can make additional shelves. The result is a panel with a pocket that is suitable for any interior. Containers with oil are placed in this pocket, wine bottles, spices. The shelf is painted in the color of the interior.
Crafts for interior decor
A house is a reflection of its owner. It's nice to come visit creative person and consider the embodied ideas and unique style. We offer you some tips for interior decor and creating crafts.
Mirror frame
An interior decor item made from scrap materials can be a wall mirror decorated with an unusual frame. It is easy to make from a regular newspaper or magazine. Colored sheets are cut into equal squares measuring 10x10 cm and rolled into tubes of equal thickness. These tubes are glued along the perimeter of the frame parallel to each other. The result is beautiful design mirrors The tubes need to be secured not only with glue, but with varnish.
Plastic lampshade
To make a plastic lampshade you will need several sets of plastic spoons, an empty 5-liter plastic container, glue. The neck of the container is cut off. The handles of the spoons are cut off to form petals. Using glue, the original petals are fixed to the surface of the container in the form of scales. The plastic lampshade is ready.
Fabric jewelry
The interior of a home made from scrap materials will become more lively if you use the remains of bright fabric. You can make them out of them various crafts, for example, fabric flowers. Using a stencil, circles d = 20 cm are cut out. A spiral is drawn on the circles, which is cut along the entire length. The spiral is twisted from the bottom, gluing it so that the bud does not fall apart. After drying, the petals are straightened. Unusual decor with your own hands, using improvised materials, ready for your apartment. Several fabric colors are combined into a composition, panels, paintings are made, shelves, walls, etc. are decorated with them.
Candlestick made from old beads
If you have old beads, do not rush to throw them away. They are disassembled into beads to make a hand-made candlestick. You need to attach an unnecessary CD to the base of the candlestick. Glue beads in rows along the edge of its circumference to form a cup. If you put a shaped candle in this glass, it will turn into a beautiful candlestick. This decorative element has a big plus. Thanks to the beads, it shimmers beautifully when the candle is lit.
Festive garland on the window
On New Year or any other holiday, the windows of the house are decorated with garlands. It is not necessary to hang bright lights, we recommend that you do unusual curtain from scrap materials. To create a garland you will need thick colored cardboard, thick thread, a needle, and scissors. Using a stencil, cut circles d = 10 cm. The circles are strung on threads of the required length. The threads are connected together into a curtain and secured to the window frame.
Jewelry hanger
There can never be too many DIY crafts. Female dressing table can be decorated homemade hanger for jewelry made from scrap materials. It's easy to do. To implement the idea, you will need a picture frame, a small piece of plywood, paint, small hooks, and a jigsaw. Saw off the plywood to the size of the baguette, paint it with paint. Mark the places where the hooks are attached and secure them. With this decorative element you can store your jewelry in an original way.
Canvas box
We suggest you make a box from plastic canvas. Canvas is a material for embroidery and crafts. It has the dimensions of an A4 sheet. The canvas has a varying number of perforations. To work, you will need the workpiece itself, threads, a needle, a piece of fabric and scissors. You can embroider with cross stitch or satin stitch on canvas. Make the details of the future box from canvas and decorate them with your favorite embroidery method. Connect the parts with thread and a needle. The canvas box is ready, it needs to be stored on the shelf. Without a doubt, it will become the main decoration of the interior of your home.
Braided rug
The tapestry technique allows you to create a rug at home with your own hands from any available materials. For example, they cut old clothes into ribbons. This option is called a “grandmother’s” rug. For crafts it is worth choosing durable material, and pull the thread by hand.
Prepare cardboard 500x500 mm. Sew it with thread. Having secured the first thread, begin weaving the tapestry. Once you've finished the last circle, turn the rug inside out and sew some rope around the perimeter to cover the ends of the threads.
Pots from bags
From scrap materials that are sometimes accumulated at home, flowerpots are made for indoor flower. For DIY crafts you will need paper bags, wooden skewers, scissors, rope, glue gun, container (for example, you can use a mayonnaise jar).
From paper bags, make blanks in the form of ribbons measuring 70x300 mm. Using skewers, make tubes from the blanks. Secure the corners with glue. Wrap the sides of the container in a paper bag. Turn it upside down. Attach 8 tubes to the base. Return the future flowerpot to its normal position. Fold the tubes up, pressing them tightly against the walls of the pots. It remains to braid the main tubes with the remaining ones in a checkerboard pattern. The pot is pierced at the top, a rope is threaded through the holes and the pot is hung on the wall of the room.
Fabric hanger
Hangers are always needed in the household. We suggest you make several of them. For crafts you will need:
- wire hangers;
- satin ribbons in contrasting colors;
- piece of fabric;
- scissors;
- needle and thread;
- glue;
- padding polyester
Draw the outline of the hanger on a piece of fabric. Leaving a small gap, cut out 2 blanks. Sew the pieces together to make a cover. Wrap the hanger hook with satin ribbon, securing it with glue. Place the fabric cover on the hanger. Fill the internal space with padding polyester. Sew up the hole. From contrasting satin ribbon make a bow and secure it at the base of the hook. The fabric hanger is ready. You can hang delicate items on it.
Mirror frame
There is always a mirror in the house. Most often it is located in the hallway, bathroom or bedroom. The decorating ideas are endless. The mirror can be beautifully decorated with tubes made from newspapers, broken pieces of porcelain or tiles, colored glass, shells, buttons, beads, hemp, etc. To fix the elements, you must use transparent silicone glue.
Decoupage
Do-it-yourself room design from scrap materials can be made using decoupage technique. We suggest you decorate a small mirror in a wooden frame:
- Clean the frame sandpaper.
- Cover the prepared surface of the decorative element with white acrylic paint.
- After the paint has dried, apply a layer of decoupage glue to the surface.
- Cut a decoupage card to the size of the frame and glue it to the surface.
- Apply the next layer of decoupage varnish.
- Sand the edges of the frame with sandpaper and cover with craquelure. The paint will dry out and crack.
- Apply a contrasting shade of paint to the cracked surface.
- You can highlight the borders of the frame and put blots on its surface.
- Cover the frame with glossy varnish.
Decor made from plastic spoons
For crafts, it is better to use a round mirror. Cut off the handles from the plastic spoons, leaving the scoops. Glue them in several rows around the entire perimeter of the mirror. Spray paint the decor. Instead of spoons, you can take buttons, beads, shells, clothespins.
Ring decor
DIY decor using improvised materials can be inexpensive. From plastic pipes cut rings of the same width. Finish their edges. Take a nylon cover. This will be the base of the structure. Attach the first row of rings to the lid. Attach the second and subsequent rows to the already glued rings. At the end of the work, we recommend that you decorate the decor with sequins. Secure the mirror in the center.
Rope decor
To implement the idea you will need hemp rope. Cut out the base from cardboard. It must be larger than the mirror itself. Place a mirror in the center of the base. Apply clear silicone adhesive to the base. Fix the hemp turn by turn. The result is a mirror that can be used to create a marine-style room interior.
Decor on glass
Do-it-yourself home decor from scrap materials includes painting. To work, you will need stained glass paints, glass contour, glitter, alcohol, cotton swabs, toothpicks and silicone glue. Before starting work, decide on the design. Transfer it to the mirror using carbon paper. Trace the design along the glass. Remove irregularities with alcohol. After the outline has dried, paint the pattern with stained glass paints, distributing them with a toothpick. The paints should dry for about 3 days. After this, the decor is complemented with glass beads or glitter.
Framing with beads
Beads are used to decorate the mirror. Mark the future frame using masking tape. Apply silicone glue to the resulting border. Pour the beads onto the paper and spread it over the glue strip. Carefully remove the tape and let the work dry thoroughly.
Decorate walls using simple materials
The atmosphere of the interior can be changed by paying special attention to wall decoration. To do this, you only need rollers, paints and color. It is not necessary to paint the surface of all walls. Sometimes it is enough to highlight part of it. They decorate the walls in different ways: with paintings, with panels, photos, natural materials, baguettes, paper butterflies, interesting hooks and other improvised materials.
Stencil decor
This method of wall decor is considered the simplest. Stencils are made by hand from thick paper, whatman paper or plastic. Patterns can be found on the Internet. The stencil is pressed tightly against the wall and spray paint is applied.
Tip: apply paint in a thin layer so as not to smudge the pattern and avoid smudges!

Huge selection floor coverings allows you to satisfy almost any request. However, when we're talking about about exclusiveness, the situation is complicated by the substantial cost of materials. And when the desire is not supported by financial capabilities, practically available means, imagination and hard work come to the rescue. By spending a minimum on materials, you can actually get original floors that will become a decoration and a source of pride. To do this, use wrapping paper, wallpaper or fabric.
Paper floor: surface preparation
The listed old methods are more suitable for a strong, level concrete or slab base (fibreboard, chipboard, plywood, OSB, DSP). If the floors are parquet or planks, you will have to either putty all the joints or level the surface, again, with slabs. If necessary, all holes are also sealed and tubercles are removed. Since you have to work with thin materials, even minor irregularities will appear after the final varnishing, so the floor should be perfectly clean, and not half clean (it is recommended to wash and vacuum it to remove the smallest dirt).
Wrapping paper floor
The presence of stone in the decoration has always been a sign of wealth, but there is an idea how to create the effect of a stone floor using wrapping paper. We will make such a floor with a simple set of tools and additional materials, also not classified as luxury or hard to find:
- Paper – in rolls or packaging bags;
- Glue - PVA is more effective than wallpaper;
- Varnish - for interior works, matte or glossy, depending on the desired effect.
To get a truly spectacular floor, the paper under the varnish must be properly crumpled, you can even leave it under a load overnight so that characteristic creases appear. During the gluing process, it will straighten out and the coating will be smooth, but traces of creases will remain and give texture. The crumpled wrapping paper is torn into pieces, precisely torn to get an uneven edge. If the base is slab, the glue is diluted with water 1/3, if it is concrete – 1/1. You can coat both sides of the paper with glue at once, or first on one side, and after laying the fragment on the floor, and on top of it. Lay pieces of wrapping paper with overlaps, carefully leveling, expelling air bubbles and excess glue. The glue is applied with hands, a brush, or even a spatula, whichever is more convenient for you. The overlaps should be generous, since when drying the pieces will shrink slightly and bald patches may form.


After the entire floor is covered with wrapping paper, it is left until completely dry (about two days). The next step is varnishing the resulting coating - if the color suits you, use a colorless parquet varnish, if not, use a tinted one, you can also stain it before varnishing. But even without additional staining, the floor will turn out to be of a non-uniform shade, since the back and front sides of the waxed packaging paper, when treated with glue, give a different shade, and will certainly alternate during the installation process.
To make wrapping paper floors durable and abrasion-resistant, the varnish is applied in several approaches, allowing each layer to dry. If necessary, the intermediate layers are sanded. You should choose a varnish with increased wear resistance or use a transparent self-leveling floor as the finishing layer.

Wallpaper floors
The only limitation when choosing wallpaper is that it must be only paper, neither vinyl nor non-woven, to implement this original idea won't fit. Otherwise, imagination is not limited, it can be an imitation natural wood, cut from different rolls or whole, photo wallpaper will give a 3D effect. The technology is no different from the previous one, only you don’t need to crumple the wallpaper, and you should cover not both sides with glue, but the floor and the back side. A layer of glue on the floor will not only increase adhesion, but also simplify the smooth joining of fragments. If layers of wrapping paper only increase the decorative effect, when wallpapering the floor, the seam should be almost invisible. After the wallpaper has dried, they are also carefully coated in several approaches with colorless varnish.
If the wallpaper is plain, imitating wood covering, before varnishing, using a stencil or manually, an ornament can be applied to them - these can be plant patterns, flowers or leaves, arranged randomly, symmetrically or forming a frame around the entire perimeter. For drawing, use gouache diluted with PVA; the glue will prevent the drawing from smearing when applying a protective varnish layer.

Clean fabric floor
To create an original fabric floor covering, the cheapest and most accessible category is used - chintz, and in modern versions these are bright colors and very big choice patterns. If surface preparation, as in previous methods, involves the formation of a durable, smooth and clean surface, then the technology for gluing chintz is somewhat different. First of all, measure and cut off the necessary pieces of canvas without stretching the material, select a pattern, since the inconsistency will be obvious, just like on wallpaper. The glue is applied to the back side of the fabric with a roller, allowed to set for 10-15 minutes, after which it is laid and smoothed with a roller, sponge or scraper. There should be no wrinkles or bubbles left. Immediately after gluing, each fragment is ironed through a cotton backing.
To prevent the varnish from changing the palette, treat the dried coating with PVA glue diluted 1/4 with water, applying a thin layer with a roller. However, if the colors are dark, protective treatment optional. It is necessary to varnish a chintz floor at least five times, and preferably all six, with each layer thoroughly drying (depending on the type of varnish), and final drying will take several days. The main condition is no drafts, otherwise it may crack. And given the specific smell, it makes sense to choose modern varnishes for water based. They dry faster and smell less.

As you can see, making an original floor with your own hands is quite possible. But regardless of the chosen method, the floor will need periodic renovation - it is varnished every couple of years. If the technologies for preparing the base and gluing are followed, wallpaper on the floor covered with varnish can remain attractive for a long time, decades; Problems will arise more likely with dismantling than with wear.
Another type of exclusive floor - no less interesting and or. In the video on our website, a professional designer and a talented amateur from Moscow share their tricks - take a look, maybe it will come in handy.
Today, the choice of decorating your home is limited only by your imagination and the depth of your wallet. However, even in an age of abundance and diversity, we remain ourselves and continue to look for new things and experiment with what we have already found. Naturally, such experiments do not bypass the field of floor coverings.
In this regard, we invite you to familiarize yourself with the list of original floor coverings with which you can decorate your own home without much difficulty or expense.
Wood floors.
The reasons why lumber is harvested by sawing a tree trunk along, and not across, are simple and understandable even to a child. However, our first example suggests going against banal logic for the sake of originality.
The technology is simple: cut blanks of the same height, lay them on a flat floor and glue them. Next, all that remains is to sand the surface of the discs, fill the space between them with grout or smaller discs and cover everything with polyurethane.
Now imagine what beauty you can achieve using discs different breeds tree!

Floor made of coins.
Have you been putting the change that accumulated in your pockets into a piggy bank for a whole year and are now ready to break the overflowing piggy bank and have a wild ride? Don't rush to spend your savings on all sorts of nonsense. There is more for them original way applications. However, what kind of coins they will be - new or already out of circulation - is up to you to decide. You can develop the idea and replace the “trifles,” for example, with buttons or bottle caps.
Unlike a floor made of wooden discs, the work here is not at all dusty, but VERY painstaking. Particular attention should be paid to leveling the surface. Cracks and irregularities should be repaired with cement and putty.
You can lay out the currency (in the literal sense of the word) mosaic right away on the floor, but it is much easier to first divide the floor area into squares, work on the table and assemble the pattern in parts on self-adhesive paper. And then transfer this unpretentious puzzle to the floor. Finally, we fill it all with epoxy sealant with a UV blocker and leave it to dry. When ready, you can act out an episode from the cartoon “Golden Antelope”, rolling on the floor and asking “That’s enough!”


Paper stone floor.
Everything ingenious is simple. Unlike previous methods, here negligence in work is not only not forbidden, but rather encouraged. We take regular wrapping paper, crumple it and leave it under pressure overnight.
Then we straighten the paper blanks and coat them with glue mixed in half with water. Be sure to overlap the joints of the sheets so that when they dry, they do not unravel. When laying the dampened paper on the floor, press it as tightly as possible. Let it dry, cover it with stain and the next day treat the floor with the same glue solution. We wait for the surface to dry completely and cover everything with parquet varnish. Ready.

Fabric floor.
In general, the technology for making such a floor has been around for many, many years. It’s just that over the last decade it has ceased to be in demand and has fallen out of sight. Well? Everything new is well forgotten old. As you might guess, a special feature of this floor is a textile fabric with a pattern or design.
Strips of cut fabric are attached to the floor using PVA glue (in the case of a solid fabric, it is enough to glue the material around the perimeter). When processing, it is important to get rid of wrinkles and expel air, because... any unevenness on the surface will inevitably lead to rapid wear and tear - it will simply crack. It is also advisable to iron the glued fabric. Now for two weeks, every 2-3 days we cover the floor with parquet varnish. 5-7 layers of varnish will give your floor sufficient strength and durability.

As you can see, such floors look very original and unusual.
Of course, it is impossible to talk about all types of floor coverings in one article. By the way, we didn’t even try to do this. We just offered you a few interesting solutions in the hope that now your wild imagination will tell you how else this list could be expanded. But before you get started, take a look at the section“Floor and Floor Coverings”on our forum. There will definitely be experienced specialists there who will give you good advice and help you avoid mistakes when bringing your ideas to life.
DIY furniture from scrap materials It will definitely become the highlight of your home: it is original, it gives the interior irresistibility and special, unique beauty.
Pieces of furniture that our parents would not understand, would call them strange and suitable only for a garage or shed, are increasingly conquering space modern apartments. And they don’t just conquer, but harmonize with the interior one hundred percent, although outside the apartment they may look ridiculous. These items are poufs made from old books and old blankets, armchairs and sofas from cast iron bathtubs, coffee tables from wooden boxes.
Pieces of furniture that our parents would not understand, would call them strange and suitable only for a garage or shed, are increasingly conquering the space of modern apartments
All this extraordinary beauty is called the author's vision, the author's idea, exclusive products, and designers ask a lot of money for it. But why? Why pay more if you can build something just as interesting, or even much more interesting, yourself?
The most necessary interior item is a table. Those tables that retail outlets offer to consumers often do not differ in either quality or unique design. Expensive stamped tables can be found everywhere.

The most necessary interior item is a table.
We invite you not to follow the Soviet habit of turning your home into a standard living space, but to imagine a little and create unusual furniture from scrap materials with your own hands.

We invite you not to follow the Soviet habit of turning your home into a standard living space, but to get a little creative and create unusual furniture from scrap materials with your own hands
To create a unique table (coffee, coffee or dining table) you need a strong stump or round timber of cut wood of the appropriate size, a can of paint and several hours of free time.

To create a unique table (coffee, coffee or dining table) you need a strong stump or round timber of cut wood of the appropriate size, a can of paint and several hours of free time
The stump must be washed from dust and dirt or dry cleaned and painted. Choose a color in accordance with the main color scheme of the room. According to our observations, white stump tables are very popular, but the color can be changed at any time.
On a note! Painting can be the final touch to making your amazing table, or you can decorate furniture using the decoupage technique or metal elements.
An old large (or small) suitcase is an excellent material for creating a unique table for a laptop, for periodicals, and desk It will look great and stand firmly on its legs.
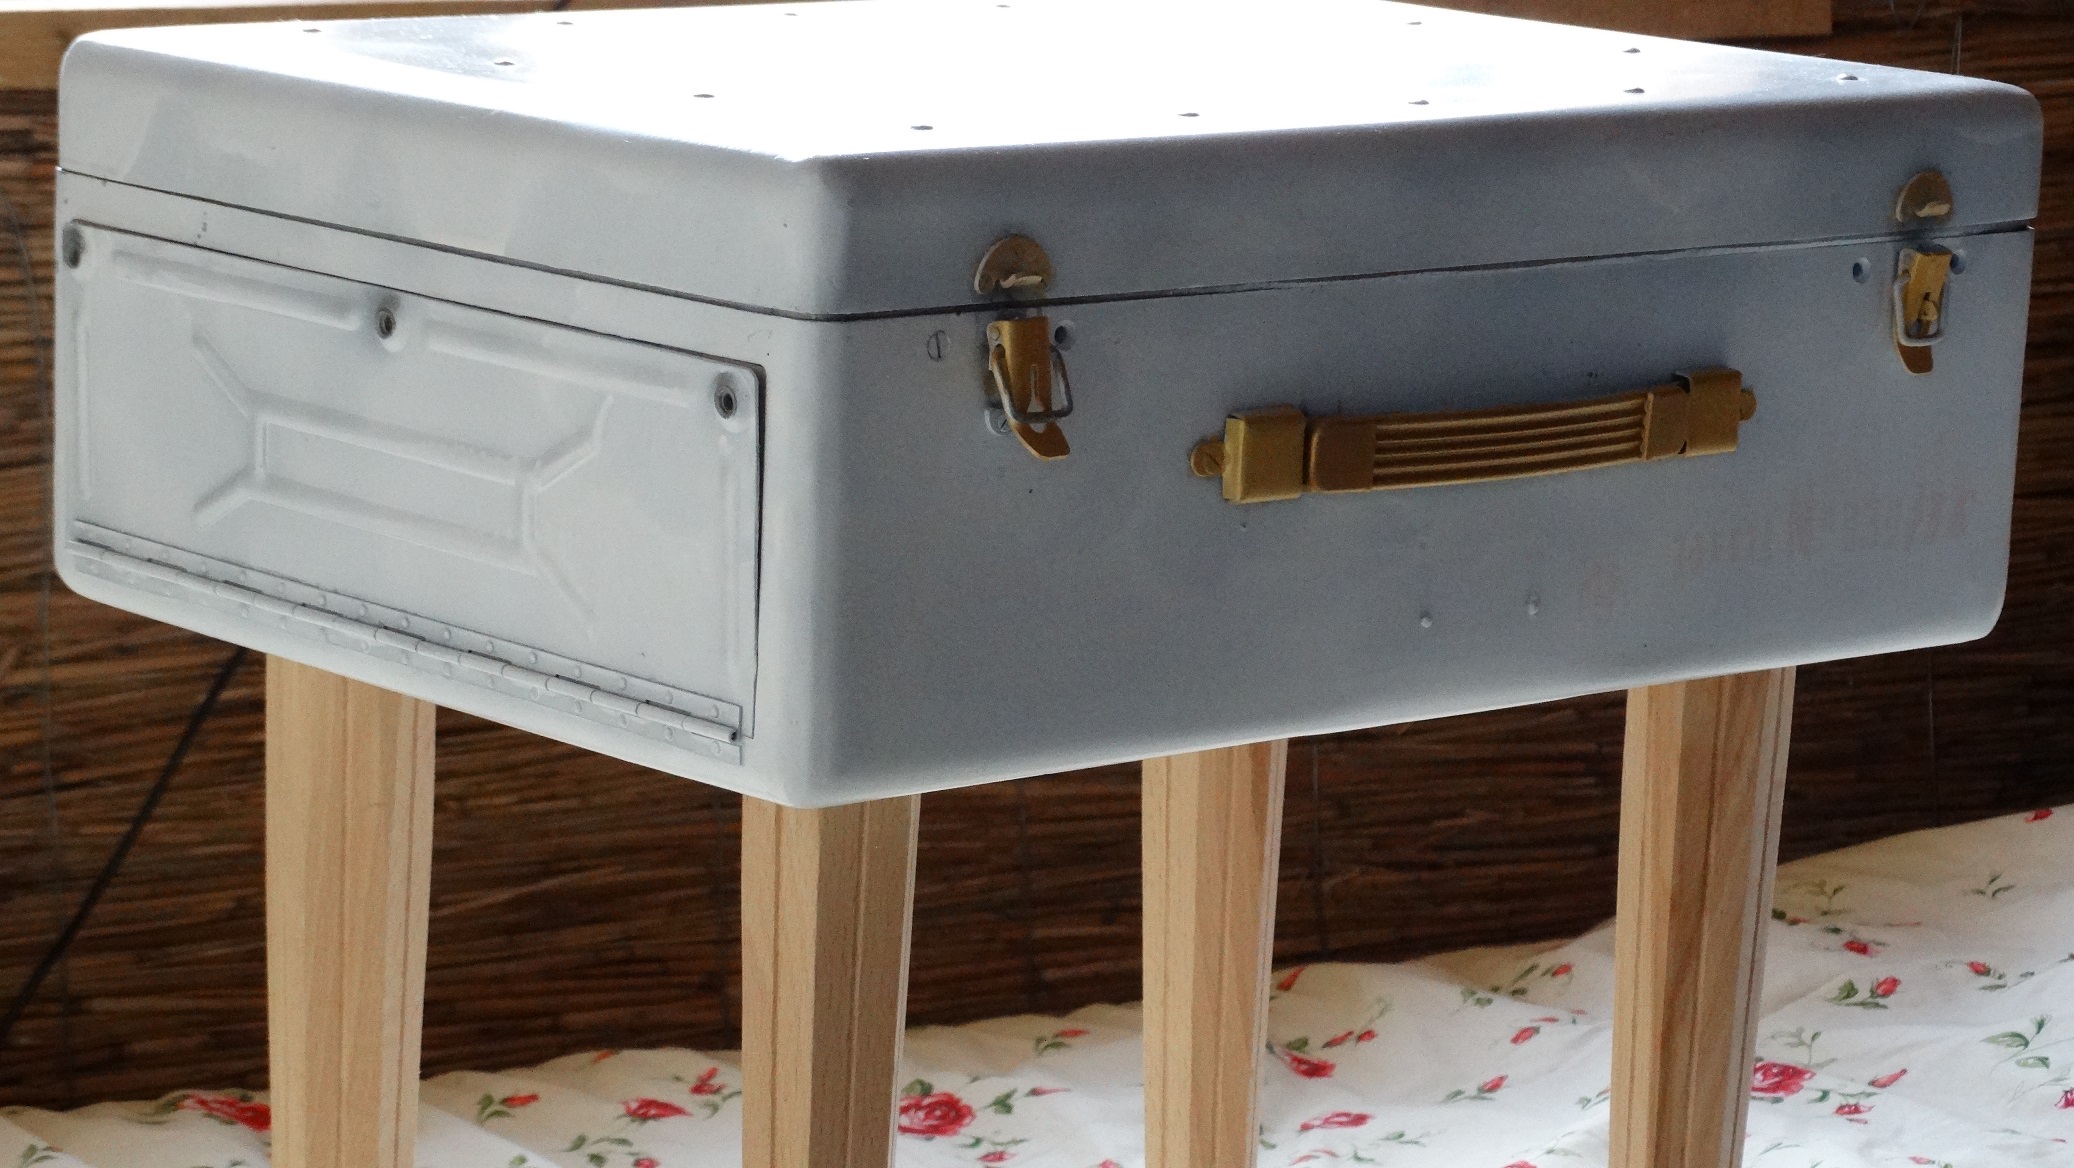
Main secret such a product: the more vintage the suitcase, the more original the table
The main secret of such a product: the more vintage the suitcase, the more original the table. If you look at a photo of furniture made from scrap materials with your own hands, namely tables made from suitcases, you will notice how much richer and more interesting the objects look if the main material for them is decorated with forging, corners, or original studs.
Important! In order to build a desk, you will need a suitcase, legs (you can take them from an old table, or you can make them yourself) and a strong, rigid board for the tabletop.
Open the suitcase by securing it in open form using strips or leather straps, attach a pre-treated table top, use the suitcase lid as an organizer, attaching pockets, shelves and drawers to it. When making a table, focus on the pirate style - attach “crab legs” or slats crosswise to ensure stability of the furniture.
Second option: place the suitcase-chest in closed on strong legs. It is unlikely that you will be able to write letters and drink tea at such a table, but you can keep cute trinkets on it and fold periodicals.
Great dinner table can be built if you have an old one at your disposal unnecessary door– it will serve as a tabletop. We suggest decorating the center of the tabletop with even rectangles (squares) made of colored durable glass. Choose different shades; the brighter the table, the better it looks. The glass must be mounted in wooden frames made of durable planks.
You can build an excellent dining table if you have an old unnecessary door at your disposal - it will serve as a tabletop
Before installing the countertop, the edges and interior strips must be painted and allowed to dry completely. The legs also need to be attached before the glazing stage.
This type of furniture will appeal to fans of natural materials. That is, completely natural: there is no need to paint or treat the beams, except to sand the surface a little to get rid of roughness. It’s great if the beams turn out to be slightly cracked - this will give the product originality.
Table made of wooden beam will appeal to fans of natural materials
The process of making a table is as follows: at the bottom of each beam, on both sides, recesses are made for the legs (the legs are also beams, but smaller in size and treated with paint and varnish), large bars 3-4 pieces are placed on smaller ones, stability is checked - and the unusual table is used for a long time and with pleasure.
The table turns out to be quite bulky and clumsy, suitable exclusively for spacious rooms, but its advantage is that it combines surprisingly harmoniously with leather upholstered furniture and fits perfectly into ultra-modern interiors.
Shelves and cabinets
This is not a typo: not FOR books, but FROM books - everything is correct. There are a few unnecessary, uninteresting, slightly shabby books in strong binding in the library, right? Of those that are already ready for waste paper? That's great. Give them a second life - let them carry other, more interesting and popular books.
It is very easy to make such furniture from scrap materials with your own hands - even a housewife can handle it
It is very easy to make such furniture from scrap materials with your own hands - even a housewife can handle it: you need to select several books of approximately the same thickness, size and binding texture (with color scheme you can experiment) and place them on fasteners (belts, bars, corners) with the spine facing the viewer - fresh, non-standard, cute.
Make a cylinder from a durable sheet of plywood, securely connecting the edges, and attach it to the wall: you can do it in its original form, or you can treat the plywood with paint or varnish.
Make a cylinder from a durable sheet of plywood, securely connecting the edges, and attach it to the wall: you can do it in its original form, or you can treat the plywood with paint or varnish
In two to three hours you can equip even the entire surface of the wall with such shelves - they are easy to make, they are original and functional.
One of the simplest methods for building kitchen or bookshelves is to attach several drawers from old ones to the wall. kitchen table. They can be treated without any treatment, or even further emphasize their “age” by rubbing existing abrasions with sandpaper.
One of the simplest methods for building kitchen or bookshelves is to attach several drawers from an old kitchen table to the wall.
Built-in wardrobe with transparent door
For a transparent door, take an old but good-quality window frame with glass.
Leave a recess in the wall that will accommodate narrow shelves. Shelves in in this case Rough boards will serve. Attach some shelves and hang the door.
Convenient to keep in the closet kitchen utensils, and if you build one in your office, then books.
For a transparent door, take an old but good-quality window frame with glass
Variety of poufs
The record for the most quantity on the Internet is broken by photos of furniture made from scrap materials with your own hands, such as a soft pouf. Ottomans can be made from anything in any quantity and in any shape.


