Sailing ship crafts. Wooden ship models
Assembling a ship model can be interesting not only for avid ship modelers, but also for beginners. By assembling a wooden model, you will learn a lot about the structure of ships, and you will enjoy seeing how the set wooden blanks turns into a real sailboat. To ensure an enjoyable assembly, we recommend starting with the most simple models. Call us - we will be happy to help you with your choice.
Each wooden ship is unique and often carries a piece of history. We present colonial ships, fishing vessels, and majestic warships - for every taste and color. We offer high-quality models for low prices- these are also foreign models brands Mamoli, Corel, Mantua, Amati, Artesania Latina, Billing Boats, Constructo, and ships for assembly from Russian manufacturers - Master Shipbuilder, Falconet, LS Model.
What is inside?
Each kit contains materials, drawings and instructions - in general, everything you need to assemble the model wooden ship. On the other hand, tools, as a rule, are not included in the kit - this saves money for those who already have tools. For everyone else, our store presents the most various instruments for modeling. Usually, we indicate everything that needs to be purchased to assemble a model from scratch in the subsection " related products" on the product page.
Master class “Do-it-yourself wooden boat”
"Boat of Childhood" Master class with step by step photos
Andrey Narvatov, 5th grade student of the Municipal Budgetary Educational Institution “Perkhlyayskaya Secondary School” of the Ruzaevsky District of the Republic of MordoviaSupervisor: Zhbanov Alexander Semenovich, teacher of fine arts and technology, MBOU "Perkhlyayskaya OOSH" Ruzaevsky district of the Republic of Mordovia
Target: Making a sailboat from wood with your own hands.
Tasks: Improve skills in working with carpentry tools, obtain information about the types and main parts sailing ships, cultivate hard work, the desire for independent creative work.
Purpose: The product is made as a gift to your beloved brother, sister or other to a loved one, will serve as a good toy and decoration for a child's room.
The master class is intended for students in grade 5 and older and will be useful for technology teachers and parents.
Ah, drops, drops, drops,
Golden carousel!
To us in a paper boat
April has sailed down the stream!
Sergey Kozlov
I love spring very much and always look forward to its arrival. And not at all because I don’t like winter, I just really want to see the first drops of spring, enjoy the warm sun, put on my boots and run through the spring puddles. My friends and I also love to let streams flow, with various boats made of paper, cardboard, and polystyrene along them. Unfortunately, paper boats quickly get wet and sink, while foam boats are too light and often capsize. So my friends and I thought about it and decided to make boats out of wood. Wood is a durable material, easy to process, and most importantly, it does not sink in water!
We approached the technology teacher with this proposal, and he happily helped us. Now I want others to learn how to make such toys. The work is not only not difficult, but also interesting. Before you start practical production boat, we, on the instructions of the teacher, searched for information about sailing ships, looked at the Internet pictures. I want to boast that now I know that the basis of any sea vessel is its hull. Conventionally, the body can be divided into two parts. The front is called the bow, and the back is called the stern. The stern and bow on both sides along the center line are connected by sides. Hence the concept of left side and starboard side. The horizontal surface at the top of the ship is called the deck. On the decks of sailing ships, one or more vertical masts are installed, to which the sails are attached.
All that remains is to show the version of the sailboat I have chosen and get to work.
Basic materials and tools for work
1. Semicircular wood of any species (size optional)
IN in this case wood length 15 cm, width flat surface 6 cm.
2 Semicircular and flat chisels
3. Sandpaper
4. Gouache, colorless varnish

A semicircular workpiece is obtained by splitting round wood along the center (diameter)
On the flat surface of the wood we will draw a boat shape.

Cut with a flat chisel.

For convenient and safe work It is better to secure the workpiece in a carpenter's or metalworker's vice. When working, you must not be distracted or disturb others. It is necessary to monitor the quality of work and follow the basic rule of safe work: do not put your hands under the cutting tool!

Let's cut out all the sides.

On the board (side part) we will draw the bow and stern.

Let's draw the deck. Strips with dots are places for attaching masts.

Cut out using a vice. The depth of the recess is 5-10 mm.

Let's process it with sandpaper.

Let's paint it. Everyone chooses the color themselves. But we must take into account that contrasting colors give more bright effect. If the product is varnished, you can use ordinary gouache.

Let's prepare two wooden rods (diameter 5-7 mm). The shape of the rods can be either cylindrical or rectangular.

Let's drill shallow holes and “plant” the masts with glue. If you don’t have a drill, you can use an awl or a sharpened nail for drilling.
The height of the masts is 10 and 6 cm from the deck surface.

We will apply decorative touches, stains and paint with varnish.

While the hull of the sailboat is “standing on the pier”, you can work on the sails. To do this, we cut out the sail from the file folder. The size of the sails depends on the size of the ship and the height of the mast. In this case, the height of the small sail is 5 cm, the large one is 9 cm. We use toothpicks, you can take a piece of empty ballpoint pen paste.

These materials are not afraid of water, are quite durable and stick well to each other with Moment glue. We cut off the excess ends.


We make two notches on the masts. The distance between them should be 7-10 mm less than the height of the sail.

The same glue is suitable for assembly. The ship is ready.

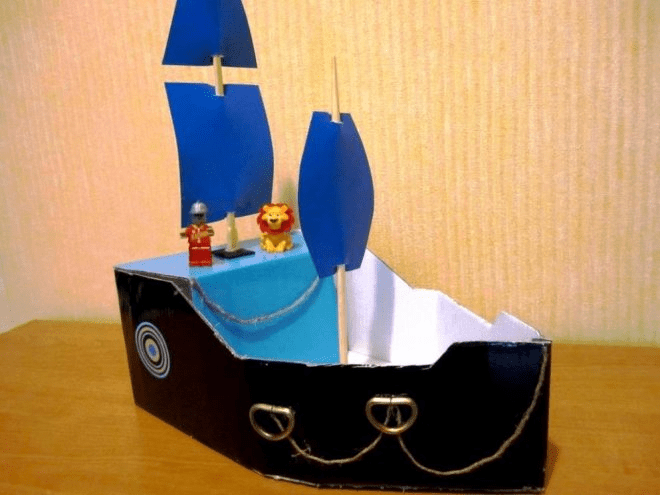
All that remains is to pass the tests. And it really doesn’t sink! The varnish protects against getting wet, floats in the slightest wind and even in artificial wind.


I would like to show the work of my classmates.
This is also a two-sail boat, only it has cardboard sails

And this one has no sails at all. His father helped his classmate cut out the bow and stern of the ship. They decided to put their ship on a pedestal.

The easiest option is chosen here, but I don’t like it...

This one is solid, but also made with the participation of elders.
Content
Recently, decor items that are made from recycled materials or from materials that are conventionally called garbage, for example, are in fashion. carton boxes from under the technology. On the other hand, it has become fashionable to create various figures and models of equipment from paper. In this article we will try to create some interesting ship models from cardboard. For some of these models you will need ready-made templates, and some products can be created without diagrams, using your imagination. At the end of the article you will definitely find a video lesson that will help you consolidate your knowledge and create interesting product from improvised means. Let's not waste time, prepare the materials and start creating.
Templates
Let's first try to create a ship using templates. They are easier to work with. What you will need:
- thick cardboard (you can use an old box);
- scissors;
- pencil;
- ready-made template;
- glue or tape;
- colored paper and other decor.
First you need to print the template and transfer it to the main material. By the way, if you are using cardboard that is not too thick, you can print the template directly on it.
You should get something like this:

Next, you need to dilute a little PVA glue with water, cut plain paper into pieces and dip them in the solution and glue them to the base of the ship. Remember the papier-mâché technique. It is better to connect the ship parts themselves using tape.
All that remains now is to decorate the blank with the prepared decor. This can be colored paper, wrapping paper, fabric. The ship can also be painted with ordinary watercolors.


You also need to make a mast for the ship. You can use an ordinary twig and several round pieces of thick cardboard.
Every boat must have a flag. For it, use fabric and applique made of paper or material. The sail can also be made from cardboard, use the bushings from toilet paper.

Making a big ship
Such option will do for young children who love exciting games. For such a ship you will need a large box. This could even be packaging from under a refrigerator or from a large TV.
First you need to connect the valves of the box and make a sharp bow of the vessel. On the sides you need to cut out several round timbers to make improvised portholes. Use a thick stick and fabric to make a flag. Use paints to decorate the ship.

Don't forget about details such as the anchor - it also needs to be made of thick material and decorated. A large do-it-yourself cardboard ship is ready to sail across the endless expanses of the apartment.
We use matchboxes
Let's call this modeling, because we will create from several matchboxes the whole ship. What you will need:
- cardboard;
- glue;
- matchboxes;
- wooden skewer or thick paper;
- colored paper;
- markers;
- scissors.
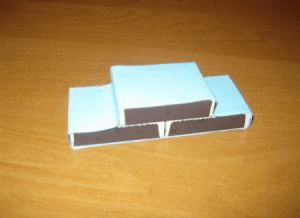
First you need to glue two matchboxes together with the short sides. Glue another box on top in the middle.

Now you need to cut out a rectangular piece of paper and glue it to the structure on top.
Now we need to cut out a strip from thick colored cardboard, with which we will form the bow of the ship.

Now you need to cut out a piece of cardboard that will correspond to the contours of the ship, look at the photo:
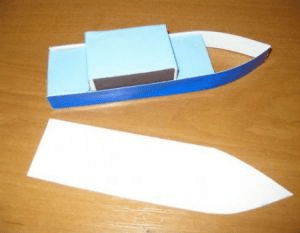
Now the bottom and top of the ship need to be fastened with glue. Next you need to make the mast. You can use a wooden skewer or roll up an A4 sheet very tightly and secure the tip to prevent the sheet from unwinding.
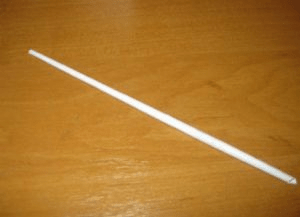
In the upper matchbox the ship needs to make a hole so that the mast can be inserted. Don't forget to use glue.
Now all that remains is to cut out the sails from colored paper, paint them and attach them to the mast.

The matchbox ship is ready! It can be made wider and higher if you use more matchboxes. If you use very thick cardboard for the bottom of the ship, then it is quite possible to float it on the water and participate in competitions for the title of the fastest boat.
DIY cardboard spaceship
We suggest using a fairly simple option that will allow you to literally create a 3D model. To do this, you need to cut out several identical parts from cardboard, but different sizes. The parts need to be fastened together, but either a thin piece of foam rubber or a small piece of thick paper must be placed between them. It will look something like this:

Or like this:

An entire space station can be made using cardboard sleeves from under toilet paper and tape.
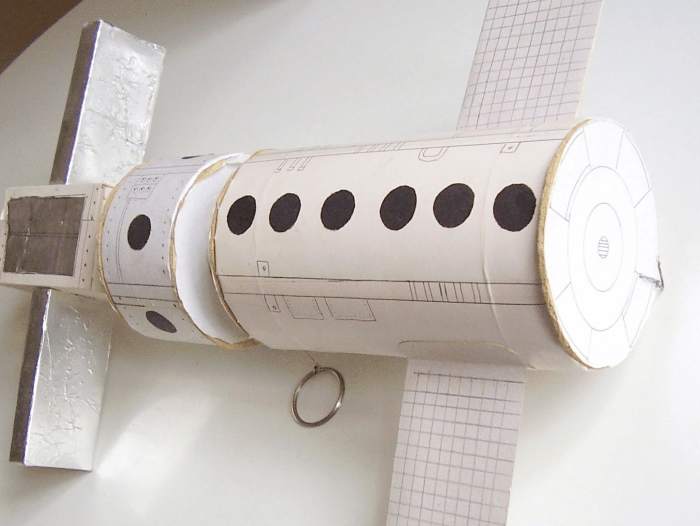
Use silver foil, a compass, a black marker and a pencil to create spaceship realistic look.
Cardboard is a fairly convenient and easy-to-work material, but if you know a few nuances, the work will seem even simpler, and the product itself will turn out neat:
- working with very dense material, use fairly sharp scissors, or even better, a stationery knife;
- before bending the cardboard parts, it is better to draw along the dotted lines with the non-sharp side of scissors or an old pen that does not write, then the material will bend neatly and evenly;
- Not in all cases you can use a glue gun. For example, if you are working with thin material, then it is better to use office glue or PVA;
- work in a room where there is not too much high humidity, otherwise your products may delaminate or parts may not stick together;
- the room should be light, it is advisable to have a window that can be opened and ventilate the room;
- We also always advise you to work only in a good mood.
How to make a ship out of cardboard with your own hands - a few more interesting options
We would like to offer a few more interesting and beautiful options ships that you can make with your own hands.

In this case, a milk carton, cardboard boxes and a sleeve are used.

And this is a luxury boat made from an ordinary cardboard box.
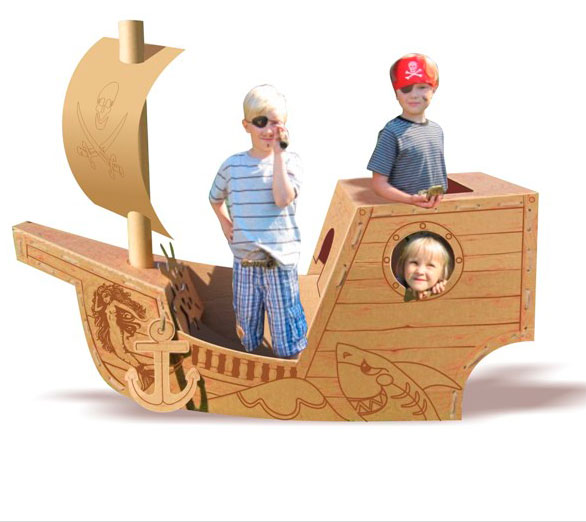
With a little practice and imagination, you can create such a beautiful pirate ship made of cardboard with your own hands. We always advise you to involve children in creativity. They will be especially pleased to know that they are creating a boat just for themselves. At the same time, you can think about a pirate costume, and also make a spyglass, a hat and a cardboard knife out of cardboard. Such participation of children in creativity helps to develop their imagination, attentiveness, perseverance, and the desire to create something with their own hands for themselves. Be sure to involve children in cleaning too. Explain to them that after themselves they need to fold all the materials, put them in their places, and also need to clean up workplace so that later you can get creative again.
Rains and streams create conditions for children to launch homemade boats. Such games will turn walking into pleasure, and creating homemade masterpieces into an exciting adventure. Any dreams can be easily realized from paper, cardboard, tubes, wood, foam, walnuts, vegetables, in different techniques.
A boat made of traffic jams
There will always be bottle caps. This is the easiest method of creating crafts for little ones.
Three plugs need to be glued together - this is the foundation of the future ship. An ordinary toothpick will serve as the mast. A sail can be, for example, a piece of colored paper. We pierce the sail in 2 places with a toothpick, attach it to the central plug - our ship is ready to go.


To control the ship, you can attach a pin with an eye to the outer plug. Tie a strong thick thread with a spool behind the eye of a pin. Now the child can use a string to pull the ship where it needs to go or return it if it floats far away.

Cardboard boat

For this we need milk packaging made of cardboard. Cut out one long side completely, with outside For beauty, you can paste the product with colored paper.

The side parts can be made curly, for example, the center can be made just below the nose. Decorate the craft with a picture and write the name. You can cut a small round hole- porthole.

In the center we attach a mast made of a thin stick, with a sail on it. You can stretch a rope from the central sail to the bow of the ship and hang the 2nd sail.

To control, fix a strong thread with a spool on the nose of the product.

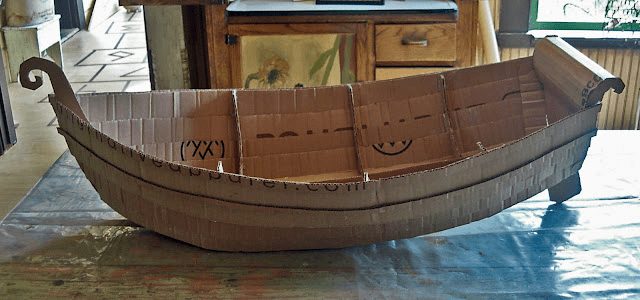
From thick cardboard, which is left over after purchasing equipment or telephones, you can make a more complex, but spectacular frigate.


Master class on boat crafts
Exactly according to the patterns (see diagram), cut out the base of the boat (a deck of 3 parts and a bottom), then glue it with tape or tape.


For a pirate frigate, round embrasures cut out on both sides at the stern look good.

To hold the mast, you need to glue together several small circles of cardboard or cotton pads, making a hole in the center of the required diameter of the mast.

Then glue these circles with the mast and sail with double-sided tape or glue to the bottom of the frigate.

Paint the product or cover it with colored paper; more often children want blue with white anchors.

For craftsmen, you can decorate the frigate’s nose with a dragon or a sea maiden. This was the custom in past centuries.


Wooden boat
You can collect small twigs that have fallen from trees in the square (park). Strong threads or glue gun connect the branches together to make a raft. Attach 2 branches along the edges of the branches (across all of them) for the strength of the structure.


A popsicle stick, if split in two, makes an excellent mast. A piece of fabric or paper will make a sail. Wrap it around the mast and you can send the yacht on its way.

Styrofoam boat
Let's look at another DIY boat craft. If after purchasing there is still a polystyrene box left, do not rush to throw it away. This is an excellent material for building a yacht!
 The small box can be fully used and a mast stick can be secured inside.

You can stretch thick threads from the mast to the corners of the boat and hang multi-colored flags on them.

You can cut a small piece out of large foam for the base. Glue 1-2 pieces of foam plastic on top - cannons. Use small sticks or matches to pierce the cannons; they can be colored with felt-tip pens in different colors: red, yellow, blue.


Make a mast with a colored flag from an ice cream stick; it can be plain or paint a white piece of paper with pirate symbols.

Matchbox boat
Bright volumetric crafts DIY boats are made from matchboxes.

You will need:
- matchbox – 3 pcs.;
- cardboard;
- colored paper (yellow, red);
- straw for drinks – 1 pc.;
- scissors and glue.

Detailed instructions on how to make a boat:

The matchboxes need to be glued together: 2nd box with the short sides, and the 3rd one on top in the middle (looks like a typewriter). Wait until completely dry.


Cut a strip of colored paper equal to the width of the box and the length of A4.

Then you need to glue our 3 glued boxes on all sides, as shown in the picture. For example, you can take blue paper.

Cut a strip of dark (blue) color 1-1.5 cm wide from cardboard (thick paper). We bend it in the middle, we get the bow of the ship. Apply this strip of glue to the sides of the boxes, and the ends of the paper should cover the matchboxes. The bow of the boat will be sharp and empty.

Draw the outline of the craft on thick paper (cardboard) - this will be the bottom. We fix the bottom with the side on the bow of the vessel.

It is convenient to make a mast from a plastic drinking straw; if not, you can twist a thin tube from plain paper. We begin to twist the sheet diagonally from the corner. Make a small hole in the top matchbox for the mast.

Lubricate well with PVA glue for better bonding and insert the mast into the box.

Sails can be made from 2 pieces of colored paper of different sizes, preferably bright yellow (red). On the sides of the short sides, you can use a hole punch to make even holes for the mast.

Separately, make a double flag of a different color (for example, blue), as shown in the figure.

We thread 2 sails through the holes, you can paint them. Glue a flag on top of the mast. Since our flag is double, it will hold the sails.

The kids love pirates, so they need to draw a pirate emblem on the sails.

Original boat ideas
The basis of a pirate frigate could be plastic bottle or a shampoo bottle. Pierce them with a wooden skewer, glue on the sail and flag. Make sailors out of bottle caps, dress them with colorful outfits: headscarves and clothes (glue on a piece of fabric). Draw faces and attach the figures to the bottle or bottle.

For example, raw zucchini is perfect for a deep boat. Cut out the center in the center, insert tubes with large leaves from plants (you can use paper) on the sides, plant sailors (pupae). It's easy to scrawl the name of the boat on the side.

Glue the ice cream sticks together, preferably in 2 rows in different directions. Attach the mast with a bright flag.

In the fall you can take half of an empty shell walnut. Secure a branch-mast with plasticine (glue), pierce it with a yellow (red, green) leaf of poplar, maple, etc. Colored boats are very beautiful.

Present to your attention original photos crafts of a boat from different materials.

Photos of boat crafts


Frigate Scarlet Sails
Step-by-step instruction
manufacturing
CHINESE JUNK
CHINESE JUNK
Now we have reached the most important part of the site.  I will give you approximate dimensions,
  since I made the ship by eye and didn’t pay much attention to the dimensions. I didn’t write them down exactly, but there are some. I will not torment you with nautical terms because I myself am not good at them, but I will write in a generally accessible language. Well, you know the basic terms. Such as deck, mast, yard, keel. This is where we will begin our work with the keel. But first we will do some preparatory work. We take a sheet of veneer, place it on some kind of plywood or board, and coat it well with glue. We secure it with buttons so that the sheet does not curl when drying. Let's start with the keel, length 45 cm
  the height of the front part is 12 cm, the back part is 8 cm. If the height dimensions are larger than anything terrible, you can always cut off the excess. After cutting out the keel, we sand it a little. We will remove the gloss, and if there is a textured coating, we will remove it completely.
  Spread glue on one side and leave to dry. You can spread from two, as you prefer. While everything is drying, we mark the ribs of the ship. We make one blank template. The width of the rib is 16 cm, the height is 6 cm. The depth of the slot for inserting the keel is 1.5 - 2 cm. The width of the slot is equal to the thickness of the veneered keel. Next we proceed to veneering the keel. Who doesn't know how it's done
  I'm telling you. Veneer mode on strips slightly larger than the width of the keel. We turn on the iron at full power so that the veneer does not burn during veneering. We place the veneer on the keel and smooth it with an iron until it is completely glued. We cut off the excess veneer and sand it with sandpaper packed onto a block.
  After we have plywooded the keel, we will make the deck and will make the rest of the ribs of the ship. Deck length 45 cm, width 16 cm. We measure 15 cm on one side, this will be the beginning of the rounding of the bow. From the back we measure 11 cm, this will also be the beginning of the rounding. The width of the rear part of the deck is 4.5 cm. Photo 5 shows the deck. Now we're starting to have trouble with the rest of the ribs. Since our keel is curved with inside then the height of the ribs will naturally change in relation to the inside of the keel to the deck. I will try to explain how best to do this. Myself
  I only realized when I made the fifth ship. And so let's get started. We place the keel on a piece of fiberboard as shown in photo 1. We mark 8 cm from the front and also from the back. And we draw stripes on the keel. It should look something like this:
  the back side is 8 cm, the front side is 5 cm. On the front of the keel we make a step to support the deck (photo 5). Next, we try on the deck, cut off the excess, and turn it over to the top with the keel. We find the lowest point between the keel and the deck and install the first rib. Immediately make marks on the keel and on the deck where you install the ribs. Let's make the next edge. It will be installed at the mark where the front part of the deck begins to curve.
  The rib width is 16 cm. We measure the height from the deck to the keel, taking into account the slot. Example. The width of the rib is 14 cm. The height from the inside of the keel to the deck is 3 cm + the depth of the slot is 2 cm and also 5 cm. Next, we take the first template blank. We place the future rib on the rectangle, combining upper part and the upper right corner. Draw along the contour. We do the same with the left corner. The height of the workpiece will change but the basic rib configuration
  will remain. We also do the back part and one edge between them. After this we make the ribs of the bow of the model. The approximate distance between the ribs is 3 cm. The same is true for the back. After the ribs are ready and adjusted, we glue them, let them fasten and glue the deck.
  When this is all done, we make inserts between the ribs around the entire perimeter. Next, we clean everything up and make bevels on the ribs from the bow and back of the ship. After this, we cut a piece from the veneer sheet to the size of the central part of the ship, coat it with glue, let it dry a little and glue it with an iron. We begin the most labor-intensive work: plywood the bottom of the ship in strips. I have them
  width is 6 mm. We take the prepared veneer sheet and cut it. After the strips have been cut, it is necessary to process the edges, clean out burrs and minor irregularities. Glue stripes in the central part
  of the ship one to one to the bow and to the rear of the ship with an overlap. Pre-apply fresh glue to the gluing area. This is what we got. Now let's clean everything up and start making additional decks. The front part of the deck starts from the beginning of the curve and protrudes 3 cm. The width of the bow part is 9 cm. The width of the part from the curve is 16.6 cm. After gluing, it will be processed, rounded and will be equal to the width of the main deck.
  The rear part also starts from the curve and is 16.6 cm, protruding by 4 cm. The width of the rear part is 9.5 cm. Additional decks have been made; now we will glue them in the same order (you can also glue them using an iron).
  First we glue the front part of the deck. Then we plywood it. After this, we ply the main deck before starting to round and install the back of the additional deck. Next we glue the back part. It does not need to be veneered since it is covered with deck superstructures. The decks are glued, rounded and we move on to making the sides of the rear part of the model. We cut two strips 4 cm wide. You determine the length yourself. Start from the point of curvature. The rear part of the board has a deployed
  angle 105 degrees. After the strips have been cut out, we make slits on them in the place where they will be
  bend along the contour of the deck and apply glue. Once the glue has dried, we begin to veneer. We cut two strips of veneer to width and glue them with an iron, simultaneously bending them along the contour of the deck. We made the side boards, but since they need to be turned out, we carefully sharpen them at an angle, trying them on to the deck. Then we glue them. Making the back of the side will not be difficult for you. Next we move on to
  deck superstructure at the rear of the model. The photo shows what she looks like. The superstructure deck configuration must be integral. A small explanation about the photo. Lateral
  the platforms should be 1.5 cm longer towards the back of the model. After we have made the deck, we make an insert with windows and other inserts in the openings for the stairs. When we have all the inserts ready and adjusted, we glue them to the deck and after that we glue the deck itself. The deck was glued and after that we plywooded it. Next we make the following sides of the deck superstructure and an insert with windows. The back of the sides will no longer be unfolded, but at a right angle. After the last deck has been made, glued and veneered, we make
  finishing sides. With the rear deck superstructure completed, we move on to the bow of the model. We also make front sides with
  at an angle of 115 degrees. They also start from the beginning of the additional deck. The sides were made, installed and glued. We proceed to the manufacture of the insert with windows and the upper platform. Dimensions of the upper platform. Length 15 cm, (excluding the balcony) width of the front part 12 cm. Protrudes 6 cm. The back part of the platform is slightly wider than the sides by about 7-8 mm on each side. After we have made the platform and the insert with the windows, we glue them. Then we ply the area. Next we make the sides of the central part of the model. We cut 2 strips, ply them on the inside, mark them
  cannon ports and cut through them. The port size is 1.5 cm by 1.5 cm. The gap between the ports is also 1.5 cm. The ports are 5-6 mm above the deck level.
  With the sides finished, we proceed to veneering the outer part of the ship. After veneering the ship, we make ladders. We're done with the stairs, let's move on to the railings. 4 mm stripe mode. We plywood them on three sides, glue them at a distance of 1 mm from the edge, sawing them on a mustache. Next, we mark them and drill holes for installing pilasters under the railings themselves. After that we make the railing ourselves. The same strip mode, but we only veneer the edges. A little trick. The photo shows that the corner pilasters are slightly higher than the others. This is to make it easier to mark.
  We drilled a hole, tried it on the pilaster, and marked the remaining points for the pilasters. After all the railings have been installed. We cut off the excess, clean it and
  plywood. We do the same in the bow of the ship. Next, we ply the edges of the sides of the ship and clean the entire ship. Let's move on to marking and installing masts. The length of the masts is at your discretion. The diameter of the mast at the bottom is 10-12 mm. At the top 4-5 mm. So that you can drill a hole to install a flagpole made from a toothpick. The ship is completely ready and we begin to sea it. We seam those parts that you consider necessary. We're done with the stain. We make 2 additional fastenings for the ropes (photo 24) and two blocks for raising the sails (photo 25). All that remains is to varnish the model, make the sails, and then install them. For the sails we will need material, a sheet of whatman paper for the pattern, wooden round skewers and the nearest workshop for sewing and repairing clothes. I hope you can handle making and installing sails.