How to make a tent over your bed with your own hands. DIY canopy over the bed
A canopy over a crib is an excellent way to make your child's sleep comfortable and safe. This accessory can be found in any children's store, but it will not suit every interior. You can sew it yourself. Let's look in more detail at how to sew a canopy for a crib.
Choice of fabric and tailoring features
Almost all fabrics are used to sew a canopy for a crib. Simple chintz is suitable as a base, and for decorative design lace, satin ribbons or pieces of brightly printed fabric. If the child was born in autumn or winter, silk, satin or lightweight flannel will be suitable. If you prefer a lighter option, you can use the following fabrics:
- Fine linen;
- Chintz;
- Chiffon;
- Fatin.
Advice! Before you go to the store, look at what the canopy crib looks like in the photo. You will learn design ideas, from which you can make a suitable choice.
Choose a mounting option and install the structure above the crib, then start sewing. To create a canopy you will need a lot of material. The cover should completely cover the perimeter of the crib. Moreover, it can be short, medium or from floor to ceiling.

The material must be calculated individually, taking into account not only the dimensions, but also the design features. More fabric will be needed if there are a lot of folds, frills and other decorative techniques. You can sew a canopy for a crib with your own hands not only from a single piece of material, but also from several of its parts.
Step-by-step instruction
If you look at the canopies for a crib from the photo, it becomes clear that they carry a high decorative function. They are also needed from a practical point of view, as they protect children from the sun's rays during daytime sleep and create comfort in the room. An adult canopy is relevant for the parents' bedroom. If you are planning to sew a canopy yourself, you will need following materials and tools:
- Sewing machine;
- Translucent fabric (of your choice);
- Satin ribbon;
- Lace ribbon (frill);
- Floor holder, made independently or purchased in a store;
- Strong threads to match the fabric;
- Decorative elements (optional).
How to make a canopy over a bed with your own hands? Perform the following steps in sequence:
1. Take the diagram and make a pattern based on it.
 2. Cut out the necessary elements from the fabric.
 Prepare materials
 3. Topstitch the tape or fold it over and stitch it from the wrong side.

4. Sew the tape along both edges of the material, leaving the top edge unfinished.
 Sew ribbon to the edges of the fabric
 5. Sew a lace frill to the front edges of the main material and stitch it using a sewing machine.
 Sew the lace ribbon to the edges
 6. Thread the canopy into the canopy holder and secure it. Cover the joint with a bow or other element.
 Decorate the joint with a bow
 You can attach the finished canopy to a special holder, which you can purchase in a store or make yourself from thick wire.
 The finished result
 On video: a simple canopy option.
Canopy for a girl's crib
How to make a canopy over a girl's bed? For sleeping place girls need not only high-quality, but also beautiful frames. Pay attention to the design of the future product. The pattern can be found in a magazine or on the Internet. Calculate required amount materials and buy them. Purchase suitable ribbons and decorative ornaments. Make suitable templates from the pattern and cut out the blanks.
The fabric is decorated not only with ribbons. For this, lace is suitable, which must be stitched around the entire perimeter of the product. Make a lace bow to hide where the two pieces meet.
All edges of the product are trimmed with satin ribbon or thread. This makes the edge neat and prevents the fabric from fraying. If the edges are weighted with tape, the fabric flows easily and fits well around the perimeter of the bed.

Pay attention to selection color palette fabrics and decorative elements. You can choose the usual pink or peach shade. Products made from flowing translucent fabric in pure white, light beige or milky shades look good.

In general, focus on the color of the crib and other pieces of furniture in the room, as well as the finish of the walls and floor. Consider factors such as the presence of mirrors, glass elements and natural light in the room.
Canopy for a boy's crib
If you have a boy, you can also create a canopy for his crib with your own hands. Consider the overall style of the room and the prevailing colors in it. Notice how the crib canopy looks in the photo below. Models for boys are distinguished by calm shades and consistent style. Harmonious combination With finishing materials and the color of the furniture makes the atmosphere unified.

When creating a canopy, consider the following:
- It should be distinguished by restraint of colors and design.
- The canopy should be made in white, yellow or blue color to create a pleasant and bright atmosphere for the child.
- Do not focus on bright and heavy fabric, as this will negatively affect the child’s condition and mood.
- The canopy can be short, long or medium.
To create a canopy for a boy's crib with your own hands, use more discreet appliqués and decorative elements. These can be stars, airplanes and bear cubs. The combination of a blue top and a white main fabric looks good.

Round canopy
Do you like unusual design solutions? Make a round canopy over a children's bed with your own hands. This will emphasize not only modern, but also classic interior in the children's room. To create this element, follow these guidelines:
- Round holder. It's easy to make yourself. The base is a round holder, which can be purchased at a children's store or ordered online. The holder can be entrusted to your husband. If he has necessary materials and tools. The holder may be impressive or not large diameter.
- Selection of fabric. Pay special attention to her choice so that the canopy bed looks harmonious. Airy and fluffy material will do. You will need at least 5 meters of material, the width of which is at least 1.5 meters.
- Sewing. You will need a special pattern. Individual elements are cut out from it. Pass along the edge of the fabric satin ribbon or process it with an overlocker. As a result, the material will not fray and fall apart into threads.
- Consolidation. Thread the material through the holder and secure with thread.
- Decorative finishing. The seam can be decorated with a bow made of lace or the material from which the canopy is made.
 An example of how to make a round canopy
 Decoration
It is not enough to simply sew a canopy. It will be functional, but will not give the necessary decorative effect room. For decoration, various decorations are used, some of which are made by hand. How to sew a canopy so that it gives the room the desired effect? For this ready product can be decorated with one of the following elements:
- Bows from dense material and lace;
- Flags and boats;
- Flowers and butterflies;
- Ruffles made of fabric and ribbons;
- Beads different color and sizes;
- Small soft toys;
- Dolls made of fabric;
- Hearts made of cardboard or fabric;
- Pom-poms made of colored threads;
- White plastic chains with beads or clear stones.
Whatever decor you choose, the main thing is that it does not weigh down light fabric. Otherwise it may be damaged. This way, you can sew your own canopy and place it over your baby's crib. The nursery will acquire a finished look and a cozy atmosphere.
Sleep is a moment of magical oblivion. The more soundly and calmly a person sleeps, the healthier he is. Therefore, it is so important to take care of the safety and serenity of sleep. In children's rooms, a child's sleep is protected by a canopy.
Canopies have been placed over royalty since ancient times. Previously, this design was truly luxurious: over a huge oak bed, a thick layer of velvet with gold tassels hung from the crossbars, and underneath there was light flowing tulle. Now the canopy looks much simpler.
Many interiors of children's rooms, especially for girls, contain this element as decoration. The most common canopies consist of a wire frame and airy tulle and fit perfectly into any setting.
But few people think about the true functions of the canopy:
- Protection from light - royals are always very gentle, they should not be allowed to be woken up by light in the morning.
- Protection from dust and insects - light tulle saves you from annoying bugs in the bed in the summer.
- Protecting small children from prying eyes.
- Protection from drafts.
Depending on the design of the canopy, it will combine various functions, and in some types even all.
Examples of canopy bed designs for children are presented in the following video:
For a newborn
Based on even one function of this - protection from unwanted glances - one can judge whether a canopy is needed for a newborn. Yes and everyone else beneficial features This decor only confirms this guess.
A small, still fragile organism is so in need of protection. Choose the lightest canopies so that the child does not feel the oppression of the canopy. Canopies for newborns need careful washing, otherwise there will be no protection from dust, but a completely unnecessary accumulation of dust.
Photo of a four-poster bed in the interior of a children's bedroom
For a child over 3 years old
From the age of three years, children show maximum activity. Many parents worry about the safety of their children and strive to reduce all dangers to a minimum. Anything your baby comes into contact with should be soft, round or light.
Some people think that canopies can cause children to get tangled or stuck in the frame. If the child is irrepressible, endlessly explores something with his hands, and simply makes a lot of movements, then it is better to abandon the canopy.
In the vast majority of cases, canopies are safe; it is difficult to get confused in the design if it is installed correctly. Read the packaging carefully or ask the store if this product is suitable for children aged three years and older. Then there will definitely be no problems with this decorative element.

For a teenager
The stereotype makes us think that a canopy is something made of tulle with openwork lace and ruffles, hanging only in little girls’ rooms. But that's not true. Textile masters create canopies precisely in teenage rooms the most unusual colors and materials.
Children in transition often consider themselves adults, so they demand stylish rooms. Canopies made of thick colorful fabric will perfectly cope with the design of any interior. Moreover, you can hide behind a canopy, which also corresponds to the desires of teenagers - personal space is fenced off, you can dream about something intimate.
For children who are not quite adults yet, but no longer infants, a canopy will help decorate game room. In the boys' room, the canopy turns into sails pirate ship. The girls' room becomes a princess bedroom with a king size bed.
Canopy over a bed for a teenager

Dimensions of canopy over children's bed
Before you buy a canopy for a crib, you need to find out the dimensions of the product that suits you. These parameters will depend on:
- Mounting heights;
- Curtain lengths;
- Material;
- Bed size;
- Canopy design.
You choose the length of the curtains yourself. Most often, for young children they prefer to hang canopies with long edges. The average cost of the simplest fabric for such a design is 160 cm, not counting the decor. The decor may cost a little more, depending on how you decorate your canopy.
The standard canopy size is calculated from the perimeter of the bed and the distance from the holder ring to the bed post. If you are not going to sew a canopy with your own hands, but simply purchase it separately, then these measurements should be sufficient.

Types of holders for it
There are three types of fastenings for cribs:
- Holder in the middle;
- Headboard holder;
- Holder around the perimeter of the bed.
Infants who need to be protected are covered behind a canopy, which is attached to the first type of holders. Children from three years of age are most often protected by a canopy, which is secured above the headboard. The third type is suitable for children who sleep in cribs without sides.
To place the first or second type of canopy over the crib, you need to fix the rod in the required place (in the middle or above the head) and set the required height. Pull the holder onto the oval or round frame top part canopy and carefully straighten it.
If you see that the fabric at the base of the canopy is much larger than the diameter of the holder, do not be alarmed. String all the fabric and then form it into a beautiful gather.
The holder around the perimeter of the bed may be different in appearance, but its essence is the same - there is a frame above the bed through which the fabric is thrown. The frame is attached either to bed posts or to the ceiling.
Canopy holder Himmelstange für Wiegen

Popular manufacturers
There are many manufacturers of these accessories on the furniture market. For example, Ikea offers buyers a wide selection of canopies over the bed for a children's room. The assortment begins with bright, medium-sized canopies for 1,500 rubles and ends with voluminous, beautiful anti-mosquito canopies for cribs for 3-5 thousand. Here you can find both classics and a canopy in the shape of a huge green leaf.
The next brand of canopies is Feretti. Prices for light, elegant canopies start at 1,000 rubles. The most expensive ones cost up to 6,000 rubles. Decent quality, pleasant appearance, but it is difficult to find colorful canopies in unusual shapes.
Elite canopies from Baby Expert cost several times more, on average 15-17 thousand. But at the same time, they remain among the top sellers and are popular due to the quality of the product, expensive fabrics and pleasant appearance.
Popular models of children's canopies
 Bryne - Ikea
  Baby Expert
  Kura - Ikea
  Mysig - Ikea
  Lova - Ikea
  Feretti
 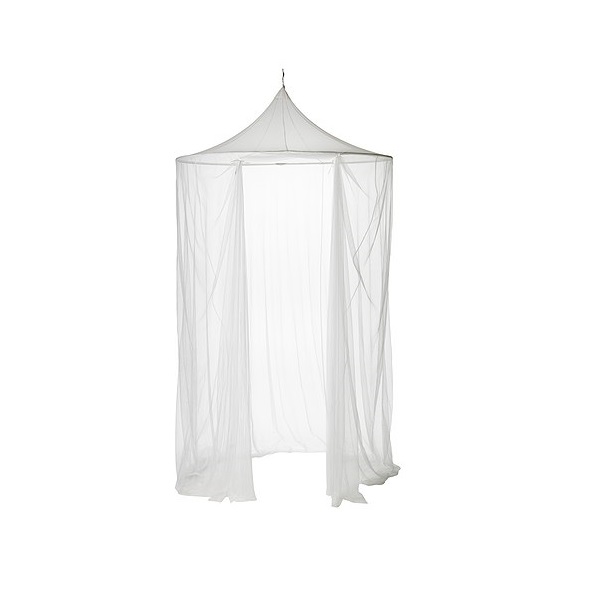 Solig - Ikea
How to make it yourself
Many craftswomen sew canopies “by eye”. That is, they measure the fabric at their own discretion and get down to business. Let's reveal a few of their secrets.
- It is best to have two canopies. If you are going to sew a canopy, then sew a warm one right away. winter option And summer light. In summer, tulle will protect from dust and insects, in winter from drafts and cold.
- Don't worry about the price of the fabric. If it is not possible to purchase expensive fabric, then take the cheapest one for the base, and use small pieces of beautiful fabric to decorate the canopy as you wish.
- Choice of fabric. On summer period The most ordinary curtain tulle (mesh or solid) will do. The main thing is the exceptional naturalness of the fabric. It would be good to have chintz or silk in a nursery.
To attach it to the frame, the base is specially treated. Some people make loops or sew on decorative hooks. The easiest way to secure the top of a canopy is to fold the edge and sew at a distance of three to five centimeters, as for elastic on underwear or a skirt.
The basis for such a canopy can be the outer circle of a large diameter hoop. If you have suitable ready-made curtains with a drawstring, use them to make a canopy.
You will need:

Ready-made curtains with drawstring;
Braid for decoration;
The outer circle is from a large diameter hoop;
Sewing machine;
Pins;
Scissors.
1. Pin the tape to the bottom of the curtains.

2. Stitch the tape using a sewing machine.

3. Remove the attachment from the hoop.

4. Hoop the curtains.

5. Return the mount to its place. The canopy is ready, all that remains is to fix it on the wall above the bed.

2. Canopy on a hula hoop base for a crib or chair

Such a canopy is a little more difficult to sew, but the result is impressive - it’s practically an awning that can comfortably cover a crib or chair from the light.
You will need:

Two types of canopy fabric;
Plastic hoop;
Velcro tape, also known as Velcro;
Sewing machine;
Pins;
Scissors;
Cardboard and pencil for making a template.
1. Determine the desired length and width of the fabric for the main part of the canopy. The length will be equal to the length of your canopy plus allowance for hem and seams. The width will be the girth of your hoop x 1.5 for draping (if you want fuller pleats, multiply the girth of your hoop by 2), plus seam allowance. Cut out the detail of the main part of the canopy.
2. Determine the length and width of the trim strip for the canopy. The length will be equal to the circumference of the hoop plus seam allowances, the width will be as you wish (for example, about 30 cm). Cut out two pieces of blanks for the canopy strip.

3. Draw a template to create the zigzag edge of the canopy trim. To do this, divide the length of the bar (remember, it is equal to the circumference of the hoop) by the number of zigzag corners you need. This will be the width of each corner. Draw a template on cardboard similar to what you see in the photo and cut it out. Then transfer the design onto the fabric using a template.
4. Cut corners on both canopy trim pieces.

5. Close one of the parts of the canopy strip into a circle with the right side inward and pin it together.

6. Place the second piece of the canopy strip next to the first one face to face so that the corners match, and pin together.

7. Stepping back 1 cm from the edge, stitch the details of the canopy trim along the side with zigzag cutouts.
8. Cut off the protruding corners and make cuts on inner corners so that after turning the edge looks neat.

9. Turn out the canopy trim piece, straighten the corners and iron.
10. Topstitch the piece.

11. Cut out the part of the loop from which the canopy will be hung.

12. Fold the loop piece in half with the right sides facing in and stitch. Turn out the hinge part.
13. Fold the piece in half as shown in the photo and iron.

14. Cut out 8 triangles to form the top of the canopy. Formula for constructing triangles:
Width of the base of the triangle = 1/8 of the circumference of the hoop + seam allowances
Triangle length (from the middle of the base to the top) = ¾ of the diameter of the hoop
15. First sew 4 triangles together with the sides. Then sew the other 4 in the same way. Before connecting both resulting fabrics into a cone, firmly sew a loop to one of them, as shown in photo 15.

16. Now you can stitch both fabrics into a cone.

17. Place the finished cone on work surface and place the hoop on top. Trim the corners.

18. Assemble the main part of the canopy.
19. Fold three parts - the main one, the strips and the cone - in the sequence shown in the photo, and pin them together. Sew all the pieces by machine.

20. Sew to the canopy with inside Velcro pieces.
21. If your hoop is not the right color, you can paint it or wrap it in colored tape or tape. All that remains is to attach the hoop to the canopy from the inside and hang the canopy by the loop.


3. Canopy in vintage style: master class

Such a canopy primarily performs a decorative function, making the sleeping area more comfortable. If you want the canopy to cover the entire length of the bed, you can lengthen its free edge (respectively, more fabric will be needed).
You will need:
Fabric for canopy;
Braid for decoration;
Scissors or cutting knife;
Sewing machine;
Pins;
Something round - as a template for constructing the rounded edges of a canopy (large bowl, pan lid, etc.).
1. Decide on the length and width of the canopy and cut out the part.

2. Using the template, round the corners of the free part of the canopy.


3. Finish the edges of the canopy.

4. Sew decorative braid on three sides of the canopy.

5. Using two curtain rods, hang the canopy over the bed.

4. Canopy in a romantic style: master class

For such a canopy, it is best to use tulle or other thin translucent fabric.
You will need:
Fabric for canopy;
Ribbons or braid in color;
Hooks for hanging canopy;
A pair of canopy hanging sticks;
Round caps for decorating sticks at the ends;
Threads with a needle;
Pencil and ruler.
1. Mark on the ceiling where the 4 hooks will be attached for hanging the canopy.

2. Screw the hooks into the ceiling.

3. Tie braid or ribbons to the hooks - there should be two long free ends left.

4. Tie the ends of the ribbons and thread your canopy fabric through the resulting loops - this way you can measure out the required amount of fabric. Also mark where the canopy will be attached to the sticks.

5. Cut the fabric.

6. Secure the fabric to the sticks - first pin, then hand sew.

7. Decorate the ends of the sticks with plugs, placing them on glue.

8. Tie ribbons or braid to the ends of the sticks.

9. Tie the ribbon to the hooks on the ceiling, hanging the canopy. Ready!
Canopy is silk fabric from Baghdad, this is how it is translated from Italian. It is a canopy over the bed, made of fabric. It is believed that the canopy first appeared on Ancient East and in Persia. Later, the canopy was used as an architectural element in Europe. Since the 12th century it has found its place in Romanesque art.
During the Gothic period, it was made of stone and was used as a symbol of royal power and heavenly protection. The use of the canopy for practical purposes began during the Renaissance and Baroque periods. A floor-length bed canopy served as protection for titled persons from cold and drafts during their sleep, and also served as protection from prying eyes.

The canopy became a separate part of interior decoration, one might say, a “royal highlight” in France during the Rococo period. In the decoration of the halls, when making canopies, they used complex openwork patterns, gilding, silk fabrics, bright brocade, and decorated the pillars with elaborate carvings. This all gave a formal and rich look to the four-poster bedrooms.
Today, a curtain over a bed is often used in children's and adult bedrooms.

The presence of a four-poster bed in a house or apartment serves as a certain sign of luxury. As a rule, this is an elegant bed canopy that creates mystery and grandeur in the interior. Like any thing, a canopy bed has both positive and negative qualities.

Advantages


Flaws


Classic version
Of the variety of canopies, four main ones can be distinguished. Cornice for classic version The canopy consists of vertical, interior pillars connected at the top by a quadrangular frame.
The stands, fastened with a frame, can be made of wood or metal. The design emphasis is on one of the points:
- On the pillars of the structure. For wooden racks wood carving technique used. For metal racks– decoration with forged elements.
- Based on canopy material. If you don't like decorating the cornice posts, you can use expensive, beautiful fabric to make a canopy.

Support
The main component for this design is the crossbar on the ceiling. It is usually located above the center or above the foot part of the bed. A fabric canopy is thrown over the crossbar. With this design the canopy is located either over the entire sleeping area, or over part of it.
The emphasis with this decision is on the fabric from which the canopy is made.

Cornice
The frame for the canopy is made in a round or square shape. The structure is mounted on the ceiling in the center of the bed. Fabric is stretched through such a frame.
IN in this case The interior focus is on the material. Canopy - the frame is very laconic and making the right choice fabric for a canopy bed, it will look like a royal bed.

Canopy
A pre-made round, square or other shaped frame is attached to the ceiling. Usually like this the structure is fixed above the headboard bed or in the center of the bed. The fabric falls down in waves, creating a pleasant romantic atmosphere in the bedroom. This is a budget type of canopy, because... does not require complex and rather expensive pillars - supports.
Fabric selection
 The frame and fabric are sold in specialized stores. Depending on the design and materials used, the price range varies. It’s easy to make a canopy over your bed with your own hands:
- Determine what shape you are do you want a canopy frame?.
- Select material and sew.
Usually for the bedroom they use translucent fabrics for the canopy, matching color scheme with curtains on the windows and other interior color compositions. It can be silk, chiffon, linen, voile, etc., etc. But you shouldn’t forget velvet, jacquard, and tapestry. Yes, these are heavy fabrics, but depending on the idea of the frame for the canopy and general interior they can be successfully implemented in the design of the bed.
In addition to the texture of the canopy curtain fabric, the desired effect in the interior can be achieved by the color and pattern of the material. Don't forget canopy shades above the bed to duplicate in other interior elements. For example, in a bedspread, in window curtains, in capes or other hand-made items.
So, how to make a canopy over a bed? In order to sew it with your own hands, you need to follow these steps:
- Cut the fabric according to the pattern. Hem the edges of each resulting element. This is necessary in order to the fabric did not fray during the operation of canopy curtains.
- Make holes at the top of the curtain for fastening. They should be located at the same distance from each other.

Choosing a canopy attachment method
How to hang a canopy:

Make your choice and create comfort in your apartment or private house.