How to install a plasterboard arch. Arch design - design ideas from professionals and do-it-yourself design (113 photos) What to make a door arch from
Arches in openings have been used for a long time, as it was believed that this architectural opening is very aesthetic. Today the arrangement of arches in doorways became popular due to the fact that they are easy to install from plasterboard. With the advent of plasterboard arches, it became possible to separate rooms without having to special effort. Such arched vaults will help give each room its own personality.
Thanks to the arch you can visually expand small space corridor, kitchen or room.
As for arch shapes, there are a large variety of them. By making arches from plasterboard, you can recreate almost any historical copy. The main convenience is that drywall is a very flexible material. Making an arch in doorway according to the following scheme:
- All necessary measurements are taken and calculated required amount material.
- Next, everything is prepared necessary tools that will be required for the job.
- The front parts of the arches are cut out, and a frame is made from a profile or wood.
- Next, the front elements of the arches are attached.
- The lower parts of the arches are cut out and also attached.
- The arched corners are attached and all surfaces are puttied.
What materials will be needed?
To work you will need following materials and tools:

Types of arch shapes.
- plasterboard 9.5 mm thick;
- guide profiles - 27x28 mm;
- rack profiles - 60x27 mm;
- self-tapping screws for fastening gypsum plasterboard (plasterboard sheet) - 3.5x25 mm;
- dowels with screws - 6x60 mm for fastening profile frame(needed if the walls are made of brick or concrete).
- self-tapping screws with a press washer - 4.2x12 mm;
- wood screws (if the walls are made of wood);
- putty on gypsum board;
- needle roller for bending plasterboard sheets;
- arched corner with perforation;
- putty knife;
- screwdriver;
- protective gloves;
- roulette;
- square;
- pencil;
- metal scissors;
- stationery knife for cutting plasterboard.
Related article: Feng Shui of a children's room
What type of arch can it be?
The opening of a door or window can be decorated by creating an arch. Exists a large number of arches that you can make in your home. When choosing, you need to be guided not only by taste preferences, but also by the following parameters: first of all, the height of the ceiling and the width of the doorway. So, some designs look good when high ceilings, while others, on the contrary, are at low levels. Kinds:

Diagram of the arch structure.
- Portal - this arch is made in the standard form of the letter P. The design of the arch can be different: polygonal or wavy. It all depends on the available materials and the imagination of the home owner.
- Classic arch - otherwise called “classic”. This type of arch is only suitable for ceilings whose height is more than 3 m in height. On average, with an opening width of 90 cm, about 45 cm of height will be occupied by the bend of the arch, so a height of 2.5 m may not be enough.
- Romance. This option is perfect for wide openings that are relatively small in height. Between rounded corners Direct insertion is performed either at an angle or horizontally.
- Modern. This type is perfect for making a doorway inside standard apartment. In this case, the corners can be either rounded or sharp.
- Half-arch. This option can perfectly perform room zoning.
- A straight arch is an excellent option for rooms designed in high-tech and modern styles.
In addition, the arches differ in their design:
- Radial (asymmetric) - the simplest and at the same time cheap technology, which will suit absolutely any interior.
- Multi-level. This design is used mainly in cases where the interior is made in one specific style.
- Openwork is suitable for all cases, except when the walls are made in a non-standard form.
- Domed and symmetrical are suitable for classic arches, the opening of which is at least 1 m.
Doorway: taking the necessary measurements

Methods for bending a sheet of drywall: dry and wet.
Before making an arch in a doorway, you need to take all the necessary measurements. Naturally, you need to start with measuring the opening. You need to find out the height and width of the opening.
Related article: Choosing a bunk bed
As for the width of the arch, it should be equal to the distance between the opposite walls of the doorway. It is necessary to measure this distance and divide it in half. This size is needed in order to make an accurate semicircle.
In addition, you need to determine the shape of the future arch in advance. If you choose a classic arch, then you need to level all the walls. They should be completely vertical so that the arch does not look awkward. You need to level the walls using beacons using putty or plaster.
Preparing gypsum boards for an arch
- First of all, you will need a regular pencil and a tight rope. The pencil is tied to a string and you get an excellent wide-scale compass.
- Next, the middle is marked on the plasterboard - that is, the radius of the future arch. To do this, you need to remember the size of the opening width.
- Where the top of the arch will be, a mark of 60-65 cm is marked. This figure was taken based on a radius of 50 cm and a height of 10-15 cm above the arch.
- Next, the plasterboard sheet is cut exactly to the width of the doorway.
- After which a point is marked that will be the center of the radius.
- Take a rope with a pencil, its length should be equal to the radius. A semicircle is drawn along a pre-marked point. When taking the correct measurements, you should get a perfect circle, which will be the arch of the opening.
- After that, take a stationery knife or jigsaw, with which you need to cut out a semicircle along the drawn line. In our case, its width should be 100 cm and its height 60-65 cm.
DIY arch frame installation
Both the aesthetics and the strength of the structure will depend on a well-executed frame.
The stages of manufacturing and installation of the frame are as follows:
- First of all, a guide made of metal profile using dowels. Next, the guides are attached to the wall in 2 places.
- After this, an arched profile is made, also from metal. To make it, using metal scissors, identical cuts are made in the profile, each of which then needs to be bent to form right angle. As a template, you can use already made parts from gypsum plasterboard. The profile is fastened with dowels, and the drywall is fastened with self-tapping screws. For the arch you will need 2 arched profiles.
- To strengthen the frame, you need to attach sections of the profile between the 2 arcs.
- Next, the arc-shaped parts are attached to the frame using self-tapping screws.
The doorway will look more aesthetically pleasing if you design it in the form of a semicircular arch. You can make it from plasterboard yourself, without resorting to the services of professional builders.
Arch markings
A significant disadvantage of this design is the reduction in the size of the doorway. To see whether the arch will fit well into a specific doorway, it is better to first cut a blank from paper or cardboard and secure it above the door. If the opening height is less than 2.5 m, it may be necessary to reduce the bend of the arch or make small bends only at the corners of the arch.Installation of an arch with a small bending radius

Constructing a circle

You can also make a compass from a scrap metal profile.
Drywall cutting
1. First, cut through the first layer of cardboard and the gypsum core. To do this, apply a ruler to the intended line and draw along it several times. sharp knife or metal file.
Cutting through the first two layers
2. To finally break the gypsum core, place the drywall on its edge and lightly tap the cut area. If the part being cut has a small width, you can break the plaster by simply pressing on the edge of the sheet.


Cutting the second layer
4. To remove roughness along the edge of the cut, it is processed sandpaper or rasp.
Important! For perfect joining of sheets along the edges of the drywall, use a sharp knife to remove 45° chamfer.

Chamfering
Cutting blanks for the upper arch of the arch
It is most convenient to work with jigsaw or a special plane for drywall. Using them you can cut out any shapes from drywall. Moreover, with this method, gypsum practically does not generate dust, and the resulting edges require almost no additional processing.
Cutting with a jigsaw
You can trim curly edges using drywall knife saw-shaped or metal files with fine teeth. However, this will require some skill. A knife or file is drawn along the intended line so that the blade penetrates as deeply as possible into the sheet. In this case, the tool must go strictly perpendicular to the surface. Next, tap the cut area with a hammer and, if necessary, run the knife over it several more times.

Cutting with a drywall saw
Then it cuts through back side sheet, on which traces of pressure from the knife are already visible. Then the excess pieces are cut off and the edges of the sheet are trimmed with sandpaper. If the cut line is large enough, it is better to cut the sheet inside the outline into segments.
For getting holes(for example, to install lamps or sockets), you can use an electric drill with a crown-shaped attachment.

Drill bit
Cutting and bending metal guides
Aluminum guides are cut using conventional metal scissors. To attach the upper part of the arch you will need a special arched profile. You can buy it in a store or make it yourself.To bend the profile, they are made on it cuts. The distance between them depends on the bending radius - the larger it is, the more often notches should be made. For bending, it is better to choose an L-shaped profile - it will be much easier to work with it, and the cuts will have to be made only on one side.

Profile bending
Drywall bending
For arch construction you can purchase arched plasterboard. It is more plastic and, since its thickness is less than ordinary sheets, it bends easily. However, buying a whole sheet is quite expensive. Some stores sell this material not in sheets, but in pieces, which is very convenient. If it is not possible to purchase a small piece, you can also bend a regular sheet of drywall.
Thin arched drywall bends easily, but costs more
To do this, you can use two methods: wet and dry. In the first case, in order for moisture to better penetrate deep into the sheet, the plasterboard blank should be rolled before bending. needle roller.

Before bending, the workpiece is rolled with a needle roller
Next the sheet is evenly moistened with water and placed on a curved surface that follows the shape of the arch, pressing down with a weight. A device for drying the workpiece can be cut from the remains of drywall or plywood.

Wet bending
Important! With any bending method, it should be taken into account that drywall bends well only along the length of the sheet.
At dry bending cuts are made along the entire length of the fold. Moreover, the larger the bending radius, the more often such notches should be applied. This can be done quickly with a grinder, however, since this creates a lot of gypsum dust, it is better to do the work outside.


Dry bending of plasterboard
Frame installation
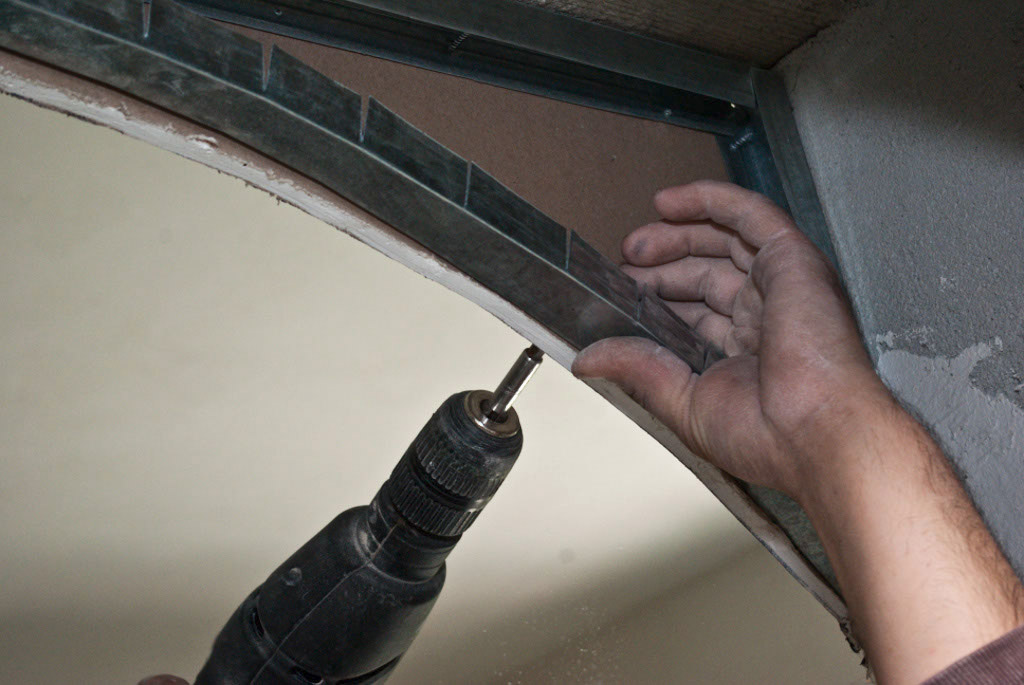
After dismantling door frame the surface is cleaned of loose plaster, dust and dirt and all irregularities are knocked down. Next, on the sides of the doorway, using self-tapping dowels in increments of 20-30 cm, they are fixed two rack metal profiles. In this case, you should retreat 11-12 mm from the edge for installing drywall and applying putty. If the opening width is large (more than 1 m), between two guides they are attached jumpers. Small sections of profiles connecting two side guides are also mounted in the lower part of the opening. They should rest against the floor.Mounted at the top of the doorway two curved profiles. If necessary, they are also connected to each other by jumpers.

Fastening the upper part of the profile

Fastening the profile with jumpers

The profile sections are fastened together with self-tapping screws
Fastening drywall
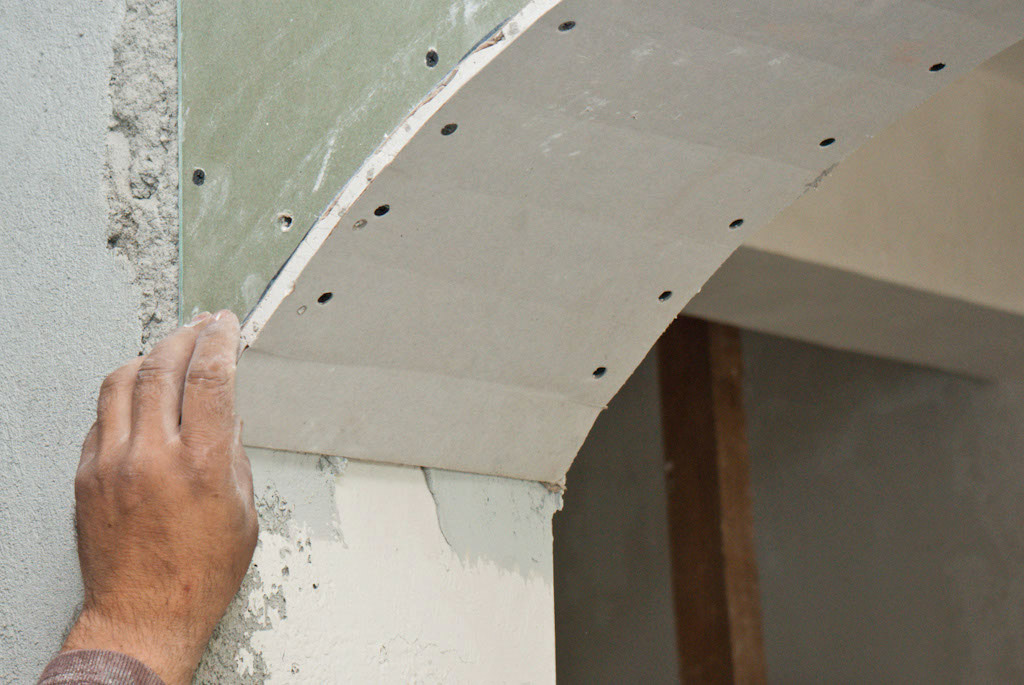
The very first self-tapping screws in increments of 25-35 cm blanks for the upper semicircle of the arch are attached. Their width should be equal to the width of the doorway plus 10-15 mm. You should not fasten the screws too close to the corners - you need to make an indent of 1-1.5 cm, otherwise cracks will appear at the fastening points.
Drywall installation

Fastening the corners
Important! To prevent the screws from protruding above the surface, they should be recessed into the sheet a couple of millimeters. Subsequently, the holes from them are covered with putty.
The finished structure is plastered with a wide spatula first starting, and then finishing putty. The solution is applied to inner side arches, and then, after it has completely dried, onto the side walls. At the joints of drywall, to protect the solution from cracking, it is attached with putty. painting mesh.

After installation is completed, the arch is covered with putty

Attaching the painting mesh
03.09.2016 27931
Installing an arch in a house can serve several purposes: to make the interior original and distinctive, or to visually enlarge the space. Absence door leaves and space for opening them allows rational use of the space of a compact apartment.
In order to avoid the need to use the expensive services of professional builders, you can make an arch in the doorway yourself. And this article will come to the rescue! In it, we looked at the main questions that beginners have: what types of arches are there, what materials they are made from. Also here are step-by-step instructions for the work being performed, advice from experts - all the subtleties of the arch making process.
In what rooms can you make an arch?
Door arches will decorate an interior made in any style, because there is a wide variety of them. First of all, they differ in the shape of the opening:
- classic, representing a regular semicircle;
- made in the Art Nouveau style, elliptical configuration;
- in the “romantic” style, which are complex combinations of rounded shapes and straight lines;
- pointed upwards, made in gothic style etc.
Arches can be installed in almost all types of premises. The only exceptions are rooms intended for privacy, such as a bedroom, office or bathroom.
There are different opinions about installing an arch in the kitchen. cause discomfort: the spread of kitchen odors throughout the apartment, noise from preparing early breakfasts while the rest of the family is sleeping, etc. But, if there is a powerful hood and the kitchen does not open into the living quarters, but, for example, into the corridor or dining room, it can be installed.
Materials
There are a large number of materials from which you can make. Typically, drywall, plastic or wood are used for these purposes.
Using concrete or bricks you can also decorate the doorway in an interesting and original way. But in order to make a brick arch with your own hands, you need skills in construction - a beginner cannot do this work. This process is also labor-intensive and time-consuming, which not everyone can afford.
In this article we will look at how to make plasterboard (gypsum plasterboard). This material is accessible and inexpensive; the technology for working with it does not require the use of special tools and will not be difficult even for a beginner.
How to make an arch from plasterboard?
You can buy plasterboard arches, especially since there is a huge selection of them on sale. But it’s difficult to choose a product that perfectly matches the doorway, so try making it yourself.
Despite the fact that gypsum board makes it possible to construct structures of the most intricate configurations, we will dwell in detail on the simplest and most common option: a semicircular interior arch.
The process of its manufacture consists of the following stages:
- preparation of tools and materials;
- measurements and, if necessary, preparation of the doorway;
- production of front parts of the structure;
- frame installation;
- arch installation;
- final works.
Let's consider each stage separately.
Materials
We will need the following materials to make the arch:
- drywall;
- metal profiles for constructing a frame;
- fasteners;
- perforated;
- putty on drywall.
When choosing drywall, pay attention to the fact that different sections of the structure will require material of different thicknesses. For the front surface, it is better to choose sheets with greater thickness to ensure structural strength. For the bottom edge, it is better to purchase thin gypsum board, which is easier to bend.
Select fasteners depending on the material of the walls in the room. For wooden walls, purchase self-tapping screws. If the design is planned for, it is better to choose dowels. They are also suitable for plaster and concrete walls.
Measurements and preparation of the doorway
Before measuring the doorway, you need to prepare it: dismantle the doors, slopes and trims, if necessary, clean and level its inner surface using beacon plastering or putty. Then, using a tape measure, we determine the height and width of the opening.
Advice! Arches are not recommended if the height of the opening is less than 2 m and the ceilings are below 2.5 m. Also keep in mind that an arch for a doorway will reduce its height by 10-15 cm.
Making the front parts of the arch
Let's look at how to make the front parts of the arch. These details must be drawn on a sheet of drywall and cut out. When performing this work, pay attention to the fact that both parts must be absolutely identical, and the semicircle of the arch must have the correct shape.
One of the popular and available ways markup is like this:
- The width of the doorway must be divided in half - this way we get the radius of the semicircle.
- We mark a rectangle on a sheet of drywall: its width should correspond to the width of the doorway, and its height should correspond to half the width of the doorway + 10-15 cm. Example: if the width of the opening is 1 m, then the rectangle should be 60-65 cm high. Added 10- 15 cm is the distance from the top of the doorway to the top of the future arch. It is not recommended to make this distance less than 10 cm.
- Now let's mark the arch of the future arch. On the bottom side of the drawn rectangle, mark the middle and, using various devices, draw an even semicircle with a radius equal to half the width of the doorway (in our case, 50 cm). This can be done with a homemade compass, using a rope (thread) and a simple pencil (chalk).
- Cut out the resulting blank. To do this, you can use a utility knife, a special knife for cutting drywall, or a jigsaw.
- To ensure that both parts are absolutely identical, the first is used to mark the second.
To mark a circle, it is not always convenient to use a homemade compass - often when using it, the lines turn out to be uneven and asymmetrical. If you have a helper, use in the following way, which will allow you to draw a circle more accurately and evenly. To mark a sheet using this method, you need a strip of flexible but elastic material. You can use a piece of soft plinth or a strip cut from a PVC panel for this purpose.
From the middle of the lower part of the marked rectangle, draw a straight line perpendicularly upward, the length of which is equal to the radius of the circle, and mark a point there. After this, the flexible strip is applied to the sheet and bent so that it comes into contact with the marked point and bottom corners drawn rectangle. While one person holds the strip in place, the second person traces it.
For the end (bottom) part of the arch, mark and cut out a narrow rectangular strip with a width equal to the thickness of the doorway. To determine the length of the strip, multiply the radius of the circle by the number π (3.14). In our case: 50 cm ×3.14 = 157 cm. It is better to cut the strip with a margin, since it is much easier to cut off the protruding extra centimeters than to cut it all out again if there are not enough of them.
Making a frame
To securely install an arch in a doorway, you need a strong frame. Therefore, the next question we will consider is how to make a frame for an arch. To make it we use a metal profile.
First we install the upper parts. To do this, we cut out two guides along the width of the doorway and fix them in the upper part of the slope, parallel to each other. If the doorway is located in a plaster, brick or concrete wall, then we use dowels to fasten the frame elements. Wood screws are suitable for wooden walls.
Let's move on to installing the side parts. We cut out 4 side parts from the metal profile and fix them in the upper part of the opening parallel to each other. Their length must correspond to the height of the plasterboard blanks. Since the blanks taper downward, be sure to cut off the lower corners of the profile so that they do not protrude beyond the drywall.
Important! When securing the frame, make sure that the front and rear parts are parallel to each other - this will prevent subsequent distortions of the structure.
So that after fixing the plasterboard sheets and a layer of putty, the structure does not protrude from the wall, the frame elements are attached at a distance of 1.5-2 cm from the edge of the opening.
Installation
Installation of a gypsum plasterboard arch consists of attaching plasterboard blanks to the frame. First, the front parts are screwed on using metal screws. The distance between adjacent fastenings should be no more than 15 cm. To ensure a tight fit to the profile, the plasterboard sheets are pre-moistened with a damp cloth, and fastening begins after they become flexible.
There are two main ways to attach the end (bottom) part of the arch. More often it is screwed using self-tapping screws with a press washer directly to the facing plasterboard parts. Less often, a special frame is built to attach it at the bottom of the structure, but this method is better to use if you plan to make an arch from fiberboard with your own hands.
Beginners often have difficulty when trying to bend drywall pieces. Therefore, let us dwell on the features of working with this material:
- the sheet is moistened with a damp cloth;
- pressing lightly, roll a needle roller over it;
- the part is placed at an angle, leaning against the wall;
- when the sheet becomes elastic and bends under own weight, it is given the necessary configuration.
Completion of work
After the arch elements are secured, wait 10-12 hours until the drywall is completely dry. The final work on making an arch includes leveling its surface and decorating.
To protect the corners of the arch, straighten the circumference and hide defects made during manufacturing, you can attach a special perforated corner along the lower edge.
The surface of the structure is primed, leveled with putty and sanded. sandpaper. The layer of putty should be sufficient to align the arch elements with the wall. It must be applied to the structure itself, as well as to the seams and joints.
Decorate a plasterboard arch different ways: wallpapered, painted, tiled or decorative stone, cover decorative plaster.
Conclusion
It’s easy to make an arch in an apartment with your own hands. The same technology, as described above, is used for structures made of MDF, fiberboard or plastic.
The main thing is not to be afraid to take on a new field of activity, to apply effort and imagination! And a door arch made by yourself will certainly become a decoration of your home!
 And why not leave an open doorway instead?
The fact is that rectangular structures hanging over your head create severe psychological discomfort. It is much more pleasant for us to see towering arches above us, which resemble the bending crowns of trees in a park or sea waves. There are no rectangles in nature; all lines are natural, lively and streamlined. Therefore, since ancient times, architects have sought to repeat natural lines so that a person in any building would feel calm and protected.
Types of arches
 There are arches various types. The classic arch is distinguished separately. It has not changed its shape for centuries. A classic arch has a radius equal to half the width of the opening and characteristic elements decor. The perimeter of the opening has a casing made of stucco or similar materials. In the center of the vault the arch forms a kind of decorative element- keystone. The side parts of such an arch are often made in the form of columns, on which the base and capitals are clearly visible. A classic arch is always appropriate in appropriate interiors.
In non-classical styles, the most popular types of arches are:
- Gothic - formed by two arcs that intersect at an acute angle and look like an arrow.
- Moroccan - strongly elongated in the center. This type of arch is common in Spanish and Moorish architecture.
- Oriental or Arabic style arches are characterized by an opening shaped like an onion or the keel of an inverted boat. This type finds its application in the architecture of India and Muslim countries of the Near and Middle East. Echoes of the style can be seen in ancient Russian religious buildings.
- Art Nouveau is distinguished by unusual forms, among which asymmetry is popular.
Modern democratic style allows for the most unexpected forms and design finds. Asymmetry, mixing styles and materials for decoration are widely used.
Bring to life any design idea allow new construction and Decoration Materials- drywall, which is attached to a frame made of wood or metal profile. These materials do not require the involvement of specialists with professional tools.
All work on constructing a plasterboard arch is easy to do yourself.
Arch as a way of zoning
 Creating an interior arch is a convenient and practical way zoning of space. With its help, you can either select separate zones in one room or studio apartment, or combine small rooms into one.
Most often, arches are installed in hallways, removing the door that darkens the room. A small hallway in this case visually merges with the next room, especially if the same finishing materials were used. For example, the same tiles are placed on the floor in the hallway and in the kitchen, and the room is separated by laminate or parquet. If the apartment or house has a designated dining room separate room, an interior arch between it and the kitchen will be much more appropriate, since the housewife will often have to walk between them with dishes in her hands.
When combining a balcony or loggia with a room, design the doorway in the form of an arch.
By building regulations demolish the carrier external wall is prohibited, and the installation of an arch will allow you not to break the rules and add zest to the interior. Below we will describe how to make an arch in a doorway.
If the arch will stand in a room with high humidity, you should purchase the appropriate drywall - its sheets are green. Regular material in conditions high humidity After a few years it will lose its shape.
We build an arch with our own hands
 An arch like this can be easily created in any room - in the kitchen, hallway or living room. If you have very little experience in finishing works, we invite you to make an arch with your own hands using step-by-step instructions and photos.
Prepare your tools in advance:
- scissors for metal work;
- knife;
- roulette;
- putty knife;
- grater or grout;
- carpenter's square;
- pencil.
Materials:
- drywall or wooden blocks
- metallic profile;
- plywood sheet;
- self-tapping screws for drywall;
- putty and plaster;
- paper tape.
Also, do not forget about the means personal protection– , goggles and respirator.
When everything for the work has been prepared and a place for the future arch has been chosen, the doorway should be measured. Considering the size of the opening, draw the desired arch shape on a sheet of drywall. This stage is the most critical, so you should approach it seriously. A curve of the desired radius can be drawn by screwing a self-tapping screw with a rope tied to it into the drywall. The length of the rope should be equal to the length of the radius. When the contours of the arch are drawn on a sheet of drywall, do not forget the old rule:
Seven times measure cut once.
Cut out the future arch along the contours using a jigsaw or a special hacksaw for drywall. Before cutting, carefully secure the sheet so that it does not move. Once the drywall is cut, it can be set aside. It's time to make the frame. As we remember, it is made from a metal profile or wooden beam. A profile frame is more suitable for brick walls, and bars for wooden ones.
Installation of a metal frame
 In order to make an arch from plasterboard, first install its frame. Guides of the required length are cut out of the profile and fixed to the wall as shown in the photo.
If the profile is attached to a concrete wall, you need to drill holes in it and hammer in dowels, into which screws are then screwed. For attaching the profile to wooden wall Use self-tapping screws at least 4–5 cm long. Optimal distance between them – 10–12 cm.
After securing the guides, measure a section of the profile for the lower edge of the arch. Since the arch has a curved shape, the profile section will also have to be bent. To do this, its sides are cut with metal scissors and carefully bent, each time trying it on the cut out part of the plasterboard arch. This process looks like this: 
Next, the bent part is attached to the guides either directly or using direct hangers, as in the drawing below. 
Hangers are needed to rigidly fasten the lower part of the arch. Next, the side parts of the arch, cut from plasterboard, are screwed to the frame. The most convenient way to do this is with a screwdriver. 
Then, at several points, jumpers should be installed connecting both side walls of the arch.
Installation of a wooden frame
 If you decide to make an interior arch from wood, then you first need to determine the thickness of the wooden blocks. Measure the width of the opening and subtract the thickness of the plywood and drywall from it, the resulting figure will be the thickness of the block. Using a jigsaw, cut out the sides of the arch from plywood.
Secure the entire structure with self-tapping screws. It should look something like this.
Installation of the lower part of the arch
 After installing the side parts of the arch, it was time to sew up the opening from below. Using a tape measure, measure the length and width of the bottom and draw it on the drywall. Since the lower part has a curved shape, the material will have to be bent. To do this, draw across the strip parallel lines pencil. The distance between them should be about 10 cm.
Cut the layer of paper along the lines with a knife. Attach the drywall to the bottom of the arch with the cuts facing up and, using smooth, slow movements, gradually shape it into the desired shape.
When bending drywall, do not apply too much force to avoid breaking the material.
Next, align the edges and secure bottom part self-tapping screws. 
After securing the bottom, use a knife to smooth out any uneven areas on the drywall.
Finishing the arch
 To ensure that the joints and places where the screws are attached do not show through, they are glued over paper tape or masking tape. They are leveled with putty in several layers and each layer is sanded with an abrasive of the required grain size. For puttying use acrylic putty for interior work or special for drywall. Apply putty with a spatula and level with grout.
If in the process of breaking the doorway from concrete wall large pieces break off, use plaster. Unlike putty, it can be applied in a thick layer. After the plaster has dried, the surface is leveled with a thin layer of putty.
To prevent cracking, a mounting mesh is reinforced over the putty.
 Lastly, a finishing layer of putty is applied to cover the mesh. After drying, the surface should be thoroughly cleaned. If the mesh is still visible after drying, apply another layer of material. The result should be a perfectly flat white surface.
Now the interior arch, made from plasterboard with your own hands, is ready for decorative finishing.
Examples of using arches in design
Check out the most successful and beautiful examples plasterboard arches in interior design. 
A complex arch with shelves connects the room with a balcony.
 Lamps are mounted in this arch between the room and the hallway. The result was a spacious and bright room.
On next photo an archway leads to the kitchen instead of a door. 
In the hallway, all doors have been replaced with arches. 
The photo clearly shows how the creation of an interior arch ennobles the room and emphasizes the beauty of the interior
Installing a prefabricated arch in a simple way - video
A few years ago, arched openings came into fashion. This design of the entrance to the room is beautiful, original and allows you to do without installing doors. Using modern materials, can be made and finisharched vaultwith your own hands. The work is not too difficult, but requires great care. In addition, you will need to think in advance how finishing will be done openings. You can complete the registration in different styles, considerhow to make an arch in a doorway.
The arch is very effective way revive the interior and make it more attractive. A beautifully designed arched opening in the vault will emphasize the beauty of the interior of the room and make the decor more original.
A huge variety of arch shapes and harmoniously selected finishes will transform the room. To verify this, just look at the photo of the room before the arch was inserted into the opening, and after the repairs were completed. Let's consider how you can create a niche in the form of an arch, install it in the vault of the wall and decorate it with your own hands.
Types of arches
When decorating interiors, arched openings perform not only decorative, but also practical functions. Create a niche in the vault of the wall separating adjacent rooms, or install a partition with an arch-shaped opening in large room can be used to divide space into zones without using interior doors.
In most cases, semicircular openings are used; the following types of arches are distinguished:
- A classic arch is a structure in which the bending radius of the arc is half its width.
- Arch modern. It has an original shape, in which the arch is performed with some elevation.
- Romantic arch. This is an almost rectangular opening, the edges of which are rounded.
- Elliptical arch. In this case, it has the shape of an oval, with widening in the middle part and narrowing at the top and bottom.
Advice! What they look like different types arches, can be seen in photos in interior magazines.
Getting ready to install the arch
Let's look at how you can install and decorate a classic plasterboard arch with your own hands.
Taking measurements
It is necessary to begin creating an arch by taking measurements from the opening. You will need:
- Take measurements along two diagonals of the opening. These measurements must match, otherwise you will have to first carry out work to level it.
- Take the width measurement. This measurement is useful for determining the bending radius of the arc.
- Measure the height.
We purchase materials
In order to install the arch you will need:
- Sheets arched plasterboard 6.5 or 8 mm thick. If there is an opening in the room standard size, one sheet is enough. This material is very convenient to use. You can use plywood, but it is more difficult to work with.
- Metal profile. You will need 2 pieces of guide profile 50x40 and 1 piece of rack profile 50x50 mm.
- Fasteners: dowels with screws (25 pcs.), self-tapping screws measuring 3.5×25 mm and self-tapping screws “seeds” 3.5×11 mm.
After construction is completed, the arch will need to be finished. To do this you need to stock up:
- Primer;
- Finishing putty;
- Perforated arched corners.
The rest of the material is purchased depending on the planned design of the opening and the adjacent wall.
Installation work
First, the frame is constructed. Steps to do this work yourself:
- We cut two sections of the profile along the height of the opening and one along the width and secure them in the opening using dowels and screws.
- Now you need to prepare the arcuate part of the frame. The length of the profile for this part is determined by adding two values - the radius of the arch and the height of the indentation from the top of the opening.
- To make it possible to bend the profile, you need to use metal scissors or a grinder to make cuts in the parallel side parts of the profile. The pitch of the cuts is 4-8 cm. After this, the profile is bent, giving it the required shape.
- We fix the manufactured part of the frame, having previously leveled it.
- We cover the finished frame with plasterboard blanks. First, the gable parts are sheathed, cutting out the parts according to the dimensions of the opening. Then it is made inner part arches. To bend a plasterboard blank with your own hands, you need to make cuts on the reverse side without damaging the outer layer. The prepared plasterboard part must be installed, secured to the frame using self-tapping screws.

Finishing work
The plasterboard arch is almost ready. But as you can see in the photo, without finishing it doesn’t look particularly attractive. Let's look at how you can design and frame an assembled arched opening with your own hands.
First of all, you need to putty all the seams and the locations of the screws. We attach a perforated corner to the outer edges of the putty compound so as not to bother with putting out the shape with putty.
Then apply a layer over the entire surface of the arch finishing putty, and after it dries, we grind the surfaces, achieving smoothness. All that remains is to prime the surface, after which finishing can be done.
How can you finish an arch? The chosen option should be harmoniously combined with the wall decoration. For example, if the walls are covered with wallpaper, the same material can be used to decorate the arch.
You can use other options that match the wall decoration. For example, finishing interior arches artificial stone, tiles, decorative plaster, you can use a combination different materials. You can see the photo to see how beautiful and original the decoration of the arch can be.
So, interior openings in the shape of arches are an original and very attractive way to decorate the interior and create an opening between adjacent rooms without installing a door. If you wish, making an arch yourself is not difficult. You can see how interesting it is to decorate an arch in photos in interior magazines.