How to properly attach PVC wall panels to walls with your own hands. How to attach plastic panels to the wall - complete instructions Fastening plastic panels to the wall
How to independently attach plastic panels to the wall when decorating an interior, what you need to know for this, what tools to use and what is the sequence of work - all this is not possible to study today a lot of work. The modern generation of plastic panels, from traditional lining, 6-10 cm wide, to solid panels 25-30 cm wide, are increasingly used not only in conventional, standard solutions for covering walls “from ceiling to floor”, but also in options that claim to to be called truly interesting interior solutions that you can implement yourself.
Features of interior solutions for the use of plastic panels
Today, plastic is experiencing a new era of development. Thanks to more advanced production technologies, manufacturers have moved away from the use of many harmful components. The current generation of this material is more environmentally friendly and safe. In addition to this, new aesthetic solutions have appeared in the design of panels - monochrome, with an unnatural bright colors, strips of plastic have given way to new, more interesting models. Today, in accordance with the demands of fashion, panels with imitation of valuable wood species, having a rough texture similar to natural wood, connecting to each other without traces of joining, are becoming increasingly popular.
Following such a rapid increase in the quality of plastic products, new solutions immediately began to appear, making it possible to use plastic panels in interior design - from traditional office premises to individual corners of modern houses.
Popular today is the use of combined combinations of plastic and other textures, for example, decorative plaster, in cladding balconies and loggias, creating panels from various textures and colors.
Design features of panels
At the same time, self-creation Such original interior design solutions are not something special today, because working with plastic does not require special skills or expensive tools, and the panels themselves, like most modern building materials for decoration, they are attached very simply.
One of the factors influencing the choice of this particular material is design features panels that allow you to create smooth, seamless surfaces. Various projections, niches and cornices are not an obstacle. After all, unlike wood panels, in addition to the main type of flat panels or strips of plastic with locking connections on the sides, there are also other shaped elements that make it possible to simply and reliably cultivate the edges, internal and external corners, create reliable protection cut end.
An additional convenience is the ease of installation and installation of all necessary communications. Sockets, switches, ventilation terminals are easily installed in the coating and do not require additional costs for moving to another location.
The main types of panels are mounted in both vertical and horizontal positions. And due to their light weight, they do not require a large amount of fastening materials. Therefore, the process of independently attaching plastic panels to the wall is extremely simple.
Preparatory work. What to pay attention to
When starting the practical implementation of the project, that is, installing PVC panels with your own hands, you should first carry out a number of preparatory work:
- clear workplace– fitting plastic panels requires a lot of free space;
- It is strongly recommended to clean the walls planned for covering from dust, old coatings, such as wallpaper, and treat them with a primer deep penetration with mandatory antifungal effect;
- using a long rule or building level, check the correctness of the wall plane and determine the greatest irregularities - depressions, bulges, distortions;
Important! Before starting the sheathing, you need to bring the plastic panels into the room so that they adapt to the temperature and humidity.
Preparatory stage is really important because it allows you to prepare the surface for further work and avoid mistakes that will be visible almost immediately. A special feature of modern plastic panels is their ability to show even small irregularities - the glossy surface will immediately demonstrate where a mistake was made.
Fastening technology
For self-installation plastic panels to the wall today there are two main methods used. The first, most common, uses prepared mounting rails. This is the most common fastening method today, although there are varieties this method, for example, installing panels first on a frame base, and then attaching them to the wall. But basically this is the traditional installation of guide rails to the load-bearing surface, and only then the plastic itself.
The second, less common option is to use it as a means of installing panels. PVC mounting glue. This is a somewhat unconventional approach, since it requires a perfectly prepared wall surface, selection of the appropriate adhesive composition, and careful preparation the adhesive surface of the plastic itself. However, this saves space, since there are no slats and the risk of insects colonizing the cavities is minimized. However, this is a very labor-intensive and costly installation method, both in terms of time and cost.
Attention! Plastic panels can only be attached with glue to pre-leveled walls.

Fastening the sheathing
The sequence of work on self-installation of plastic lining, taking into account the conditions of each specific room, can be arranged in the following algorithm of actions:
- preparatory stage - removing unnecessary things and furniture, cleaning the surface of the walls from wallpaper and priming them;
- marking walls for sheathing, taking into account the passage of communications and the features of the interior solution for laying panels;
- installation of sheathing;
- installation of the starting ceiling profile, plinth, first corner profile;
- installation of panel strips;
- installation of external elements engineering communications– switches, sockets, air ducts, heating pipes, water pipes, gas pipes;

The most important point, in addition to installing the panel strips, is fastening the sheathing, which acts as a frame for the plastic. Sheathing strips can be wooden or plastic. Traditionally, wooden slats are used, as they help support the structure and give rigidity to the panels. Wood allows you to eliminate unevenness in the wall and thereby ensure a smooth surface of the plastic. One of the disadvantages of wooden planks as a frame is that such planks are prone to rotting, and the space between the wall and the plastic increases by up to 2 cm.
Plastic guides make it possible to reduce the gap between the wall and the panel to a minimum; they do not rot, but require a perfectly flat wall surface and the use of special panel holder brackets - clamps - as fasteners.
When choosing a way to independently attach plastic panels to the wall, you need to take into account one more feature of plastic - it reacts to temperature and expands when it rises, so for reliable fixation you need to take into account the lathing pitch - 30-50 cm. This step is enough to hold panels.
The sheathing slats are arranged perpendicular to the direction of the panel strips, the lower rail is mounted at a height of 5-10 cm from the floor, the upper one at the same distance from the ceiling, in the case of installing panels at the full height of the wall.

To install the slats you will need:
- hammer drill with a set of drills;
- screwdriver with a set of bits;
- wood saw;
- jigsaw;
- assembly saw;
- drill with a set of drills;
- screwdrivers;
- hammer;
The slats are attached with nails quick installation into through holes, it is preferable to use quick installation systems with 80 mm long dowels for wooden slats and 60 mm for a plastic tire. Nails are installed at least every 80 cm.
For a plastic guide, the fastening points correspond to the technological holes.
Installation of plastic panels
Installation begins with the installation of the lower guide profile (plinth) and the upper ceiling starting profile from shaped elements. It is preferable that the profile be selected along the length of the entire room. The first bar, adjusted in height (it needs to be made slightly smaller by 5-7 mm), is attached to the corner profile. Installation is carried out vertically in level (or at an angle if design solution requires an angle of inclination). The first strip is secured with staples, small nails or clamps.
The second and subsequent strips are attached after the locking connection is tightly fitted. It is allowed to use a wooden block and a mallet for a tighter fixation - the block is placed at the end of the plastic panel and the panel is put in place with light blows of the mallet.

To work with plastic you will need:
- tape measure, ruler, corner, marker, and possibly a protractor;
- level or plumb line;
- glue gun and assembly adhesive (for gluing ceiling plinths);
- hammer;
- assembly saw with a disk for finishing cuts (a disk with small or very small teeth);
- miter box, at least with angles of 45 and 90 degrees.
A special feature of this stage is the need to correctly adjust the panel to size, and it is recommended to make the cut with a jigsaw or mounting saw. The cut should be smooth, at an angle of 90 degrees. It is preferable to use a saw with small teeth, which results in a more accurate cut. Before installation in the guides, you need to thoroughly clean the sections from sawdust and sintered plastic, and also smooth out any unevenness.
In rooms where air temperature fluctuations are small and the plastic will not be subject to frequent expansion and contraction, it is recommended to fasten the plastic panels to the sheathing using a construction stapler.
Gradually covering the entire surface of the wall with panels, the outer panel is cut to size, taking into account the size of the corner profile. The dressed corner profile with the outermost strip of plastic is secured with clamps on the adjacent wall. Thus, all panels in the room are installed.
The edge panel, cut to size, is mounted in the groove of the lock, first at the bottom, in the wall panel, and then gradually, using a plaster spatula 90-100 mm wide, carefully bending the edges of the plinth and corner, inserted further, going up.
The bent edges of the corner panel and ceiling profile will fall into place over time, without visible signs of deformation.
In fact, attaching plastic panels to the wall yourself is much easier than it seems. Follow the recommendations described above and you will succeed. Good luck!
Installation decorative panels allows you to solve many pressing problems. And it’s not just about the design of the premises as such, of course. But simply buying suitable products is not enough; you also need to carefully study their features and understand how to install them correctly.


Criterias of choice
Speaking about plastic (PVC) decorative sheet materials, about their installation, one cannot ignore the question of what exactly is to be installed. Even the most scrupulous adherence to technology will not allow you to achieve good results when using bad products. Most wall panels are purchased for bathrooms, so resistance to humidity and microorganisms is of great importance. Since any wall periodically experiences mechanical impact, the surface must be resistant to such developments.
First of all, it depends on the thickness of the outer surface. Reliable wall blocks should have a layer of 0.25 cm, while in the ultra-budget category this figure reaches only 0.15 cm (if it still reaches). It is also important appearance: good product always smooth not only in its own geometry, but also in color.


Strength is determined not only by the depth of the panel, but also by the number of ribs. The most reliable designs are equipped with 29 such parts, and the average is 20. But edge to edge is different, they must also be perfectly smooth and not differ in thickness; Any placement other than at right angles to the surface is prohibited.
It is also useful to look at the joints of the panels, which should fit together as tightly as possible. Since thick walls and additional fins cannot be created from thin air, good block quite heavy. This can even be considered one of the practical advantages. One more circumstance should be taken into account: you can decorate the walls of a house either well or cheaply. Experienced owners always purchase at least mid-price panels, and qualified builders approve of this.


In addition to these obvious considerations, it is worth paying attention to the chalk, or more precisely, its concentration. Standard-compliant panels contain this mineral only in trace amounts. When they bend halfway, they will straighten and there will be no dents on the surface. But even flawless wall blocks can be damaged by improper work.
Preparatory stage
You won’t be able to do everything right if you don’t prepare for installation. Meticulous work is not required, but accurate measurements of the surfaces to be finished and calculation of the required volume of material are extremely important. At the preliminary stage, they decide how to install the panels. Ideally smooth surfaces that only need to be decorated are simply pasted over. And if there are deviations from strict verticals, then you will need to create frames; They will also have to be used to disguise communications.
Initially, the lowest point on the ceiling is found, and marks equal to the width of one panel are drawn from it. With a level around the entire perimeter, make marks where anchors or dowels are to be secured. These fasteners will help attach the frame to the walls.


The profiles should be attached at an angle of 90 degrees to the slabs that are to be placed on them. You can make installation easier if, in addition to setting marks and checking the level, you add pulling a thin cord, the edges of which are covered with colored chalk and pressed against the surface to be treated.
The profile itself can be formed from wood, metal and even plastic. The choice of a suitable material is determined primarily by the conditions in which it will be used. So, wood performs well in a “regular” room, but its prospects are much worse in bathrooms or on open balconies. And even where high humidity is unlikely to occur, you will have to use specially selected impregnation. This is the only way to prevent exposure to liquid and the occurrence of mold.


Tools and accessories
To work you will need:
- stepladder (more convenient than a moving table or stool);
- drill (replaced with a hammer drill);
- roulette;
- hydraulic level;
- metal saw;
- painting knife;
- self-tapping screws;
- hammer.

In addition to additional tools, it is worth noting the importance of prepared accessories. You will definitely need a so-called starting profile, which helps close the borders of the panels at the ends. In addition to it, you will need an F-shaped profile, which provides the best decorative qualities of the end blocks. Specialized moldings help connect the various panels into a single structure. There are different types of profiles for external and internal corners.
Since the panels will be adjacent to floors and ceilings, two types of baseboards must be used. Soft universal corners are useful. Fastening to frame parts is ensured with self-tapping screws or galvanized nails. All components, with the exception of frame guides that are not visible from the outside, must have the same color as the panels. Even experienced designers do not recommend experimenting with color contrasts in this case.


Calculation
In order for wall surfaces to be finished properly, you need to carefully and scrupulously calculate the need for the blocks used and the components for them.
Standard dimensions of wall panels are:
- thickness 0.6-1 cm;
- width 25-30 cm;
- length 250-600 cm.
The key importance, according to professionals, is the width. If you choose the largest possible products, you can reduce the number of seams, and the appearance of the installation will be closer to a continuous surface. But during the work itself narrow designs more practical because they are easier to bend. And the relative lightness of each block makes itself felt.
A compromise is achieved by using panels with a width of 250 mm.


The calculation itself begins with determining the perimeter of the sheathed base. From this figure the perimeter of each door, each window or other part that for some reason cannot be sheathed is subtracted. The result obtained is divided by the perimeter of a single block (only remembering that part of the block material will go into segments). Rounding in calculations is always carried out upward, and a margin for cuts is provided in the amount of 10%. If you have no experience, you can even leave 12-14%.
- slats will have to be placed not only on the edges of the walls, they need to surround the openings of doors and windows;
- the standard profile gap is 0.3 m;
- the very first profile is always turned at right angles to the future installation plane;
- the slats themselves are fastened to the walls using self-tapping screws or dowels with a gap of 400 mm;
- The guides are attached to the slats at a distance of 500 mm.


Installation methods
On the frame
When all the PVC panels have been selected and purchased, when the components for installation have been prepared, you can begin it immediately. And in many cases the most practical solution turns out to be the use of a frame. Decorative blocks can be secured with self-tapping screws even on relatively uneven surfaces. But there is a problem - you will have to either use a screwdriver or spend a lot of time. To screw in self-tapping screws, it is advisable to use a wooden sheathing, so first the timber is sawed and impregnated with antiseptic mixtures.
Alternatively, you can fasten the panels yourself using clamps. Such details ensure reliable retention of decorative blocks. When using clamps, the lathing is formed from metal, and the covering can be assembled without additional effort. Each deformed block is quickly replaced with a new product, and even if the entire cladding is no longer satisfactory, it can be easily replaced. Installation of frames is carried out exclusively on levels to avoid distortions.


There is no need to measure each individual batten, you just need to mark the walls. The lowest stroke of the frame is created 10-20 mm above the floor. A line is drawn from the selected point using a level. Similarly, they show features under the ceilings or along the edges of the trim. Then, from the lowest strip that needs to be sheathed, they retreat upward 400 - 500 mm, set up a beacon, and so systematically move to the top strip; Beacons will help ensure parallel lines.
It is important to take into account that horizontal frames should be mounted in a vertical plane, vertical ones - horizontally. If you need to hang panels on uneven walls, the sheathing is mounted on top of wooden wedges. Wires running along the walls are hidden under the finishing.
Since you can’t joke with electricity, all work is carried out only after measurements. Clamps are used to press the wiring so that it does not protrude beyond the boundaries of the sheathing.


The slats are placed moving from the most distant (relative to the entrance) corners. But if for some reason another place is most noticeable, they still work from there. The panel is fastened by inserting it into the side moldings, attaching it to the corner and attaching it to the sheathing on the reverse side. The next block is inserted into a special groove on the first one, the joints are thoroughly pressed and attached to the frame slats. You can increase the tightness of the joints by lubricating the sides with silicone.
The following panels are connected according to exactly the same scheme. To prepare holes for sockets or switches, use sharply sharpened knives. When installation is completed, the treated areas are covered with plastic boxes. But to insert the last lamella, it is cut to width. First, try on the wall, mark with a pencil, and then take a hacksaw.


Every corner, every connection should be covered with moldings. With their help, panels are inserted with edges on both sides, and all intersections immediately become more pleasing to look at. The final stage of the work is the installation of decorative molding along the entire perimeter of the ceiling and a baseboard that repeats it at the bottom. If you use the panels installed in this way carefully, they will retain their attractive appearance for a long time and will not require repairs.
Before you begin, be sure to:
- remove peeling coatings;
- look for cracks and chips;
- if they are detected, immediately putty or plaster the problem areas.


An additional challenge is the installation of PVC panels in rooms exposed to moisture. The primary surface must be covered with waterproofing. It is applied to a pre-moistened base. When the product dries, treatment against mold fungi is carried out. When using wooden sheathing, all calculations of distances from the wall should take into account an amendment of 0.2 - 0.3 cm associated with possible deviations from the ideal shape.
The upper and lower levels are verified by the hydraulic level, and the side lines – by the plumb line. Fastening is carried out through hangers that set the indentation. After installing the sheathing, carefully check whether its outer edges are on the same line. Adjustment, if necessary, is carried out either by cutting the timber with a plane, or by adding substrates. If screws are used to create the frame, the gap between them will be from 200 to 250 mm for wooden ones and from 150 to 250 mm for metal products.

Frameless
Fastening PVC panels does not necessarily mean using frames. Installation is often done using glue. The procedure itself is not complicated, you just have to carefully prepare for it. Naturally, it is necessary to remove all the previous coating completely and seal the cracks. If with the frame method the remaining intact layer could be tolerable, then here the situation is different.
It’s not always possible to make a completely perfect wall. But even inexperienced people can reduce the height difference to 5 mm or less. In addition, before attaching the panels with glue, it is necessary to wash off the whitewash, remove greasy traces with detergents and apply a primer. After all this work, the decisive factor is right choice and application of glue. It is possible to use universal adhesives, but it is much more correct to choose compounds that are specially made for joining plastics.


High quality adhesive:
- forms a frozen transparent film;
- immune to getting wet, cooling (even alternating with overheating);
- adheres two surfaces in a short time and retains its ability to hold them together for a long time.
Hot-melt adhesive is not suitable at all. It holds the panel too tightly and does not allow the plastic, which rapidly expands when heated, to move. As a result, it quickly disappears. It is advisable to use polyurethane-based sealants or “liquid nails”. They allow you to avoid such unpleasant developments.
The panels themselves are rubbed on the reverse side before gluing. damp cloth. This allows you to remove dust.


Then glue is applied pointwise, at a distance of 0.25 - 0.35 m. Contrary to the obvious, when using liquid nails, the attached panel must be tapped and removed. Only contact with air for 5 - 7 minutes ensures the stability of the connection upon repeated application. Frameless installation almost always avoids creating external and internal corners.
Plastic corners without grooves are used instead. Such products are covered with transparent silicone, rubbing with a damp cloth to remove excess mixture. The insert can, depending on the severity of the angle, reach 2–5 cm. The places where the electrical outlet should be placed are cut out. Turn off the power supply in advance; The installation is completed by laying skirting boards at the joints with the floor and ceiling, which are screwed in with self-tapping screws.
Panel borders cover polyurethane foam or silicone-based sealant. The second option is optimal where humidity is excessively high. If you have to cut off the glued parts, use hand saws or electric jigsaws. Sometimes frameless installation of PVC panels is carried out using a construction network.


Covering walls with PVC panels, whether framed or frameless, is done only in rooms where there are no temperature fluctuations exceeding 20 degrees. Installation in a room where the air is colder than +10 is not allowed. If the panels were stored or transported at lower temperatures, they should be kept in normal conditions for at least 48 hours. It is advisable to install heat-protective material under the cladding. The lathing is installed in maximum increments of 0.5 m; no considerations justify exceeding this distance.


Cladding slats should surround not only openings for windows and doors, but also kitchen vents, as well as ventilation outlets in other rooms. The recommended dimensions of the slats are 3x1 or 3x2 cm. When it is clear that the room will be particularly wet, the lathing is equipped with cuts. This will improve ventilation. When connecting plastic blocks horizontally on facades, the groove edges are oriented downward to prevent the grooves from filling with water.


Leaving upper and lower gaps of 0.5 cm helps to compensate for temperature shifts. The vertical layout of panels with a pattern is from left to right, from one corner to another. For blocks that are colored monotonously or form a pattern that is symmetrical in any direction, the choice of primary angle is subjective. In addition to the tools listed above, the work may require pobedit drills, screwdrivers, miter boxes, pliers, squares, furniture staplers with staples 1 cm long. When using a finish without seams, maximum attention should be paid to the tightness of the bow of its parts, otherwise it will turn out unsightly.


It is extremely difficult to decorate walls with your own hands using panels decorated with bright and rich designs characterized by abundant detail. Judging by the reviews, such work inevitably causes difficulties, especially when placing components and complementary elements. The relief of the mosaic forces us to completely abandon the idea of removing the corner slots. You should carefully choose the color of the panels to be mounted, because errors of this kind are difficult to correct. The closer the parts of the frame are to each other, the stronger it becomes as a whole, but the fastenings cannot be brought closer than 300 mm.


It is not advisable to use adhesive fastening if you know for sure that PVC panels will have to be removed in the future. And the need for this sometimes arises suddenly, so you should definitely think about frame installation . To attach the cladding to metal profiles, it is recommended to use self-tapping screws with press washers. Irregularities concrete wall
corrected by placing a block of the required thickness. You can use PVC panels in the hallway without any doubt, you just need to select them carefully.


Most often they choose to imitate natural wood. Regardless of the reproduced breed and dark or lightened color, a calm and benevolent interior is created. In modern settings, tones such as wenge or bleached oak are used.
It is worth remembering all the time that in small corridors, excess darkness is contraindicated. Be sure to achieve contrast in the color of walls and furniture. Duplicating the appearance of a stone is becoming increasingly popular.
A variety of PVC coloring with specially selected pigments makes this task easier. When choosing a suitable option for a “stone” wall, you must first ask yourself whether you want to emphasize the luxury and solidity of the image or create a laconic ensemble. Regardless of the approach taken, there is ample room to demonstrate originality. It is not even necessary to use only panels; they combine well with other materials (paint and varnish, various wallpapers, frescoes). Corridors with dim, subdued lighting should be finished with light-colored materials. Otherwise, the space will be visually absorbed. Large rooms can already be covered with large-scale drawings and geometric patterns. If the walls are made light and flooring


Thus, profile H is used at joints and joints, and L is used to start laying and at the ends, although both products are 3 m long and are intended for 0.8 cm panels. Plastic profiles in the shape of the letter U are inexpensive and weigh little, make it easier to fasten. At the same time, they are extremely resistant to humidity, water vapor, and temperature fluctuations. Such blocks need to be placed at intervals of 30 cm. But screws or dowels are screwed in every 100 cm.
Profile grooves in the shape of the letter U can be used for pulling cables. If you choose to use metal sheathing, the cable should be pulled through PVC pipes with a corrugated sheath. Only it prevents the destruction of the braids by the cutting parts of the profile. Not acceptable according to technical reasons installation of any polyvinyl chloride blocks in places where temperatures may exceed 40 degrees, with or without high humidity. Instead of cutting the end panels to width, you can unfold them, bringing the locks to the opposite side and cutting the groove from the outside.


All work with PVC must be carried out more carefully than with wood. It is fragile and any sudden movement can create cracks in the outer layer. There is no way to remove them; the panel will be hopelessly damaged.
The taskbar is one of the main mechanisms for managing and interacting with the system in Windows. Therefore, from setting it up and setting up those important elements, which are located on it, will directly depend on the comfort of your work with the OS and the computer as a whole.
Task bar
To go to settings Taskbars And start menu you need to right-click on Start button in the left bottom corner screen and select the item in the context menu that opens Properties. After this, a window will open in front of you Taskbar and Start menu properties, the component settings of which we will consider.
By the way, you can also access taskbar settings from Control panels by clicking on the item with the self-explanatory name Taskbar and Start Menu.
The taskbar and Start menu window contains three tabs: Task bar, Start Menu And Toolbars, which are responsible for setting the parameters of the corresponding Windows components.
Customizing the Taskbar and Notification Area
At the top of the tab there are settings that are responsible for the design and display of the taskbar.
Pin the taskbar . By checking this box, you can fix the taskbar on the monitor screen in the place where it is currently located. In this case, it will be impossible to stretch, move or collapse. As a rule, this item is checked by default. If you want to increase the height of the taskbar (when located at the top or bottom of the screen) or its width (when located on the left or right of the screen), and also change the size of the notification area and toolbar, then uncheck this item. After this, you can perform all the above operations by dragging the boundaries of the desired areas with the mouse.
Automatically hide the taskbar. Activating this option will allow you to use the maximum desktop area when working, since the control panel will be hidden and will no longer be displayed on the screen on top of all windows. To open the panel in this mode, you need to move the mouse cursor to the edge of the screen along which it is located.
Use small icons. This option allows you to make program icons smaller and open applications located on the taskbar. In this way, you can expand the workspace and increase the number of displayed elements on the panel itself.
Position of the taskbar on the screen. Allows you to select from the drop-down menu where the panel will be placed on the screen. You have four options: Bottom, Top, Right or Left.
Taskbar buttons. At this point, you can choose how icons of running programs and open windows will be displayed on the taskbar:
- Always group, hide labels. This mode is activated by default and allows you to expand free space on the taskbar due to the fact that icons of similar open applications are grouped, and the icons themselves do not have labels of their names. For example, if you have several Explorer windows open at once, they will be grouped into one icon on the taskbar, which will be displayed as several rectangles superimposed on each other.
- Group when taskbar is full. Unlike the previous option, this mode is more informative for the user. All icons for open applications are located separately on the taskbar and are labeled with the names of the windows in which they are running. Icon grouping occurs only when the taskbar is full and there is no free space to accommodate new icons.
- Do not group. Grouping of open program icons does not occur under any circumstances.
In the middle of the Taskbar tab there is an item Notification area , which is responsible for configuring the display of system icons and background program icons, as well as their messages in the notification area (tray).
After clicking on the Settings button, a window will open in front of you with a list of all the icons of background and system applications, next to which you can select their behavior in the tray from three available options:
- Show icon and notifications
- Hide icon and notifications
- Show notifications only
Below the general list of all icons there are items Turn system icons on or off(Clock, Volume, Network, Power and Action Center), as well as Restore default icon behavior. You can also activate the option Always show icons and notifications on the taskbar.
And finally, in the lower area of the tab we are considering there is an option setting Desktop previewusingAeroPeek. Activating this function allows you to hover the mouse cursor over the button Collapse all windows, perform quick temporary viewing of content Desktop. Wherein open windows do not collapse, as happens when this button is pressed, but become transparent.
Customizing the Start Menu
Let's move on to studying the next tab of the window with a self-explanatory name Start Menu. As you probably already guessed, here are the options responsible for setting the parameters of one of the key components of Windows system management, which is called up using the button of the same name located at the very beginning of the taskbar.
The appearance of the Start menu and the elements of which it consists, as well as the behavior of objects and icons in it, is influenced by a lot of parameters that simply would not fit on this tab. This is probably why the developers put them in a separate window, which opens after pressing the button Tune. We'll talk about this a little later, but for now let's return to our tab and look at the few parameters that are still located on it.
Power button action . Using this item, you can configure the system action that will occur after you press the physical power button located on the computer case. To do this, you must select any of six options from the drop-down menu:
- Shutdown- leads to the complete closing of all programs, logging out and shutting down the computer. This action is set by default.
- Change user- causes the user to log out of the system to the account selection screen without closing running programs.
- Ending a session- causes the user to log out of the system to the account selection screen and close all running applications.
- Locking your computer- leads to blocking of the system without closing running programs. To resume operation, the user will need to enter a password.
- leads to closing all applications, logging out and restarting the computer.- Dream- puts the computer into a low power state. At the same time, all parameters of the current work session are saved, which allows you to quickly resume work in the future.
Confidentiality . This option contains two items that allow you to display or hide recently opened programs, files or documents on the left side of the Start menu. Everything is simple here - if the checkboxes are checked, then display is allowed, if unchecked, it is prohibited.
Now let's look at the options that are contained in the window Customizing the Start Menu called by the above button Tune.
This window contains quite a lot of settings, but there is no point in considering all of them in detail. Many points have self-explanatory names and do not need any additional comments, but we will still make small explanations about some.
Most of the Start menu settings concern the display of thematic user folders and menus, including: Videos, Music, Documents, Homegroup, Games, Pictures, Personal Folder, Favorites, Recent Documents, TV Recordings and Downloads, as well as basic elements controls: Administrative Tools group, Run command, Computer, Control Panel, Network, Connect to, Default Programs, Help, Devices and Printers.
Depending on the menu item, several display options can be applied to it:
- Don't display this element
- Display as menu- the group will be displayed on the right side of the Start menu as a folder with an arrow that opens automatically when you hover the mouse cursor.
- Display as link- the element will be displayed on the right side of the Start menu as a regular link, after clicking on it, a new window will open with the contents of the folder of the same name.
Highlight recently installed programs . If this option is checked, the system in the Start menu and All Programs group will highlight new (recently installed) applications and the folders in which they are contained in dark yellow.
Search other files and libraries . An item that allows you to expand the search locations for the necessary information or speed up the search process itself by disabling scanning of public folders.
Search Control Panel programs and features . When this option is activated, you will be able to search for the desired objects in Control panels systems.
Large icons . Unchecking this item will reduce the icons of the most frequently launched programs, the list of which is located on the left side of the Start menu. This will increase the number of applications displayed in this list.
Allow context menu and dragging of objects . Activating this parameter allows you to call up the context menu of Start menu objects, as well as drag them with the mouse into various work areas of the system. For example, you can drag a program icon from the Start Menu to the Desktop or, conversely, add a link to an application to the Start menu by dragging an icon from any open window there.
In addition to the parameters discussed above, at the bottom of the settings window there are two more elements with which you can adjust the size, or rather the height, of the Start menu. They regulate the display of the number of positions in lists of recently used programs and items.
Customizing Toolbars
As in previous versions of operating systems, Windows 7 provides the ability to work with toolbars that serve to quickly launch program components and access resources.
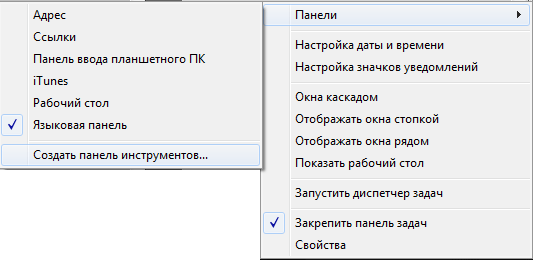
Initially, the system includes only a few standard toolbars: Address, Links, Tablet PC Input Panel and Desktop. But as new applications are installed, the list of these panels will expand. For example, in our case, you see an additional iTunes panel appear.
You can also create your own toolbars yourself. To do this, right-click on an empty space on Taskbars and in the context menu that opens, select Panels and then the command Create a toolbar V.
Controlling the display of toolbars is carried out at an intuitive level. To do this, just uncheck or check the box next to the desired panel and press the button Apply.
If you have started renovating your bathroom or loggia, but don’t know how to install plastic panels on the wall, you need to thoroughly understand this issue. Study the subtleties and nuances of this process so that home renovation will be a joy and will not bring unnecessary trouble. The cost of such an interior is many times lower, and there are countless design options.
What are plastic panels attached to?
Plastic sheathing is an excellent way to solve several problems at once: the parts are easy to mount on the wall, and they do not require much maintenance. However, to complete the task, it is important to know how to attach plastic panels to the wall correctly. Here are the important points regarding the installation of such cladding:
- PVC panels can be attached to the wall using nails, self-tapping screws, or use special “Liquid Nails” glue.
- If the walls are smooth, then you can install fasteners directly to them: in the case of a wooden or soft surface, self-tapping screws are suitable, but for concrete you need to take dowel nails.
- If the walls are difficult to level, first install a special wooden or metal lattice frame.
Each fastening method has its own nuances:
- If nails are used, it will not be possible to remove the slabs to use them in another place: during dismantling, the parts will simply break into several parts.
- Clamps or staples driven in with a special stapler work best.
How to properly attach PVC panels to the wall
To understand how to attach plastic panels to the wall, remember a few useful tips:
- Cut the elements themselves, placing them face up.
- To protect your eyes, be sure to wear construction glasses while cutting parts.
- When driving nails, it is important to hit the nail head clearly, otherwise dents will remain. It will be impossible to correct such a defect.
- Do not remove until the installation process is complete. protective film so as not to leave dirty marks on the casing.
- After installation, wash the walls only with soapy water so as not to spoil the structure or design.
On a wooden sheathing
The question of how to attach plastic panels to the wall can be solved by lathing made of wood. The slats must be screwed at a distance of about fifty centimeters. The wooden beams must be perpendicular to the direction of the PVC: if the parts of the future interior are located vertically, then it is best to nail the wooden structure horizontally.
- First of all, install the fittings. First fasten the outer and inner corners to the surface, then the final element - the ceiling plinth, and finally - the molding with lamellas.
- Next, install the first part connecting the fastening elements. Secure with nails or staples from the side of the wide mounting flange.
- To ensure that the entire structure does not turn out crooked, check the first before attaching the next part. It should stand straight.
- Mount the narrow shelf of the second element to the first, leaving no gaps.
- So sequentially attach all the PVC panels. Only the very last element differs: it must be inserted with force to fix the entire structure. If the size does not fit the remaining space, trim the piece along the trim with a knife.
Using a metal frame
If there is always high humidity in the room, for example, in a sauna or bathroom, then the wood will quickly swell and you will have to do the repairs again. How to attach plastic panels to the wall in this case? Metal mounting structures are suitable. To simplify the installation process of the cladding, special clips are used. Thanks to them, you can easily remove interior elements and attach others.
When installing sheathing, be aware that the material may expand as temperatures change. When using a wide beam, sound insulation or insulation can be added to the free space. So simple plastic panels will help solve several problems at once: create a tasteful interior and retain heat inside the room.
Installation of PVC panels without lathing using liquid nails
For smooth walls, use construction adhesive, but during such repairs, wear a respirator and ventilate the room. The benefits will outweigh all temporary inconveniences. “Liquid nails” do not affect plastic and dry quickly, which makes it possible to correct details on the wall. This glue is environmentally friendly and does not depend on changes climatic conditions(temperature and humidity changes).
- Before gluing the panels, it is necessary to prepare the walls: remove old wallpaper, tiles and plaster, smooth out any inaccuracies and prime the surface.
- At the very beginning, remove the slabs from the packaging for thirty minutes to allow adaptation to the humidity in the air.
- Prepare the glue itself: cut off the tip, put on the cap, open it and install the product in the construction gun.
- Draw dots, a lattice, or a zigzag pattern on the wall.
- At the time of gluing, press the part against the wall so that the glue will better adhere to the entire element evenly. You can use a rubber roller. The first couple of minutes it is easy to adjust the position of the structure, and after 20 minutes the glue will set.
- The final step is to “seal” the seams between the PVC parts and other elements of the bathroom with sealant. The wall profile is ready.
Video
Even a renovation novice can handle installing fasteners and trim in a bathroom onto a wall surface. However, to avoid technology violations and damage to the cladding, watch the step-by-step instructions in the video below, where a specialist will share his secrets in installing sheets and fasteners in the slab and on the ceiling. The manual will help you install the panels flawlessly the first time.
Installing plastic panels on the wall in the bathroom
How to attach wall panels to a loggia
How to attach plastic panels - step-by-step instructions
When thinking about renovation, we always want to get excellent result, and at the same time do without unnecessary expenses and meet the minimum deadlines. Another important point– so that repair work does not cause a lot of trouble, does not leave behind dirt and does not greatly disturb the neighbors.
An excellent solution in this case would be to install plastic panels. Our instructions will help you understand how to attach plastic panels. They are easily mounted on walls or ceilings and do not require leveling the surface in advance.
Plastic panels are easy to clean and ideal for rooms with high humidity (bathroom, sauna, boiler room). A variety of colors and textures will help create a unique and cozy interior. To install such panels, it is enough to have several tools on hand.
Necessary tools and preliminary preparation
The tools necessary for attaching plastic panels can be found in almost every home:
- electric drill;
- wood hacksaw;
- scissors and hacksaw for metal;
- screwdriver or screwdriver;
- tape measure, building level, pencil or marker;
- hammer, stapler;
- ladder.
First, use a tape measure to measure work surface, this will allow you to calculate correctly required amount materials.
The surface must be cleared of wallpaper. If the panels stick, be sure to clean the walls or tiles of paint and dust.
Installation features and procedure
The panels are fastened either directly to the wall or to a pre-prepared sheathing. To mount it on the wall, it must be perfectly flat. Lathing is wooden beams or slats that are screwed to the surface at a certain distance from each other. For walls, the width between the slats should not exceed 30 - 40 cm, for the ceiling - no more than 30 cm. Lathing slats are attached to the wall perpendicularly to the direction of the panels.
If the wall to which the slats are attached is wooden or any other into which self-tapping screws can be easily screwed, then it is best to use them to attach the bars. If the wall is concrete or brick, then it is best to fasten the bars using dowel-nails or using ordinary dowels and self-tapping screws.
An example of fastening sheathing under plastic panels.Before you get started, you must understand how to properly attach plastic panels to the wall.
- If you decide to fasten the panels to the sheathing with nails, keep in mind that reuse material will be impossible, since, most likely, during dismantling the integrity of the panel will be compromised.
- The best method of fastening is with clamps.
- But using staples that are driven in using a special stapler is also a good option.
- Another good option for fastening panels is self-tapping screws.
The most common methods of fastening plastic panels.Once you have decided on the method of attaching the panels, you need to do the following:
First install the fittings: finishing element, external or internal corner. If the panel covers the wall to the ceiling, then attach the ceiling plinth to the top beam.
Available types of fittings for plastic panels.Insert the panel into the fastening element using the narrow fastening flange. The panel is secured on the side of the wide mounting shelf using nails or brackets.
After making sure that the first panel is installed level, insert the next one with the narrow end into the groove of the previous panel. Try to mount the panels tightly to each other.
Installation of the necessary fittings and the first plastic panel.The last plastic panel that completes the row must be inserted with force between the final element and the previous panel. If the panel needs to be reduced in width, cut off the excess using a knife, moving along the panel.
Video: Installation of lathing, fittings and PVC panels
Features of installing plastic panels on walls
If the room is dry and the walls are smooth, then the panels can be mounted directly on the wall without using lathing.
Fastening panels with glue directly to the walls without using lathing.In rooms with high humidity, a plastic or metal mounting profile should be used as lathing. In this case, the panels are attached to the slats with special clips, which greatly facilitates the installation and dismantling of the structure.
Fastening panels using plastic profile using special clips.You should take into account the expansion of the material when the temperature changes, so when adjusting the panels in height, leave a small gap. If you use a wide beam for the sheathing, then insulation or soundproofing material can be placed in the resulting space between the wall and the panels.
Features of installing plastic panels on the ceiling
Now let's look at ways to attach plastic panels to the ceiling. Before installation, you need to determine the distance between the panels and the ceiling. This gap will depend on the type of lighting. If you plan to install built-in lamps, then the distance should be at least 10-15 cm, so you can completely hide the wiring. Mark the locations of the lamps in advance with a pencil, cut out the holes and install the lamp bases.
Metal lathing for mounting plastic panels on the ceiling in the bathroom.Next, you perform the same steps as when installing the panels on the walls. Indoors with flat ceiling you can do without lathing. Install the ceiling plinth on three walls before starting work. Use a building level to position the panels evenly.
When installing plastic panels in a room with high humidity, fill in the ceiling gaps silicone sealant to achieve complete waterproofness.
1. Cut and drill panels with the right side facing up. Use a hacksaw, handsaw, or utility knife to cut. Always wear special glasses to protect your eyes.
2. Apply the glue directly to the wall. Draw a grid using even lines, leaving no empty areas. Use only special construction adhesive “liquid nails”.
3. When driving nails into the panel during installation, be careful not to hit the surface with a hammer, otherwise dents will remain.
4. Plastic panels should be cleaned with soapy water. Do not use abrasive cleaners, rough scourers or solvent-based products for cleaning.
Now you know how to attach plastic panels to the wall and how to care for them. Installing plastic panels does not require much time and can be done by any beginner. By choosing this easy-to-install material, you can create a unique interior with your own hands. Among the variety of panels imitating stone, wood, paper of various colors, you are sure to find an option to your liking.
Be sure to watch the video below, it very clearly shows the process of installing plastic panels.
Video: Finishing bathroom walls and ceilings with PVC panels
How to properly attach plastic panels to the wall
If you decide to finish the walls and ceiling in the bathroom, hallway, kitchen or balcony, then you should look for materials that can cope with high humidity in these rooms and will not change their properties. And PVC panels will be the best option in this case.
They are not expensive, practical and high quality. Among other advantages, the panels are easy to clean, do not deform from contact with moisture and do not fade in the sun. And their installation is quite simple.
They are simply ideal for leveling walls, and thanks to their wide color palette allow you to realize any design fantasies. But fastening the panels also has its own nuances and subtleties.
Materials and tools
Installing plastic panels is quite easy, and therefore you can do this work yourself. But to do the work yourself you need some simple tools:
After all the right tool prepared, you can go for panels, sheathing materials and fasteners. But it’s still worth it first take all necessary measurements so as not to buy too many materials or, conversely, not to buy more later.
How to calculate materials
Plastic panels are produced in the most different colors And different sizes. The length of the panels most often varies from 2.7 m to six meters, while their width can reach 50 cm, and the thickness of the panels can be 8 or 10 mm. Based on these parameters, you should calculate the required amount of materials for finishing the rooms.
First you need completely measure the room without missing a single wall, then you need to decide in which direction the panels will be laid - along or across. And after all measurements are completed, the amount of material required should be calculated.
It is worth remembering that depending on how you attach the panels - lengthwise or crosswise, you can visually resize and the outline of the room. If the panels are placed parallel to the floor, the room will visually appear wider, and vertically - higher.
In order to complete the sheathing you will need metal profiles or wooden blocks . Installation of plastic panels on the wall is carried out using fastening to a frame or installation with liquid nails and glue.
Fastening plastic panels to the wall on a frame
Before finishing the walls, you need to make a frame from timber or a metal profile. Before starting work, you need to remove excess dirt and dust from the walls, and also treat the surface with a special antifungal agent.
Then you need draw the sheathing grid using a level. The distance between the slats should be no more than 40 cm. On the marking lines, you need to drill holes at a distance of 50 cm from each other. It is in them that the profile will be attached to the wall with suitable fasteners.
First you need to screw on those profiles that will go along the perimeter of the room, and only then you need to fasten the transverse parts.
If the walls in the room are relatively flat, that is, the difference is not more than 5 cm, then it can be used for a frame wooden blocks, but at greater difference you need to use a metal profile. It is much easier to secure it at a distance from the wall using special fasteners. After the sheathing is completely completed, you can begin finishing work.
It is worth starting work from the corner farthest to the entrance, because it is the one that is most visible and any trimming will be visible here. First you need secure starting stripes at the top and bottom of the frame. The outer or inner mounting corner should be secured to the side. These elements will help secure the plastic and hide the unaesthetic appearance of the panel cuts. Now you can begin installing the material.
Cut off the plastic the right size, it is better to make it 5 cm less in height - when temperatures change, this will help the panel not to deform. Insert it first into the upper and lower grooves, and then into the side. Plastic must be secured to each sheathing post. secured with screws or stapler. Subsequent planks will be attached in the same way.
Installing the last strip is the most difficult step. To do this, it needs to be cut half a centimeter less than required by the rules. First insert it into the corner profile and then snap into the groove of the previous panel. This way you will not deform the guides and finish the wall installation neatly.
Installation of PVC panels with glue and liquid nails
Perfectly straight walls are a rarity these days. But if you are the happy owner of such walls, then there is the possibility of installing panels without the use of sheathing. This method has a lot of advantages, but there are practically no disadvantages:
But first you need to be as careful as possible prepare the walls for work. All visible dirt must be removed from them, primed and coated with an antifungal compound. Now you can attach the plastic.
If the wall allows, then the panel should secure with self-tapping screw somewhere in the middle of the wall, this will help ensure a more secure fastening. A special flexible corner should be glued in the corners of the room. It helps hide the curvature of corners, give the room completeness and forms internal and external corners.
But it should be remembered that with this installation method it is impossible to hide the wiring and secure the lamps. Therefore, the choice of method is up to you.
Installation of PVC panels on the ceiling
Installing PVC panels on walls is much easier than on the ceiling, but this work can also be done with your own hands. After all, the PVC panel helps hide wiring, communication pipes, and ceiling unevenness. It’s also convenient to place spot lighting on them.
Ideal for ceilings frame made of metal profiles, which will help attach the PVC plate more securely. Besides, metal carcass does not deform from moisture and temperature changes.
Before you begin assembling the frame, you need to carefully prepare the ceiling. Remains of paint, whitewash or plaster must be removed from it. Then you need to treat the surface with an antifungal compound.
To start need to make markings walls at a distance of 10 cm from the ceiling. After this, you need to install the elements at a distance of 40 cm from each other. If the distance is greater, the PVC tracks will sag over time.
Then you need pin the start profile or a special baguette for plastic. Corners should be cut using a miter box. But you can cut the corners using a stationery knife already at the installation site. After this, the panels can be installed.
At the end of the work, it should be installed around the perimeter of the room plastic molding, and place a plastic plinth along the floor. At this point, all work on finishing the room with plastic is completed. If the panels are used carefully, they will long time do not lose their attractiveness and beauty. And considering that it can be easily washed, this finish becomes a real boon in rooms where you often have to wash the walls and ceiling.
Just don’t use aggressive products to wash the panels - they can destroy the surface and you will have to change the coating. But this also has a significant advantage - if one track is damaged, there is no need to change the entire surface; it is enough to remove the damaged area and replace it with a new one.
As you can see, finishing the walls and PVC ceilings You can easily make panels with your own hands. All work is carried out in stages. And if strictly follow the instructions of professionals, then the work can be done in as soon as possible and without much effort. But remember that you need to select high-quality and reliable materials, and it is better to take a professional tool.
How to attach plastic PVC panels to the wall yourself
PVC panels are one of the the best varieties finishing and decorating ceilings and walls different rooms, and especially places with high humidity, which include kitchens, balconies, hallways, bathrooms. They attract both their cost and quality indicators and convenience.
Mounting methods
There are three methods for attaching PVC panels to the wall - with self-tapping screws, clamps, and adhesive. Fastening with glue is only suitable for perfectly smooth walls. Before use, you need to level, clean and dry the mounting surface. Afterwards, an even amount of glue is applied to the material, and it is fixed to the wall.
Types of glue for installing PVC panels:
- special adhesive mixture for polyvinyl chloride panels;
- universal glue “Moment-montazh”;
- liquid nails.
You can use a frame for gluing. Thanks to it, there is no need to level the surface of the walls, and the adhesive composition is applied to the wood sheathing. It is strictly contraindicated to use adhesive material with ingredients such as a cleaner or solvent.
Fastening with self-tapping screws is one of the win-win methods of fastening plastic, which does not require leveling the surface to a perfectly flat state. So that the work does not drag on for a long time You will need a screwdriver to screw in the screws. The disadvantage of this fastening method: a more suitable frame in this case is wooden, so it will take more time to cut the timber and treat it with an antiseptic.
Most the best option- this is fastening with clamps. They are convenient and quick to attach to the sheathing. Clamps help securely fix the material to the wall. The sheathing is easily assembled from metal profiles. If the lining is damaged, it is easy to replace it with a new one. Installation of finishing is carried out quickly.
Fastening tools
Before you begin installation, you need to prepare a set of tools. Most of them can be found in every owner's home. To work you will need:
- for marking - a pencil with a tape measure;
- a hacksaw with fine teeth to cut the blade;
- construction level;
- plastic profile or slats for fixing;
- hammer drill, screwdriver;
- antiseptic, sealant, adhesive composition.
Before you start finishing the walls with clapboard, you will need to remove the old covering, check for the presence of cracks, if there are any, eliminate them, and treat the surface with an anti-fungal agent. When mounted on a frame, you can do without additional leveling of the surface.
Installation sequence
PVC lining can be attached directly to the wall or used for attachment, previously prepared sheathing. It is made from slats or beams of wood. For attachment to the wall, the distance between the beams is no more than 300-400 mm, for the ceiling - 300 mm.
Before you begin fastening, it is better to thoroughly understand how to properly fasten plastic panels. When polyvinyl chloride products are nailed to the sheathing, there is a high probability of breaking the integrity of the material, which will lead to the inability to reuse them, so it is better to use clamps, staples or self-tapping screws.
Then the fittings are installed: the final part, the corner for the outer or inner side . You need to attach a ceiling plinth to the top rail if the wall is covered with clapboard up to the ceiling. The material is inserted into the mounting part with a thin mounting flange and secured with nails or staples to the side of the wide mounting flange. When the lining is attached evenly, into its hole narrow side the next one is inserted. The panels need to be fastened closely, one to the other. The lining that completes the row must be properly secured between the final piece and the panel preceding it.
In a dry room with smooth walls, it is not necessary to use lathing, and the lining can be fixed directly to the wall. At high humidity, instead of lathing, it is better to use a profile for installation from plastic or metal. Clips are used for fastening, which makes working with the panels much easier.
When attaching the lining to the ceiling, it is necessary to determine the gap between it and the ceiling, which will depend on the type of lighting available. To hide the electrical wiring with built-in lamps, this gap should be 100-1 50 mm. Before attaching the panels, holes are cut for the chandeliers, and the bases of the lighting fixtures are installed in them. Then the PVC panel is attached to the ceiling in the same way as on the wall..
If the ceiling is level, it is not necessary to use lathing. When starting work, a ceiling plinth is installed on three walls. For level placement, a building level is used. Before installing the lining in rooms with high humidity, gaps and cracks in the ceiling are filled with silicone sealant to create waterproofness.
When getting started, you need to know how to attach PVC panels correctly and attach the material securely. Do not neglect the technical guidance and recommendations of professionals that can make installation easier.
- The panel should be face up during cutting and drilling. Cut better with a saw for metal products or a manual, construction knife.
- The adhesive composition is applied in straight lines to the wall, drawing a grid.
- To clean wall panels, it is better to use a soap solution. Do not use solvents, detergents that contain abrasives, or rough scourers.
- It is recommended to wear safety glasses before attaching plastic panels to the wall.
- Before starting work, familiarize yourself with the theory of how to attach plastic panels to the wall.
By doing the work step by step and following the instructions, you can install the panels yourself, without the help of specialists.
The Windows operating system allows you to customize the appearance of the desktop and panels in detail so that the user is as comfortable as possible. This also applies to the taskbar with which you interact constantly - the Start menu, running applications, open folders, time, running services and much more. In this article, you will figure out how to pin the taskbar at the bottom of the screen, and also consider the settings of this element in more detail.
Moving a panel
First, let's look at the case in which the taskbar is not at the bottom of the desktop. Before fixing it in one place, you need to drag it below.
This can be done just with the mouse. You need to place the cursor on any free space on the taskbar and, holding LMB, drag the cursor down the screen. Together with the mouse, the position and interface element will change - you can check this by moving the panel on different sides of the desktop. After changing sides, the position of the shortcuts on the desktop will move slightly.
Now the Windows 10 interface needs to be fixed so that you don’t accidentally move it when working with your computer. To do this, right-click on the panel and select “Taskbar Settings” in the menu that opens.
After this, a window with detailed settings for this interface element will appear on the screen. To prevent you from accidentally moving the bottom bar when manipulating with the mouse, you must enable the “Lock the taskbar” option.
There are also many other settings here that allow you to pin the taskbar to the bottom of the screen. For example, in the "Position" column you can select the side where the desktop interface will be located. You can use this function instead of moving the panel with the mouse, as described in the previous paragraph of the instructions.
What to do if the interface disappears?
IN operating system Windows has an option where the unused interface can be hidden automatically. If you move your cursor to the bottom edge of the desktop, the taskbar will automatically reappear.
If you want to pin the taskbar to the bottom of the screen on Windows 10 so it doesn't disappear, follow these steps:
- Open the settings again as described above.
- Find the item "Automatically hide the taskbar in desktop mode" and move the toggle switch to the "Off" position.
- Close the settings window and check the function. The bottom bar is now pinned and will not disappear when navigating to applications.
Additional options
Besides the fact that you can pin the taskbar to the bottom of the screen through the GUI options, this can be done faster. Just right-click on the panel and select “Pin all taskbars” from the menu. Along with the main bar at the bottom of the screen, custom panels will also be fixed.
You can pin any elements (programs, folders, files) to the taskbar and create subgroups. To add any program/folder to the interface, you need to right-click on the executive file or shortcut of this utility and select “Pin to taskbar” from the menu. After this, the application icon will appear at the bottom. It will remain in place even after rebooting the PC. You can unpin it by dragging it with the mouse or through the same menu.
We've covered all the steps that will help you pin the taskbar to the bottom of the screen on Windows 10. You can also check out the other options in the Options window and customize the interface as you wish.