Make a caterpillar module for a car with your own hands. We assemble a homemade mini tractor on caterpillar tracks with our own hands with a photo and video review
"Parma" cuts through the swamps and off-road terrain of our vast country.
All data is taken from the forum of the website "Lunokhodov.Net", where he shares his experiences and skills under the nickname mishanya68.
The tasks initially assigned to the all-terrain vehicle builder.
IN technical requirements and wishes the following points:
1. confident movement on snow of average depth and density for the Urals.
2. capacity 2 people, plus 50-80 kg of cargo.
3. at a minimum, must confidently float on the water (the main use is fishing and buoyancy for safety).
4. The main application is snow and ice 90%, the rest is autumn and spring - snow and mud.
5. Maximum use of ready-made serial parts and assemblies.
In connection with this project, I once again re-read the topics on “Tazik”, “Luntik”, “Barsik” and “Yukon” - these are ready-made all-terrain vehicles described on the website “Lunokhodov.Net”. Many thanks to the authors of the projects for sharing their experience, developments and drawings that they used.
Based on the experience of previous builders, I outlined an approximate design
1. turn on a differential with a rear axle, but we’ll install a cylindrical one.
2. 2-cylinder engine, made in China with a cylinder capacity of 690 cubic mm.
3. transmission: belt variator - VAZ 5-speed gearbox - rear axle from VAZ.
4. dimensions 2500x1750 mm.
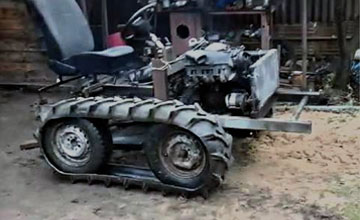
The rear axle is taken from a classic Zhiguli. Instead of wheels, there are sprockets (drive wheels for the caterpillar)
The beam was used. After disassembling, after checking for straightness, I cut off the excess and immediately cleaned it, cleaning it with flap wheels with 40 grit. It turned out quite quickly, 1.5-2 hours for everything, and cleaning took about 30 minutes. But this time is then saved on welding and painting.
Engine made in China.

Drawings have been developed for the production of guides that are attached to the inside of the track belt and prevent the tracks from coming off during movement and turns.

The axle shaft is factory.

The axle shaft is purchased, find the differences! Therefore, it was decided to leave the factory axle shafts, but with replacement of the bearings.

I bought belts for the production of tracks in a rubber products store at a repair plant in Perm.
Can you be more specific: what is “increased strength”??? In numbers. 4 spacers is good, 12 mm is not a lot?
The strength of the tape is created by the gaskets - the rest is rubber, which itself does not bear the load, BUT protects the gaskets from damage. For example, I took one so that on one side (outer) there was 3-4 mm, and on the other (inner) - 1 mm. WITH inside practically no damage is expected, and the extra thickness - excess weight and not small! As for the gaskets - they are ALWAYS the same thickness - 1mm, the rest depends on their quantity!
By footage: I took 4 pieces. with a length of 6.5 m, width - 150mm, thickness - 8mm, ply - 7. It came out to 10 thousand rubles.

I began to weld the frame of the future all-terrain vehicle. Some call it a frame, some a boat, some a skeleton, but the author calls this structure a keel, since the all-terrain vehicle is more intended for swimming.

The rounded front of the keel should improve the buoyancy quality of the homemade car.

It was decided to make an all-terrain vehicle without a balancer, since it is intended for trips to winter time, the roads are smoother, the weight of the structure is reduced, and it is technically easier to implement.

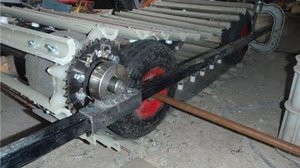
The frame is assembled with support rollers on both sides, the wheels used are the most common and common R 13 from VAZ, the bottom of the star is raised from the floor level by 350 mm, the wheel has a diameter of 570 mm.

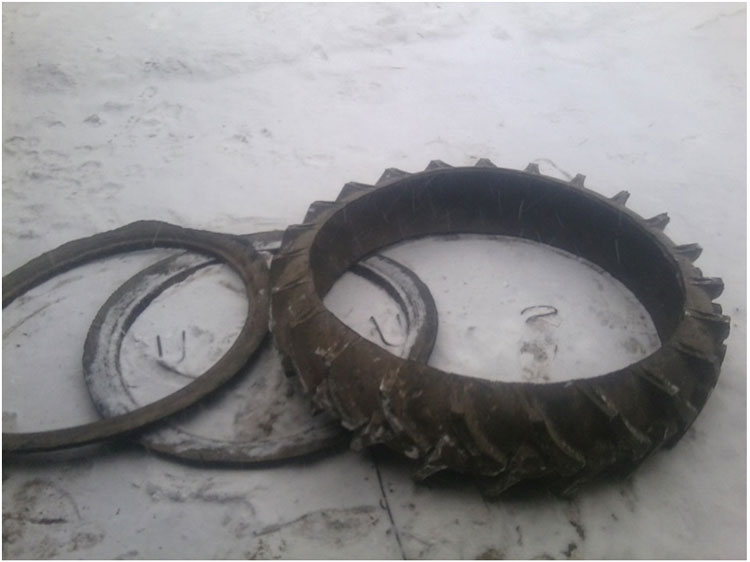
Preparing tracks for making caterpillars.

Plates for fastening.

Drilling template.

Ready-made holes on conveyor belts for making caterpillars.

Drilling holes according to the template.

Assembly.

A device for drilling holes in rubber using the punch method, but here you don’t need to hit the punch, it is clamped into the drill chuck and the rubber is cut, the results are very good holes and less effort is needed.

You can watch the video how this is done.
Photo of a device clamped into a drill chuck.

Photo of a device for bending pressure plates and bent plates.

One caterpillar is ready.

Safety precautions. To avoid the pain of hitting the ends of the pipe and getting scratched, it is better to protect yourself, at least with gloves.

The caterpillar fits around the sprocket, all tracks are in contact with the teeth.

Front view.

The tension mechanism is made so that both sloths are tensioned at the same time, there are pros and cons of this method. Plus the largest - the same tension of the tracks, provided that the tracks are the same during manufacturing and are equally stretched, ease of execution and more reliable fastening sloth axes. If these conditions are met, straight driving is ensured.
Disadvantages: poor sealing of the boat, since the sloth shaft runs inside the boat; if one caterpillar falls off, both sides relax in order to put it on. Also to be removed for repairs if necessary.

Plates for fastening tension mechanisms.

The jibs and amplifiers are welded.

Bridge fastening.

Installing disc brakes on a VAZ axle, due to the braking of the drive wheels, the all-terrain vehicle will turn while driving.

The guides are on the inside of the caterpillar, on the upper fold along the edges of the fang it is pressed 9 mm, this is with a plate width of 40 mm, steel thickness is 2.5 mm. this is the limit for a press with a force of 10 tons.

Guides, with a plate welded inside for fastening to the tracks.

A device for making guide plates using a press.

This will guide the tension wheel.

The guide plate touches the brake hose from the disc brakes on the sprocket, so you need to change the brake hoses and use Niva ones.

The gaps between the guides for the passage of the caterpillar along the track sprocket are acceptable.

All plates are chopped and bent.

The caterpillar is the most labor-intensive and labor-intensive part of the all-terrain vehicle.

The track and sprocket must interact with each other without binding at the entrance or exit of the sprocket. The check has been completed.

Watch the video.
Engine installation.

Installation of the clutch and gearbox.

Installing the cardan.

Variator on the engine pulley. Transmission - only for now positive results, Kayur's variator works very well with the Chinese engine. At first there were problems with the belt releasing at idle, but after adjusting the carb, everything returned to normal. It releases completely at approximately 1000-1100 engine rpm, gripping at approximately 1500-1700 rpm. Fully compressed at about 2500-2800 rpm.
I couldn’t understand why, by ear, the maximum speed was less than 3000 rpm, then I saw the throttle limiting bolt was fully tightened, the Chinese apparently tightened it for a quiet break-in, and also completed the control levers.

The first departure took place. First impressions are excellent.
Everything I said about differential rotation is not entirely true. There are points about which a little later. The all-terrain vehicle is still quite light and nimble.
It rolls around the garage with its hands into one person, turns around into two people. In the video, the surface is compacted snow, gear is first and a third of the gas, I press the levers with one finger, there is almost no noise from the stars.
I finished work with the controls (gear shifter and throttle drive), and also made the cardan protection frame. Made a short trip. Now everything works fine. Tomorrow I'll take everything apart for welding the boat and painting it.


I disassembled the all-terrain vehicle for welding and painting.

He turned over on his back.

I scalded the bottom, the sides remained and can be painted.

The braces are installed.

The pulley shaft is inside the casing.


I scalded the sides and painted them.

Painted everything inside.

The gearbox is outside with a plug for filling oil and the differential.
Dear visitors to the site “”, today we will figure out how to make tracks for a tracked all-terrain vehicle yourself and what is needed for this? Let's go... is the most passable among its brothers, and all because specific pressure on the ground is evenly distributed over the entire lower plane of the caterpillar, that is, it is a uniform point of support. But on wheeled all-terrain vehicles, the pressure is distributed over 4 points, so they often get stuck and slip. A simple example for you, why are tracked tanks? Yes, all for the same reason, to evenly distribute the huge weight of the machine onto the plane of the caterpillar in contact with the ground, otherwise they will simply get stuck in the ground and not budge.
The first step is to get a conveyor belt, it looks like this. 
 You will also need a corrugated pipe of rectangular cross-section.
  And of course fasteners in the form of: bolts, nuts, washers, engravers.
  First, we make blanks for the tracks according to the width of the track being made, cut them with a grinder and put them in a pile)
  After which these blanks must be handed over the required form and press on a special homemade machine. For clarity, let's see how a professional does it, 40 seconds to crimp one track is no joke guys)
 It is advisable to lubricate the ends a little with used oil.
  After the track has been given the correct shape, you still need to weld fangs-limiters onto it.
 In the upper part, additional reinforcement is welded in the form of the letter “ V»
 In general, such a track should turn out.
  First you need to check and adjust directly at the installation site of the caterpillar itself.
  Then you can start assembling the caterpillar, but first you need to make holes in the conveyor belt, mainly this one is used homemade instrument. The tube is sharpened at the end, and there is a hole on the side for removing chopped rubber.
  The tracks are also drilled with a drill, 2 holes on each edge.
  Next, we assemble the caterpillar into a single whole.


 This is how homemade tracks for all-terrain vehicles are made; as you can see, it is quite possible to do it yourself, which will significantly reduce the cost of the all-terrain vehicle you are assembling.
Thank you all for your attention!
For such transport, caterpillars become big problem, which many snowmobile enthusiasts encounter. To resolve the issue, some resort to the most different options implementation of ideas.
The article presents the most worthy methods for quickly constructing a homemade snowmobile track, which have proven themselves excellent in operation.
Tools and material
For the manufacture of different types homemade caterpillars use the same tools and materials. There is plenty of such goodness in every household. And if something is missing, you can buy it in the store. Scroll necessary materials and tools:
- a large knife with a durable sharpened blade, preferably used as a hunting knife;
- used for simplified work electric jigsaw, but the teeth on the blade should be fine;
- spanners, bolts and nuts - this is necessary to equip the track with a clutch. It is recommended to select long bolts. The nut is tightened from the outside of the product (the bolt is passed from the inside to outside);
- fishing line to strengthen the edges;
- rope or similar tying material individual parts future caterpillars for a snowmobile;
- a hammer and a sharp pin for making holes in the product.
Making tracks from tires
This option for constructing rubber tracks has a number of advantages. There is plenty of material to be found. In case of urgent need it won't be difficult to carry out renovation work in a very short time. To make rubber tracks, you should choose truck tires. In addition, the tread must be identical in pattern to the rest of the tires - this will significantly simplify further work.
Manufacturing process:
- Initially, a tire is taken. A transverse cut is made to create a strip. The sides are cut out of it - a kind of treadmill should be formed. The procedure requires a lot of patience, because cutting out excess parts of the tire is quite labor-intensive. The tools used are a large knife with a good sharp blade.
- Rubber is easy to cut if the knife is soaked in warm, soapy water. Wetting needs to be done periodically. To achieve greater ease of operation, you should use an electric jigsaw with a fine tooth blade. The blade is also soaked in soapy liquid from time to time.
- If the tire hardness is high, it is recommended to remove a couple of layers of rubber from the inside - this is very difficult, so it is easier to find a tire with a soft structure. In case of dissatisfaction with the tread pattern, new cutting of the lugs is allowed at your discretion.
A rubber track made by yourself has a huge advantage - it is a closed loop. With this advantage, reliability and strength are significantly increased. The only thing you need to pay attention to is securing individual tire elements when creating a track for a snowmobile. Often, some tire options are not suitable in width. In this case, you should find material for specific parameters or tighten individual pieces with a small cable.
Transport belt for caterpillar
This material is very common. Therefore, it will not be particularly difficult to find a conveyor belt. You can purchase it in used condition or, if possible, simply ask your friends.
Manufacturing process:
- The conveyor belt may soon deteriorate during operation, so it is necessary to stitch the sides of the material using thick fishing line. You need to do it the way seamstresses sew the edges of fabric using the overcasting method. If you do not do the work, then after some time the edges will turn into rags, therefore, the tape cannot be avoided. To give the rubber strip the appearance of a ring, stitching the ends is used, but the method is not very reliable. It is easier to use a hinge based on the type of piano hinge.
- The thickness of the conveyor belt depends on the power of the motor. A strip 1 cm thick shows excellent results. It is used in agricultural machinery. It is allowed to use tape from old Soviet motorcycles.
The advantages lie in the abundance of resources. If broken, a homemade caterpillar can be restored in short time without professional tools. Before purchasing a full-fledged track, you can use the belt version for quite a long time.
Track belts
This option is very easy to manufacture and does not require any skills. The material is quite common. There will be no difficulties in purchasing it.
Manufacturing process:
- The belts are wedge-shaped, therefore, creating a single piece of fabric is very simple. And lugs can be made according to at will. Bolts and nuts or rivets are used as coupling.
- The belts are convenient because they have holes that can easily be adjusted to the snowmobile's drive sprocket. For these purposes, a gap is left between the strips during operation.
- For fastening it is allowed to use any durable material, for example, a small diameter cable. It is important that the work is done efficiently, otherwise the entire structure will fall apart when driving.

There are actually many more methods for making DIY tracks. It also doesn’t hurt to use your imagination and come up with something better and replace tires and tires with better ones. practical material. But, nevertheless, tracks made from tires are considered the best solution. They are simple to manufacture, and the time spent on work will be minimal.
Video
See how you can make reliable snowmobile tracks with your own hands.
When operating in off-road conditions, tracked vehicles have undeniable advantages over wheeled transport due to its all-terrain qualities, allowing it to overcome deep loose snow, soggy arable land or rocky ford.
The popularity of tracked vehicles among household users is so great that many home craftsmen independently “convert” their wheeled vehicles into homemade ones - tracks made from scrap materials.
One of the retrofitting options is to use old tires from MTZ tractors, allowing significantly increase cross-country ability personal auto and motorcycle equipment at minimal financial costs.

For a tracked vehicle of any purpose, be it a tank or a snowmobile, forward motion is provided by a tracked propulsion unit (DC).
It uses two motivating factors:
- torque Mk, transmitted from the engine/power drive to the drive wheels;
- adhesion of tracks to the ground.
A caterpillar or caterpillar chain of a main engine is a link structure, which is a continuous continuous belt or chain.
For full traction with the ground surface, the caterpillar equipped with relief protrusions, serving as active lugs.
The crawler principle is illustrated kinematic scheme work of the main engine located below. The following positions are indicated on the diagram:
- pos. 1 – caterpillar;
- pos. 2 – support rollers that prevent the track belt from sagging;
- pos. 3 – drive sprocket (drive wheel), which converts torque from the engine into traction force necessary for the forward movement of the machine;
- pos. 4 – support rollers, ensuring full contact of the caterpillar track with the surface of the ground support;
- pos. 5 – shock absorbers;
- pos. 6 – guide wheel, which serves to direct the forward movement of the machine and transfers part of its weight to the ground.
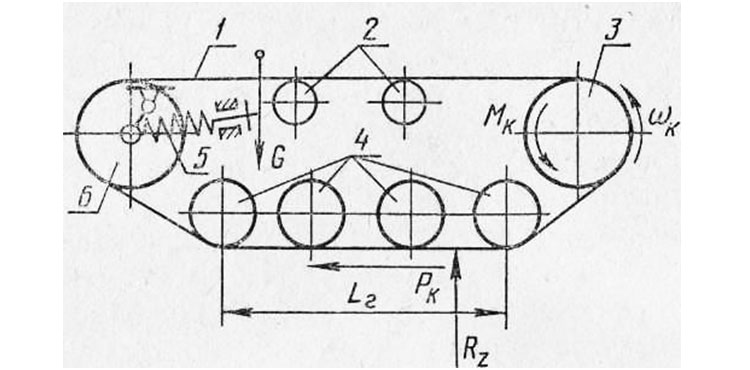
Movement according to the caterpillar principle carried out as follows:
- Torque Mk is supplied to the drive sprocket (item 3).
- The rotating sprocket rewinds the continuous track belt/chain (item 2).
- The caterpillar (item 2) is in close adhesion to the support surface (soil, loose soil, etc.). It is affected by:
- force R z – reaction of the supporting surface, which the caterpillar transmits to the vehicle frame;
- tangential reaction of the ground support P k.
The rewindable track belt/chain is continuously laid in the direction of forward movement of the vehicle on the surface of the ground support under the road wheels, creating for the wheels of the vehicle path with lower resistance to movement than on soft ground.
During movement, the caterpillar belt rises from the supporting surface and transfers the pushing force to the vehicle frame.
The specific pressure on the support (soil) along the length of the track is uneven - increased in the area of the drive sprockets, decreased in the front part in the area of the guide wheel (item 6). The maximum pressure on the ground from the main engine is in the area of the road wheels (item 4).
Advantages of homemade diesel engines from MTZ tires
Thanks to the continuous placement of the caterpillar belt under the machine's rollers, a large contact area of the belt with the ground, significantly reducing the average pressure of the machine on the soil.
The range of average pressure on the ground of equipment with deep pressure is from 11.8 to 118 kN/sq.m (from 0.12 to 1.2 kgf/sq.cm), which is significantly lower than the pressure of a human foot.
Such low performance pressure ensures protection of equipment from immersion in the ground, swampy soil or snow. By varying the size of the surface area in the contact zone of the track with the support, an optimal ratio of the vehicle's cross-country ability with its traction force for towing cargo is achieved.
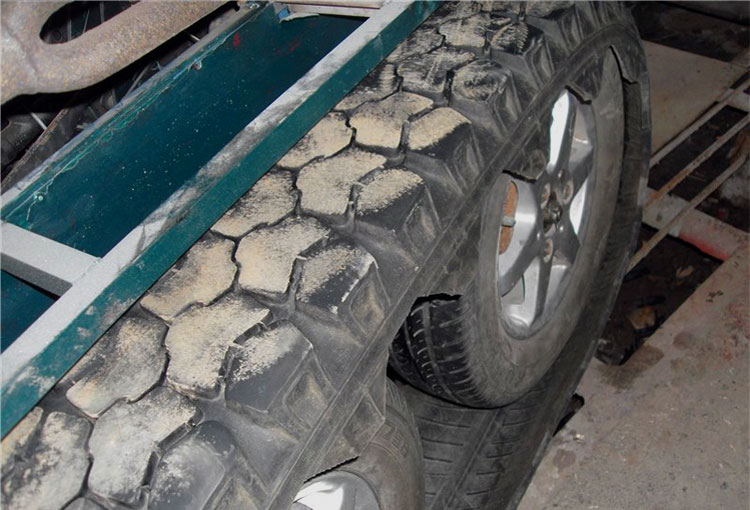
When equipping vehicles with caterpillar tracks, homemade DIYers use transport belts or tires from automobile and tractor wheels.
The photo below shows homemade all-terrain vehicle on conveyor belt tracks reinforced type 250 mm wide. Grousers with a height of 25 mm are used.
All-terrain vehicle made from a conveyor belt:

For most craftsmen, the preferred source materials for the manufacture of diesel engines are old tires from MTZ tractors of various models.
The main advantages of MTZ tires, as a source material, and the tracks themselves made from these tires include the following factors:
- Availability old MTZ tires. Quite often, after dismantling, they are stored in the depths of the utility yards of enterprises, cluttering the territory.
- The tire is a closed continuous structure, does not require sewing the ends tapes.
- On a tracked platform made from a tractor tire no need to increase lugs, since the tires have a pronounced tread pattern of the factory design.
- MTZ wheel tires have high strength and wear resistance, ensuring reliable, trouble-free operation of the caterpillar track on soils containing sharp stones.
- Versatility applications - you can select tires for all types of tracked vehicles, including measures to modernize equipment or increase the width of tracks.
- Recycling of used tractor tires solves the most important problem of recycling dismantled wheels - the possibility of their reuse.
From shortcomings When working with tractor tires, two circumstances are noted:
- limited fixed track length, determined by the size of the tire blank;
- the need to double two tires when installing a track with a width exceeding the width of one blank tire.
Requirements for converting equipment to caterpillar tracks
The picture shows simplest in design homemade cart with tracks made from tires.
The re-equipment of equipment for diesel engines is carried out exclusively for utilitarian reasons of pragmatic owners of wheeled vehicles or motor vehicles who wish improve all-terrain qualities their "helpers".
For all models of equipment intended for driving in field conditions, the market offers serial versions of industrially manufactured gas engines.
However, all this costs a lot of money, and tires free or very cheap.
Many equipment users manage to independently, in a home workshop, make tracks from tractor tires, install them on their machines and successfully operate in off-road conditions.
Regardless of the type of car or motor vehicle, technicians take into account the following factors:
- To install the main engine mechanisms, it is necessary to equip special frame structures increased strength and rigidity, capable of withstanding increased weight and dynamic loads.
- When using improvised means, many craftsmen use pneumatic wheels as tensioners, as well as a pair of driving and driven wheels. The tape is put on the flat tires, which are then inflated, creating the required track tension.
- The owner of the equipment must clearly determine the purpose of the machine in order to select optimal sizes width and length of the caterpillar track.
- Taking into account the increase in weight and traction loads on the engine after installation of the main engine, it is necessary to optimize the correspondence between the maximum engine power and the width of the track. Otherwise the engine breaks down quickly.
When choosing the ratio of engine power and belt width of a homemade tracked installation you can be guided by price list data on all-terrain vehicles equipped with serial tracks.
Below we will consider the categories of machines that are most popular among craftsmen when converting them to crawler tracks.
Main categories of popular equipment equipped with gas engines
The list of models of household vehicles and motorcycles operating on loose snow and marshy soils is unusually wide.
The names of the machines themselves, accepted in everyday life, indicate their field of application.
Snowmobiles
This vehicle designed for movement on loose snow cover.
Unlike the anglicism “snowmobile”, which denotes any vehicle adapted for movement on snow (snowmobiles, all-terrain vehicles on tracks and pneumatic wheels, etc.), in Russia a snowmobile is only called means of ski-caterpillar movement(rear main engine, in front - skis instead of the front wheel) with motorcycle-type controls.
For utilitarian snowmobiles, the engine power is 30-40 hp, the track width ranges from 38 cm to 50 cm and even 60 cm.
Accordingly, if a master sets his task to create a machine for moving on virgin snow with a load, then he should focus on these indicators.
Similar parameters must be maintained when creating so-called snow and swamp-going vehicles.
 If the master needs make a faster snowmobile(like sports ones), then the width of the tire track can be reduced.
The weight loads of a high-speed vehicle are much lower than those of a cargo utility vehicle.
The picture shows a motorcycle-based snowmobile equipped with a homemade 23 cm wide track cut from an excavator tire.
Otherwise, a homemade snowmobile track is made with your own hands according to the basic principle.
All-terrain vehicles
They are commonly referred to as any vehicle capable of driving off-road and even overcome water obstacles.
Types of all-terrain vehicles industrial production plenty:
- SUVs;
- swamp walkers;
- amphibians;
- tracked tractors and conveyors;
- ATVs;
- ATV category vehicles, etc.
Their cost not everyone can afford it, therefore, in home workshops they prefer to create their own exclusive products, “re-shoeing” their cars with tracks from tires made by themselves for an all-terrain vehicle.
Depending on the engine power of the vehicle, wider blades can be allowed.
For homemade all-terrain vehicles with a 40-70 hp engine. and a small weight load, a tape width is sufficient 30-40 cm.
 For vehicles based on UAZ vehicles with an engine of 110-150 hp. track width required 40 cm with support rollers (6 pcs.) and support rollers (3 pcs.).
Naturally, the profile height of a tractor tire will not be enough to overcome a water obstacle, it is necessary to install high lugs.
The figure shows an all-terrain vehicle based on the Oka vehicle with a caterpillar track made of tires.
Walk-behind tractors
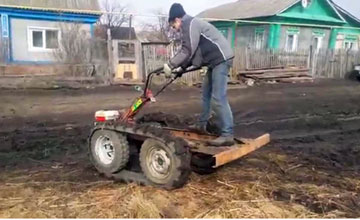
Represented by numerous mobile devices based on a single-axle chassis. Converted for the State Duma homemade options walk-behind tractors are widely in demand among rural residents and owners country houses or summer cottages.
The motivation for independently re-equipping units, bypassing the purchase of serial tracks, is obvious.
The cost of the NEVA wheeled walk-behind tractor does not exceed 1000 dollars. USA, while the most simple machines, adapted for movement on snow, are estimated at 5-10 thousand dollars. and higher.
The drive power of the walk-behind tractor (5-8 hp) is quite enough to be successfully used as an all-season vehicle
Motorcycle dogs
Motorized towing vehicles, nicknamed motorized dogs in everyday speech, are a mechanical coupling of a sled with a towing vehicle on a main engine. The driver and cargo are placed in the sleigh.
Serial models are produced in a wide range of drive power (from 6 to 30 hp) and are equipped with a motor made of rubber-metal tape up to 60 cm wide.
 Home craftsmen usually make towing vehicles based on a 15 hp engine from improvised means, installing tracks from tires 500 mm wide.
Such homemade motorized dogs capable of transporting sleds with a load of up to 700 kg, reaching speeds of up to 40-50 km/h.
Most often, a homemade caterpillar for a motorized dog is made from a tire to save money.
The photo shows a homemade motorized towing vehicle based on a walk-behind tractor.
Algorithm for making a caterpillar belt with your own hands
The caterpillar track for any model from the above categories of equipment is made from tires of various sizes corresponding to the selected design. Let's look at how to make a caterpillar from a tire step by step.
The work on tape production is unified and follows a general algorithm.
Special knowledge in the manufacture of caterpillar tracks from tractor or car tire not required, however you can’t do without certain plumbing skills.
The process of forming a caterpillar track from an MTZ tire consists of several stages:
- Select a tire with a slightly worn tread.
- The path is being cut for the caterpillar using a sharpened shoe knife. Working with a sharp knife is dangerous and requires increased caution and attention.
- To cut rubber better, it is recommended to use a knife periodically moisten with soapy water.
- Cutting with a knife can be successfully replaced jigsaw, protecting yourself from possible injury.
- Both sides are cut off tires.
- Excess material is removed from inside the tire.

The criterion for quality work is an even cut without frayed edges of the resulting tape.
Thus, the track element is ready to use:
Video on the topic
You can see a homemade snowmobile track made from a tire in action in this video:
Conclusion
Making homemade tracks for converting equipment to caterpillar tracks is a very popular way to expand functionality machines at minimal cost.
Using dismantled old ones tractor tires for GD helps to solve the issues of recycling old tires without using traditional waste processing methods - burning, grinding, chemical treatment, etc.
In contact with
Dear site visitors " Homemade friend“Today we will figure out how to make tracks for a tracked all-terrain vehicle yourself and what is needed for this? Let's go... Crawler all-terrain vehicle is the most passable among its fellows, and all because the specific pressure on the ground is evenly distributed over the entire lower plane of the caterpillar, that is, it is a uniform support point. But on wheeled all-terrain vehicles, the pressure is distributed over 4 points, so they often get stuck and slip. A simple example for you, why are tracked tanks? Yes, all for the same reason, to evenly distribute the huge weight of the machine onto the plane of the caterpillar in contact with the ground, otherwise they will simply get stuck in the ground and not budge.
Tracks for homemade all-terrain vehicles they are made mainly from a conveyor belt and corrugated pipes of rectangular cross-section, and the tracks are pre-pressed on a homemade machine where they are processed required form. The tracks are attached to the tape with bolts and nuts. And so, let's take a closer look at the process of creating an all-terrain vehicle track.
Materials
- conveyer belt
- corrugated pipe of rectangular section
- bolts, nuts, washers, screws
- fittings
Tools
Step-by-step process for creating a do-it-yourself all-terrain vehicle caterpillar.
The first step is to get a conveyor belt, it looks like this.


You will also need a corrugated pipe of rectangular cross-section.

And of course fasteners in the form of: bolts, nuts, washers, engravers.

First, we make blanks for the tracks according to the width of the track being made, cut them with a grinder and put them in a pile)

After that, these blanks need to be given the desired shape and pressed on a special homemade machine. For clarity, let's see how a professional does it, 40 seconds to crimp one track is no joke guys)

It is advisable to lubricate the ends a little with used oil.

After the track has been given the correct shape, you still need to weld fangs-limiters onto it.


In the upper part, additional reinforcement is welded in the form of the letter “ V»


In general, such a track should turn out.

First you need to check and adjust directly at the installation site of the caterpillar itself.

Then you can start assembling the caterpillar, but first you need to make holes in the conveyor belt; basically, a homemade tool like this is used. The tube is sharpened at the end, and there is a hole on the side for removing chopped rubber.

The tracks are also drilled with a drill, 2 holes on each edge.


This is how homemade tracks for all-terrain vehicles are made; as you can see, it is quite possible to do it yourself, which will significantly reduce the cost of the all-terrain vehicle you are assembling.
Thank you all for your attention!
A homemade caterpillar for an all-terrain vehicle or snowmobile that is light in weight can be made on the basis of a simple bushing-roller chain and a conveyor belt. And it’s very easy to do; there’s no need to purchase a special tool. In order for such a homemade caterpillar to serve longer, it is necessary to stitch the edge of the conveyor belt with fishing line. The step is about a centimeter. This procedure will help protect the tape from fraying. But you can connect it into a ring in any way acceptable and accessible to you. Less reliable is to simply sew the ends of the tape. Most often it is recommended to use a hinge like a piano hinge. But the thickness of the tape depends on the power of the engine installed on the all-terrain vehicle. An indicator from 8 to 10 mm will be appropriate if you are using a motor from a domestic motorcycle. Device made in a similar way, well suited for use on a snowmobile. Plus, such a homemade caterpillar can be easily repaired and replaced in case of damage. This greatly simplifies the process of operating your invention.