Eliminating the problem of a large gap between the bathtub and the wall. How to install a bathtub correctly: before or after laying tiles What to build a box or lay tiles first
Today the main work is the box.
I would like to say that for me personally the sequence of masonry is important here. For the seams that exist, they need to converge, for them to come together. I adjust the seam horizontally so that it goes from start to finish.

Well, there is a point here, I somehow didn’t pay much attention to it before. First, it is still better to lay two tiles on the left side. That is, this one and this one.


But before laying, adjust these tiles. It is slightly sawed and placed under the already laid tiles.

That is, first you need to mark it, how it will lie and then put them together. If you lay the tiles separately, then adjusting them will be too problematic.

Therefore, I initially mark these tiles and lay them together to bring out this seam. You can even look here to make it clear what I’m talking about. That is, attach a corner. You can see that he is jumping a little. If we first lay these two tiles together in the corner. That is, this big one and this small piece, and then we’ll try to cover it with a lid. Due to flaws in the tile itself, this seam may come apart.

To prevent this from happening, we will try to lay it down first big side, and here these flaws are already compensated for.

Well, when these two tiles were already laid, then I laid these sidewalls. Well, and then I completely stretched out this entire row.

I won't post it in parts. I'll pull this row through first. It will be much smoother this way. Then it will be much easier to adjust this side panel. I'll turn on the laser. Well, let’s say arbitrarily, I placed it on the edge and already along the edge, that is, I initially cut these tiles a little with a margin.

I took this size, cut it off a little with a margin, and then sawed them. I just twist and saw through. Here they are all ready for me. That is, they are all sawn through already.

Well, then I made a groove and now I will run this row completely so that it can be pressed with a rule. That is, fully expose it, as needed, and then just lay down the side part.

How to cut tiles correctly
On a side note, what other point did I want to draw your attention to? Here, let's take this tile.

That is, it is clear that the tiles are not sawed all the way to the glaze. The rest is simply sanded off later. And here is the moment when you need to use sandpaper in one direction. Under no circumstances should you move back and forth. Otherwise, the crumbs that fall off the sandpaper can simply catch the glaze.
Well, before working on the fittings in general, I still do this test. I have a piece of tile. That is, I do a test cut on any regular tile, because they still differ from each other, and the strength of the glaze differs from each other. I make a test cut; I have Zasuitsky tiles on both sides. That is, on the one hand, if you take any tile and look. Let’s say that here the glaze and the ceramic meet right here at the very junction. And with reverse side tiles, the glaze goes inside.

And so, in general, in most tiles. Therefore, on the one hand we have a little more, on the other a little less. And I will do this test wash so that I run it more, more and more and determine at what point the glaze begins to tear. In order to somehow make such a limitation for yourself in the future. What can no longer be sawed, then you need to work manually.

Well, and then, as I said, I will initially work with ventilation. Here you need to make ventilation so that “ceiling workers” can come and stretch the ceiling and install lamps. Well, then there will be work on the floor. That's all for now.
All rights to the video belong to: Severov Apartment Renovation Kazan
When planning a bathroom renovation, almost all people wonder what to do first: install a bathtub or tile the room? Both of these options have the right to be considered correct, because the choice of one or another sequence depends on several factors. The material from which the bathtub is made, the size of the bathroom, the skill and responsibility of the tiler and plumber are taken into account. Let's consider the features, advantages and disadvantages of both repair sequences.
In this case, first the bathroom is completely tiled (walls and floors), and then the plumbing is brought into the room and installed.

The junction of the bathtub with the wall is sealed with sanitary silicone with antifungal additives or covered with a decorative plinth.

The advantages of this method include the convenience of performing the work, since nothing interferes with the master. There is also no risk of damage to plumbing equipment. Another plus is that it’s easy to replace the bathtub with a new one, if necessary.
The main disadvantage is that silicone sealant (even sanitary sealant) develops mold over time and has to be replaced.
Note! According to the manufacturers' instructions, this method is mandatory for use when installing an acrylic bathtub.
First the bath, then the tiles
In this case, a bathtub is brought into the room prepared for laying tiles and placed. More often this method is used when installing a cast iron bathtub, since if you bring it in after finishing works, tiled flooring can cause serious damage.

After installing the plumbing, the bathroom tiles are laid. With this method of wall cladding, the bathtub turns out to be embedded or built into the tiles. The tiles should not rest on the edge: a gap of 1–2 mm is left, which is filled with sanitary sealant or a waterproof fugue, for example, based on epoxy resin.

This technology has several advantages:
- The edges of the bathtub are recessed into the lining, so the water flows directly into it.
- Also the bath takes less space due to the fact that it is built into the cladding. This is important for small combined bathrooms.
- Tiles are saved, since with this technology the wall behind the bathroom is not tiled.
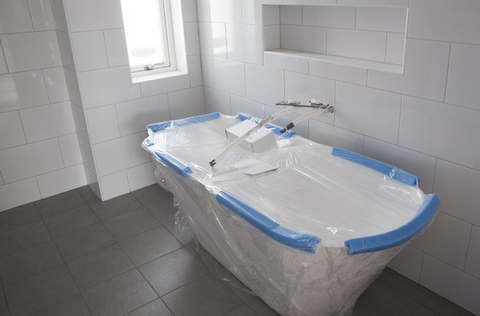
The disadvantages of finishing the walls after installing a bathroom include the fact that the equipment must be protected from dirt and the possible fall of tools, tiles or other objects inside, which will damage the enamel. After installation, it is recommended to line the bathtub with cardboard and cover plastic film, and put thick plywood on top so that the master can veneer the wall above it.
Option number three
This option is considered optimal for steel bathtubs, but is suitable for any type. After preparing the bathroom for finishing, a bathtub is brought into it and installed, but not connected to the communications. Markings for laying tiles are made according to the actual location of the equipment (along the side). After marking is completed, the bathtub is moved to the side or taken out, and they begin to line the walls, while the tiles are mounted not from the floor, but from the marked line, taking into account the gap. Another option is to start laying the tiles from the floor, and make a gap the width of the side to move the bathtub close to the wall. When the installation is complete, the bathtub is installed and connected to the sewer system, and a mixer is connected to the water outlets.
The advantage of this method is that the bathtub is protected from the risk of damage during wall finishing. Also, the sides are recessed into the tiles, which preserves the usable area of the bathroom. Among the disadvantages, they note the need to maintain accurate markings: even with a slight mistake, the bathtub simply will not fit into the prepared “niche”.
Nuances when performing work
When planning the layout of the tiles, it is taken into account that it is advisable to lay whole tiles near the side and above the ceiling: this way the finish looks more attractive. If whole tiles do not fit the height of the wall, practice decorative design border - such inserts make the cladding elegant and original.
Before sealing the joint with the wall or starting to lay tiles from the side, the bathtub is filled with water so that it shrinks.
If you choose the option with a bathtub recessed into the cladding, you should understand that if it is necessary to replace the equipment, the tiles adjacent to the side will have to be dismantled.
The material of the bathtub is of primary importance when choosing the order of work in the bathroom. In an already finished sanitary room, it is recommended to install acrylic, corner, hydromassage and large (non-standard) size products.
 A Jacuzzi should not be built into tiles, as repairs will require moving the equipment away.
 Cast iron bathtubs are ideal for built-in installation. With steel products, both options are acceptable, since they weigh little and are strong enough to stand on the side when finishing walls.
You should also listen to the opinion of the experts: specialists with extensive experience will determine on site best option taking into account the specific situation and circumstances.
Advice! If you need bathroom renovation specialists, there is a very convenient service for selecting specialists from. Just fill out the order details, the experts will respond and you can choose who to collaborate with. Each specialist in the system has a rating, reviews and examples of work, which will help with the choice. Looks like a mini tender. Placing an application is FREE and does not oblige you to anything. Works in almost all cities of Russia.
If you are a master, then go to, register in the system and you will be able to accept orders.
The problem of a large gap between the bathtub and the wall is very common in new buildings. It is not at all clear what the developer is guided by, because the length of the bathtub was determined a long time ago by clear standards and is 150, 160, 170 centimeters. However, the space for the bath is often 5-7 centimeters wider than this standard.
Solutions options
There are several solutions to this issue:
You can build up the wall where the bathtub adjoins and tile it like the rest of the walls. In my opinion, it looks “clumsy” and not aesthetically pleasing.

You can take a bath 10 centimeters longer (the next standard size) and “crash” into the walls with the edges of the product. A fairly high-quality solution, but the thickness of the tile cladding should be taken into account so that the tile fits aesthetically on the side and does not extend too far. Applicable mainly only with wide, flat sides of the bathtub or when the edges cut into the walls quite a bit.
A better solution would be to construct a box made of plasterboard (or gypsum fiber) the width of the bathtub, from floor to ceiling. This option is good because you can close significant gaps between the wall and the bathroom. In addition, often the walls are not at 90 degrees to each other - a floor-to-ceiling box allows you to hide defects in the geometry of the room. Thanks to the box, the “wedge” on the tile will not be visible anywhere.

You can build up the missing centimeters with plasterboard along the entire wall. If this is done along the wall where communications are planned, then the problem with hidden placement of pipes will be solved. The most correct solution, in my opinion: 5-7 cm of space does not solve anything in terms of plan total area, but there is an opportunity to get rid of pipe boxes. After all, it is often not possible to trench walls under sewer pipes in order to hide them.
It is the option of hiding communications that we will consider in more detail.
Relevant or not?
To determine the relevance of plasterboard (gypsum fiber) cladding to eliminate an unpleasant gap, first of all you need to try to mark the cladding. This will allow you to judge the feasibility in general, how much space the cladding will “steal” and whether it is possible to hide all communications.
When marking, you need to carefully consider all the little things: how the frame will fit (will it interfere with the pipes), the thickness of the glue and tiles. In the end, you need to decide whether the bathtub will be installed before tiling or after. In general, most craftsmen adhere to the first option (first install the bathtub, then lay the tiles), including me. In general, everything needs to be carefully measured and taken into account.
It is worth noting that it will not be possible to completely eliminate the box: at a minimum, you will have to make a box where 110 mm goes. sewer pipe to the toilet. If the sewer riser is located outside the bathroom, then the box can only be placed in bottom corner, naturally, if the toilet is planned there and whether it is planned at all. If the riser is 110 mm. the pipe is located in the bathroom itself, then a vertical box cannot be avoided.
 Thanks to the false wall and the fact that the sewer riser is located outside the bathroom, we were able to get rid of the boxes. The only box had to be erected under the toilet, at the entry point of 110 mm. sewer pipe. 50 mm sewer pipes are hidden behind the plasterboard lining. And water pipes. And most importantly, the lining is made in such a way that the bathtub fits perfectly without gaps. Please note: the bathtub was installed after the tiles were laid - this was the customer's request. In general, it will be more practical to lay the tiles to an already installed bathtub.
After the arguments about boxes, any reader will say: if boxes cannot be completely abandoned, then what is the point of covering the entire wall at all, is it really just for the sake of a clear fit for the bathroom? Not only... Horizontal water pipes, sewer pipes 50 mm. will be hidden behind a false wall. Without a false wall, you will have to make a horizontal box along the entire length of the pipes, and the box will interfere with the installation of furniture, for example, a cabinet with a washbasin. And in the end, extra boxes mean extra corners, and corners spoil the design of any room, even if they are made perfectly.
Communications
As described above, all the pipes are hidden behind the cladding, and only water sockets for the necessary plumbing fixtures stick out. There is plenty of space for the water supply, but for the sewer pipe it is 50 mm. you'll have to make room. Where, according to the plan, the drywall profile should go and the profile gets in the way sewer pipe- the profile can be cut. That is, the pipe can pass close to the drywall. In more severe cases, when there is not enough space, you can cut the drywall itself where it interferes with the pipe. Ultimately, the main thing is that the pipes do not interfere with the laying of the tiles.


Subsequently, when the wall is being sewn up, it is important not to forget the places where the pipes are too close to the cladding and not to accidentally pierce them with self-tapping screws. I strongly recommend marking places where such problems are possible.
False wall close to the bathtub
When facing with plasterboard, questions may arise: is one layer of plasterboard enough? how often should you create a profile? My answers are simple: one layer of plasterboard 12.5 mm. quite enough - tiling will significantly strengthen the structure, moreover, under heavy objects mortgages are made (see below). As for the distance between the profiles, 60 cm is more than enough.
Also, the question may arise: is it necessary to fill the empty space under the cladding with insulation? Here you need to weigh the relevance - if sound insulation from neighbors is needed, then insulation will only give a small effect. It is worth understanding that it is worth insulating with polystyrene foam or extruded polystyrene foam, mineral wool does not tolerate high humidity.
For the canopy of the water heater and heavy furniture (if any), plywood inserts should be provided. For storage water heater 50-100 liters require at least two layers of 18 mm plywood; for a cabinet with a mirror, one layer of 10 mm is enough. for eyes.


Plywood inserts are attached to the frame of the false wall. When screwing gypsum board sheets onto the mortgages, thin zigzags should be applied polyurethane foam and attaching the sheet, do not screw it too often.
We reviewed the main points of designing and installing a false wall made of gypsum plasterboard to eliminate the gap to the bathtub and conceal the laying of communications. In general, the topic can be covered on several pages, because it includes pipe routing, frame installation, and so on that deserve detailed attention. In subsequent publications we will fill this gap.
When planning a bathroom renovation, you need to decide on the sequence of work. What to do first: lay tiles or install a bathtub? Which algorithm is the most correct and rational? The answer to this question depends on several factors. The size of the room, the material of the bathtub, and the level of skill of those who will carry out the finishing and plumbing work. There are some other nuances.
Sequence options
Option 1: first tiles, then bath
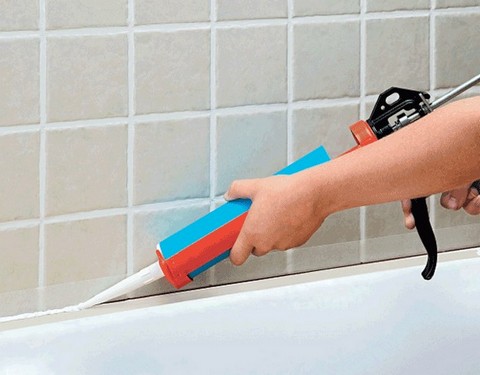
The bathtub is brought into the tiled bathroom. All that remains is to install it. To fill the gap between the bathtub and the wall, sealant is most often used. It keeps water out and holds the bowl.
If the bathroom is large and the bathtub is on legs, you don’t have to put it against the wall at all.
Option 2: first the bath, then the tiles
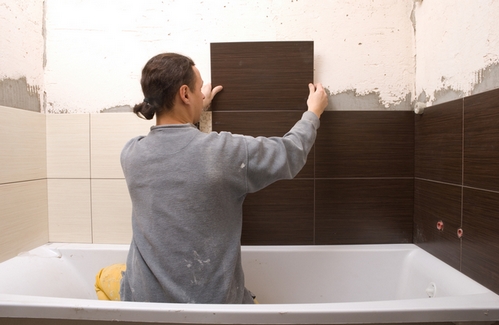
The bathtub is brought in before finishing the walls begins. Installed and fixed. Only after this does the laying of tiles begin.
In fact, the bathtub is lined with ceramics or, in other words, built in. The tile goes onto the side of the bathtub, but does not rest against it, but “hangs” with a gap of several millimeters. The gap is subsequently filled with sealant and/or moisture resistant (preferably epoxy). Next, the junction can be decorated with a special ceramic border or plastic corner.
Option 3: first measure the bathtub, then lay the tiles
The bathtub is brought into an unfinished room and installed. Measurements are taken and markings are made for the tiles. Then the bath is taken out or moved aside. The tiles are not placed from the floor, but from the level of the side of the bathtub, taking into account the required gap. When the finishing is completed, the bathtub is placed under the already laid tiles.
Mistakes are unacceptable here: if you missed the measurements a little, the bathtub may not fit.
How to choose the right option?
Depending on the size of the room
If the bathtub fits exactly from wall to wall, it is risky to choose the first option. It may happen that after leveling the walls and laying the tiles, the distance will be reduced, and the bathtub simply will not fit. Therefore, if the bathroom is very small, you first need to install a bathtub and then lay the tiles from it. It's more reliable.
If the bathroom, on the contrary, is large, you can choose the third option: bring in, install, measure, mark, move and lay the tiles not from the floor, but from the level of the side of the bathtub.
Depending on the type of bath
You should read the instructions for the new bathtub. As a rule, manufacturers of acrylic bathtubs recommend laying tiles first and only then installing the bathtub, sealing the joint with the wall with sealant.
Manufacturers of steel bathtubs are not so categorical, but they do not advise placing the edge of the tile directly against the side. Steel bath capable of “walking”. As a result, a row of tiles lying on the side can be squeezed out. Overlay steel bath You can use tiles, but you need to leave a gap.
A cast-iron bathtub is most often “built in” into the tiles, rather than placed against an already tiled wall. Such bathtubs are the most reliable, heaviest, and most stable. And they usually last a very long time. Therefore, their integration does not entail any special risks.
There is another important aspect associated with a cast iron bathtub. If you tile the bathroom and only then bring in the bathtub, the finish may suffer. Cast iron is hard and heavy, so it’s not even very swipe on tiles can lead to chips and cracks.
Unlike cast iron, an acrylic bathtub, especially an inexpensive one, may require replacement in just a few years. If it is built into the tile, you will have to break the structure. Before deciding on a sequence option, you need to decide - are you ready for unplanned repairs? If the bathtub is installed in a tiled bathroom, and the joint with the wall is filled only with sealant, there will not be any particular difficulties in replacing it.
The size of the bath also matters. If it is very large (corner models, for example, have such dimensions), covering it with tiles will be, to put it mildly, inconvenient. How will this affect the quality of styling? Will the new bathtub be damaged during finishing work? Maybe such a bathtub should be installed only in a tiled bathroom?
Here, of course, a lot depends on the skill and experience of the tiler. If he is ready to work in such conditions and at the same time guarantees that the bath will not be damaged, you can give preference to the “built-in” option.
If the bathtub is equipped additional functions(hydromassage), “sewing” it into the tile is fraught. If any breakdown occurs, you will either have to put up with it or destroy the structure.

- acrylic bathtubs, especially inexpensive ones
- atypically large baths
- bathtubs with additional functions
- heavy cast iron baths
The exception is, of course, free-standing cast iron bathtubs, including claw-foot bathtubs. They are never built in and often are not connected to the wall at all.
Depending on the budget
Laying tiles only from the side of the bath allows you to save on material. After all, the walls under the bathroom are not tiled.
If renovations are being done in an apartment that will be rented out, it is still advisable to bring the bathtub into the already tiled bathroom. Here it is better to save on the bath itself. Fortunately, changing it, with this installation option, will not be difficult.
Depending on whether the bathroom is used during the renovation
If the owners live in an apartment where renovations are taking place, they want to minimize the period during which the bathrooms are not functioning. In this situation, it will be convenient to bring and install the bathtub into a prepared but not yet tiled bathroom, and then cover it with tiles. While the renovation is ongoing, the bathroom can be used.
Depending on the opinion of the masters
If conditions allow you to choose any of the options, you can trust the craftsmen doing the repairs. Specialists with extensive experience will determine the optimal sequence themselves and tell you about all the possible pros and cons.
1. If a whole tile comes from the side of the bathtub, rather than a short cut, the picture turns out to be more attractive. When planning to bring a bathtub into a tiled bathroom, it is advisable to approximately determine at what height the side will be before laying the tiles.
2. Before caulking the “seam” between the wall and the bathtub silicone sealant, it is recommended to fill the bowl with water until it drains. You can drain the water only after the sealant has dried. It is claimed that if you “seal” an empty bathtub, then after filling it can come off the wall. To protect the bathtub and walls from traces of sealant, before work you need to stick mounting tape on them.
3. If you want to “drown” the bathtub into the tiles that were laid long ago, you can make a shallow groove in the tiles. The width of the groove is the size of the side of the bathtub. The bathtub is pushed into the groove, the joint is treated with sealant and/or moisture-resistant grout.
A rather pressing question these days is whether the tile comes first or the door, and the answers to it are divergent and contradictory. Here everything depends on a number of circumstances, and on the one hand you may need to first lay out the tiles and then install the doors, but in another case you will need to do everything exactly the opposite. And let's look at each of the options in more detail, and decide that first the doors or tiles in the bathroom.
Type of repair
Suppose you decide to renovate your bathroom, and just how large-scale it will be will also contribute to the selection of the algorithm and will tell you to install bathroom doors before or after the tiles. There are at least three options to consider here:
- When the bathroom was previously renovated, but you just wanted to change the tiles, then no one will dismantle the door frame, and in in this case the tiles are laid already at installed door and subsequently adjusted to it.
- In the second case, when a large-scale renovation is planned, taking into account the replacement of the door frame and door. Here the installation must be carefully thought out, and only in this case the tiles are laid first and then the door is installed.
- And the third situation is a complete renovation from scratch. The condition is also applicable here, as in the second case, but note that when installing a door frame, the laid tile may fall off and be damaged, which is why it is installed in the first place door frame, the doors are tried on, and only then the canvas itself is removed, and installation is carried out at installed box. Subsequently, the tiles are either adjusted to the door or the imperfections are hidden by platbands.
Place for laying tiles
Where the tiles are laid is also important. Here, as you know, there can be only two options:
- installation on the wall.
And the sequence of work will also depend on them. Let's take a closer look at both situations and decide what to do first: tiles or doors?
- When the tiles are laid under the door in the bathroom, then the decision is made that the ceramics should be installed first, and then the door should be installed. But at the same time, with the door already installed, the tiles can be placed under the door frame, which will be somewhat more difficult.
- But in the bathroom, prerequisite First, the frame is installed, then the tiles are laid, and only then the trim is installed and the door itself is installed.
 Box mounting option
 From here we can take a lesson that the tiles on the floor are laid first, and the doors only then, but the door frame itself is installed first. And now, in addition to such factors, it is worth paying attention to the pros and cons of installing doors before and after the tiles, which will actually help you decide on the correct sequence.
Why is it better to install doors after tiles?
First, let's look at the factors that indicate that it is necessary to install doors after tiling:
- When installing the door before the tiles, there is a risk of damaging it during finishing.
- In some cases, the design will interfere with the work.
 Connector of tiles with laminate through the threshold
 There are practically no other reasons to install doors after the tiles, but on the other hand, in this case there is a high risk of damaging the tile itself when installing the doors.
To install the door after laying the tiles, it is important to clearly set all levels on the floor and wall, and observe the installation gaps. Most professional craftsmen will answer that it is better to install doors after finishing works. This will save the expensive door from damage during repairs.
 It is possible to file the installed door under the laminate
 Installing the door to the tiles
And now let's look at the factors that indicate that you should install the doors first, and then lay the tiles.
 Floor level difference
 - First of all, the doors are installed in the opening of the previous one, but nevertheless there is a risk of damaging the surface of the floor and walls. In cases where the tiles have already been laid, there is a high risk of damaging it during the work.
- In some cases, it may even happen that the size of the door will slightly mismatch the opening and there will be a need to expand it. Even by just a few millimeters of increase, vibration during installation can cause the tile to burst or simply fall off.
- In addition, as a result of the load on the walls, the doorway may be slightly skewed, so it will no longer be possible to install the door perfectly straight and it will be blocked. Most of the walls are not level, and just installing the box perfectly plumb will serve as a beacon for their alignment in the future.
Thus, it becomes clear that you should not lay the tiles forward at all, since they can subsequently be destroyed and damaged.
Therefore, it all depends on what you choose.
And as a result, multiple statements that the tiles are laid first, and only after that the door is installed, are erroneous. At a minimum, by carrying out work in this way, you risk spending extra money, since you will have to redo part of the wall cladding. IN best case scenario, of course, everything will work out well, but at the same time the risk of damage is too great.
As a last resort, when finishing, you can remove the door leaf itself, also remove the trim; if this is not possible, then cover them with film, which will help avoid contamination and damage.
It is important to take into account that doors absorb moisture, and installation can only be done after the plaster has dried and other wet work has been done.
High humidity in the room is indicated by condensation on the windows.
Otherwise, if there are small gaps in the frame, the doors will begin to scrape, and after repairs, large gaps may appear or the door leaf may even twist.
Thus, in the question of what comes first: a tile or a door, for the most part we choose the option based on the situation. And in addition, we offer you several videos in which experts expressed their opinions.