Digital entrance intercoms. What to do if the intercom does not work and what malfunctions occur
As you might guess from the title, this article will focus on devices designed to prevent unwanted guests from entering the entrance. Let's consider a coordinated multi-address intercom from "Cyfral" in order to form a general idea about multi-addressing, the principle of connecting an access control system, and how to annoy a loud neighbor.
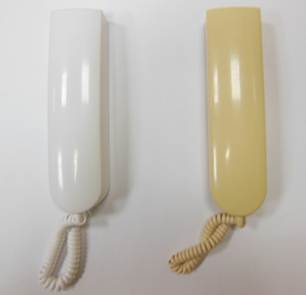
To begin with, let's look at two intercom handsets - coordinate and digital, I took the most ordinary ones from LASKOMEX.

As the autopsy showed, the filling is somewhat similar, at the same time, there are a couple fundamental differences. The figure on the right shows the digital version. The L- and L+ terminal blocks assume the presence of two wires coming from the digital switch; as a rule, it is located inside the entrance in a low-current panel. The polarity of the wires, if it is not possible to get to the switch, is determined by a multimeter when measuring direct current up to 20V, voltage is around 7.5V. Jumpers marked 1, 2, 4, 8, 16, 32, 64, 128 are directly responsible for addressing. For example, number 110 is dialed like this: jumpers 64, 32, 8, 4 and 2 are turned on.
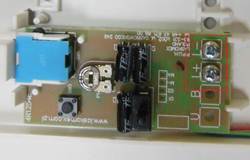
Check: 2+4+8+32+64=110.
The internals of the coordinate brother are less interesting. It is connected, like the digital version, via two wires, the polarity is determined directly during a call to the subscriber, the pulse is somewhere around 9.5V.
When going to a site connected to an entrance intercom system, it is always advisable to have both handsets. They will always help us diagnose the performance of the line and its type.
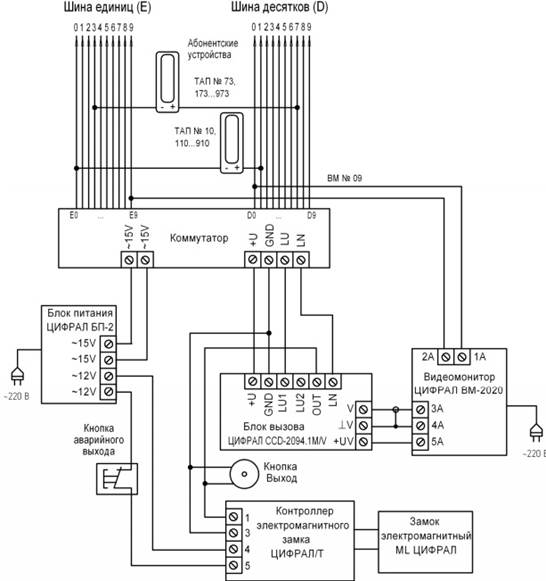
Let's consider schematic diagram intercom connections based on the digital coordinate switch KMG-100.
It is worth paying special attention to the fact that a power supply is used that generates alternating current nominal 12V and 15V. Tires of tens and ones are our LN+ and LN-. Tens are connected to “LN+”, ones to “LN-”.
Let's evaluate the connection diagram based on the BKM-440M digital switch from VIZIT. In case we are not using a camera, the terminals are called “HS+” and “HS-” (CH6). The fourth and fifth channels allow us to additionally connect the camera; oddly enough, this requires as many as four wires.

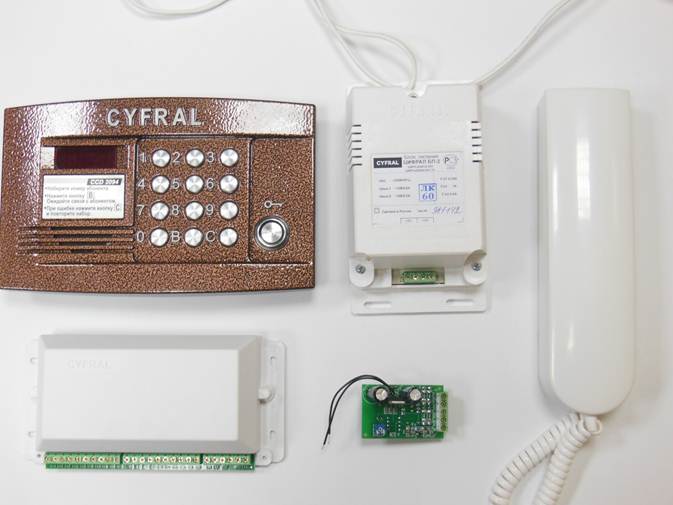
The following figure shows the following equipment:
1) Call block CCD-2094
2) Switch DIGITAL KMG-100
3) Power supply unit DIGITAL BP-2
4) Controller DIGITAL/T
Now let's talk about interface modules. What are these devices and what are they used with? The figure shows a video intercom, which is not compatible with a two-wire line, but is connected via all known four wires (+12V, ground, audio, video). The interface module, as you may have guessed, is designed to emulate two-wire communication.
There are two types of interface modules: coordinate and digital.
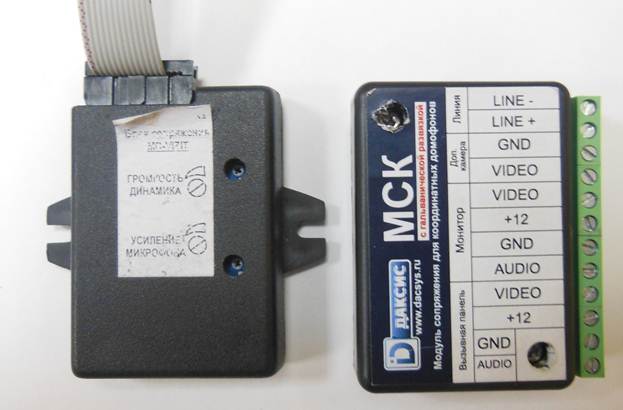
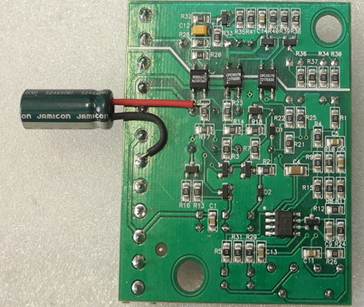
From the figure you can understand that connection does not require special effort, however, there are a number of pitfalls. For example, even with correct connection The interface module will refuse to pair. The reason lies in the intercom, or more precisely in the potential difference between the GND and AUDIO terminal blocks at the time of the call. The solution came directly from Daxis support. It was proposed to install a capacitor with a capacity of 200 microfarads or higher.
There is another interesting point, I met him directly at the site. Having connected the coordinate interface module to the intercom and the line, the calling panel refused to dial and gave an error. As it turned out, the reason was hidden in the polarity of the LN+ and LN- lines. The fact is that when calling, the polarity of the line changed and the final impulse did not pass through. The equipment in this case was from VIZIT.
In conclusion, one more quote from practice. Standard entrance with digital intercom kit. We installed the CDV-70A intercom from COMMAX. Its peculiarity lies in the integrated digital interface module, which prompts the question: “How to issue an address to the module if there are no usual jumpers?” Helped out those. support from COMMAX. The algorithm was as follows:
1) Turn off the monitor.
2) While holding the lower right button, turn on the monitor with the toggle switch (ON/OFF).
3) call the subscriber 3-4 times (call, reset, call).
And indeed, on the third call, the intercom picked up, and the address, apparently, was saved in the energy-intensive memory of the interface module.
This article will be updated as innovations occur in the world of intercom.
Intercom at the entrance or office building increases the level of security: protects against the entry of persons who could litter, steal something or cause harm to property and people’s health. Digital intercoms– popular equipment that has a number of advantages for use in security systems:
- unlike coordinate ones, they do not require countless wires going to each apartment. This means a significant simplification of the installation process;
- assume the ability to connect up to 255 subscribers to 1 calling panel;
- have an open architecture, thanks to which most failed units can be replaced without reinstalling the entire system;
- require minimal maintenance.
Digital intercoms have flexible capabilities for adapting to security systems of different functionality and scale.
Our company offers customers reliable intercoms digital type from certified brands whose products meet international quality standards:
- push-button and touch models with excellent protection against mechanical damage and weather conditions;
- intercoms with high-quality “filling”, which exhibits excellent resistance to external actions, be it burglary attempts or severe frosts/heat;
- stylish minimalist design that will fit into any door design or building as a whole.
The catalog also contains the necessary components for organizing intercom networks: processors, concierge consoles, power supplies and electronics units. All intercoms are equipped with modern security mechanisms against unauthorized opening and copying of keys.
We offer digital intercoms at a low cost, as well as installation services for any intercom network. An experienced team of craftsmen is working for you, who install intercom systems with pinpoint precision and accuracy!
If you have not yet decided on the choice of intercom for your home/office, call our consultant. We will help you choose an intercom model that meets all your needs, while eliminating unnecessary functions and configurations.
|
Digital intercom PRO-TM. Antique silver color |
 Intercom PRO-TM. Walnut color |
 Intercom Pro-TM. Mahogany color |
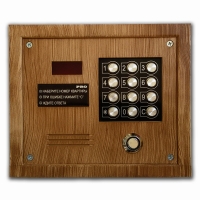
Intercom with digital addressing PRO (monoblock) is designed for organizing authorized access to the entrances of residential multi-apartment buildings. Provides access using electronic identifiers (keys or key fobs) using one of the following protocols: DS1990A, EM-Marine or Mifare. It is used both for new installation and for repair replacement of intercoms and calling panels with IR dialing ( digital intercoms brands LASKOMEX, PROEL, KEYMAN, RAIKMANN, ... and intercoms CD4100). The PRO monoblock intercom replaces a pair of devices: calling panel (remote/call unit) + electronics unit (processor) of the listed brands.
Has digital addressing of subscriber devices, up to 255 subscribers; three-digit, seven-segment display; built-in controller of iButton identifier keys of the DS1990A series with protection circuits against supply to the contactor high voltage; structurally, the front panel is aluminum/steel, with a total thickness of 5.5 mm; double-spring push-button keyboard with a thrust steel plate; Keypad backlight; built-in electrical circuits for controlling and demagnetizing the electromagnetic lock.
The PRO intercom works with digital subscriber devices LC-8d, LM-8d, UP-4Ts, TDTs, TKP-12D and others similar in the scheme of connecting digital audio stations via a two-wire line. The maximum number of AUs is 255. Entered numbers are from 1 to 999.
Pre-installed non-volatile memory ensures operation with 1000 TM keys. It is possible to increase the number to 2000, 4000 (correspondingly, the time for writing and reading TM keys increases when the memory is maximally full). The electromagnetic lock is powered and controlled from the intercom. The electrical circuits used in the intercom for removing residual magnetization from the armature of the electromagnetic lock allow the installation of such locks in a minimal configuration (without control and demagnetization boards).
Development and support: RTM LLC
Distinctive characteristics:
Anti-vandal housing. Front panel design: aluminum/steel with a total thickness of 5.5 mm
Built-in electric shock protection circuits
Connecting an electromagnetic lock without control and demagnetization boards
Push-button double-spring keyboard with steel support plate
Keyboard field backlight
Light and sound indication
Quick installation and connection
High operational reliability and ease of maintenance
Main technical characteristics:
Maximum number of subscriber devices: 255
Entered numbers: from 1 to 999
Working with identifiers of one of 3 standards: DS1990A / Em-Marine / Mifare
Additional controller modes: *AUTO COLLECTION*, *TEST*
Maximum number of writable keys: from 1000 to 4000
Supply voltage: 15V(DC)
Current consumption: no more than 0.3A (excluding EM lock) Recommended power supply - RS-25-15 Mean Well
Operating operating temperature: -40°С to +50°С
Body paint: powder coating
Color: antique silver (default) / antique copper / black moire / any of the Customer’s choice (for a batch of 10 pcs.)
Size (mm): 210x180x35
Weight (kg): 1.0 kg
|
|
Head of the development department, deputy director Vladislav Kirichenko.
Digital or coordinate intercom?
Users of an entrance intercom, if they need to replace the handset, will have a question about which system - coordinate or digital - is used in the structure of the intercom.
This information is necessary to know because these technologies have large differences in the design of intercom handsets. Coordinate and digital intercom technologies also differ in connection method, which must be taken into account when installing devices.
In a digital intercom system, all apartment subscriber handsets are connected to one line, which is stretched along the riser of the entire entrance of the house and has taps for each apartment.
This line is laid with a low-current two-core wire from the entrance intercom to the receiving tube of each apartment. All tubes are connected in parallel, observing the polarity of connection to the tube terminals.
The apartment number is set on the circuit board of each subscriber device by installing jumpers.
For digital access devices, the most commonly used subscriber panels are Lascomex LC-8D or Laskomex LM-8D. If you open the cover on the tube body, you can see the location of all the elements on the circuit board.
At the top right there are jumpers that are used to set the subscriber number. The apartment number is dialed in the following way: the sum of the numbers that are connected by jumpers must correspond to the apartment number.
For example, for apartment No. 73, you need to connect terminals with values 64.8 and 1 with jumpers. The remaining unnecessary elements (jumpers) are removed from the circuit board.
At self-replacement the receiving panel of the intercom, you need to install jumpers on the new handset in the same way as they were installed on the previous panel.
The circuit board also contains:
- power switch (left),
- microphone and speaker volume control (top)
- terminals for connecting to the line leading to the entrance intercom (bottom).
If an intercom of a combined model is installed at the entrance, then the coding is carried out on the rear panel of the intercom, or in the interface module. Intercoms are very sensitive to the quality of the signal received from the entrance.
An intercom operating using a coordinate system has a different operating principle. The switch installed on the entrance coordinate intercom is connected by a multi-core cable laid along the riser of the entrance to each individual apartment.
All wires in the wire have a color assigned to them: “0” - Blue colour, “1” - red, etc. Inside the cable there are several cores, each with ten wires. The wire is selected based on the number of apartments that are planned to be connected to the calling unit. So for a five-story building you will need a cable with two cores of 10 wires, and for a nine-story building - 4 cores.
Each subscriber panel of the coordinate intercom is connected to its own pair of wires, which determines the apartment number. Therefore, such receiving units do not require coding, unlike digital systems. When connecting, it is important to observe the polarity of the wires.
Panels used for coordinate systems, simpler in design and more reliable in operation. They contain fewer elements, therefore have less weight and size. For example, the UKP-12 coordinate panel is even visually different from the Lascomex LC-8D or Laskomex LM-8D tubes. Below is typical diagram connecting a multi-apartment intercom system of this type.
Digital or coordinate intercom?
When replacing the entrance intercom tube or installing a combined video intercom, the question arises: which system is installed at the entrance, digital or coordinate? In this article we will try to reveal the differences and ways to determine the type of system of your entrance intercom.
Digital intercom is characterized by the fact that all subscriber handsets are connected to one line stretched along the riser of the entrance. That is, a two-core cable runs through a low-current channel - the main line of the entrance intercom. All tubes are connected in parallel, according to polarity. The difference is that on the handset board itself the apartment number is set using closed jumpers. Let's look at the design of the tube using a common example.
The image shows the internal circuit board of the handset. On the right side of the board there are jumpers for coding the apartment number, on the left there is a power switch, at the bottom there are marks for connecting the intercom line, and on top there is a volume control for the speaker and microphone.
The apartment number is encoded as follows: the sum of the numbers of closed jumpers must equal the number of your apartment. For example: Your apartment No. 73. We close the jumpers with the values 64, 8 and 1. We remove the remaining jumpers from the board.
If you decide to change the intercom handset, then the jumpers are set on the new one in the same way as they were on the old handset. Tubes for digital entrance intercom: Lascomex LC-8D Lascomex LM-8D.
When installing combined models of video intercoms, encoding is carried out on the rear panel of the video intercom or in the interface module, if installed external unit connections to the access system. Video intercoms are more sensitive to the connection quality of the access audio signal, so conventional handsets can work more stable and better. The rule “the simpler the system, the more reliable it is” applies to this situation perfectly.
Coordinate intercom works on a completely different principle than digital. A switch is responsible for communication with apartment handsets, from which a train of wires runs along the access riser. It contains a large number of veins, which are divided into tens and units. That is, the main wires are divided, as a rule, by color, of which each wire of unit 0 is blue; 1 - red; 2 - white; 3 - green, etc. A dozen are usually 2-3 wires, based on the number of apartments in the entrance. In a five-story building there will be 2 of them, and in a nine-story building there will be four.
The tubes are each connected to their own wire, where the value gives the apartment number. The required ten and one from the train are used. Thus, apartment coding on such handsets is not required because each handset receives its own switch signal, unlike digital systems.
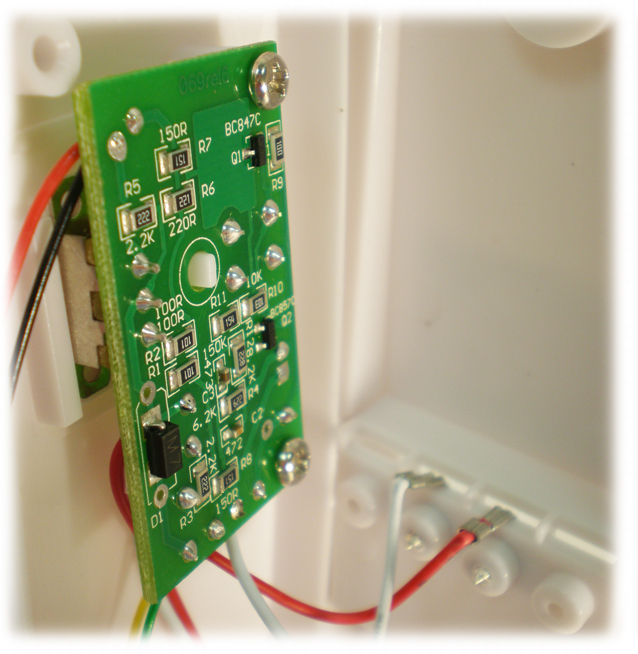
Coordinate tubes are simpler in structure and therefore cheaper. The image shows the internal board of the UKP-12 coordinate tube. As you can see from the picture, the board is even visually different from the digital tube. It is smaller in size and contains fewer elements. The main thing when connecting a coordinate tube is to maintain polarity.
Tubes for coordinated entrance intercom: UKP-7, UKP-12, UKP-12M, Laskomex LM-UKT
The most famous and widespread coordinate intercoms are Vizit, Cyfral and Eltis.
This way you can determine the type of intercom installed at the entrance and not make a mistake when choosing a combined video monitor model. Many assume that digital systems better than coordinate ones, but this is misleading. The main difference is the communication algorithm, which does not determine the final quality of the intercom for a specific user. All systems are provided to residents good quality communication, if the entrance intercom is serviced by qualified specialists and configured correctly. Systems are selected by companies servicing them based on their experience and specialization.