By what means and how to open the intercom with Metacom if there is no key. Digital intercom "Metakom". User manual
Today, installing an intercom is no longer a curiosity. This small, but extremely convenient tool will help secure your home in these turbulent times. Before ordering a particular device, you should understand that it is a complex system, which, depending on the place of application, has its own types and functions. One of the most popular among buyers is the Metakom intercom.
In most cases, the intercom connection is made in apartment buildings. Such devices allow you to open the door using a lock, code or through a signal from the apartment. Thanks to these innovations, you don’t have to worry about thieves breaking into your home.
In addition, modern intercoms have very complex programming, which makes entering the premises completely impossible.
What are the advantages of this model?
There are several types of intercoms:
- Apartment buildings;
- Audio intercoms;
- Video intercoms.
Metakom is the simplest device that will restrict access to a residential premises by unauthorized persons. Its connection may take several days: it all depends on the number of residents. Although the installation itself is easy, the work requires care.
When installing, specialists use a special scheme, which helps to prevent errors during installation and various types malfunctions in subsequent work.
Consists of a specially built-in audio panel, which is mounted from the outside and from the inside premises, for example, in the entrance, on doors or gates.
If you decide to install an audio intercom yourself, then the instructions or diagram that is included with the device will help you.
In addition, a special tube is installed inside the room. The device has a microphone on both sides for two-way communication. The call is made by entering a special code, for example, an apartment number. The door opens remotely: after the user enters special code or after pressing a button from inside the home.
Modern Metacom devices also include wireless audio models that are easy to install and easy to use. Such models have gained wide popularity among users and are most often used among owners of private homes, office, and industrial premises.
You can find out more detailed information about intercoms of this brand by watching this video:
Due to the fact that the package includes a special circuit, even an amateur can install the device. In addition to the above devices, video intercoms are also becoming increasingly popular. It may include a black-and-white or color monitor and a special panel with a video camera, microphone, infrared illumination, electromechanical lock. At the client's request, an additional surveillance video camera is connected to the video intercom. Connecting such an intercom yourself will not be difficult.
How to properly connect the device?
Before you start studying the device connection diagram, make sure you have the following tools:
- Insulating tape. It will help protect users from accidents after the work is completed;
- Drill;
- Dowels;
- Pliers;
- Alabaster;
- Self-tapping screws.
You can install an intercom yourself or seek help from a specialist.
Before turning to the installation instructions, you should decide on the model of the device. IN in this case It is recommended to rely on the required functions of the device, the estimate, as well as the type of protected object. The connection diagram itself is very simple; the only thing you should pay attention to is the correct routing of all wires. In addition, the operation of the device directly depends on the quality of the settings of all modules and the connection of their wires.
You can view more detailed information on how to install an intercom in this video:
For an apartment the most simple option connection will be a set of handset and calling device. If you connect a video intercom, then in this case you will also need a base with a screen and a video peephole, which will need to be installed on the front door.
Before installing the intercom, it is recommended to decide in advance where exactly the intercom handset will be located. Usually its location is near the door. As already mentioned, laying cables is the most labor-intensive process. The most convenient and harmless method for walls is to lay wires in special plastic channels. All that is needed is to connect the wires correctly (usually there are only four, maximum six). Pay attention to the quality of the ring ring, as well as the programming of the device.
What is the best way to connect the intercom handset?
In addition, you should take seriously the installation of the handset itself in the apartment, since the length of the wire from the intercom should not exceed thirty to forty meters from the device, otherwise the signal will not arrive. During installation, there is a separate tube diagram included in the package, which is recommended to be followed.
 Appearance and location of intercom controls
 The installation principle is simple: special marks are made at the place determined for the tube, where holes are then drilled. Then, using special choppers previously mounted in the hole, self-tapping screws are screwed in. Wires are supplied to Metacom, and the entire device is eventually placed in its proper place.
When connecting some types of intercoms, the use of an electric lock is provided. In most cases, such a lock is used in private houses or cottages. This way you can open a door or gate from a long distance.
 Equipment connection plan
 If the installation of the Metakom intercom was carried out correctly, then the device is completely ready for operation. If you have any doubts about the correct installation, you should contact a professional.
At the entrances to apartment buildings Metakom intercom is often used. The system consists of two working modules: a processor connected to a power supply, and a digital panel. Over two hundred and fifty subscriber handsets can be connected to the intercom. The controller allows you to open the TOUCH door MEMORY keys(over five hundred keys fit in memory).
It is also possible to open using a four-digit digital code, individual for each apartment.
User manual
Emergency commands
E – malfunction of one infrared ray.
Err – more than one beam. Disabling the keyboard.
E0 – failure in RAM. The failure cannot be repaired; the device must be replaced.
E2 – connection fault with the subscriber handset.
Acoustic adjustments of the Metakom intercom
1. Linear balance.
2. Loudspeaker gain.
3. Microphone gain.
Custom code programming
Important: the procedure is carried out with the subscriber's handset off-hook.
To set an individual code for the Metacom intercom you need:
1. Dial the apartment number on the keyboard.
2. When the connection appears, press the “key” and hold so that the apartment owner presses the open button on the indoor unit.
3. Enter a new four-digit code for the Metacom intercom.
Custom Key Programming
1. Attach the master key to the reader. This should be followed by three beeps.
2. Dial the apartment number and attach the user key.
How to hack Metacom intercom
Hacking a Metacom intercom may be necessary, for example, if you forgot your digital code and lost the key. The house is empty. There are few options: either wait for one of the neighbors to appear, or try to enter yourself.
This scheme is only possible if the intercom installers did not change the factory codes.
1. Press call. Enter the first apartment number in the entrance. Press call again. The message “Code” will appear. Enter 5702.
2. If this code does not work, you can try the following option: 65535, call button, 1234, call again, 8.
3. Another possible combination: 1234, call, 6, call button again, 4568.
4. Sometimes the Metakom intercom can be opened using a magnetic key without firmware.
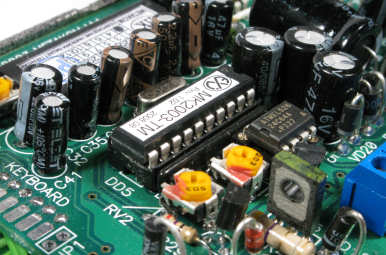
The MK2003 intercom program is supplied in the form of a programmed microcontroller chip (MCU, Atmel AT89C4051-24PI, DIP-20 package) and is intended to replace a previously installed MCU.
Carefully remove the old MCU from the socket, lifting it, for example, with a sharp screwdriver, alternately from one end to the other. Do not allow the microcircuit to become too distorted in the socket to avoid deformation of the terminals. Install the new MCU, respecting its orientation (the first pin is at the top left).
List of main differences from version 1.0:
Fixed a bug that allowed the use of “universal” keys (“all-terrain vehicles”), including Proxi all-terrain vehicles for the MK2003-RF panel;
Added filter for unprotected ( unfinalized) duplicate keys based on the blank TM2004(recorded on the MKA-01U adapter and other duplicators that do not perform finalization). The filter can be turned on or off in service mode (see below);
Added a filter for duplicate keys based on a blank TM-08 (RW1990). The filter can be turned on or off in service mode (see below);
Added a filter for dongles operating using the Dallas-compatible protocol (DS1990A, TM2003, etc.). When the filter is enabled, such keys cannot be used as subscriber keys. This filter only applies to keys that are not detected, such as TM2004 or TM-08 (RW1990). Therefore, if you need to prohibit All Dallas-compatible keys, you must also enable the TM2004 and TM-08 filters. If only TM2002 keys were used during the initial installation of the intercom, turning on all three filters will protect the intercom from duplicate keys based on Dallas-compatible blanks (even if the original for the copy was a TM2002 key). The filter can be turned on or off in service mode (see below);
Added sound signal, which accompanies key filtering. It can be used to distinguish filtered keys from keys not recorded in the intercom memory;
Added the ability to call special subscriber(concierge, duty apartment, etc.) by pressing one button (“0”);
Added auto collection function keys;
Now each controller has unique serial number, which can be seen without entering service mode. This feature may be useful in the event of theft of the calling panel;
If the calling panel is operating in common code mode and the common code is reset, then when the call button is pressed, the “COd” message is not displayed on the indicator;
In service mode when performing functions " 1 " (general/individual code), " 2 "(TM2004 filter), " 8 " (filter TM-08) and " 7 " (Dallas filter) now shows the current installation state ("o-I" or "O-i");
In service mode (subscriber settings) when performing functions " 8 " (checking the status of the uniphone) and " 9 " (comparator setting) the speakerphone circuit is now turned on. This allows you to more accurately adjust the comparator thresholds;
The button for opening from the entrance now works not only in standby mode, but also in the mode of talking with a subscriber or dialing a number on the keyboard;
You can now open the lock with a TM key in all operating modes of the intercom;
Warning signals to subscriber handsets when the lock is opened with an individual code or key (if this option is enabled in service mode) are now sent in all modes of operation of the intercom, including the mode of conversation with another subscriber (in this case, the conversation with the current subscriber is interrupted for the time required to issue a warning - about one second);
Table of individual codes N4000000 in new version The program does not contain subscriber codes. Thus, the possibility of opening the door using the codes of this table is eliminated (if, when installing the intercom, the number of the “factory” table was not changed or the “common code” mode was not selected). When generating a table of individual codes N4000000 in service mode (SYS-1-4000000-#) or when performing a full EEPROM initialization (SYS-4), all subscriber access codes are deleted. The individual code table N4000000 remains the factory default setting, but does not contain any codes;
When reading the TM key in standby mode, the message “-t-” and the display are not displayed, only a sound signal is given.
Key filter management:
After replacing the microcontroller on the intercom board, as well as after performing a full initialization or transferring settings from the computer to the intercom using a DS1996L key or a 24C64 chip, all filters turned off. Those. all keys work allowed. To manage filters, enter the service mode ("") and perform the following steps:
| To enable the TM2004 filter (the keys will be prohibited): | |
| To turn off the TM2004 filter (the keys will be allowed): | |
| To turn on the TM-08/RW1990 filter (the keys will be prohibited): | |
| To turn off the TM-08/RW1990 filter (the keys will allowed): | |
| To enable the Dallas filter (the keys will be prohibited): | |
| To turn off the Dallas filter (the keys will be allowed): |
Please note that when calling a function, the display shows its current state ("O-i" - the filter is on, "o-I" - the filter is off).
The rest of the functioning of the intercom, incl. in service mode, does not differ from the standard version and corresponds to what is described in the passport. The data structure of the EEPROM memory chip remains the same, therefore, when replacing the controller in an on-site intercom, reprogramming the subscriber keys and changing any settings not required.
When working with the control program for the MKA-01U adapter, you no longer need to check the “Prohibit adding keys from the calling panel” checkbox on the “ tab General settings" Since this flag is set by default in the program, it is recommended to clear it before writing data to a file, 24C64 chip or DS1996L key.
Documentation:
| Description | File name or Adobe Acrobat Reader. A way to quickly determine the program version in an intercom:
Microcontroller on the intercom board |