Entrance door controller z 5r. Now about the nuances. Typical elements of the simplest system
) as standalone controller to restrict access to entrances residential buildings, in the premises of administrative institutions, industrial enterprises.
The Z-5R controller allows you to connect the following equipment:
· contact key reader;
· contactless reader emulating the DS1990A key protocol;
· a lock that can be opened by both applying and removing voltage (installing a jumper on printed circuit board controller - output inversion);
· lock opening button (normally open);
· external buzzer, external LED;
· open door sensor.
When working in conjunction with the AC-Z computer adapter (plus the "Z Base" program), it becomes possible to maintain a key database in a PC and quickly change (load/unload) the list of keys in the Z-5R controller (using the DS1996 key or only using the adapter and PC).
| Built-in non-volatile memory | 8 KB |
| Maximum number of keys: | up to 680 pcs. (DS1990A) |
| -simple keys | -for passage |
| - master key | -for programming |
| - locking key | -to block passage (can be used as a simple key) |
| Presence of jumper type locks | + |
| Light and sound indication of operating and programming modes | |
| Ability to write the contents of the controller's memory to the DS1996 key and vice versa. Possibility of programming the controller using the AC-Z adapter and a PC without DS1996 | |
| Setting the lock opening duration: | from 0 to 255c (factory - 3 sec) |
| There is a demagnetization circuit | |
| Exit: | MOS transistor. |
| Operating voltage: | 12V DC |
| Current consumption (standby mode) | 4mA |
| Switching current | up to 5A |
| Protection against incorrect activation | + |
| Overall dimensions, mm: | 54x31x14 |
| Working temperature: | From -40°С to +50°С |
Z-5R controller programming instructions
First activation - recording master keys
(controller memory state is erased, do not install jumper!)
Short beeps are issued for 16 seconds. Which indicates that the controller’s memory has been erased and the mode for adding master keys has been set.
At the moment the signals are issued, touch the contactor with the key - this will lead to its recording in the controller’s memory as a master key. The cessation of issuing short signals confirms the successful recording of the first master key. To add new master keys, touch the contactor with them one by one with a pause between touches of less than 16 seconds. For each touch with a new key, the controller emits a short confirmation signal. Exit from the mode of adding master keys occurs automatically 16 seconds after the last touch. The controller informs about exiting the mode with a series of 5 short signals.
In the future, master keys are used for programming.
If it was not possible to record a single key, repeat the activation.
* Entering the master key recording mode when power is applied only when the key database is completely empty (neither simple, nor master, nor blocking)
Lock programming modes
| Modes | Entering programming mode | Designations |
| 1. Adding simple keys | 1 d M | 1…4 - number of key touches d - long touch (about 6 seconds) k - short touch (less than 1 sec) M - master key P - simple key B - blocking key |
| 2. Adding blocking keys. | 1 d M | |
| 3. Adding master keys. | 1 k M, 1 d M | |
| 4. Erasing individual keys. | 2 k M, 1 d M | |
| 5. Erase all keys (controller memory). | 3 kM, 1dM | |
| 6. Setting the door opening time. | 4 to M | |
| 7. Recording the controller memory into a special key memory. | 1 d M | |
| 8. Recording the memory of a special key into the controller memory. | 1 d M | |
| 9. Working with a locking key. | 1 d B |
General properties of programming modes
To switch the controller to the desired programming mode, short (less than 1 second) and long (about 6 seconds) touches with the master key are used. There is a time limit for working in programming mode after the last touch (about 16 seconds), after which the controller returns to its initial state, informing with a series of five short signals.
1. Adding simple keys (1 d M)
Touch and hold the master key in the contactor (long touch). At the moment of touch, the controller will emit a short signal confirming the identification of the master key, and after 6 seconds a second signal indicating that the lock will enter the mode of adding simple keys. After this, the master key should be removed. To add new keys, touch them one by one to the contactor with a pause between touches of less than 16 seconds. For each touch with a new key, the controller emits a short confirmation signal. If the key is already in memory, then two short beeps. The mode is exited either automatically 16 seconds after the last touch, or when touched with the master key. The controller informs about exiting the mode with a series of 5 short signals.
2. Adding blocking keys (1 d M)
In the mode of adding simple keys, you need to touch the contactor with the selected key and hold for about 9 seconds until a long signal (i.e., first there will be a short signal, a long signal about adding a blocking key). If you do not add more keys, then there will be a series of short signals - exit from the programming mode.
3. Adding master keys (1 k M, 1 d M)
Briefly touch the contactor with the master key (short touch). At the moment of touch, the controller will emit a short signal confirming the recognition of the master key, and no more than 6 seconds later, touch and hold the master key in the contactor (long touch). At the moment of touch, the controller will give two short signals indicating the second touch with the master key in programming mode, and after 6 seconds one signal indicating the lock will enter the mode of adding master keys. After this, the master key should be removed. To add new master keys, touch them one by one to the contactor with a pause between touches of no more than 16 seconds. For each touch with a new key, the controller emits a short confirmation signal. If the key is already in memory as a master key, then there will be no signals. Exit from the mode of adding master keys occurs automatically 16 seconds after the last touch. The controller informs about exiting the mode with a series of 5 short signals.
4. Erasing simple keys using a master key (2 k M, 1 d M)
Briefly touch the contactor with the master key twice (short touches). At the moment of the first touch, the controller will emit a short signal confirming the identification of the master key. At the moment of the second touch, the controller will emit two short signals indicating the second touch with the master key in programming mode, and after no more than 6 seconds, touch and hold the master key. key in contactor (long touch). At the moment of the third touch, the controller will emit three short signals, and after 6 seconds one signal indicating that the lock will enter the mode of erasing simple keys. After this, the master key should be removed. To erase the keys, touch them one by one to the contactor with a pause between touches of no more than 16 seconds. For each touch with an erasable key, the controller emits a short confirmation signal. If the key is not in memory, then two short beeps. The mode is exited either automatically 16 seconds after the last touch, or when touched with the master key. The controller informs about exiting the mode with a series of 5 short signals.
5. Erase controller memory (3 kM, 1 d M)
Briefly touch the contactor with the master key three times (short touches). At the moment of the first touch, the controller will emit a short signal confirming the identification of the master key. At the moment of the second touch, the controller will emit two short signals indicating the second touch with the master key in programming mode. At the moment of the third touch, the controller will give three short signals indicating the third touch with the master key, and after no more than 6 seconds, touch and hold the master key in the contactor (long touch). At the moment of the fourth touch, the controller will emit four short signals, and after 6 seconds a series of short signals indicating erasing the controller’s memory and exiting the programming mode. After this, the master key should be removed. The transition to programming mode will be carried out automatically after turning on the power.
*-When the entire database is destroyed using the master key, the programmed opening time is not erased.
6. Programming opening time (4 kM)
Briefly touch the contactor with the master key four times. At the moment of each touch, the controller emits signals confirming the identification of the master key, and their number will correspond to the number of touches. At the moment of the fourth touch, the controller produces four signals respectively and goes into the opening time programming mode. Within 6 seconds from the last touch, you must close the door button for the time required to open. After releasing the button, the controller will generate a signal and record the time in memory.
7. Write controller memory to DS1996 memory (1 d M)
Prepare DS1996 for recording*.
Touch and hold the DS1996 in the contactor. When touched, the controller will emit a short signal confirming that the DS1996 key is set to recording mode (if there are two short signals, then you need to repeat preparing the DS1996 using a PC). Then wait for the operation to complete until a series of short signals (if after 5 seconds there are no signals, then the operation repeat).
8. Write DS1996 memory to controller memory (1 dM)
Prepare DS1996 for reading*.
Switch the controller to the mode of adding simple keys. To do this, touch and hold the master key in the contactor. At the moment of touch, the controller will issue a short signal confirming the identification of the master key, and after 6 seconds a second signal indicating that the lock will enter the mode of adding simple keys. After this, the master key should be removed.
Touch and hold the DS1996 in the contactor. When touched, the controller will emit a short signal confirming that the DS1996 key is set to recording mode (if there are two short signals, then you need to repeat preparing the DS1996 using a PC). Then wait for the operation to complete until a series of short signals (if after 5 seconds there are no signals, then the operation repeat)
Upon completion of recording, the controller will issue a series of short signals indicating completion of recording and exit from programming mode.
*- DS1996 is prepared using a computer and an AC-Z adapter.
9. Working with a locking key (1 dB)
The locking key is designed to work:
· as a simple access key in the general operating mode of the controller (i.e., access is open to all simple keys registered in the database)
· to switch the controller to blocking mode (in this mode, only blocking keys open the controller).
· to switch to normal mode
The locking key opens when released.
To switch to the blocking mode, apply the blocking key to the contactor and hold for about 3 seconds until a long continuous period appears, which corresponds to turning on the blocking mode.
In this mode, all simple keys are blocked. When using a simple key, the controller does not open, but produces many short signals.
Exit from blocking mode to general mode is done
- similar to switching to blocking mode using a blocking key (up to a series of short signals)
- short touch of the master key (series of short signals)
Lock control (opening).
Touch the contactor with the key. If the key code matches the code in the controller’s memory, the lock is set to the open state for a period not less than the “opening time”. The lock is set to the closed state after the door reed switch opens (the door is closed) only after the “opening time” has expired. If the door is continuously open (the reed switch contacts are closed), the controller signals for 15 seconds about the state of the open door.
In the absence of a reed switch, the closed state occurs after the “opening time”.
If the key code does not match the code in memory, the controller emits two short signals confirming the reading, but indicating a mismatch of codes.
Press the door button. The lock will be in the open state for a period not less than the “opening time”. The lock is set to the closed state after the door reed switch is opened (the door is closed - the electrical contacts of the reed switch are open) only after the “opening time” has expired. In the absence of a reed switch, the closed state occurs after the “opening time”. If the button is held down, the lock is in the open state.
The order of using jumpers.
The controller comes with one jumper, which is used in cases of programming and installation in the electromechanical lock mode (five positions in total - see the controller connection diagram).
Position No. 1- sets the logic of the power cascade.
· without jumper - electromagnetic lock, in the closed state, voltage is applied;
· with a jumper - electromechanical lock, in the closed state the voltage is removed.
Position No. 2- to erase the controller memory. To do this, turn off the power to the lock, install the jumper and turn on the power. Upon completion of erasing, a series of short signals.
*-All keys are erased, the programmed opening time is erased (the factory default is set to 3 seconds)
Position No. 3- to switch to the “adding simple keys” mode. To do this, turn off the power to the lock, install the jumper and turn on the power. After the signal, the controller is located:
· in the mode of adding simple keys (you can add simple, blocking keys without a master key),
· for recording information using DS1996 (without a master key) to the controller and vice versa. When touching DS1996:
- signaling with one signal - the DS1996 key is ready for reading or writing. Next, wait for the operation to complete until a series of short signals (if after 5 seconds there are no signals, then repeat the operation)
- if there are two signals, then the DS1996 key is not prepared.
Position No. 4- standard place, does not affect the operation of the controller.
Regulation No. 5- the key database created in the PC can be written to the controller connected to the PC via the AC-Z adapter.
http://pandia.ru/text/78/594/images/image003_67.jpg" width="134" height="53 src=">a lock that can be opened by both applying and removing voltage (installing a jumper on the controller printed circuit board - output inversion);
· lock opening button (normally open);
· external buzzer, external LED;
· open door sensor.
http://pandia.ru/text/78/594/images/image005_102.gif" width="187">Base Z ") it becomes possible to maintain a key database in a PC and quickly change (load/unload) the list of keys in the Z controller -5R (using DS1996 dongle or just using adapter and PC).
Basic specifications controller Z-5 R.
Built-in non-volatile memory | |
Maximum number of keys: | up to 680 pcs. (DS1990A) |
Simple keys | To pass |
Master key | For programming |
Locking key | To block passage (can be used as a simple key) |
Presence of jumper type locks | |
Light and sound indication of operating and programming modes |
|
Ability to write the contents of the controller memory to the DS1996 key and vice versa Possibility of programming the controller using an AC-Z adapter and a PC without DS1996 |
|
Setting the lock opening duration: | from 0 to 255c (factory - 3 sec) |
There is a demagnetization circuit | |
MOS transistor. |
|
Operating voltage: | |
Current consumption (standby mode) | |
Switching current | |
Protection against incorrect activation | |
Overall dimensions, mm: | |
Working temperature: | From -40°С to +50°С |
Contents of delivery . -controller Z-5R............ 1 pc.
Jumper………………..1 pc. (used in cases of programming and setting to electromechanical lock mode.)
Mounting box………1 pc. (on order)
The Z-5R controller is designed for use in rooms with artificially controlled climatic conditions, for example, in closed heated or cooled rooms (absence of precipitation, sand, dust, moisture condensation).
Guarantee to the Z-5R controller ( Iron Logic) - unlimited.
· violation of these Instructions;
· Availability mechanical damage;
· presence of traces of exposure to water and aggressive substances;
· presence of traces of unqualified intervention in the controller circuit
During the warranty period, the Manufacturer will eliminate free of charge malfunctions of the Z-5R controller that arose through the fault of the Manufacturer, or replace faulty components and blocks.
Repairs are carried out in the Manufacturer's workshop.
Controller programming instructions Z -5 R
Control of the “CODE LOCK” (controllerZ-5 R).
First activation – recording master keys
( controller memory status is erased, do not install a jumper!)
Short beeps are issued for 16 seconds. Which indicates that the controller memory is erased and installed mode for adding master keys.
At the moment the signals are issued, touch the contactor with the key - this will lead to its recording in the controller’s memory as a master key. Stopping short signals confirms successful recording first key master. To add new master keys, touch them one by one to the contactor with a pause between touches of less than 16 seconds. For each touch with a new key, the controller emits a short confirmation signal. Exit from the mode of adding master keys occurs automatically 16 seconds after the last touch. The controller informs about exiting the mode with a series of 5 short signals.
In the future, master keys are used for programming.
If it was not possible to record a single key, repeat the activation.
* Entering the master key recording mode when power is applied only when the key database is completely empty (neither simple, nor master, nor blocking)
Lock programming modes
Entering programming mode | Designations |
|
1. Adding simple keys | 1…4 – number of key touches d- long touch (about 6sec) To- short touch (less than 1 sec) M– master key P– simple key B– blocking key |
|
2. Adding blocking keys. | ||
3. Adding master keys. | 1 k M, 1 d M |
|
4. Erasing individual keys. | 2 k M, 1 d M |
|
5. Erase all keys (controller memory). | 3 kM, 1dM |
|
6. Setting the door opening time. | ||
7. Recording the controller memory into a special key memory. | ||
8. Recording the memory of a special key into the controller memory. | ||
9. Working with a locking key. |
General properties of programming modes
To switch the controller to the desired programming mode, short (less than 1 second) and long (about 6 seconds) touches with the master key are used. There is a time limit for working in programming mode after the last touch (about 16 seconds), after which the controller returns to its initial state, informing with a series of five short signals.
1. Adding simple keys ( 1 d M)
Touch and hold the master key in the contactor (long touch). At the moment of touch, the controller will emit a short signal confirming the identification of the master key, and after 6 seconds a second signal indicating that the lock has entered mode for adding simple keys . After this, the master key should be removed. To add new keys, touch them one by one to the contactor with a pause between touches of less than 16 seconds. For each touch with a new key, the controller emits a short confirmation signal. If the key is already in memory, then two short beeps. The mode is exited either automatically 16 seconds after the last touch, or when touched with the master key. The controller informs about exiting the mode with a series of 5 short signals.
2. Adding blocking keys(1 d M)
IN mode of adding simple keys you need to touch the contactor with the selected key and hold it for about 9 seconds until there is a long signal (i.e., first there will be a short signal, a long signal about adding a blocking key). If you do not add more keys, then there will be a series of short signals - exiting the programming mode.
3. Adding master keys ( 1 k M, 1 d M)
Briefly touch the contactor with the master key (short touch). At the moment of touch, the controller will emit a short signal confirming the recognition of the master key, and no more than 6 seconds later, touch and hold the master key in the contactor (long touch). At the moment of touch, the controller will give two short signals indicating second touching the master key in the programming mode, and after 6 seconds one signal indicating the transition of the lock to the mode of adding master keys. After this, the master key should be removed. To add new master keys, touch them one by one to the contactor with a pause between touches of no more than 16 seconds. For each touch with a new key, the controller emits a short confirmation signal. If the key is already in memory as a master key, then there will be no signals. Exit from the mode of adding master keys occurs automatically 16 seconds after the last touch. The controller informs about exiting the mode with a series of 5 short signals.
4. Erasing simple keys using a master key ( 2 k M, 1 d M)
Briefly touch the contactor with the master key twice (short touches). At the moment of the first touch, the controller will emit a short signal confirming the identification of the master key. At the moment of the second touch, the controller will emit two short signals indicating the second touch with the master key in programming mode, and after no more than 6 seconds, touch and hold the master key in contactor (long touch). At the moment of the third touch, the controller will emit three short signals, and after 6 seconds one signal indicating that the lock will enter the mode of erasing simple keys. After this, the master key should be removed. To erase the keys, touch them one by one to the contactor with a pause between touches of no more than 16 seconds. For each touch with an erasable key, the controller emits a short confirmation signal. If the key is not in memory, then two short beeps. The mode is exited either automatically 16 seconds after the last touch, or when touched with the master key. The controller informs about exiting the mode with a series of 5 short signals.
5. Erase controller memory ( 3 k M, 1 d M)
Briefly touch the contactor with the master key three times (short touches). At the moment of the first touch, the controller will issue a short signal confirming the identification of the master key. At the moment of the second touch, the controller will issue two short signals indicating the second touch with the master key in programming mode. At the moment of the third touch, the controller will give three short signals indicating the third touch with the master key, and after no more than 6 seconds, touch and hold the master key in the contactor (long touch). At the moment of the fourth touch, the controller will emit four short signals, and after 6 seconds a series of short signals indicating erasing the controller’s memory and exiting the programming mode. After this, the master key should be removed. The transition to programming mode will be carried out automatically after turning on the power.
*-When the entire database is destroyed using the master key, the programmed opening time is not erased.
6. Programming opening time ( 4 to M)
Briefly touch the contactor with the master key four times. At the moment of each touch, the controller emits signals confirming the identification of the master key, and their number will correspond to the number of touches. At the moment of the fourth touch, the controller produces four signals respectively and goes into the opening time programming mode. Within 6 seconds from the last touch, you must close the door button for the time required to open. After releasing the button, the controller will generate a signal and record the time in memory.
7. Write controller memory to memoryD.S.1996 (1 d M )
Prepare DS1996 for recording*.
Touch and hold the DS1996 in the contactor. When touched, the controller will emit a short signal confirming that the DS1996 key is set to recording mode (if there are two short signals, then you need to repeat preparing the DS1996 using a PC). Then wait for the operation to complete until a series of short signals (if after 5 seconds there are no signals, then the operation repeat).
8. Write DS1996 memory to controller memory ( 1 d M)
Prepare DS1996 for reading*.
Switch the controller to the mode of adding simple keys. To do this, touch and hold the master key in the contactor. At the moment of touch, the controller will emit a short signal confirming the identification of the master key, and after 6 seconds a second signal indicating that the lock will enter the mode of adding simple keys. After this, the master key should be removed.
Touch and hold the DS1996 in the contactor. When touched, the controller will emit a short signal confirming that the DS1996 key is set to recording mode (if there are two short signals, then you need to repeat preparing the DS1996 using a PC). Then wait for the operation to complete until a series of short signals (if after 5 seconds there are no signals, then the operation repeat)
Upon completion of recording, the controller will issue a series of short signals indicating completion of recording and exit from programming mode.
*- DS1996 is prepared using a computer and an AC-Z adapter.
9. Working with a locking key (1 d B )
The locking key is designed to work:
· as a simple access key in the general operating mode of the controller (i.e., access is open to all simple keys registered in the database)
· to transfer the controller to lock mode(in this mode, only the blocking keys open the controller).
· to switch to normal mode
The locking key opens when released.
To transfer to lock mode Apply the blocking key to the contactor and hold for about 3 seconds until a long continuous signal appears, which corresponds to switching on lock mode .
In this mode, all simple keys are blocked. When using a simple key, the controller does not open, but produces many short signals.
Exit from blocking mode to general mode is done
Same as switching to blocking mode using a blocking key (up to a series of short signals)
Short touch of the master key (series of short signals)
Lock control (opening).
Touch the contactor with the key. If the key code matches the code in the controller’s memory, the lock is set to the open state for a period not less than the “opening time”. In state closed The lock is installed after the door reed switch opens (the door is closed) only after the “opening time” has expired. If the door is continuously open (the reed switch contacts are closed), the controller signals for 15 seconds about the state of the open door.
If there is no reed switch, the condition closed occurs after the “opening time”.
If the key code does not match the code in memory, the controller emits two short signals confirming the reading, but indicating a mismatch of codes.
Press the door button. The lock will be set to open for a period not less than the “opening time”. In state closed The lock is installed after the door reed switch opens (the door is closed - the electrical contacts of the reed switch are open) only after the “opening time” has expired. If there is no reed switch, the condition closed occurs after the “opening time”. If the button is held down, the lock is in the open.
The order of using jumpers.
The controller comes with one jumper, which is used in cases of programming and installation in the electromechanical lock mode (five positions in total - see the controller connection diagram).
Position No. 1- sets the logic of the power cascade.
· without jumper – electromagnetic lock, able closed voltage applied;
· with jumper – electromechanical lock, able closed tension is relieved.
Position No. 2- to erase the controller memory. To do this, turn off the power to the lock, install the jumper and turn on the power. Upon completion of erasing, a series of short signals.
*-All keys are erased, the programmed opening time is erased (the factory default is set to 3 seconds)
Position No. 3- to switch to the “adding simple keys” mode. To do this, turn off the power to the lock, install the jumper and turn on the power. After the signal, the controller is located:
· in the mode of adding simple keys (you can add simple, blocking keys without a master key),
· for recording information using DS1996 (without a master key) to the controller and vice versa. When touching DS1996:
– signaling with one signal - the DS1996 key is ready for reading or writing. Next, wait for the operation to complete until a series of short signals (if after 5 seconds there are no signals, then repeat the operation)
– if there are two signals, then the DS1996 key is not prepared.
Position No. 4- standard place, does not affect the operation of the controller.
Regulation No. 5- the key database created in the PC can be written to the controller connected to the PC via the AC-Z adapter.
Description of IronLogic Z-5R
IronLogic Z-5R is a stand-alone controller designed to control electromagnetic and electromechanical locks. The dimensions of the product allow it to be installed both inside the lock and separately. Work with Touch keys Memory DS1990A and with RFID cards/key fobs. The Z-5R controller allows you to connect the following equipment: Touch Memory contactor or RFID reader, electromagnetic/electromechanical lock, lock release button, external buzzer, external LED, door open sensor.
The controller has several operating modes. ACCEPT mode allows you to restore the key database. By activating the ACCEPT mode, the controller allows access to all keys brought in and at the same time stores their ID in its memory. Thus, after working for several days in ACCEPT mode, the controller forms a new key database. TRIGGER mode - lock operation control: on/off. One touch key-lock closed; the second touch of the key - the lock is open. The TRIGGER mode is convenient in cases where it is necessary to open or block the door for a certain period (working day, break, etc.) Concierge mode - access permission control. A blocking key allows or denies opening the door to all other registered keys. The Concierge mode is convenient in cases where it is necessary to fulfill a condition in which you cannot enter a room if there is no responsible person(owner of the blocking key).
IronLogic Z-5R Specifications
- Unit: 1 piece
- Dimensions (mm): 45x25x14
- Supply voltage: 8-18V DC
- Current consumption: 4 mA
- Switching current: 5A
- Number of keys/cards (max): 1364 pcs.
- Key type:DS1990A, RFID cards/key fobs
- Built-in non-volatile memory (EEPROM)
- Output: MOS transistor
- Setting the duration of opening the lock: from 0 to 220 sec.
- Light/sound indication of operating modes: built-in buzzer, LED
- Jumper to select the lock type: electromagnetic, electromechanical
- Operating temperature: from -40°С to +50°С
- Overall dimensions (mm): 45x25x14.
The Z-5R controller is intended for use in access control systems (electromagnetic/electromechanical locks) as an autonomous controller to restrict access to the entrances of residential buildings, administrative offices, and industrial enterprises.
Attention!
This manual applies to Z-5R controllers produced before 2010. We also have instructions for modern versions of the Z-5R instructions (which can work with both iButton Touch Memmory and Proximity key fobs) - as of 2017 download PDF
full list instructions are available on the Useful catalog page
Full technical description
The Z-5R controller allows you to connect the following equipment:
- contact key reader;
- contactless reader emulating the DS1990A key protocol;
- a lock that can be opened by both applying and removing voltage (installing a jumper on the controller's printed circuit board - output inversion);
- lock release button (normally open);
- external buzzer, external LED;
- door open sensor.
When working in conjunction with the AC-Z computer adapter (plus the "Z Base" program), it becomes possible to maintain a key database in a PC and quickly change (load/unload) the list of keys in the Z-5R controller (using the DS1996 key or only using the adapter and PC).
Specifications:
| Parameter | Meaning |
|---|---|
| Built-in non-volatile memory | 8 KB |
| Maximum number of keys: | up to 680 pcs. (DS1990A) |
| -simple keys | -for passage |
| - master key | -for programming |
| - locking key | -to block passage (can be used as a simple key) |
| Presence of jumper type locks | + |
| Light and sound indication of operating and programming modes | Available |
| Ability to write the contents of the controller memory to the DS1996 key and vice versa | Available |
| Possibility of programming the controller using an AC-Z adapter and a PC without DS1996 | Available |
| Setting the lock opening duration: | from 0 to 255c (factory - 3 sec) |
| Demagnetization circuit | Available |
| Exit: | MOS transistor. |
| Operating voltage: | 12V DC |
| Current consumption (standby mode) | 4mA |
| Switching current | up to 5A |
| Protection against incorrect activation | + |
| Overall dimensions, mm: | 54x31x14 |
| Working temperature: | From -40°С to +50°С |
Contents of delivery:
- controller Z-5R 1……………… pcs.
- jumper……………… 1 pc. (used in cases of programming and setting to electromechanical lock mode.)
- mounting box……………… 1 pc. (on order)
The Z-5R controller is intended for operation in rooms with artificially controlled climatic conditions, for example, in closed heated or cooled rooms (absence of precipitation, sand, dust, moisture condensation).
The warranty for the Z-5R (Iron Logic) controller is unlimited.
Grounds for termination of warranty obligations:
- violation of these Instructions;
- presence of mechanical damage;
- presence of traces of exposure to water and aggressive substances;
- presence of traces of unqualified intervention in the controller circuit
During the warranty period, the Manufacturer will eliminate free of charge malfunctions of the Z-5R controller that arose through the fault of the Manufacturer, or replace faulty components and blocks.
Repairs are carried out in the Manufacturer's workshop.
Z-5R controller programming instructions
CODE LOCK control (Z-5R controller)
The first activation is the recording of master keys.(controller memory state is erased, do not install jumper!)
Short beeps are issued for 16 seconds. Which indicates that the controller’s memory has been erased and the mode for adding master keys has been set.
At the moment the signals are issued, touch the contactor with the key - this will lead to its recording in the controller’s memory as a master key. The cessation of issuing short signals confirms the successful recording of the first master key. To add new master keys, touch the contactor with them one by one with a pause between touches of less than 16 seconds. For each touch with a new key, the controller emits a short confirmation signal. Exit from the mode of adding master keys occurs automatically 16 seconds after the last touch. The controller informs about exiting the mode with a series of 5 short signals.
In the future, master keys are used for programming.
If it was not possible to record a single key, repeat the activation.
* Entering the master key recording mode when power is applied only when the key database is completely empty (neither simple, nor master, nor blocking)
Lock programming modes
| Modes | Entering programming mode | Designations |
|---|---|---|
| 1. Adding simple keys | 1 d M | 1…4 – number of key touches d - long touch (about 6 seconds) k - short touch (less than 1 sec) M – master key P – simple key B – blocking key |
| 2. Adding blocking keys. | 1 d M | |
| 3. Adding master keys. | 1 k M, 1 d M | |
| 4. Erasing individual keys. | 2 k M, 1 d M | |
| 5. Erase all keys (controller memory). | 3 kM, 1dM | |
| 6. Setting the door opening time. | 4 to M | |
| 7. Recording the controller memory into a special key memory. | 1 d M | |
| 8. Recording the memory of a special key into the controller memory. | 1 d M | |
| 9. Working with a locking key. | 1 d B |
General properties of programming modes
To switch the controller to the desired programming mode, short (less than 1 second) and long (about 6 seconds) touches with the master key are used. There is a time limit for working in programming mode after the last touch (about 16 seconds), after which the controller returns to its initial state, informing with a series of five short signals.
1. Adding simple keys (1 d M)
Touch and hold the master key in the contactor (long touch). At the moment of touch, the controller will emit a short signal confirming the identification of the master key, and after 6 seconds a second signal indicating that the lock will enter the mode of adding simple keys. After this, the master key should be removed. To add new keys, touch them one by one to the contactor with a pause between touches of less than 16 seconds. For each touch with a new key, the controller emits a short confirmation signal. If the key is already in memory, then two short beeps. The mode is exited either automatically 16 seconds after the last touch, or when touched with the master key. The controller informs about exiting the mode with a series of 5 short signals.
2. Adding blocking keys (1 d M)
In the mode of adding simple keys, you need to touch the contactor with the selected key and hold for about 9 seconds until a long signal (i.e., first there will be a short signal, a long signal about adding a blocking key). If you do not add more keys, then there will be a series of short signals - exiting the programming mode.
3. Adding master keys (1 k M, 1 d M)
Briefly touch the contactor with the master key (short touch). At the moment of touch, the controller will emit a short signal confirming the recognition of the master key, and no more than 6 seconds later, touch and hold the master key in the contactor (long touch). At the moment of touch, the controller will give two short signals indicating the second touch with the master key in programming mode, and after 6 seconds one signal indicating the lock will enter the mode of adding master keys. After this, the master key should be removed. To add new master keys, touch them one by one to the contactor with a pause between touches of no more than 16 seconds. For each touch with a new key, the controller emits a short confirmation signal. If the key is already in memory as a master key, then there will be no signals. Exit from the mode of adding master keys occurs automatically 16 seconds after the last touch. The controller informs about exiting the mode with a series of 5 short signals.
4. Erasing simple keys using a master key (2 k M, 1 d M)
Briefly touch the contactor with the master key twice (short touches). At the moment of the first touch, the controller will emit a short signal confirming the identification of the master key. At the moment of the second touch, the controller will emit two short signals indicating the second touch with the master key in programming mode, and after no more than 6 seconds, touch and hold the master key. key in contactor (long touch). At the moment of the third touch, the controller will emit three short signals, and after 6 seconds one signal indicating that the lock will enter the mode of erasing simple keys. After this, the master key should be removed. To erase the keys, touch them one by one to the contactor with a pause between touches of no more than 16 seconds. For each touch with an erasable key, the controller emits a short confirmation signal. If the key is not in memory, then two short beeps. The mode is exited either automatically 16 seconds after the last touch, or when touched with the master key. The controller informs about exiting the mode with a series of 5 short signals.
5. Erase controller memory (3 kM, 1 d M)
Briefly touch the contactor with the master key three times (short touches). At the moment of the first touch, the controller will emit a short signal confirming the identification of the master key. At the moment of the second touch, the controller will emit two short signals indicating the second touch with the master key in programming mode. At the moment of the third touch, the controller will give three short signals indicating the third touch with the master key, and after no more than 6 seconds, touch and hold the master key in the contactor (long touch). At the moment of the fourth touch, the controller will emit four short signals, and after 6 seconds a series of short signals indicating erasing the controller’s memory and exiting the programming mode. After this, the master key should be removed. The transition to programming mode will be carried out automatically after turning on the power.
*-When the entire database is destroyed using the master key, the programmed opening time is not erased.
6. Programming opening time (4 kM)
Briefly touch the contactor with the master key four times. At the moment of each touch, the controller emits signals confirming the identification of the master key, and their number will correspond to the number of touches. At the moment of the fourth touch, the controller produces four signals respectively and goes into the opening time programming mode. Within 6 seconds from the last touch, you must close the door button for the time required to open. After releasing the button, the controller will generate a signal and record the time in memory.
7. Write controller memory to DS1996 memory (1 d M)
Prepare DS1996 for recording*.
Switch the controller to the mode of adding simple keys.
To do this, touch and hold the master key in the contactor. At the moment of touch, the controller will emit a short signal confirming the identification of the master key, and after 6 seconds a second signal indicating that the lock will enter the mode of adding simple keys. After this, the master key should be removed.
Touch and hold the DS1996 in the contactor. When touched, the controller will emit a short signal confirming that the DS1996 key is set to recording mode (if there are two short signals, then you need to repeat preparing the DS1996 using a PC). Then wait for the operation to complete until a series of short signals (if after 5 seconds there are no signals, then the operation repeat).
8. Write DS1996 memory to controller memory (1 dM)
Prepare DS1996 for reading*.
Switch the controller to the mode of adding simple keys. To do this, touch and hold the master key in the contactor. At the moment of touch, the controller will emit a short signal confirming the identification of the master key, and after 6 seconds a second signal indicating that the lock will enter the mode of adding simple keys. After this, the master key should be removed.
Touch and hold the DS1996 in the contactor. When touched, the controller will emit a short signal confirming that the DS1996 key is set to recording mode (if there are two short signals, then you need to repeat preparing the DS1996 using a PC). Then wait for the operation to complete until a series of short signals (if after 5 seconds there are no signals, then the operation repeat)
Upon completion of recording, the controller will issue a series of short signals indicating completion of recording and exit from programming mode.
*- DS1996 is prepared using a computer and an AC-Z adapter.
9. Working with a locking key (1 dB)
The locking key is designed to work:
- as a simple access key in the general operating mode of the controller (i.e. access is open to all simple keys registered in the database)
- to switch the controller to blocking mode (in this mode, only blocking keys open the controller).
- to switch to normal mode
The locking key opens when released.
To switch to the blocking mode, apply the blocking key to the contactor and hold for about 3 seconds until a long continuous period appears, which corresponds to turning on the blocking mode.
In this mode, all simple keys are blocked. When using a simple key, the controller does not open, but produces many short signals.
Exit from blocking mode to general mode is done
- similar to switching to blocking mode using a blocking key (up to a series of short signals)
- short touch of the master key (series of short signals)
Lock control (opening).
Touch the contactor with the key. If the key code matches the code in the controller’s memory, the lock is set to the open state for a period not less than the “opening time”. The lock is set to the closed state after the door reed switch opens (the door is closed) only after the “opening time” has expired. If the door is continuously open (the reed switch contacts are closed), the controller signals for 15 seconds about the state of the open door.
In the absence of a reed switch, the closed state occurs after the “opening time”.
If the key code does not match the code in memory, the controller emits two short signals confirming the reading, but indicating a mismatch of codes.
Press the door button. The lock will be in the open state for a period not less than the “opening time”. The lock is set to the closed state after the door reed switch is opened (the door is closed - the electrical contacts of the reed switch are open) only after the “opening time” has expired. In the absence of a reed switch, the closed state occurs after the “opening time”. If the button is held down, the lock is in the open state.
The order of using jumpers.
The controller comes with one jumper, which is used in cases of programming and installation in the electromechanical lock mode (five positions in total - see the controller connection diagram).
Position No. 1 - sets the logic of the power cascade.
- without jumper – electromagnetic lock, in the closed state, voltage is applied;
- with jumper – electromechanical lock, in the closed state the voltage is removed.
Position No. 2 is for erasing the controller memory.
To do this, turn off the power to the lock, install the jumper and turn on the power. Upon completion of erasing, a series of short signals.
*-All keys are erased, the programmed opening time is erased (the factory default is set to 3 seconds)
Position No. 3 - to switch to the “adding simple keys” mode.
To do this, turn off the power to the lock, install the jumper and turn on the power. After the signal, the controller is located:
- in the mode of adding simple keys (you can add simple, blocking keys without a master key),
- for recording information using DS1996 (without a master key) to the controller and vice versa. When touching DS1996:
- signaling with one signal - the DS1996 key is ready for reading or writing. Next, wait for the operation to complete until a series of short signals (if after 5 seconds there are no signals, then repeat the operation)
- if there are two signals, then the DS1996 key is not prepared.
Position No. 4 is a standard position and does not affect the operation of the controller.
Position No. 5 - the key database created in the PC can be written to the controller connected to the PC via the AC-Z adapter.
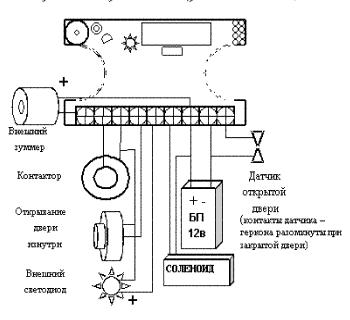
Z-5R controller connection diagram