DIY outdoor toilet in the country. Do-it-yourself wooden toilet for a summer house (drawings)
Everyone knows the popular expression that says that getting to know the theater begins with the hanger. We won’t be mistaken if we say about a dacha that it starts with the toilet. You can judge the owner by its appearance and structure. The “hands-on” owner made this building beautiful and neat. There are no drafts or unpleasant smell.
It will be useful for beginners in country life to learn how to build an inexpensive and comfortable outdoor toilet with their own hands.
In this article we will talk about the most common types of closet structures, their structure and consider the possibility of combining them with other country houses.
Based on the method of waste disposal, these structures are divided into three types:
- Powder closets;
- Toilets with a cesspool (septic tank);
- Water closets.
The first type of outdoor toilet is easy to install and operate. Its main part is a seat (stool), under which a removable container is installed. After each visit, a peat mixture is poured into it with a scoop, which absorbs liquid and unpleasant odors.

A toilet seat with a sealed lid and a bucket of peat – that’s all you need to set up an outdoor latrine
A significant drawback of this design is the small capacity of the bucket. For those who rarely visit the dacha, a powder closet is optimal. If you plan to spend weekends on your property or your family has more than three people, you will have to empty the container often.
An improved version of the powder closet is the peat dry closet, offered on the market today. It consists of plastic case, inside of which one or two containers are placed. A tank with a peat mixture and a dispenser is installed on top.

1, 2 – containers for the solid fraction; 3 – funnel for liquid; 4 – funnel for solid fraction; 5 – tank with peat dispenser; 6 – ventilation pipe; 7 – drainage tube
To eliminate unpleasant odors, the structure is equipped with an exhaust pipe leading to the roof of the cabin. The containers in this toilet need to be emptied no more than once a week. This is achieved by separating the liquid and solid fractions of waste.
When using the dry closet, the liquid enters a funnel located in the front part of the body and is discharged through a tube into the ground or a plastic container located outside. Dense fractions of sewage accumulate in the internal container.
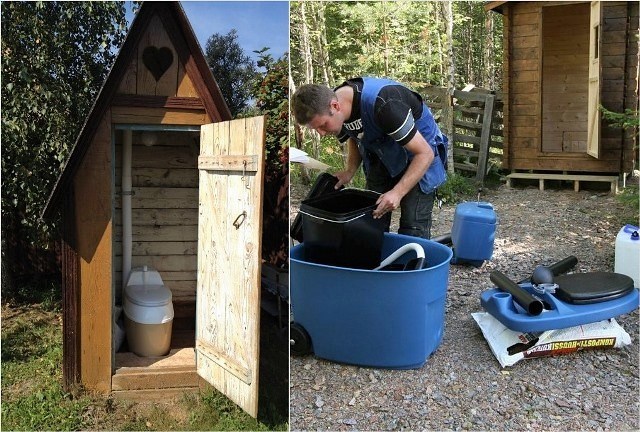
The dry closet is in the “combat position” and in the process of installation. In the first case, the cramped cabin is striking, so we do not advise you to save on its space at the expense of comfort.
Despite the advantages of a peat toilet over a classic powder toilet (converting waste into fertilizer, good ventilation and an extended period of use), many summer residents choose the option with a cesspool (septic tank). Its installation is cheaper than purchasing an “advanced” dry closet, and the cleaning frequency is 1-2 times a year.
At the same time, you should remember two serious problems that a cesspool can present to its owners if constructed incorrectly:
- Soil contamination by pathogenic bacteria;
- Unpleasant smell.
It is not enough to simply dig a large hole in the ground and place a toilet box over it. The container with sewage must be reliably isolated from the ground. A concrete tank treated with waterproofing impregnation is best suited for this purpose.
The second condition is the introduction of special bacteria into the cesspool. They quickly decompose sewage, disinfect it and eliminate odor. Dry bacteria concentrates for septic tanks and cesspools can be purchased today at any hardware supermarket.
The design of the backlash closet (air toilet) cannot be called too complicated. Its main part is a concrete pit with a hole. A booth is installed on it. To eliminate the unpleasant odor on her back wall an exhaust pipe is placed. Its lower end is in a hole, and its upper end rises above the roof. Due to the difference in height, draft is generated. Air from the cabin is sucked into the pit and released into the atmosphere through a pipe.

Backlash closet design diagram
Another popular toilet option for a summer house is a water closet. Its main part is the familiar toilet with a flush cistern. It contains a water lock, which prevents the smell from escaping from the pit into the cabin. Unfortunately, it is impossible to use such a system without heating, since in winter the water in the toilet and cistern freezes. Therefore, this design is designed for the warm season.

Drawing of an outdoor water closet
With the onset of warm days, the container on the roof of the booth is filled with water. The outlet channel is connected to through a tee equipped with a vertical ventilation pipe.
Options for outdoor toilet stalls
You can build a toilet stall from different materials. Most often, the basis of the structure is a wooden frame covered with OSB board, tongue and groove board, plywood or siding.

A toilet covered with planed boards looks neat and cozy
Moving away from the use of frame and cladding, the house can be folded from, thereby creating a picturesque imitation of a log house.

Lovers of natural wood can also be advised to use a blockhouse for cladding. It is cheaper than a massive log and is easily mounted on a frame. The walls of the toilet, lined with wooden herringbone paneling, look no less attractive.

Many dacha owners are not satisfied with the rustic appearance of the “birdhouse” toilet. Striving for originality, they erect luxurious log mansions on the plots for “solitary reflection.”

Bricks and blocks as materials for constructing latrines are still very popular. Whatever one may say, the capital structure will last for decades. Neither dampness, nor wind, nor sun will harm it.

If there are no facing bricks at hand, then the walls can be built from the remains of red and silicate bricks. High-quality plaster will hide uneven masonry.

The cabin, built from assorted bricks, is awaiting plastering.
Translucent polycarbonate can be used to cover the cabin from a metal profile. This material looks very aesthetically pleasing and is not afraid of moisture.

Sheet corrugated sheets are a practical and durable material for toilet cubicles. It can be placed on either a wooden or steel frame. The only condition is the internal lining of the walls with insulation. Without this addition, there will be a hot “oven” in the summer and a freezer in the winter.

The interior decoration of the cabin with plastic lining is laconic and hygienic
To category unusual materials, used for the construction of latrines include straw blocks. A cabin built from them is warm and cozy. Anyone who wants to amaze the imagination of neighbors and guests does not go to a construction site to buy materials. Having collected a certain number of empty bottles, he builds a toilet out of them, “to everyone’s surprise.”

In addition to rectangular and rounded structures, “huts” of different sizes are very popular.

There are two rational grains in this decision:
- The slopes of a steep roof replace the walls;
- The unusual appearance of the building adorns the landscape.
Very often the toilet becomes part of the utility unit. This solution allows you to place several rooms in one building. As a result, savings are achieved during construction (common walls) and the comfort of use increases (a warm toilet is always at hand).

Solid combination latrine with shower, lined with siding and covered with a hipped bitumen roof

Option for a brick toilet interconnected with a shower stall

Aesthetically, the combination of a log frame and a plastic slate roof in one outbuilding (toilet-shower) is not very successful

Some owners combine two toilets in the building: “for gentlemen and ladies.”
How to build a simple toilet for your dacha yourself?
Having decided on a waste disposal system (powder closet, cesspool, septic tank), you can begin construction.
Minimum internal dimensions of the cabin– width 1 meter, depth 1.4 meters and height 2.0 meters.
The basis of the structure, the step-by-step construction of which we will consider, is a wooden frame made of antiseptic bursa. It can be placed on a block foundation or on a shallow concrete “ribbon”. A thick sheet of plywood or OSB board with a rectangular hole cut in it is attached to the frame on top.

Having assembled the base, the vertical frame posts and strapping bars are leveled.

Having made the frame, it is sheathed with plywood using a jigsaw and a screwdriver.

The next step is installation of the roof rafters. They are made from dry timber with a cross-section of 5x10 cm, cutting it into the upper chord of the walls. In the upper part, the bars are connected to a horizontal ridge board.

Having completed this stage, the rafters are sheathed with plywood. This is the best base for asphalt shingles to go on the roof.

Having finished with the roof, they begin to assemble the “podium” frame. A powder closet storage tank will be installed in it and a hole will be made for a seat with a lid.

The toilet door is assembled from a tongue and groove board, fastened with transverse strips for greater rigidity.

After lining the doorway with timber, the door leaf is attached to it using hinges. The final operation is painting the toilet booth outside and inside.

In conclusion, let’s say that we have considered the option of building a summer outdoor toilet. For the winter season, the walls from the inside must be insulated with polystyrene foam (minslab) and sheathed with any sheet material (plywood, OSB, board, plastic).
If you decide to install light in the booth, then at the same time you can increase the comfort of use at minimal cost. Install an electric fan heater. In just a few minutes it will warm the air to above-zero temperatures.
Arranging a country toilet is one of the primary problems faced by owners who have acquired a plot for the construction of a country house or a private house. It may seem that there is nothing complicated about this, but before you begin work, you should carefully consider the location of the building, choose a suitable structure, calculate its dimensions and draw up drawings.
Build practical and comfortable toilet at the dacha with your own hands is quite possible if you approach the issue seriously, taking into account the ease of use, the complexity of construction and maintenance, as well as the compliance of the structure with Sanitary Regulations and Regulations. Let's consider the listed nuances and existing models of country closets in more detail.
Design selection
The main feature by which designs differ is the absence or presence of a cesspool. In addition, a toilet in a country house can be outdoor or located inside the country house.
Some owners equip two toilets in a private house - one “warm”, located in the main building, and the second on the street. This is rational, because in cold or rainy weather it is much more comfortable to use a home toilet, and when doing garden work, an outdoor “hut” is more convenient.
Pit toilet
Photo: backlash closetIf you plan to live at the dacha for a long time, including during the cold season, it makes sense to make a full-fledged bathroom in the house, combined with a bathroom. In this case, one cannot do without sewerage and, accordingly, a cesspool.
For these purposes, the so-called backlash closet is more suitable. It is a sealed cesspool located in close proximity to the house. Waste enters it through a pipe, and cleaning is carried out only using a sewer machine. To protect the house from unpleasant odors, a ventilation pipe is connected to the cesspool.
A toilet for a dacha with a cesspool located on the street is an easier option to implement. It can be built and successfully operated even before the house is built, and then used as a spare one.
Typically, this design consists of a cesspool about 1.5 m deep and installed above it small house. Inside, a special toilet seat is placed above the hole for sewage and lighting is provided to the toilet stall. The cesspool is cleaned with a sewer machine or simply buried after filling 2/3 of the volume and the toilet is moved to another place. In 6-7 years, the waste will completely decompose.
A country toilet with a cesspool is practical and does not require frequent cleaning of the pit, but there is a drawback - it can only be installed in deep areas groundwater(from 2.5 m). In other cases, in accordance with sanitary standards, it must be replaced with alternative designs.
Country toilet without cesspool
In a private house where there is no sewerage system and groundwater or reservoirs are too close, the toilet is equipped without a cesspool. The most economical solution in this case is a powder closet. The toilet house for it looks the same as for a structure with a cesspool, but a special container is placed under the toilet seat for collecting feces.
 Photo: powder closet
 So as not to bother you bad smell After relieving yourself, you should immediately add a little peat or sawdust. After filling the tank, its contents are sent to the compost heap and later (after 2-3 years) used as fertilizer.
A modified version of the powder closet can be used inside the house - a peat toilet. It is designed almost like a regular toilet, but instead of water in the tank there is peat, and the sewer pipe is replaced by a container for collecting sewage. Ventilation leading from the tank to the street allows you to get rid of the smell.
A more expensive, but quicker to implement and effective option is a bathroom with a dry closet. This design is compact and suitable for installation both in a private house and on a plot. A dry toilet looks like a miniature toilet, consisting of a toilet seat and a tank for feces. Sewage is processed by adding active microorganisms or chemicals to the tank.
The downside is that the contents of a dry closet with a chemical cartridge cannot be used as fertilizer. In addition, such models require special maintenance.
Choosing a location
If you decide to make a country toilet without a cesspool, this stage of construction is not so important. But an outdoor toilet with a cesspool is built so that it meets certain rules:
- Distance to any water sources – 25 m or more.
- The booth is located at least 1 m from the fence.
- To the basement or cellar - at least 12 m.
- Fruit trees are no closer than 4 m, and bushes are at a distance of 1 m or more.
- You can drive up to the site using a sewer truck (if you plan to clean the cesspool).
When arranging a bathroom inside the house, in addition to the listed requirements for the placement of a cesspool, the layout of the building is taken into account. It is advisable to make the toilet adjacent to external wall buildings of at least one of the parties, so ventilation costs will be lower.
Pay attention!
In houses with two or more floors, according to sanitary standards, the restroom cannot be located above the living rooms or kitchen.
Country toilet dimensions
In accordance with building regulations, utility rooms, which include a toilet, should occupy no more than 20% of the house's area. A bathroom combined with a bathroom usually occupies from 3.8 m², and a separate toilet from 1.5 m².
Since there is rarely excess free space in a wooden country house, they focus on the minimum acceptable dimensions. The same principle of minimalism applies to a free-standing rustic toilet. The sizes are chosen so that a person does not feel cramped in it. 1 m wide, 1.2-1.5 m deep and about 2.1-2.2 m high is enough.
 Photo: dimensions of a simple village toilet
 Schemes and drawings
If we are talking about a village toilet, when creating drawings, you need to take into account not only the desired dimensions of the structure, but also the materials from which it will be made. It is also necessary to decide on the type of construction and additional elements(washbasin, peat drawer, etc.). A country toilet can be built from the following materials:
- bricks;
- wood;
- metal
By type of construction, the most popular are birdhouse, house and hut. They all differ in roof shape and appearance. A birdhouse is easier to implement, but is considered a summer option, but an insulated house and hut are suitable for use at any time of the year.
 Photo: country toilet “house” with ventilation pipe
 When placing a toilet in a private house, the sewage system deserves special attention. You can order pipe laying drawings from a professional plumber, but for a building of 1-2 floors you can actually do it yourself.
The starting point for drawing up the diagram is the location of the riser and the main collecting pipe. You will also need:
- Draw the plan of the country house to scale and mark the risers on it.
- Mark all the plumbing elements in the figure and indicate how to connect them.
- Schematically connect the plumbing to the riser pipes.
- Decide on the diameter of the riser and fan pipe.
- Calculate the total length of sewer pipes in the house (taking into account the reserve for connections).
- Consider the location external sewerage.
 Photo: sewerage diagram in a country toilet
 Construction of a cesspool
When building a yard toilet for a summer residence, the first step is to mark the contours of the foundation of the future building, focusing on the drawings. According to the applied markings, using a shovel, dig a hole for a cesspool (usually square) with a side of 1 m and a depth of 1.5 to 2 m.
By type, cesspools are sealed and absorbent. In the first case, the walls of the cesspool are lined with concrete slabs, bricks, boards treated with bitumen, or a plastic container is placed inside. In the second case, they limit themselves to a layer of pebbles or crushed stone poured onto the bottom of the pit.
 Photo: toilet pit
 Construction of a toilet house (step by step)
Wood is an inexpensive and easy-to-process material, so many owners make their dacha toilets from it. Let's look at the stages of building a birdhouse-type toilet house made of boards.
Construction of an outdoor toilet in a private house step by step:
- Foundation. In a wooden closet, a columnar foundation of brick or concrete blocks is installed at the corners of the structure. A layer of roofing material is laid on top of the supports.
- Frame. Bottom part The house is made of antiseptic-treated timber (side dimensions are 15x15 cm or 10x10 cm).
- Frame. Checking the building level, four racks are fixed to the frame using bolts and metal plates. At the same time, the front ones are made higher than the rear ones. Then, the upper frame and door posts are attached. Additional diagonal slats are placed on three blank walls, and a frame for a toilet seat is installed in the rear part of the structure.
- Roof. The country toilet is covered with slate and roofing felt, you can use the remains of the corrugated sheet (if available).
- Sheathing. Boards are nailed vertically to the frame every 15 cm - the basis for further cladding. The final step is fastening the outside and inside of wooden or plastic lining and hanging the door structure.
Important!
For ease of use, lighting should be installed in a village toilet. A standard low-wattage ceiling light or spotlights will do.
 Photo: frame of a toilet house with a platform for a toilet seat
 Features of constructing a toilet in a private house
To equip a toilet for a summer house inside the house, the first thing you should do is decide on the type of sewage system. It happens:
- Gravity flow. In this case, waste flows into the cesspool under the influence of water due to the slope of the pipes. The slope should be 2 cm for every meter of descending pipe.
- Pressurized. When laying pipes with the required slope is problematic, in a private house you can install a toilet with a special fecal pump, which ensures the movement of waste from bottom to top and allows the use of pipes of a smaller diameter.
Sewage system design
The sewer sections are connected to each other using fittings; the joints can be additionally coated with sealant. If necessary, long pieces of pipes are cut with a regular hacksaw. The structure is fixed to the wall with clips of the appropriate diameter or clamps on studs. If there are already laid cast iron pipes, they are joined to polypropylene using rubber cuff.
 Photo: external sewer pipes
 The outer part of the sewer is placed in a trench, no higher than the freezing level of the soil. Pipes made of plastic, cement, cast iron, and asbestos are suitable for it. Above the junction of the internal and external sewer system An inspection hatch must be placed, and a check valve must be installed inside the pipe. This will simplify maintenance and prevent wastewater from backflowing if the cesspool or septic tank overflows.
Toilet installation
If the sewer system is laid, all that remains is to install the toilet and the warm toilet for the dacha is ready. Floors in wood or brick country house usually made of wood and require preliminary preparation - leveling, antiseptic treatment or painting.
The toilet is installed on a prepared, flat surface. After making sure that all the holes fit together, mark the places of attachment to the floor, level the structure and fix it with the fasteners included in the kit. The connection to the sewer pipe is made through a rubber sealing collar or a plastic eccentric. The cracks where the toilet meets the floor are sealed cement mortar, and the joint with the pipe is treated with silicone sealant.
 Photo: connecting the toilet to the sewer pipe
 Conclusions
Making an outdoor toilet in a country house with your own hands or arranging a warm bathroom in a private house is a feasible task, although not an easy one. By carefully studying the possible options, taking the time to draw up a work plan and assessing the costs, you can find the optimal solution for your home. We wish you good luck!
The most important criterion for choosing the type of toilet for a summer residence is the level of groundwater in the area. If the groundwater is deep (deeper than 2.5-3.5 m), especially if the water does not rise above two meters from the surface of the earth even during heavy rains, any of the above types of toilets is possible. When groundwater levels are high, this is exactly what we usually have in areas middle zone– the water is close to the surface, a classic toilet with a cesspool is unacceptable.
When groundwater stands above 2.5 m, the preferred option is a powder closet or backlash closet, as well as a bio- or chemical toilet. Since these structures have a sealed cesspool, waste does not enter groundwater and is safe in an epidemiological sense. Let's take a closer look at each of the options.
| Toilet type | Description |
| Classic "country" toilet with pit cesspool (1) | This is a cesspool one and a half meters deep, on top of which there is a corresponding “house”. Everything that falls into the pit accumulates there, gradually decomposing. This toilet is not suitable for big family, because it will fill up too quickly, and the sewage will not have time to ferment. The situation is resolved in two ways: either the toilet is moved to another place by burying a filled pit, or the cesspool is cleaned - manually or using a cesspool truck. |
| Powder closet (2) | Suitable for areas with high groundwater levels. There is no cesspool here. Its role is played by a sealed container installed under the seat. After each trip to the toilet, a new portion of sewage should be covered with peat, ash or sawdust. When the container is full, its contents are taken out into the compost pit, sprinkled with peat. |
| Backlash closet (3) | This type of toilet is suitable for being in the home. This is a structure equipped with a sealed cesspool (next to the outer wall). It is cleaned using a sewer machine. Thus, the pit itself is located outside the house, and all waste enters it through a pipe. The pit should slope away from the house. |
| Dry toilet | This is the same booth that stands on city streets with a container that contains active microorganisms that process waste. Buy such a toilet - there are any sizes on sale, dry closets suitable for home and outdoor use. |
| Chemical | Essentially the same dry closet, but with a different waste processing technology. Chemicals are used - the contents of the toilet (unlike the dry closet) become unsuitable for use as fertilizer in beds and flower beds. |
| Peat toilet (4) | This is the same powder closet, only of a more modern design. Suitable for home use. This is just a toilet, in the tank, instead of water, there is dry peat, and the role of sewer pipes is played by a container for waste. The design provides ventilation - it is taken to the open air. |

Construction of a toilet in the country: according to the law and in harmony with the neighbors
There are clear standards for the placement of a country street toilet. This is especially important for those structures that involve contact of sewage with soil and groundwater. According to sanitary requirements, any source of water (well, well, river, lake, stream, etc.) must be more than 25 m.
The door to the toilet should not be located on the side of the neighbors.
Note
When building a toilet, it is better to take into account the directions of the winds that are most frequent in your area: unpleasant odors should not bother the neighbors.
When your summer cottage is located slightly downhill, the toilet should be lower than the source clean water- this way waste will not get into the water.
Regarding the country house and neighbors' buildings
- The toilet must be at least 12 m away from residential buildings, cellars, and basements.
- From the building of a bathhouse, sauna, shower - at least 8 m.
- From enclosures for keeping animals, poultry houses, etc. - no less than 4 m.
- From trees and bushes - no less than a meter; at the same distance - from the fence enclosing your summer cottage.
Do-it-yourself toilet - do-it-yourself powder closet
Building a classic “village” toilet is not at all difficult and even a novice builder can do it. Therefore, let's focus on the device more modern design- powder closet.
Pros of powder closet:
- This design does not include a cesspool, which simplifies its construction. No need to dig a pit.
- A powder closet can be erected next to residential buildings.
- Groundwater is not polluted.
The beginning of any construction is a drawing, since all parts must have precisely calculated dimensions. They should be such that the toilet is easy to use. Thus, the minimum width of the building must be at least 1.5 m, depth - at least a meter, height - 2.2 m. The dimensions can be large, but making them smaller is not advisable. Now it’s time to decide on the building material. Most often, country toilets are made of wood. But you can build a brick toilet, cover the walls with metal profiles or slate.
Foundation: laying the foundation of the toilet
The toilet is a lightweight building that does not require a strong, solid foundation. Often a strip foundation is poured under a country toilet - the foundation is poured only along the perimeter of the walls. When creating strip foundation For any building, a trench is dug, it is brought above the zero mark and filled with cement mortar. The role of waterproofing is performed by roofing felt. The foundation is filled with crushed stone, rubble stone, gravel, broken brick. Layers of coarse sand and gravel are poured into the trench; each layer should be compacted and watered. At ground level, the foundation is filled with cement mortar. The base is made of brick and insulated with a layer of roofing felt. A blind area must be made on the outside of the foundation.
But it is much easier to make the simplest foundation for a wooden toilet: either bury supports (concrete pillars, timber or logs), or make a foundation from concrete blocks or bricks laid out along the perimeter of the building.
Operating procedure
- The first stage is marking the site for future construction. We accurately mark the corners of the future building.
- We bury supports as a foundation. We will need four asbestos-cement pipes, their diameter is about 150 mm. The outside should be coated with bitumen mastic.
- Some types of soils do not have the necessary characteristics for construction: strength, slight compressibility, etc. Peat soils usually compress under load, clay soils swell, and forest-like soils can settle under the weight of the building in spring and autumn. Before starting construction, if you are building a brick toilet, such soils require a number of drainage measures or replacement of unsuitable soil for construction. To check, it is enough to dig a hole in the place where the building will stand, with a depth of 0.5 to 1.5 m, and look at the composition of the soil. The best option for construction is if your soil is based on fine-grained compacted sand.
- In the corners of the future building you should dig 4 deep wells(about 70 cm). The pipes are buried into the ground to this depth. Although in general, the depth to which the pipes need to be buried will depend on the structure of the soil. On some soils it may be necessary to bury the pipes by 90-100 cm.
- Next, the pipes are filled with concrete mortar to a third of the height. The concrete is compacted to remove air bubbles. Support poles, most often wooden, are inserted inside the pipes and secured with concrete mortar.
- The pillars are fixed so that they protrude to a height of 2.3 m from the ground. The location of the pillars should be level relative to the corners.
The simplest option for a toilet foundation
For light wooden construction, it is enough to simply install concrete blocks or bricks. The frame will be placed on them. This “foundation” is made like this: the top layer of soil is removed to a depth of 30 cm and compacted tightly. A layer of sand is poured into the bottom of the trench, and concrete blocks or bricks are placed on top.
We are building a toilet frame
The frame of a country toilet is made of wooden beams with a cross-section of 50 x 50 mm or 80 * 80 mm. Sometimes they take thicker timber (100 * 100 mm) or even thicker, but this is not advisable. You will also need metal corners. The frame consists of 4 load-bearing supports installed vertically. We also need lining for the roof of our building.
Roof trim: horizontal bars protrude beyond the body by a distance of about 40 cm. A canopy is formed in front, and a ledge in the back for draining rainwater.
We're sitting well
The correct height of the toilet seat is the key to ease of use of the toilet. A seat that is too high will be uncomfortable for children and short people, while a seat that is too low will cause discomfort for tall family members. It is necessary to take into account at what level the floor in the toilet will be located - 40 cm upward is set aside from this height. And keep in mind that there will also be sheathing on top of the trim (about 20 mm wide).
It should be taken into account
- The screed is at the level of the toilet seat, which will appear later. The beams of this harness are installed in space against the vertical supports of the frame. The height of the toilet seat to the toilet floor should be 40-45 cm.
- For the strength of the frame, diagonal jibs are also made on the back and side walls. The frame for fastening the door consists of 2 vertical supports about 1.9-2 m high and a horizontal bar at this height.
Note
Often, slate or corrugated sheets are used to build a country toilet. They are easier to work with, but it will be uncomfortable in such a toilet. Wooden walls allow air to pass through it, providing natural ventilation.
Toilet frame trim
The walls of the country toilet are covered with wooden boards, the thickness of which should be from 20 to 25 mm. They are fitted tightly and nailed to the frame supports. It is better to place the boards vertically, with the top of the back wall and side wall sheathing boards carefully cut to match the slope of the roof (since in this design the roof will slope towards the rear wall). There is usually a door in the back wall of the powder closet through which the waste container is taken out. The hinged door has a height of 40 to 45 cm (it is made to the height of the toilet seat).
We cover the toilet roof with our own hands
The roof of such a structure is usually covered with either corrugated sheets, slate, or metal tiles. The wooden roof is covered with roofing felt or other waterproofing material.
The roof of the toilet is made so that there is a hole in it for the ventilation pipe. The pipe should be sealed.
Making a toilet door
The door is made of wood and hung on two or three hinges, depending on how heavy the door is. The door is also equipped with a latch, hook or latch on the outside and inside. A small window is usually made above the door to allow light to enter. Thrifty owners usually glass the window.
If you make the size of the toilet house large enough, you can even hang a washbasin in it.
Seat: the most important thing
What to make the seat and toilet seat of the powder toilet from? These can be boards, lining, moisture-resistant plywood. It's best to stop at wood paneling frame of the toilet seat, the boards must be painted, a hole must be cut and an appropriate container containing 20-40 liters must be installed under the toilet seat. It is better to make the lid of the toilet seat hinged, securing it on hinges. In addition, you should find a place in the toilet for a container of peat (you can hang it on the wall) and a bucket for used toilet paper.
Toilet with a barrel
From wind and rain
The roof is built after the walls are completely sheathed. Fix it along the line of the upper slope, checking the correspondence of the angles of the slope on adjacent surfaces. He should
Since at the stage of roof construction the building is still weakly secured, when working at height, just a ladder is not enough; additional insurance is needed. For example, using a reinforced stepladder.
be 30 degrees. Having installed the roof, sew up the back wall. Careful owners also hem overhangs.
The roof in this design is covered with boards. The thickness of the board is at least 20 mm. You can fasten the roof sheathing boards to the rafters with ordinary nails - there will be no special load-bearing load on a small roof.
The roof is covered with roofing material - use ondulin, metal tiles or roofing felt.
It is not advisable to cover the toilet roof with slate - such a covering greatly increases the wind load on the building.
Final check
An important stage of work is the final check. The degree of tightening of all screws, the verticality of the walls and the horizontalness of the floor are checked.
- If there are violations, you can correct the structure by adding gravel under the foundation, installing spacers, etc.
- The base of the toilet should be carefully secured; for this purpose, another fastener is placed at the bottom of the foundation. The support columns on the sides are concreted, finally securing the structure.
- Be sure to check your work for any through holes inside, on the back of the roof and walls. These sharp tips on nails and screws can cause serious injury to people.
And finally, the interior decoration of our building. It begins, of course, with cutting out a hole. First of all, a niche is cut out in the floor of the toilet along the perimeter of the buried barrel (manual, circular saw, jigsaw, etc.). The upper part of the niche is hemmed with a 25 mm board. The niche should be exactly in the center, 200-250 mm from the back wall of the toilet, and its dimensions should be at least 450 x 450 mm.
Summer residents decorate the “house” at their own discretion. The main thing is not to overload it decorative details, because the structure is quite fragile. The simplest option is to sheathe the perimeter of the front side with a decorative platband.
Reliable protection
Wood impregnation is applied after completion of the main construction work. The choice of impregnations today is very large.
- The tree should be impregnated with an antiseptic, this will protect wooden parts from mold, fungi, organic formations. After all, the toilet is an unheated room.
- All wooden parts should be protected from rotting. In conditions of high humidity, rotting can destroy a structure in just two to three years.
- Fire-resistant coating is very important. A cigarette carelessly thrown away in the toilet can cause a fire in this wooden structure.
- And another function of impregnating and painting a toilet is decorative.
Hanging the toilet door
You can make the door yourself or reuse an existing one. In any case, it also needs the application of protective impregnations. The door is installed on hinges that are pre-lubricated with any solid lubricant (solid oil, for example), which will protect metal parts from the appearance of rust.
Toilet lighting
Before the final finishing of the interior decoration of our house, we should take care of lighting. When carrying out electrical installation work, it must be taken into account that the toilet is a building with high humidity. Based on this, we comply with the following standards:
If there are children in the family
Let's say we use LED lamps voltage 12 or 36 Volts. A voltage converter is installed at the beginning of the power supply line, and the switch will be built into the design of the lamp. If there are children in the family, then such a safe lamp can be installed at a low height.
- There should be no more than five meters from the power line support to the toilet.
- The power cable is installed using a mast with a height of at least 250 cm; in this case, the mast must be securely fastened to the rear wall of the toilet.
- Grounding installation is required.
- Cable routing inside the building is carried out open method, its cross-section must be at least 0.75 square meters. mm.
- The lamp power should not exceed 40 W. It is safest to use energy-saving lamps. The design of the lamp itself must be intended for use in rooms with high humidity.
- The light switch should not be located inside the toilet. It is installed on a special panel at the beginning of the power supply line. This may be a distribution panel, or the switch can be installed inside a permanent building.
Mounting the seat
First of all, we need to make a so-called podium. You will need bars measuring 30 * 60 mm, as well as self-tapping screws at least 70 mm long, which will connect these bars into the podium structure.
The niche opposite the cesspool should remain free - this will allow the barrel to be cleaned in a timely manner, and such a toilet will last much longer.
The created structure is sheathed with sheet material, which must be durable (plywood, chipboard, OSB boards). The front wall is covered with a rectangle the right size. Secure it with self-tapping screws.
Upper part podium - mark a strip of sheet material that will go around the vertical posts of the wall frame. They cut out a rectangular part, and then mark the grooves, the location and size of which correspond to the racks.
On the top part we install a toilet seat, closed with a lid.
For aesthetics, so that the interior space of the podium is hidden from view, install a simple device inside - a plastic box without a bottom or lid.
Interior decoration of a country toilet
If you used to build a toilet quality materials, the inside of the toilet does not need to be painted. It is enough just to etch the boards with a protective coating.
The floor and podium are painted with weather-resistant dyes.
It is still better to protect the building door and external walls by painting. First, the surfaces are cleaned of old paint, if any, and sanded.
DIY backlash closet
How to organize a sewer system
You can make a pressure or gravity sewer. This depends on the characteristics of each individual summer cottage. With pressure sewerage, waste is supplied using special fecal pumps; with gravity sewerage, it leaves by gravity.
When installing a gravity sewer, it is very important to maintain the slopes correctly. The slope must be the same throughout, and then the length of the sewer pipe can be any.
Note
Very often they make the slope as large as possible, believing that this way the waste will flow out faster. This is a mistake. If the slope is too steep, liquid leaks out faster, solid waste is retained, and the pipes become clogged. Also, the flow of air to the surfaces of underfilled pipes leads to corrosion and a decrease in their service life.
Pressure sewerage is installed if it is impossible to maintain a sufficient slope angle. This could be when, for example, that By the way
Drainage slope
For novice builders, the difficulty lies in the fact that the unit of measurement of slope adopted in the construction literature is unusual for them - these are decimal fractions of the form 0.03 or 0.008. This fraction is the ratio of the height of descent to the length of the pipe. For example, 3 cm by 1 m, or 0.8 cm by 1 m. The length of the sewer pipe in meters, when multiplied by the slope, will give the total height of the slope along its entire length.
Polypropylene pipes (they do not deform at high and low temperatures and are easy to install) are assembled starting from the bottom, inserting each subsequent one into the socket of the previous one. In places of turns and at the bottom of risers, special inspection pipes are required. Joint polypropylene pipe with cast iron it is done using a rubber cuff.
When installing pressure sewerage, the pipes are connected by welding. The diameter of such pipes depends on the requirements of the pump and ranges from 20 to 40 mm.
The outer part of the sewer is placed in a trench. The depth of the trench should be below the soil freezing level. Pipes for external sewerage are made of cast iron, ceramic or asbestos, but they can also be plastic if they are laid in places where there is no increased load. The pipes must slope towards the drain.
When installing a toilet, remember that its outlet should not be lower than the neck of the pipe. In this case, it is raised using bricks and cement. The toilet outlet is placed on the cuff with a seal, and the cuff itself is inserted into the pipe.
Note
If necessary, it is better to place 2 elbows at 45° than one at 90°. This way the flow of drains will not slow down.
The toilet is located below ground level.
A fecal pump is needed here. Purchasing one is not a problem; summer residents are offered a wide range of models that differ in power, distance, method of pumping waste (vertically or horizontally), etc.
The final chord: what to do with the “good” from the toilet
The country sewer system is divided into two types
| Hermetically sealed cesspool | Such a pit is reliably isolated, and it does not pose an environmental hazard. Sewage with a cesspool requires regular cleaning as the tank fills. This should be taken into account when choosing a place to place it: a sewage disposal truck should freely approach such a pit. A cesspool is undesirable if groundwater lies at a distance closer than 3.5 m from the surface. It should be located no closer than 30 m from the nearest well. And, preferably, no closer than 15 m from the country house. The walls of the cesspool should not allow water to pass through. To do this, it is concreted or filled with cement mortar. If the depth of the hole depends on the groundwater level, then the width is not limited. |
| Septic tank – wastewater treatment system | Such a system collects all waste from summer residents into a special tank called a sump. It provides mechanical cleaning. Modern devices equipped with a biofilter. Purified water is discharged to a place remote from the dacha area. A septic tank is used to bring waste products to an environmentally safe state. There are two types of septic tanks: storage and purification. A storage septic tank requires periodic cleaning. It is equipped with fill level sensors. A storage septic tank is purchased based on the volume required for the family. The volume is calculated from the daily water consumption at the dacha. One person consumes from 50 to 250 liters per day. It is better to purchase a storage septic tank “with a reserve”. You should also take into account the material of manufacture and the thickness of the walls, since the septic tank is buried in the ground. A cleaning septic tank consists of several chambers where waste is completely cleaned. |
Shower and toilet in the country: for beginner builders
Even if in your life you have never built anything more complicated than a stool, you can build a toilet and shower in your summer cottage.
STEP 1. cesspool
It is better to seal the walls of the cesspool by providing a hatch for pumping out waste.
- First, we clear the construction site of roots, trees, bushes and debris. For a family of 3-4 people, we dig a hole one meter wide, 120 cm long, 200 cm deep.
- The earth should not crumble into the hole and clutter the construction area. Fertile layer on garden wheelbarrow we take it to the garden, the clay away from our plot.
- We strengthen the walls of the resulting pit. We take flat sheets of slate measuring 1 * 2 m and cut them with a grinder to the size of the walls. We lower the sheets down and secure them in the hole using reinforcement corners. For this purpose, we punch holes in the slate and hammer the corners into the wall of the pit.
- The gaps between the walls of the pit and the slate should be sealed using reinforcement rods. We lay the rods in the cracks, then lay sheets of roofing felt for waterproofing, then fill in the cement mortar.
- We place a sheet of iron at the bottom of the hole: this way the earth will be sealed from impurities.
- For now, we cover the finished pit with polyethylene from dampness and precipitation, and we ourselves begin to build a columnar foundation.
STEP 2. FILLING THE FOUNDATION
It is economical to combine a shower and toilet for a summer house in one building. The parameters of such a building are: width one and a half meters, length 3 meters, height 2 m 20 cm. Thus, the premises will have an area of 1.5 by 1.5 m. However, for a family of three people, a building area of 1.2 for a shower and toilet is enough * 1.2 m.
Note
It is very important to spread the slate sheets with wooden blocks before pouring the solution.
- The building will be wooden, which means that the foundation will be columnar, light, and 80 cm deep.
- We cut 16 wooden stakes and mark the location of the future foundation. Along the perimeter of a rectangle with parameters 150 by 300 cm, we install 14 stakes every 75 cm. We also place pegs in the far corners of the pit: there will be a hatch through which the cesspool will be cleaned in the future.
- Check the location and verticality of the pegs. There should be equal spaces between the stakes, all angles should be 90°.
- To drill holes, it is best to use a garden auger with an auger with a diameter of 13 cm. We make 16 holes. We equip each pit with wooden formwork, the height-length-width of which is 20 x 20 * 20 cm. Using a building level, we level the formwork horizontally.
- In each hole we insert three reinforcing rods, which are fastened together with wire - this way the foundation will be reliable. We place rolled up roofing material at the bottom of the hole so that the concrete is isolated from the soil.
- We fill the recesses with cement mortar. Fine crushed stone is often added to cement, based on the ratio of cement, sand and crushed stone 1: 3: 5. We level the solution onto the formwork.
- We place a metal pin with a diameter of about 10 mm in the center of each hole. We deepen the stud by 12 cm so that 8 cm remains above the cement level.
- While the cement hardens, we prepare a wooden beam for constructing the frame.
STEP 3. CONSTRUCTION OF THE FRAME
We will need a beam, the side of which will be equal to 10 cm. When the cement has hardened, it is time to remove the formwork and make the lower frame of the foundation.
- Using a chainsaw, we cut off the beams along the length of the sides of the future building and connect them together in half a tree. That is, 5 cm of the thickness of the beam is cut out on each side, and so the beams are connected to each other according to the principle of a puzzle.
- We drill holes into which the studs protruding from our columnar foundation will go.
- We lay the ceiling, securing it with a washer and nut with a spanner.
- Don’t forget to lay roofing felt under the timber for waterproofing.
- The lower frame is ready: the beams lie on the posts, fastened with studs and nuts. After this, the wooden beams of the strapping are covered protective composition from external influences.
- Above the pit (there will be a floor and a “podium” seat) two metal channels are laid for strength.
- Part of the cesspool outside the perimeter of the walls is covered with planks and protected with moisture-proofing material. In the future, the drainage machine hose can be inserted by removing several boards.
- We begin to install vertical pillars. Their height is equal to the height of the future building - 220 cm. The first pillars are installed in the corners of the building, checking that they are installed correctly using the building level.
- We connect the vertical pillars of the frame to the lower frame using metal plates and corners for fastening. For reliability, we install spacers at the base of the pillars, securing them with long-length self-tapping screws.
- We install the next two pillars where the doors will be. Their height is 200 cm, the width between them is 80 cm. Above the door at a height of two meters we strengthen the horizontal spacer. And the remaining 20 cm between the doorway and the ceiling will subsequently be glazed. We also secure these pillars using spacers secured long screws. When the pillars are installed, you need to make the top trim: the timber is also connected halfway across the tree.
- The entire structure is treated with an antiseptic compound to prevent wood rotting.
This article presents samples of country toilets: drawings of cabins, their average sizes, some recommendations for construction. The design can be different: there are rectangular, triangular, diamond-shaped designs. Choose a shape, then a material, and you can start building. There are drawings, the structure is not the most complicated. Just keep in mind that the sizes are given for people of average height and build. They can be easily changed without changing the design much.
The design of a country toilet can be simple or intricate
Outdoor toilet diagram
The most common option for a country or garden toilet is a rectangular structure. It is also called a “birdhouse” because in the version with a pitched roof it is very reminiscent of it.

Project of a country toilet made of wood like “Birdhouse” (to enlarge the size of the picture, click on it with the left mouse button)
In the toilet drawing shown in the photo above, a 40 mm thick board was used for finishing. The construction is quite inexpensive. Doors can be made from the same boards, fastened with strips at the top, bottom and diagonally. The hinges can be installed externally, like barn hinges, decorating the building in a deliberately rough style.

Samples of country toilets: the drawings are the same, the design is different
Despite the fact that the building is utilitarian, if desired, it can be given an attractive appearance and the birdhouse will turn into a quite attractive small building. For example, you can make a small mill from this building.

Country toilet-mill - a little imagination and an unsightly building becomes a decoration of the site (to enlarge the size of the picture, click on it with the left mouse button)
The same birdhouse, but made from a log house - a completely different look. Everything will look especially harmonious if the building on the site is built (or will be built) also from logs.

Even the simplest log toilet looks almost exotic. Moreover, it can be used as winter option(to enlarge the size of the picture, click on it with the left mouse button)
For regions where wood is a luxury and it is irrational to spend it on building a toilet, the same structure can be sheathed with a different material. For example, the frame is sheathed with any sheet material - plywood, fiberboard, gypsum fiber board. You can lay finishing material on them outside - tiles or decorative stone. An even more budget-friendly option is to sheathe it with corrugated sheeting.

You can build a toilet in your dacha with your own hands from any material. This one is made from corrugated sheets (to enlarge the size of the picture, click on it with the left mouse button)
This is the type of toilet that is not difficult to build using bricks. They are usually made in half a brick. There are no difficulties even for an inexperienced mason. Offset masonry, cement-sand mortar.

Using the same project and drawing, you can build a brick toilet (to enlarge the size of the picture, click on it with the left mouse button)
Toilet type "Shalash" (triangular)
This toilet cubicle looks like a triangle. The side walls are also the roof slope. You can build such a toilet with your own hands in a few hours. Drawings with approximate dimensions are given in the picture below. Adjustments can and should be made to them: all dimensions are given for people of average build.

Drawing of a country toilet of the “Hut” type (to enlarge the size of the picture, click on it with the left mouse button)
If you need wider doors, you can not expand the base, which is already quite large in this project, but make doors of a non-standard shape - as in the picture on the right.
Sheathing finishing materials in the toilets "Shalash" is carried out only in front and behind. Roofing material is laid on the side surfaces. You can use any, but it looks good soft tiles or polymer slate.

Having the drawings of a triangular toilet in the country is easy to build
In the photo on the right, the sheathing is made under sheet roofing material - we used plastic slate - it comes in different colors, is relatively inexpensive, and is easy to install - with nails and spacers.
If you plan to use soft roofing material - roofing felt, bitumen shingles or something similar, make a solid sheathing - from a sheet of moisture-resistant plywood, chipboard, gypsum fiber board. They are attached to the frame with self-tapping screws, and roofing materials are laid on top.
Drawing of the Teremok toilet
This toilet is shaped like a diamond. Compared to the “Shalash,” it takes longer to build, but it also has a more decorative appearance. If designed appropriately, it will not spoil the landscape at all.

Drawing of the Teremok toilet with dimensions (to enlarge the size of the picture, click on it with the left mouse button)
A diamond-shaped toilet house on a summer cottage looks good. The outside of the frame can be covered with round timber of small diameter sawn in half, clapboard of large thickness, block house, regular board. If you use a board, do not nail it end-to-end, but overlap it a couple of centimeters on the bottom, like a fir cone. You can, of course, end-to-end, but the appearance will not be the same...
Second option: the Teremok country toilet is made with beveled side walls.

Country toilet "Teremok" - the second project with dimensions (to increase the size of the picture, click on it with the left mouse button)
The main challenge in any small wooden toilet is to secure the doors well. The door frame is the most loaded part, especially on the side where the doors are attached. To fasten the door posts to the frame beams, use studs - this way the fastening will be reliable.

Photo illustrations: building a toilet in the country with his own hands. The drawings are presented above
From this generally simple design you can make a restroom in any style. For example, in Dutch. The finishing is simple - light plastic, on top of which are characteristic beams painted with stain. Please note that glass inserts and the fact that the roof of this example is made of polycarbonate. If the polycarbonate is multilayer, it shouldn’t be hot)))

Country outdoor toilet in the form of a Dutch house
You can even turn the Teremok toilet into a royal carriage. This is not a joke...confirmation in the photo. All you need to do is change the shape and add a few decorative elements typical of carriages. So you get a toilet in the form of a carriage.

Here are some photos of the manufacturing process. The original has a dry closet, so the construction is simple: there is no need to think about the pit and the nuances associated with it... but such a cabin can be adapted to any type...

Characteristic frame
Please note that the shape is achieved thanks to boards installed at an angle, and the smoothly tapering bottom is achieved by appropriately trimmed supports.

A dry toilet is installed on the podium
The floor is covered with short boards, then the sheathing begins on the outside. At the top, the carriage also has a smooth curve - you cut out the corresponding guides from short boards, nail them to the existing side posts, and you can begin the outer cladding of the walls.

The inside is also lined with clapboard. The exterior of the carriage toilet is whitewashed, the interior wood has a natural color. Then all that remains is decoration and the addition of characteristic details - monograms painted in gold, lanterns, “golden” chains, wheels.

Painting and decoration
“Royal” curtains and flowers))) There was even a washbasin and a small sink.

Inside view of the windows
After all the efforts, we have the most unusual toilet in the area. Few people can boast of this...

There are also suitcases in the trunk))
Warm restroom
Using a toilet with a single plank wall in the summer is quite comfortable. But not all dachas are visited only in the warm season. For the autumn-spring period, at least some kind of insulation is necessary to block drafts.
In this case, the design of the toilet is no different. Just increase the dimensions by 5-10 cm more: the skin will be double - outside and inside, and insulation is laid between the skin. The doors will also need to be insulated - double doors are too heavy for such a building, but from the inside they can be covered with a piece of linoleum, dermantine and other easily washable material.
Combined shower-toilet
The second most necessary building at the dacha is a shower. And if so, then why build two separate structures if they can be built under one roof. Several drawings of country toilets with a shower for self-construction are published below.

Option of a combined toilet for a shower (to enlarge the size of the picture, click on it with the left mouse button)
The second project of a toilet and shower under one roof.

Appearance and drawing of a toilet and shower for a summer house in one building (to enlarge the size of the picture, click on it with the left mouse button)

View and dimensions of the toilet + shower from the front and side (to enlarge the size of the picture, click on it with the left mouse button)
As you guessed, the structure is simply doubled in width. If you want, you can create your own project, according to your desires and needs. The drawing of a utility room with a toilet will be exactly like this. You may need to make one of the rooms a little larger. Just provide for this when planning and manufacturing supports for construction.
Build a toilet with your own hands: drawings, dimensions
The first thing you need at your summer cottage is to build a toilet. It’s not difficult to do this with your own hands. If you need drawings, they are in the article. For cabins of different types - birdhouse, "Teremok", "Shalash", with shower
Do-it-yourself country toilet: photos, drawings and design tips
Everyone knows that comfortable stay at the dacha is possible only if there is a well-equipped sanitary facility. It is for this reason that the arrangement of a dacha site most often begins with the construction of a toilet, for which it is extremely important to choose the right location and materials. In this material we will look at how to build a country toilet with your own hands. Photos, drawings and detailed instructions are attached.

A well-equipped closet is the key to a comfortable stay outside the city
Choosing the optimal location
The right location is the key to the successful construction of a sanitary facility, its durability and strength.

Place plays a decisive role in many respects

A responsible approach to business will save you from problems with construction in the future
Before starting construction, pay attention to the following points:
- On the drawing of your site, indicate places located at least 8 meters from the water well, 7 from the house and 1 from the fence. This is what they will be optimal options for construction.

- The next point to pay attention to is the height of the site. An excellent option for construction is a lowland.
- The soil on which the toilet will be built should not be very wet.
- Wind direction is one of the most important indicators that need to be taken into account. We must try to ensure that the predominant direction is not directed towards residential premises.
- Another important point: shadow, which in the case of a country toilet should not be constant, just as the location of the structure in the sun is unacceptable. The best way out of this situation would be to build a toilet under a tree that casts a shadow only at certain times of the day.
- If construction is planned for for a long time, it is necessary to provide convenient access for a sewer truck in order to clean the cesspool in a timely manner.
Important information! Under no circumstances should you build a toilet on the site of an old destroyed closet or garbage pit - this can be dangerous in the future!

The process of cleaning a septic tank or cesspool
DIY country toilet: photos, drawings of various types
There are many different types of country toilets. As a rule, they do not require water supply or sewerage, and some of the presented options can even be purchased at a regular hardware store. So, now we will look at options for building a country toilet with our own hands with photos and drawings.
Country toilets have many different types designs
Standard sanitary room
This design looks like a very ordinary booth with a seat or just a hole in the floor, often made of boards or other available material, which is additionally reinforced in the walls and foundation. A sewer truck is used to remove waste.

An ordinary country toilet with a simple design that is accessible to most
Do-it-yourself toilet for your dacha. Step-by-step instructions for building a toilet (hut, birdhouse), ready-made drawings and some nuances of arrangement in special material.
Powder toilet
This building differs from the others in the absence of a cesspool, as it uses the “powdering” technology. After each visit to the latrine, the waste is sprinkled with a mixture of peat or ordinary ash, and the resulting substance is excellent for fertilizing the soil.

The powder toilet provides the opportunity to obtain high-quality fertilizer for your garden
Chemical sanitary room
This toilet differs from the previous one in that waste neutralization involves exclusively chemicals, which means you won’t be able to get fertilizer for your plot this way.

The chemical toilet does not provide for the possibility of further use of waste products as fertilizer
Backlash toilet
The construction of such a building involves partially deepening a cesspool under a residential building, due to which the toilet is built right next to the wall. The toilet hole is connected to it using a small sewer pipe. Waste is pumped out by installing a sealed hatch.

The backlash toilet involves a cesspool under the house
This design is manufactured at the factory, delivered to customers in finished form and serves a great alternative DIY country toilet. Photos, drawings and other materials are presented below. A dry toilet is a cubicle in which a waste tank is installed. After each trip to the toilet, waste products are neutralized using special bioreagents.

A dry toilet is convenient because you don’t need to build a toilet yourself and look for materials
Peat type closet
Thanks to its unique design, this toilet combines the features of dry closets and “powder” technologies. Thus, all waste processed in this building and accumulated in a separate container can be used as natural fertilizer.

A peat toilet allows you to obtain excellent natural fertilizer
Peat toilet for a summer house: which one is better? An overview of the pros and cons, as well as popular manufacturers and prices for peat closets in a special publication on our portal.
So we've sorted everything out existing species closets, each of which has its own advantages and disadvantages of use. But only you can decide which one is suitable for your site.
Now we will look at how to build a toilet in a country house with our own hands. Drawings, dimensions and calculations must be prepared in advance, and we will help you with this.

A competent, clear drawing is the key to a successful business.
If you decide to build a toilet in your country house with your own hands, the drawings and dimensions of which are presented below, it is important to take into account all the nuances and little things.

The beautiful design of the booth is pleasing to the eye
The construction sequence is as follows:
- According to the above rules for finding the optimal location for the construction of a closet, choose the most appropriate option.
- The future building is marked, a hole is dug with a depth of two meters and a width of one and a half meters.
- If the soil is loose or wet, the bottom of the pit is filled with crushed stone or gravel and lined with brickwork.
- The foundation is installed - strip or columnar, depending on your requirements and requests.
- A frame is erected from wood or any other materials, which is subsequently covered with corrugated boards, boards and other coverings. The roof is being blocked.
- If necessary, the room is insulated from the inside.
Useful information! The liquid part of the waste should be well absorbed into the soil.

It is important to follow the construction sequence - this will help you do everything right
We make a toilet in the country with our own hands: drawings, sizes of the most popular options
The frame of the future building is made of bars measuring 10x5 cm, which are installed on runners according to the drawing.
Useful advice! It is necessary to ensure that the beams are thoroughly treated with an antiseptic, since they come into contact with the pit and the waste located in it.

Sanitary room frame drawing
If you plan to cover it with wood, then the same beams are used as when constructing the frame, which are attached to the base with nails. It is important not to forget to make special windows for ventilation and lighting during the day.

Standard toilet with a tire cesspool
Building a roof is not a difficult task: it can be done using any roofing materials available to you.

For aesthetes, it’s worth trying to build an unusual roof
Drawing conclusions
So, we see that with proper preparation, building a country toilet with your own hands, the photo, drawings of which are presented above, is quite simple. The key to the success of any of your construction undertakings is a responsible approach!
DIY country toilet
If you decide to build a country toilet with your own hands, the photos, drawings, videos and dimensions presented in this article will help you cope with this task.
Projects, drawings and diagrams of a country toilet
You shouldn’t deny yourself comfort even at the dacha. There are a huge number of projects for country toilets that every person can implement. But first you need to decide on a drawing and, according to it, build the future structure.
A huge amount of materials and all kinds of designs for country toilets leads to the fact that people are simply lost against the backdrop of all this diversity. That is why the theoretical part is so important. Based on the data in this article, you can choose the optimal project for your dacha.
Typical designs of country toilets

Basically, to create a country toilet project, the following types of structures are used:
Each of these designs has its own advantages. That is why it is so important to decide on the type before starting construction.
Country toilet with cesspool
The project must include a foundation pit. You also need to take care of its arrangement. For this you can use a plastic barrel or brickwork, reinforced with reinforcement.
In the project you must provide the required amount of bricks and cement, and also do not forget about the reinforcement. The walls you create are subsequently covered with plaster. It is the pit that determines the character of the above-ground building. Usually it's small wooden house, created from scrap materials. It can be in the form of a hut, a miniature house, or even a tower.
According to this country toilet project, all waste will accumulate in a pit. For further cleaning you will need a vacuum cleaner. The main disadvantage of the project is the unpleasant smell. That is why it is very important to provide for ventilation at the planning stage.
Ventilation can be either natural or forced. In the first case, two holes are made in the structure at the bottom and at the top. Their purpose is extremely simple - to create air disturbances. This way, the unpleasant odor will not linger inside for long.

Forced ventilation is a simple fan that blows out all the unpleasant odors from the toilet. When installing it, you need to think about the compensation hole through which air will penetrate inside. Its diameter must be no less than the diameter of the fan. All this is written down in the project.
Powder closet
When creating this country house project, a cesspool is not provided. All waste is collected in a reservoir under the toilet seat. It is best to include two containers in the design different sizes. In the smaller one you need to make several different-sized holes and insert it into large capacity, on the side of which there will be a round exit. A drainage hose is connected to it.
Through the hose, the liquid goes into the ground or drainage system. Main role In this country toilet project, the container for the filler plays a role. Peat is most often used as a mixture. The filler helps control unpleasant odors. Once the tank is full, it should be taken to the compost heap.

When you make a drawing, it is important to take into account the ease of removing the container. There are two possible options solutions to this problem. In the first of them, the reservoir is removed when the seat is raised. In the second, a small door is cut out at the back of the building. It allows you to remove the filled container without much difficulty.
You don't even need to build anything here. In fact, you are buying finished project country toilet. All you need to do is install the product in a convenient place. In this case, you can purchase it as finished design, and the whole cabin.
Shower and toilet under one roof
Nowadays, designs for a country toilet combined with a shower are very popular. This is especially beneficial from a financial point of view. In addition, such a project allows you to significantly save free space on the site.

In the project, the toilet and shower will have one common wall. The result is savings in building materials. In this case, the bathroom can operate both on the basis of a tank with a mixture, and on the basis of a cesspool.
How to create a drawing
The main task of the drawing when creating a country toilet project is to detail the design. The paper clearly indicates the size, shape and type of building. At the same time, there are a number of standards that must be observed.

Firstly, the distance from a country toilet to a water supply point cannot be less than 30 meters. This must be specified in the project. Secondly, a residential or commercial building should not be located closer than 15 meters. Of course, there are exceptions in the form of the same septic tank with a biological treatment system.
Dimensions are of particular importance in the drawing. You are free to ask them yourself. But there are certain standards that make it possible to create a beautiful and easy-to-use building with a high guarantee.

The height of the future dacha building should not exceed two and a half meters. In this case, the minimum indicator is at the level of 2 meters. The length of the building is from 1.2 to 1.8 m. The width is in the range from 1 to 1.2 m.

Many novice builders do not attach enough importance to the parameters of the cesspool. This is unacceptable. After all, it also needs to be included in the drawings. The estimated depth is 1.5-2 m, diameter is from 2 to 2.5 m. If groundwater lies close to the surface, then the pit will have to be abandoned.
Projects of superstructures for country toilets
When choosing a suitable project for a country toilet, the selection of material is of particular importance. It is he who largely sets the parameters of the future building. There are several typical options, which will be discussed further.
Brick toilet
Advantages of this material can be listed ad infinitum. It is resistant to atmospheric influences, retains heat and cool equally well, and is environmentally friendly. Moreover, it allows you to give the structure any shape.
The basis of this project is the foundation. Without it, creating a country toilet out of brick is simply impossible. Separately, it is necessary to mention the quality of the masonry. This is the real art of laying bricks that will last forever. The top of the building is covered with a roof, a material for which in most cases slate is used.

In the picture you see an example of a related project. One design combines a toilet and a shower. This is not only practical, but also allows you to save a lot on the cost of building materials.
The project of a wooden country toilet is a classic. Its construction takes a minimum of time, but in order for the structure to serve you faithfully, it is necessary to strictly follow the planned plan during the work process.

The picture shows one of the most popular options among summer residents - a teremok. As you can see, he has a small internal space and small dimensions. This allows you to install it anywhere. It is also worth noting the aesthetic appearance.
Metal toilet
This project option will appeal to those who want to save time and money. During construction, you can use sheets of metal left over from the construction of the house. The only thing you need to take care of is the interior lining. Of course, you can do without it, but in winter it will be very problematic to stay in such a structure.

The main advantage of the project is that there is no need for any knowledge. Almost anyone can build such a country toilet. This is the most cost-effective option you can imagine. The only thing you need to pay attention to is the toilet seat. It is best made of wood to make it comfortable to sit on.
Types of wooden cabins
It is wooden cabins that are most popular among summer residents. This is explained quite simply. The timber is inexpensive, but provides good thermal insulation and has a pleasant appearance. During construction, the following projects are most often used:


As you can see, there are many different designs for country toilets. During construction, you choose the material, type of construction and internal structure. Any of the above options has its own disadvantages and advantages. Therefore, it is very important to weigh all the pros and cons of each project and make a choice in favor of the optimal one.
Country toilet: projects, diagrams, photo drawings
Projects, drawings and diagrams of a country toilet You shouldn’t deny yourself comfort even in the country. There are a huge number of projects for country toilets that anyone can implement
Do-it-yourself toilet in the country - drawings and dimensions
 For those who have decided to build a toilet in their country house with their own hands, drawings, dimensions, and sketches are the necessary help that does not allow you to deviate from the chosen technology or build a structure that is not suitable for use. Before proceeding with more precise developments, it is important to choose the type of design of the country toilet, its location and other parameters. They, in turn, depend on operating conditions, which indicates the need detailed analysis taking into account the perspective. For example, if there is a possibility that after some time the number of people visiting the dacha will increase, or you plan to equip the house in such a way that you can live in it longer, create a toilet in advance with the expectation of an increase in load, so that you do not have to redo it later .
Types of toilets
The easiest way to build a toilet for a summer house with your own hands is a wooden one - drawings of such structures are not difficult to find, and in some cases, step-by-step instructions without illustrations are sufficient. However, a beautiful and reliable house is not enough to ensure comfort. It is important to take care of waste disposal. From this point of view, there are several options for a country toilet.
Backlash closet
The backlash closet is designed in such a way that waste from the toilet moves by gravity, collecting in the receiver, which is cleaned as it is filled. Typically, the movement of waste is facilitated by the inclined floor of the tank, which has a shape that expands in the direction from the toilet. The advantage of this design is that it is possible without the construction of a full-fledged sewer system. install the toilet in a warm room in the house, and move the tank outside to avoid odor. The part of the backlash closet located outside is equipped with a lid through which cleaning is carried out using a sewer machine. To ensure thermal insulation, it is made hermetically sealed and multi-layered (for example, made of metal and wood with a “layer” of thermal insulation material). The disadvantage of a backlash closet is that it is built into a load-bearing wall, which means that its arrangement is best done during the construction of the house.
 The photo shows a diagram of the backlash toilet
Powder closet
The powder closet has a storage tank in which waste alternates with layers of backfill (“powdered”). Sawdust, peat, ash or a mixture of these components are used as such backfill. Backfilling is performed after each visit to the toilet. For purchased models, a special distributor is responsible for the distribution of the bulk mixture. Homemade ones use a regular bucket or other container with a scoop, which is installed in the toilet.
The advantages of the powder closet are:
- the ability to use the contents of the country toilet storage tank to obtain organic, safe fertilizer (for this, when the tank is filled, it is unloaded into a compost pit for ripening),
- solving the disposal issue (no need to call a sewer truck),
- minimum excavation work (they will only be required to construct the foundation of the building, the tank is placed on the surface),
- the possibility of constructing compact portable toilet models that can be brought into the house (for example, based on a regular bucket).
 Drawing of a wooden powder closet with dimensions according to the “hut” type
  Drawing of a country toilet like a powder-closet made of corrugated board, “birdhouse” type
Dry toilets are structures in which waste is recycled. During the decomposition process, the contents of the tanks turn into sludge that is uniform in consistency, safe, and occupies less space(and therefore less likely to require emptying of the tank) and convenient for pumping. In order to ensure the decomposition reaction, factory composting toilets use fillers, which can be:
- peat mixture
- chemically active reagents,
- biological products (dry or in liquid form), which are colonies of bacteria of a certain type.
 The dry toilet can be used both in a separate street house and in a house
Pit toilets
A country toilet with a cesspool is a kind of classic. Not the most convenient, but the simplest and cheapest option. All waste is collected in a storage tank, which is periodically cleaned using vacuum trucks. In some cases, the filled cesspool is covered with earth, moving the house to another place. In such a filled hole, after some time, compost is formed, which can be used to fertilize the soil. The most common (albeit least environmentally friendly) is the toilet option in which the cesspool has no bottom. It is only sometimes covered with crushed stone, gravel or other material through which filtration is carried out with partial drainage of the contents into the soil.
Important: If the groundwater level is high, it is advisable to replace such pit models with sealed storage tanks.
 The drawing shows the dimensions of a country toilet with a cesspool
Options for arranging a cesspool
Regardless of the presence of a sealed bottom, the toilet cesspool requires the construction of walls. Firstly, they prevent the collapse of the earth in the dug pit. Secondly, the walls prevent waste from seeping into the upper layers of the soil. To construct cesspools, a variety of materials are used, specially purchased, left over from the construction of other structures, or simply available materials. Let's look at the most common options.
Concrete rings
Concrete rings combine the strength, reliability and durability of the best building materials with high speed, with which they can be used to build a tank of the required volume. The rings are attached to each other in a “column” using mortar, the seams are sealed and waterproofing is performed. All work can be completed in one day. The disadvantage of this option is the large weight of the finished concrete products. It is impossible to bring them to the site, unload and install them correctly without the use of special lifting equipment, which means that additional costs will be required to build a toilet.
Monolithic concrete
For the construction of a cesspool made of monolithic concrete, the material can be easily delivered to the site. The solution is prepared in a household concrete mixer or in any container using a drill mixer. Before starting to prepare the solution, formwork is installed in the pit. It can be made from any available materials (boards, plywood, metal sheets, etc.). To give the structure greater strength, a reinforcing frame is installed in the formwork before pouring the mortar. For large wall heights, experts recommend filling in stages - no more than 50-70 cm at a time. This method requires more time, since each new level is completed only after the lower one has hardened, but it is more practical and allows you to use less material to complete the formwork.
Plastic containers
The undoubted advantages of plastic containers are their tightness and immunity to moisture. Thanks to these features, country toilet cesspools made of plastic are durable and reliable. The disadvantage of the material is its flexibility. The plasticity and pliability of plastic do not allow it to withstand soil pressure, therefore, in order to avoid deformation, the walls are reinforced with reinforcement and cement mortar. In this regard, the most convenient are Eurocubes, which are initially equipped with an outer frame made of strong wire. To strengthen such structures, it remains to fill the gap between the walls of the pit and plastic container mortar. In addition to Eurocubes, other containers made of this material, for example, barrels, can be used to construct cesspools.
 Using plastic Eurocubes - inexpensive option sealed pit toilet devices
Brickwork takes time, but this construction of a cesspool allows you to give it any shape and maintain the required dimensions. You can make a tank of round, rectangular or square shape from brick. It is advisable to choose such a building material when there are remains of bricks available after the construction of other objects. To ensure the strength of the walls, it is enough to lay half a brick. In order for the toilet pit to have the required tightness, it is important to avoid omissions at the masonry stage and to plaster or coat the walls with a waterproofing compound after construction is completed.
 You will find more information about a factory peat toilet for a summer house and its choice in a separate article on the site. There is also an overview of popular models and reviews.
If you are interested in how you can make a shower for a dacha made of polycarbonate with or without a dressing room, then we also have an article on this topic.
You can read about the construction of an outdoor washbasin here.
Choosing a site for construction
It is difficult to formulate uniform requirements for choosing a place to build a toilet - a lot depends on the type of construction and the tightness of the storage tank (the likelihood of waste getting into the soil). When designing a toilet in a country house with your own hands, the drawings and dimensions are chosen taking into account a number of factors. When choosing the installation location, it is important to take into account the wind rose so that the toilet does not become a source of unpleasant sensations for the inhabitants of the dacha and their neighbors. If the design of the toilet involves periodic pumping of the contents using a sewer machine, it is necessary to provide possibility of convenient access special equipment to the site.
The most stringent requirements are imposed on non-hermetic models (primarily cesspools without a bottom). They must be installed at approximately average height if the area is different difficult terrain(in lowlands there is a high risk of groundwater contamination, and at heights there is a high risk of structural destruction due to soil erosion). It is also important comply with the required distance of the toilet from the main objects(from the house - at least 12 meters, from the water source - 25 meters, from the plantings - 4 meters and no closer than 1 meter from the fence).
Materials and tools
The choice of materials for constructing a toilet in a summer cottage is largely determined by the choice of the type of waste disposal unit. For example, when installing a cesspool, you will need bricks, cement, concrete rings or plastic tanks - depending on what you choose. To build the frame of the house you will need:
- timber with a section of 100x100 or 100x50 mm, 3 m long for the frame and vertical posts of the house,
- timber 50x50 mm for the “podium” or step on which the seat will be installed inside,
- Chipboard, boards, lining or other material for internal and external cladding,
- Ruberoid and slate or corrugated sheeting for the roof.
 The photo shows a finished wooden toilet on the site
We should also not forget that for a stationary structure it is necessary foundation- tape (you will need cement for the mortar) or columnar (cement or brick), as well as waterproofing (roofing felt or other similar material) that prevents contact between the structure and the frame in order to minimize the occurrence of rotting.
For ventilation you will need a plastic pipe with a diameter of 100 mm.
For ease of use, it is also good to install in a country toilet lighting– install electrical wiring and install a lamp or, at a minimum, equip the structure with a battery-powered lamp.
Layout and dimensions of country toilets
The scheme for constructing a country toilet is the same, in contrast to the parameters of the tanks, which are calculated in accordance with the intensity of use of the device, the number of people visiting the country house, the seasonality and duration of such visits.
The classic option is a rectangular birdhouse. It is easy to implement and convenient to use. For comfort, it is enough to make the following dimensions of the toilet in the country with your own hands:
If such dimensions seem insufficient to the owner, you can build a toilet in the country with your own hands, the dimensions of which will be larger.
Supporters of aesthetics may prefer to build a country toilet with their own hands, using drawings of a more complex design - a “hut” house, which has a small base and practically consists of two inclined planes.
 Types of houses for country toilets - “hut” and “birdhouse”


Construction step by step
For an example of the stage-by-stage implementation of construction work, we chose a “birdhouse”. This toilet scheme for a summer house is the easiest to implement.
Before starting work, the location of the future structure on the ground is marked.
1. The foundation is being completed. Strip structures are often recommended for installing a house, but many experts call a columnar foundation more practical for lightweight buildings. The simplest way to install it is to install asbestos pipes into the ground, into which the solution is poured and before it hardens, vertical pipes are installed wooden supports. It is important to control the position of the latter in terms of level, to ensure that no displacement occurs during the process of concrete gaining strength.
The construction of the foundation according to this scheme has its own nuances:
- Asbestos pipes are covered with a waterproofing layer before installation.
- The installation of vertical supports is carried out after filling the pipes with concrete to a third of the height and gaining strength with this portion of the solution.
- The immersion depth of support pipes depends on the type of soil and averages 0.5-0.7 m, but for unstable sandy soils It is advisable to increase the depth.
2. The frame of the future toilet structure is being constructed. The easiest way for this purpose is to use 100x100 (50) mm timber and wood hardware. To protect against moisture and rotting, the timber can be treated with impregnation or primed and painted. The solidity of the structure will be ensured by a metal frame, however, special equipment (welding machine) will be required for its construction.
The main elements of a reliable frame:
- load-bearing vertical supports (the front pair is longer than the rear pair to ensure the slope of the roof),
- two horizontal frames - for installing the roof and at the level of the toilet seat,
- diagonal beams on the sides of the structure to give the structure rigidity,
- supports and horizontal part of the doorway.
3. The toilet frame is covered from the outside and inside. The material you can choose from is:
4. The waterproofing layer and the main roof material are installed.
5. A door is hung, which is pre-equipped with a latch and a small window to allow light into the room (or a window can be made in the space above the door).
6. Lighting is installed.
7. The equipment of the toilet includes the installation of a seat and lid, shelves for accessories, a washbasin, etc.
Ventilation
The scheme for building a toilet in a country house with your own hands will be incomplete without ventilation. Ventilation of garden toilets is easily done from plastic pipe with a diameter of 100 mm. It is removed from the storage tank (it is important to ensure the tightness of the joints) and is attached to the outside of the structure (use metal clamps). The upper part of the pipe, equipped with a deflector to improve exhaust and protect against precipitation, rises 20-50 cm above the roof.
Do-it-yourself toilet in the country: drawings, dimensions, how to build a wooden one, diagram, photo
Drawings and dimensions for building a toilet in the country with your own hands. Selecting a recycler design. Required materials. Necessary tools. Sequence of work.