DIY rocking chair - preparing a corner for relaxation. Step-by-step instructions and manufacturing options
A successful invention for those who value the opportunity to relax and unwind without leaving home is a rocking chair. And if you put it in the garden, you can enjoy it twice as much.
The traditional material for such chairs is willow vine and its analogue is rattan. Products made from this material weigh little, are distinguished by elegant lines and a respectable price.
Modern materials can also be used in the manufacture of wicker chairs - there are options made from synthetic wicker. They are no worse than natural ones, are not at all afraid of moisture and have a very long service life.
Metal chairs, despite the reliability and plasticity of the material, are too heavy. A wrought iron chair will look great in the garden, but you will have to make a platform for it. In addition, working with metal requires certain skills; it is difficult for a beginner to make a metal chair.
Rocking chair made from pipe scraps
 Rocking chair made of metal profile
 Affordable and attractive appearance on chairs made of plastic. To these advantages we can add resistance to wet weather, durability, and bright, non-fading color. In addition, they do not have to be repainted or processed.
For self-made Wood is best suited - an inexpensive, easy-to-work material. Upon completion of work wooden chair You can give it any color or keep its texture. For those who are thinking about making their own furniture for the first time, wood is best suited.
There are many models for home craftsmen, the simplest ones are presented below.
When designing a homemade rocking chair, the main thing is that it does not tip over when the sitter leans back. It is also important that the rocking process itself, for which the chair was made, does not force the person to strain too much.
Types of rocking chairs
 The simplest type is chairs built according to the radius principle. These are the most affordable products for self-production; they are distinguished by the simplicity of manufacturing technology and design. The model presented below has a somewhat heavy and awkward appearance; this chair is suitable for the garden.
Chairs of this type are designed with a fairly low seating position, which ensures smooth rocking and safety for the seated person. If the seat is installed at a normal height, then the chair runners are equipped with bumpers - limiters of the swing amplitude. To get up from such a chair, you need to make a physical effort. And the swing itself requires some tension. 
Much more stable than chairs on runners of variable curvature; they do not tip over.
Nirvana chairs are very comfortable; if you lean forward a little, it will gently “land” a person on his feet. Rockers on elliptical runners, despite their comfort, can tip over, so they are equipped with bump stops; the front one usually serves as a footrest.
There is no possibility of tipping over when rocking on reclining chairs with awnings or on elliptical runners.
Where to begin
Below is a rocking chair for the garden, which even a beginner can make with some effort. On  You can try your hand at such a model before moving on to a complex home version.
In any case, the drawing should be as simple as possible so that it can be reproduced even without much experience.

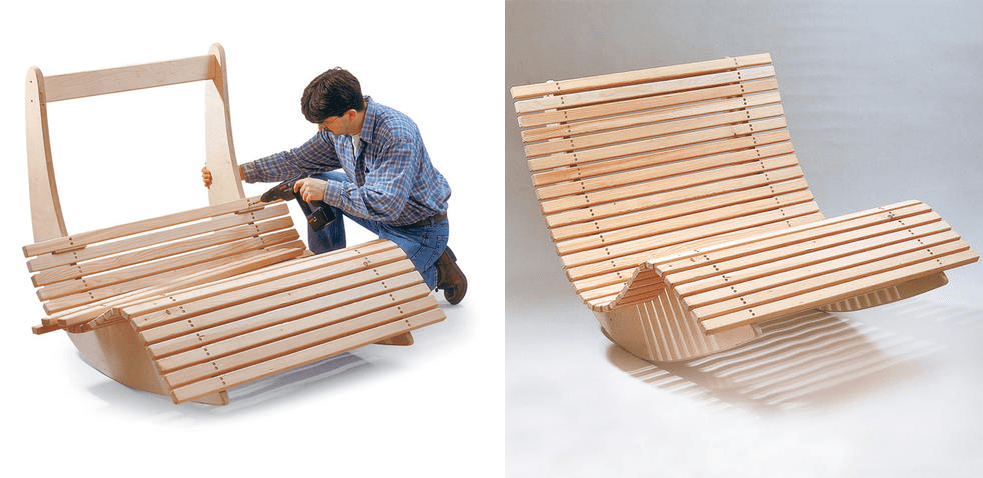
 This compact chair will look great in the garden and can be placed at home without taking up much space. This simple model will be used to describe the process.
You should start with a drawing
The drawing is made on a scale grid, on which each cell corresponds to 10 cm. All markings on the sawn parts must be made in accordance with the drawing, taking into account the scale.
What can a chair be made from?
Euro plywood 3 cm thick is suitable for work.
- You need to cut out the sidewalls exactly according to the pattern, three parts for each side;
- The remaining parts are made of timber 50 mm wide and 25 mm thick. For the seat and backrest you need 35 elements made of timber, each length 120 mm;
- In order to correctly calculate how much timber you will need, you must first visit the store and see what beams are available and what their length is. Knowing the initial size of the material, it will be possible to minimize waste by varying the width of the chair;
- For example, if bars of the required thickness, 2.3 meters long, are available for sale, then you can make the chair a little narrower - cut the bars for the back and seat to 115 mm each. If the beams are slightly wider, then the chair can be made a little wider so that there are not a lot of scraps left;
- You will also need three crossbars made of timber; when making them, you should proceed from the width of the chair - that is, the length of the bars for the back and seat.
Small variations in width will not affect the stability of the chair, so you can do this without worrying about the result.
When the parts are ready
After the parts are cut, they will need to be processed. There should be no roughness on them.
In addition, carefully processed surfaces will give the product a finished look and facilitate finishing.
Surfaces are treated using grinding machine, each part must be sanded on both sides with sandpaper of different grains. If you have the skill, you can use a router attachment to soften and round the sides of each part. If this is not possible, you can simply process the cuts with a grinder or sand them manually.
Treatment with hot drying oil should be carried out in at least two layers. This is one of the most unmodern methods, but after this the product can be painted oil paint and use even outdoors, without losing its qualities and appearance.
Small parts can be dipped entirely into boiling drying oil, but you should not hold them with your hands. It's better to make improvised tongs from wooden slats. Larger parts should be generously coated with a brush, laying them out on cardboard, each side in turn, and dry the remaining parts in the same way. Working with hot drying oil requires great care; this should be kept in mind during the impregnation process. You must not bend over a container with a boiling substance; you must wear thick work gloves.
Alternatively, the parts can be treated with antiseptics, stains, and other impregnations, of which there are a great variety in stores. They should be selected based on intended purpose item: where it will be used.
At the end of the work, you can go through it with fine sandpaper again by hand, bringing it to complete smoothness.
Assembly
- It is imperative to mark the places where the cross beams are connected - these places are marked on the drawing; their location should be calculated on finished parts, based on the grid step.
- Having assembled the sides, you can begin to attach the seat and back parts. The back will be attached to the stand, the seat to the drawers.
We need to pay attention to this again. that the drawers must be fixed strictly symmetrically, and the assembled side parts, if placed on top of each other, must completely coincide, without the slightest deviation.
- Now the side parts are fastened together by crossbars; they should be attached at the legs, in the middle and at the top of the chair. For attachment, it is better to use confirmats (a type of connecting fastener);
- To attach the back and seat parts, four holes should be drilled in each block, two on each side. To ensure that the heads of the screws are not visible, each hole must be slightly widened from above with a drill of a larger diameter (it must be selected according to the diameter of the heads). When screwed on, the caps will end up in recesses, which can then be masked with furniture putty.
Such careful completion of the first part of the work will ensure the fulfillment of the following indispensable condition - all parts of the seat and back, all 35 bars must be positioned strictly horizontally.
Final processing
After assembly, the product must be processed again to give it a finished look. In addition, this will significantly extend its service life and maintain its aesthetic appearance.
If the parts were treated with drying oil, then after assembly the chair should be coated with oil paint, in thin layers of two or three layers.
If you want the product to have the natural texture of wood, it should be treated with stain of the desired shade and varnished.
The varnish should be waterproof, just like the stain. There are varnishes that create a particularly durable coating that is resistant to abrasion and cracking. If the chair will be on the street, it is better to take yacht varnish or other with increased strength. In any case, it is better to keep the product under a canopy, this will extend its functionality, or at least bring it into the house during precipitation.
- For the chair you need to use strong varieties wood These are oak, larch, conifers;
- Europlywood, a 3 cm thick laminated wood material, also has sufficient strength to make the chair reliable;
- Sheets of plywood must be carefully inspected before purchasing to ensure there are no surface damage or cracks. This will eliminate difficulties when cutting the product and its subsequent processing;
- The more time is spent on processing the product and impregnating it with drying oil or compounds, the longer its service life will be;
- The chair does not need to be upholstered with foam rubber and thick fabrics; this will contribute to the accumulation of moisture under the upholstery, which will quickly render it unusable. It is better to get removable pillows for the seat and backrest;
- If ready product It leans too far back or, conversely, is oriented forward; after finishing the work, it will have to be balanced. To do this, an additional cross member is installed at the rear ends of the sidewalls. Previously, recesses are cut into it, where weights are attached according to the inclination. Also, if necessary, the front part of the chair is loaded. By adding and subtracting them, trying to sit and rock in a chair, you can achieve the ideal balance of the product.
Making a rocking chair is a rather complicated process, but quite doable. If you carry out all the steps correctly and carefully, following the drawing and tips outlined in the article, the result will be a beautiful and functional product that will last a long time.
For inspiration, you can watch the video at the link below. The video contains incredibly simple models that you can make yourself, using affordable materials.
In order for the long-awaited holiday in the garden to bring maximum pleasure, you need to take care of what furniture you will relax on. It’s clear that you can rest on a small wooden stool for no more than 5 minutes, after which you just need to get up and warm up. This option garden furniture like a rocking chair will allow you to relax for hours with a cup of coffee and a book, so be sure to make this device with your own hands, and now we will help you with this a little!
- Article
- Video
Rocking chair: buy or make it yourself?
Today furniture stores provide a wide range of inexpensive garden and room furniture, among which you can find a rocking chair. This is not to say that buying a rocking chair is a bad option, because in addition to the fact that the manufacturer makes a high-quality and stable design of the chair, its design can be very diverse and more decorative than you can make it. Therefore, if you have enough material resources and do not have a minimum knowledge of woodworking, purchasing a rocking chair will be a smarter move for you.
But still, if creating a rocking chair with your own hands is your dream, then be sure to make it come true, because... There is nothing complicated in this work.
You can make a rocking chair with your own hands in one day, spending money only on a sheet of plywood (or planed boards), wood glue and wood screws, in general, the costs are minimal.
Provide detailed instructions will be very difficult, and you are unlikely to understand it, so it is best to explain how to make a rocking chair with your own hands using the example of drawings, several important advice and video lesson. Let's not waste any time and start looking at all these components!
What to make a rocking chair from?
In order for the rocking chair to be strong, reliable and durable, it is best to use higher quality types of wood - larch, oak, pine needles. Sheets of plywood are also often used to create rocking chairs with their own hands, which are not only easy to saw, but also have plasticity and are easy to process.
First of all, no matter what material you choose for the rocking chair, it must be treated with protective agents, because... this furniture will be placed outdoors and exposed to adverse influences natural features(rain, snow, frost) can quickly lose its attractive appearance or even rot.

It is not recommended to cover an outdoor rocking chair with fabric, foam rubber or other materials, because... if they get rain (and this will definitely happen), the fabric will begin to fray and then it will have to be altered. In this case, it is better to use softer types of wood, and when you get ready to relax on a rocking chair, just take a blanket with you to cover the chair, that’s all.
Many designers create a rocking chair frame from forged metal, and the seat is made of wood - this option is also good for a summer house, because the durability of the furniture will be even greater.

Furniture stores even provide plastic rocking chairs, the advantage of which is their high immunity to weather conditions, lightness of construction and inexpensive price.

Where to place a rocking chair at your summer cottage?
If you still want to relax under the open sky, then bring the rocking chair under the canopy for the evening.
The rocking chair will find a place anywhere: near, on the porch, near the pool, next to the area.
The main thing is that during your vacation you can observe the most beautiful places on summer cottage such as garden, fountain, etc.
Before we provide a video tutorial on how to make a rocking chair, I would like to give you some tips on making a rocking chair with your own hands, so:
- The thickness of the material to create a chair must be at least 15 mm; for the frame it is better to use even a 20 mm board.
- As mentioned earlier, it is better to use types of wood such as oak, larch and pine needles.
- Be sure to treat the material with antiseptic agents and treat the metal with anti-corrosion agents.
- To fasten structural elements, it is better to use a tenon connection, which must be provided for in advance in the drawing. If for some reason the tenon joint cannot be made, then use wood glue and self-tapping screws.
- Choose self-tapping screws of a suitable length so that they do not come out from the opposite side of the board and at the same time reliably connect the structure.
- To hide the screw heads, use special plugs wooden color which can be purchased on the market.
- Before making a rocking chair with your own hands, prepare a drawing on graph paper, on which you will outline all the structural elements on a scale of 1:1. Next, cut out all the structural elements and place them compactly on a board or sheet of plywood, then trace them with a simple pencil and carefully cut them out with a jigsaw.
- After applying the antiseptic, the boards should dry thoroughly. Before the finished structure is assembled, cover all the constituent elements with a primer and apply paint.
By using these drawings to create a rocking chair, you will not only reduce the overall construction time, but you will also not have to suffer for a long time, selecting the design and correct sizes details!


A homemade rocking chair will cost many craftsmen less than a store-bought product. Self-made furniture will be of higher quality and more environmentally friendly; you can think through your own design and construction concept. The rocking chair will become a good addition to the interior design of the room, a device that will calm you down, give you the mood to work, and relax you. This product will also become indispensable when rocking a child. For the baby himself, such a chair is a real swing.
If a person has nothing to do with carpentry, then a natural question arises: how to make a rocking chair with your own hands? Initially, you should decide on the type of rocking chair; there are several of them. There are different types regarding design features:
- A rocking chair that has radius runners. This model is classic and most popular. It has a low landing, since on rounded “radii” it is very difficult to maintain balance when swinging.
- Chair with runners of variable curvature. In this case, the “radii” do not represent part of the roundness, which means the swing can have a large amplitude. IN in this case use will be safer and more comfortable.
- Armchair nirvana. There are two subtypes: elliptical and spring. The first is considered unsafe, as capsizing often occurs, but the swing is soft and smooth. Spring models are more suitable for widespread use, but making a rocking chair with your own hands such an upgrade requires skill and experience.
- Rocking chairs 3 in 1. All three modes are presented here: chair, rocking chair, lounger. Depending on the degree of reclining of the structure, the position of the body is determined. Multifunctional furniture, but large in size.
The presented design options can be made from almost any material: wood, metal, wicker, rattan. The seat can be hard, soft or a combination. Materials can be combined, and in some models it is even necessary. Thanks to photos on the Internet, you can choose the product model you like.
Wicker model
Making furniture from wicker or rattan with your own hands is quite difficult. Rattan is expensive material, but a product made from it has a long service life, and the body is more resistant to mechanical stress. The same cannot be said about the vine, but it is more accessible and pliable to work with.
To create original wicker furniture, you can watch the master class. Such instructions will be quite sufficient to implement the project. First, the material is prepared:
1. Rattan cannot be collected by yourself - it is a tough vine that grows in certain areas of America. The vine is harvested independently: branches are collected throughout the year. Length and thickness may vary. When the vine is collected, it is placed vertically outside to dry.
2. Processing of rods involves stripping. The branches are placed in a bath with warm water, where the material should spend about 12 hours. The branches will become elastic. When each twig bends well, you can remove the bark from them.
3. To continue working, you need to give each element the appropriate form. Thick branches are fixed in clamps in the appropriate position, and thin branches are divided into several parts, called shreds, using a splitter.
4. Each shank must be passed through a press so that they become flat and suitable for weaving.
5. The prepared vine is placed in a dryer for three days, where the shape of each element of the future product is permanently fixed. Only from such a vine can a rocking chair be made.
The next stage will be the manufacturing itself:
1. First, a frame is made from thick branches or wooden planks. The sizes are determined independently. All parts are fixed with nails or wire. The item is placed in the dryer for several days.
 The frame is being made
 2. Braiding consists of covering the back and seat with tires. Furniture glue is applied to the body, which will serve as an additional connection. The shanks themselves braid the sheathing rods in a checkerboard pattern.
 We braid the back and seat
 3. When the body is ready, the runners are attached and the product is tested. The chair needs to be slightly rocked; if this process proceeds easily, and the chair itself does not tip over when rocked, then the center of gravity is determined correctly.
4. The last step is to open the vine with furniture varnish.
The made rocking chair can be used in the country house, veranda, balcony, garden, hallway. In addition to the positive sensations during use of this subject furniture, this element will become a wonderful authentic design decoration.
On video: making a fully wicker rocking chair
Wooden rocking chair
Making a rocking chair from wood with your own hands is quite simple, the main thing is to make the appropriate preparation. If this is the first time such work is being done, a master class will help with this. . First we prepare the tools:
- wood hacksaws, jigsaw;
- sanding machine or sandpaper;
- screwdriver;
- set of drills;
- measuring tape;
- hammer;
- putty knife;
- level;
- construction angle;
- brushes, pencil.
Preparation of the material is also important. Wooden rocking chair made partly from plywood. It is better to choose the remaining wooden parts from an elastic material. It would be great if it were flannel.
After collecting tools and material, you can begin to work. Initially, a drawing of a rocking chair is made in accordance with the parameters of the future product. The diagram is an exact copy, but on a reduced scale:
1. You need to cut out the side elements from plywood with your own hands, which are semicircular bases with grooves for flannel. A jigsaw, wood saws and a sander will come in handy here.
 Making the sides
 2. Flannels are prepared; you can make them from plywood with your own hands, but provided that the plywood is at least 30 millimeters thick and flexible in its base.
 We make flannels
 3. The side parts made of plywood are connected to each other using 30x50x600 mm bars. Crossbars (flannels) are attached to the frame from above using a screwdriver at a distance of 2-3 cm from each other.
 Assembling the structure
 4. We attach the flannel to the frame; for this we use a screwdriver.
 Screw the flannel to the frame
 5. The plywood rocking chair is awaiting finishing. Places where flannel is attached to the sidewalls are covered with putty. When the putty has dried, you can coat the product with wood varnish.
 Finishing
 A rocking chair made of plywood can be additionally equipped with other elements. For example, you can make the seat soft. To do this, a foam rubber base is laid on a wooden base, on top of which the fabric is laid.
On video: how to make a rocking chair out of wood.
Metal chair
There is another class of product - metal rocking chairs. Not every master will be able to make such a design, since this requires more serious equipment and skill. Although, it’s worth trying to make a rocking chair out of metal with your own hands. This can be done by looking at the photos, or by watching the master class.
To work we need the following components:
- steel rods;
- galvanizing;
- steel corners;
- welding machine;
- drill with special drills;
- Bulgarian.
Often, arcs for runners are made from profile pipe, and corners are cut out from the profile itself, which will serve as fasteners. From a profiled metal sheet you can make all the necessary elements to create such a structure:
1. First, drawings are made according to the product design. To do this, you can take a ready-made chair and transfer this sketch, but also think about a way to attach the rounded runners.
2. Steel rods are cut into 1 meter lengths. After this, the frame is welded, to which the rods will be welded. The distance between them is about 1 centimeter. The metal curls into an oval.
3. After this, the master must attach the seat to the oval base. The seat itself is made of galvanized steel. Fastening is carried out using bolts, and holes for them are made using a drill.
4. The final stage will be painting and sanding the sharp parts.
If we compare the operating conditions of wicker, metal and wooden furniture, then the most universal option is precisely wicker. It does not damage the floor surface, is easy to move, and can be used in any room or outdoors.
You can decorate such a piece of furniture with textiles, in particular decorative pillows, quilted bedspreads, warm blankets. Thus, a note of comfort and coziness is introduced into the overall idea.
Most people associate a rocking chair with rest and relaxation. Imagination draws a veranda country house, a warm blanket and a glass of wine. Is it possible to make this piece of furniture, synonymous with a measured life, with your own hands? After reading this article, even a novice master will easily cope with this task.
- glider;
- classic on runners.
Each type has a number of features, so let’s consider them in more detail.
Glider (with pendulum mechanism)
This type of furniture has a fixed base, and swinging occurs using a pendulum mechanism. It has a number of advantages over the classic one, but the main advantage is silent operation. That is why it is often purchased by mothers for feeding and rocking babies.
Classic on skids
This type of rocking chair is known to everyone, but not everyone knows what a wide variety of subspecies of this piece of furniture exist.
- On simple runners of constant curvature (radius).
Radius runners are the simplest and most common type of support
However, it is worth knowing that this is not the safest design option. Professionals make custom-made, as a rule, rocking chairs on runners that are not of constant, but of variable curvature, which are calculated taking into account the height and weight of the users. It is these models that have the lowest risk of capsizing.
- On elliptical skids with tilt stops.
- On springs.
- Vanka-stand-up.
What materials can a rocking chair be made from - table
| Material | Description, features | Advantages | Flaws |
| willow vine | Very durable openwork products are made from wicker, but this work is very labor-intensive and requires certain skills. This material is often used to make suspended structures. |
| afraid of moisture |
| Rattan | Rattan products have their own ethnic flavor. Weaving it yourself is a difficult task, since it is not easy to get material in our latitudes. |
|
|
| Wood massif | The most common material for making strong and durable rocking chairs is wood. Are used different breeds wood, but the most common are coniferous, especially durable species (alder, oak, larch). |
|
|
| Metal | Since metal has a large mass, only the frame is usually made of it, and the seats are made of another material - plastic, fabric, leather, wood. Fully metal forged products look impressive, but are quite complex in execution. To do this, you need to have a special tool, as well as skills in working with metal. | durability | heavy weight of the structure |
| Plastic | To make a folding rocking chair yourself, you will need special equipment. |
| low strength of the product. |
Rocking chairs made of plastic, metal, rattan, willow wicker and solid wood - photo gallery
Armchairs for home and garden
In the house it is better to use products made from environmentally friendly materials, not too heavy, so as not to spoil the floor covering. Size also matters if your apartment is not too large. Most suitable option- plastic and wooden products. Wicker furniture also suitable, but not always appropriate in an urban interior.
If you plan to use furniture outdoors, then you need to take into account some points: how resistant the material is to moisture, exposure to the sun, and whether it is easy to clean. With certain preparation, a product made from almost any material can be used outdoors - forged, plastic, wooden models. Designs with a sun awning are relevant on hot days.
You can also make original rocking chairs from chairs that have been going to be repaired for a long time.
Photo gallery: options for wooden garden chairs
DIY rocking chairs
Making this piece of furniture is not entirely simple task, but it can be done even by those who have never done anything like this before. There are many designs, options and manufacturing methods. Let's look at the most interesting and simple ones.
The simplest chair from an ordinary children's highchair
The best option is to use ordinary wooden chair. For production you will need following materials and tools:
- chair with back and armrests;
- high-quality plywood 15 mm thick;
- wood varnish;
- jigsaw;
- milling cutter;
- Sander;
- dowels
Stages of work:
- We cut out radial runners from plywood according to the diagram using a jigsaw.
- We sand them with a machine or sandpaper on a lath.
- We make cuts from the bottom of the chair legs and select grooves for the runners.
- We insert the runners into the grooves of the chair legs, fix them with glue and dowels.
- We cover the surface of the rocking chair with varnish.
Video: making a high chair
Vanka-stanka: step-by-step instructions, photos, drawings
It will also be easy to make such a rocking chair from plywood yourself, if you know the drawing. There are many options on the Internet, we will present one that does not have the risk of capsizing.
Materials and tools for assembly:
- sheets of plywood measuring 1520x800 mm, 15 mm thick (for sidewalls, racks and supports), 10 mm thick (for back and seat slats);
- jigsaw;
- glue;
- screws.
Chair assembly steps:
- We are preparing a drawing of the future product.
- We transfer the drawing onto sheets of plywood.
- We cut out the necessary elements using a jigsaw.
- We drill holes for the screws.
- We sand, prime and paint all the elements.
- We assemble the frame.
- We form the seat and back from the planks and glue the elements.
- We fix all the elements with self-tapping screws.
Video: simple plywood rocking chair
Is it possible to assemble a pendulum mechanism for a sliding chair on your own?
The pendulum structure moves top part chair relative to its base. To do it yourself you need detailed diagram. It's not an easy job. But the principle of operation of the mechanism is always the same. For simplest design you will need:
- 4 bars of the same length and two of a larger length (sizes are chosen depending on the design scheme);
- 8 bearing nuts and washers.
Instructions:
- Assemble the bars and drill one hole in them at each end for the bearings.
- Make an end beam (it holds the weight of the entire sliding structure):

- Attach each end part to two bars. This will be a simple pendulum mechanism. Next, it is connected to the base of the chair and the seat. Example finished design below.
Rocking chair made of plastic (polypropylene) pipes: diagram and operating procedure
The chair can also be made from profile metal or simple water pipes. To work you will need:
- plastic pipes with a diameter of 25 mm (for sidewalls) and 20 mm (for transverse elements);
- drill and pipe welding machine;
- fittings with a cross-section of 15 mm (inserted into pipes to enhance the stability of the chair);
- fittings for corner connections (2 pcs. - for 90° and 6 pcs. - for 45°);
- pipe plugs;
- pencil, ruler.
Instructions:

To make the chair comfortable, it needs to be fixed to the frame. foam mattress 50 mm thick. To do this, you will need a cover with ties, which is easy to sew yourself (by machine or even by hand).
Give plastic pipe a rounded shape can be achieved using hot sand. To do this, the sand is heated in the oven to 95–130 °C, a plug is inserted into one end of the part, the tube is filled with sand, given the required shape and wait for it to cool.
Desire and basic skills in working with tools are all you need to independently build a comfortable and beautiful rocking chair for your home or cottage. The described instructions will help you do this correctly and quickly.