How to make a children's house in an apartment or on the street. How to make a hut - in simple terms about complex things
Children in the country need a place to play and have fun. An excellent option could be a hut that you make with your own hands. To do this, you don’t need to spend a lot of time and money, just use your imagination. An unusual hut is made from materials that are always on hand. We invite you to familiarize yourself with some design options for a children's hut.

Fabric hut
To make a fabric hut, you need to prepare:
a large and dense piece of fabric measuring 2 by 4 meters;
2 support posts(trees), which should be spaced 2 meters apart;
2.5 meter rope;
a set of hooks for securing the hut to the ground.

Initially, we must pull the rope in a horizontal position between 2 posts and secure it thoroughly. Then we hang a piece of fabric symmetrically on top of the rope. The next stage is fixing the hut to the floor. You need to sew metal eyelets onto the edges of the fabric in advance or make loops that are also sewn along the edge. After this, hooks are threaded through the loops and fixed in the ground.


Hut made of plant branches
This option for creating a hut is a little difficult to design, but nothing is impossible.
Prepare in advance:
PVC pipes or branches of the required length;
climbing vegetation or sow seeds;
strong rope.
It is worth noting that such a hut can only be used after several months. It is recommended to begin construction of the structure after winter period with the beginning of spring. To begin, install pipes or tree branches in a triangle shape. Then fasten them together at the top with rope.


After assembling the hut, you can begin sowing the seeds. It is necessary to plant plants that climb beautifully around the structure. They will begin to grow, and then you must direct them up the racks of the hut. At the height of summer, the children's hut will probably be ready.
Hut made of PVC pipes and fabric
This option involves the construction of their structure PVC pipes, which need to be covered on top durable fabric. The construction method is identical to the second plan described above. Racks made of pipes are placed and tied tightly at the top with a rope. Then they need to be fixed in the ground. The hut for children is covered with cloth and it is ready for use.

Hut made of hoop and fabric
This method is the most original. To work you need to have:
Aluminum hoop or metal pipe, twisted into a ring;
strong rope and fabric.

Building such a hut is not difficult. Cover the hoop with fabric and sew the ends together. The remaining fabric must be sewn all over the hoop and a rope attached to it in the center. Then the structure is fixed on a tree or in another place suitable for children’s games.
Using a stepladder
In this case, a simple stepladder will serve as a hut. You just need to place the stepladder in a convenient place for games and hang the fabric on it. This construction option is characterized by its mobility, since the stepladder can be moved both into the yard and into the house.

Newspaper and fabric hut
This is an unusual construction of tubes made from newspapers, which are covered with fabric. But remember that in inclement weather such a hut must be removed so that it does not get wet and spoil. To build the structure, prepare:
Textile;
newspapers;
large width tape and stapler.

First, roll the newspapers into tubes and secure their edges with a stapler. Then make a triangle-shaped structure and also fix it. Place a cloth on top of the hut.
For lovers of outdoor activities, knowledge and practical skill building a hut with your own hands is extremely necessary, because one day this skill can literally save a life. It's about about those who enjoy long-distance tourist expeditions through forests and mountains, kayaking on rivers or skiing on snowy slopes, fishing, hiking for herbs, berries and mushrooms.
To build a hut , you don't need to put in a lot of effort. Having an understanding of the principle of constructing temporary structures depending on the terrain and the nature of bad weather, it can be erected in a matter of hours.
Types of huts and choice of location
Exists three types possible designs:
- Standing separately– a classic type of hut in a forest or open area.
- Pristavnoy– living trees, shrubs, and steep slopes are used as support.
- In-depth- a kind of mixture of a hut and a dugout.
In survival situations it may be necessary to do hut for:
- arranging a place to stay for the night;
- shelter from strong wind or sweltering sun;
- keeping things warm and dry during rain, hail or snow;
- protection from predators and insects;
- warehouse for temporary storage of things.
If a person gets lost and is left alone for the night, then he cannot do without building a temporary hut in the forest. You can create a place to rest in it using foliage, dry moss or clothes. If necessary, you can even make a fire inside it.
Where is the best place to build a hut? It is preferable to erect such temporary structures on a flat, wooded area among dense plantings - lush shrubs and spreading trees. They will protect from drafts and unnecessary attention from forest inhabitants and other tourists.
Places to make huts do not do it:
- open glades;
- under sandy or rocky slopes;
- near mountain rivers or other turbulent bodies of water;
- near alone standing trees.
After choosing the most suitable place, you should clear it of fallen leaves, branches, stones, thorns and other things. This will provide greater comfort while inside the hut in the forest. And also safety if a fire is lit inside the structure.
What is needed to build a hut
Such a simple temporary shelter is easy to build at any time of the year. When going on a trip away from civilization, it is useful to have a folding saw, hatchet, knife and rope with you. But in an extreme situation they may not be at hand. In any case, to make a hut, the main thing is to obtain a certain amount of building material.
For example, in snowy steppes it would be snow and branches of bushes, if they could be found. And in the forest there is a lot of material: fallen trees, broken branches, broken branches, poles, stones, bark, fallen leaves, moss, grass, pine cones, spruce branches coniferous plants, And so on. Unfortunately, modern forests contain a lot of garbage, for example, plastic, pieces of reinforcement, polyethylene film, fabric - all this can also be successfully used to build a hut in the forest.
When looking for building materials for a shelter, you should first pay attention to your feet. You should not headlong break and destroy all living things: young trees, healthy branches and foliage of trees and bushes. It is necessary to treat the forest with respect, and such a good attitude will return a hundredfold: predatory animals will bypass, plants will be protected from cold, winds and precipitation, and the fire will warm and not burn.
Types of huts and their arrangement
All the most brilliant ideas Nature itself provides humanity with construction. Dwellings of amazing strength and structural modification are built by beavers, wasps, ants, weavers, the red-eared whistler (or otherwise “bowbird”) and many others. People can only look closely and try to grasp the essence of the construction method.
The most common are 3 types of huts: single-pitched, gable and circular. Each of them have functional features, which should be distinguished in order to build the most suitable shelter in each specific case. For example, in winter it is better to make a hut in the shape of a pyramid or semicircle, in conditions strong winds it will serve as good protection. Among other things, the type of structure depends on the area and the number of people for whom it will be built.
Lean hut
This is a shelter that has one inclined wall, which simultaneously acts as a roof, that is, a kind of canopy. Covers from the sun, dripping rain or wind blowing in one direction. This type of hut does not protect against the cold, since one side is completely or partially open. IN warm weather You can spend the night, but such a vacation will not be very comfortable.

How to make a lean-to hut with your own hands:
- Find 2 trees standing close to each other. Or drive 2 poles into the ground with branches at the required distance.
- Place the crossbar on top of the forks. If necessary, you can strengthen the connections by tying the crossbar to trees or poles with vines.
- Lean several long poles against it at an acute angle in increments of about 25 cm (so that when viewed from the side you get a triangle).
- Using branches of leaning poles, lay thin rods horizontally on them - this will evenly distribute the weight of the future flooring.
- Place coniferous or deciduous branches, ferns, leaves, straw or other material on the finished frame.
- Cover the slope and sides with branches, clothing or something else.
For this design, an attached type of hut is most often used.
Gable hut
A more comfortable shelter compared to a lean-to shelter. Can protect from rain, hail, snow, wind, scorching sun or cold. Can be used for sleeping or storing things. Making a gable hut with your own hands is a little more difficult than a single-slope hut.

It is built in the same way as a lean-to, only long poles are installed at an acute angle to the top beam on both sides. The “back” part should be completely covered with twigs, branches, spruce branches or leaves. The “front” part will serve as an entrance; it can be partially covered for greater comfort and better heat retention inside the hut in the forest.
To provide shelter from rain, the thickness of the decking must be at least 20 cm (non-compacted hardwood or coniferous branches), so that moisture does not seep through them. It’s better to build a rain shelter using an awning or plastic film.
In rainy weather, it is better to dig small grooves along the side walls to drain the flowing water away from the structure.
Circular hut
The design resembles a wigwam or tent in a simpler variation. Such a building effectively protects from bad weather, as well as from cold. You can organize a fire inside the shelter, but in this case it is necessary to build a hut with a hole in the roof so that the smoke can freely escape from it. To build such a shelter, you can use a tree as a support, after making sure that it is strong and there are no, for example, ants on it. But then it will be impossible to make a fire inside - only at the entrance.

(No ratings yet)
 Summer has come - the time when adults and children go to nature to take a break from the bustle of the city and enjoy clean air. Those who want to experience nature more deeply do not take tents with them, but prefer to build a hut on the spot. However, not all people have this skill - everything happens for the first time, and if the company does not have people who have already built a hut before, then the process without additional information can drag on and ruin the whole mood.
Depending on the means available to build a hut, the methods vary. In this article we will look at options for building the most commonly used shelters in nature, namely, a halabuda, a hut in the forest, a house made of branches, a house for children and an Indian hut.
Halabuda
Halabuda on a tree is a real dream of many adults and children. Depending on the goals, time spent and execution, halabuda can be either temporary or strong construction, which will last longer than one season and is ideal for a mini-headquarters for children. If you are planning to make a halabuda for yourself, then you will get a wonderful corner for close communication with nature.
 If you decide to build a tree house for your children, then it is very important to choose the right materials. They have to be as light as possible, which means the use of iron and cement is excluded. The following materials can be used for basic construction:
- Various weavings (from vines, reeds, young shoots);
- Strong ropes;
- Plywood;
- Boards.
The selected tree on which the house will be placed must be stable, strong, fairly tall and spreading with strong horizontal branches. Before building a house, the tree needs to be tested. For this purpose on planned level of halabuda Several people must climb in, the total weight of which will be approximately the total weight of the children or people who will use the hut. Next, you should jump on the tree and shake it, simulating a storm.
 Pay attention to the stability of the tree. It should not wobble or crack. If the conditions are met, then proceed directly to the construction itself. If you need the house for one season, then you can build only the floor and roof. In such a building The floor can be a strong net, and the roof can be polyethylene. If you are planning to make something like a house, then the halabuda should be carefully planned and, ideally, made as a model before construction. After this, the main parts of the halabuda can be constructed either directly on the tree from the very beginning, or on the ground and raised onto the tree later.
Gallery: DIY hut (25 photos)


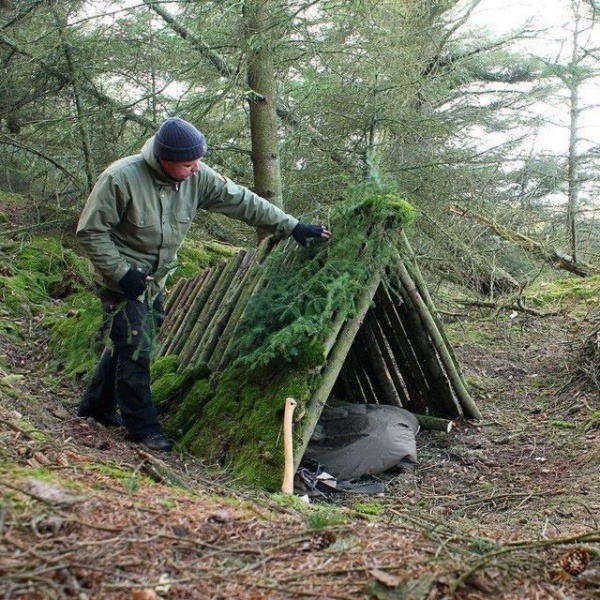
Hut
Now let's look at how to make a hut in the forest. Trees, branches, and leaves are used to build the house. The easiest option would be to use a tree felled at an angle, which can be used as a support for the building. Before erecting a hut, you should make sure that the tree securely fixed and it will not fall on you under the weight of the branches. The construction of a hut involves weaving additional branches into the branches of a tree to protect it from the wind. If there is no fallen tree, then you can cut down a small tree and tie it by the base to a branch big tree, and then close the gaps with other branches.
 In the warm season, if you have a sleeping bag, the structure can be single-pitched - only one part of the structure is closed, which is a canopy at an angle of 45-60 degrees. For the construction, you can use a pole consisting of a strong long branch placed between the branches of two adjacent trees. Further, just like in the case of a fallen tree, large branches lean on one side at an angle. The top of the canopy can be sprinkled with leaves. Such a hut reflects heat well from the fire and protects from the wind on one side. If necessary, it can easily be expanded into a full-fledged house from additional branches.
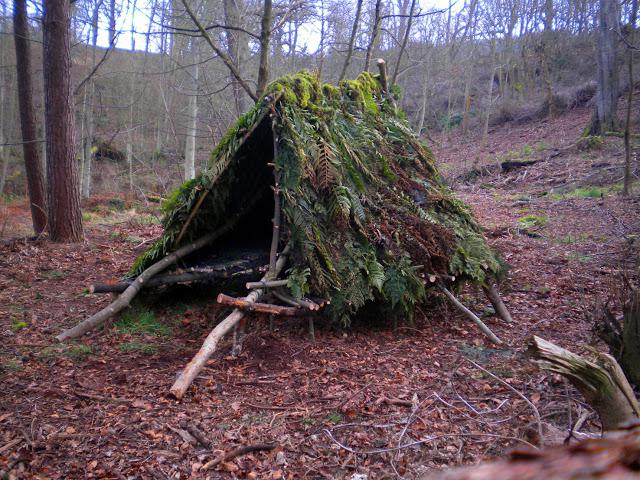
House made of branches
 Such a hut can be built both in the country and in the forest. There are several options for constructing such a shelter, but, in any case, you will need a lot of long branches and strong rope. In the first case main strong branches They are stuck into the ground in a cone shape and are firmly attached to each other at the top with a rope. After this, others are added to the supporting branches, but only if necessary. If the building is located in the forest, then it is advisable to tie its top to a tree to give it stability.
The second option for building a house from branches differs in that the branches will be located around the tree trunk, which will serve as its support. Otherwise, the construction method is similar to the first, with the exception of the absence of the need to tie the top of the hut, since the support is already there.
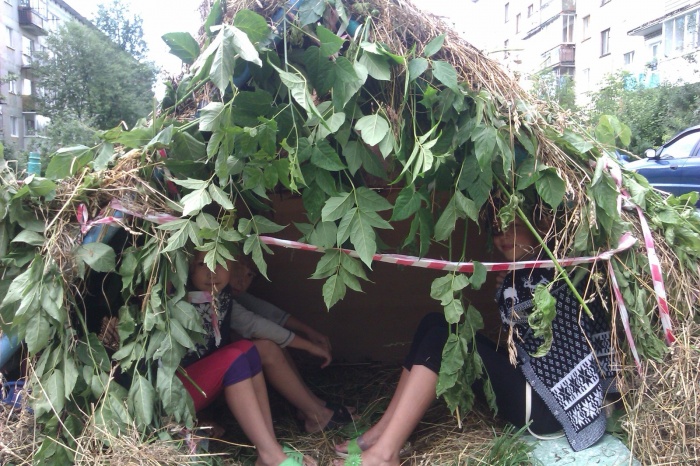
Children's hut
On vacation, adults want the children to have fun and, at the same time, so that they do not run away and are nearby, in sight. For this purpose, you can build a house with your children, which will then become the main playground.
 All of the above methods are suitable for a children's hut. In particular, you can build a halabuda on the ground, and not on a tree. Such a halabuda can be constructed from any available means. If you you are at the dacha and if you don't want to go to all the trouble, you can simply take out 2-6 chairs (depending on the number of children, so that everyone can fit inside) and cover them with a blanket or several, interlocked with clothespins. Alternatively, you can stretch the fabric for the halabuda, using branches of a low-growing tree to secure it.
The other options listed above can also be simplified, since for children the very fact of having a shelter is more important than often its design or functionality. However don't forget that children are restless and often awkward, which means that the structure itself must be perfectly fixed so that children do not inadvertently knock it over while playing.
Indian hut
The main difference between a Tipi, or Indian hut, is that in the center of the structure there is a hole for the smoke from the fire to escape. You can spend several weeks or even more in such a hut, if during installation waterproof fabric was used. In the case of the construction of an Indian hut, it is more like a short-term decorative element Rather than a full-fledged place to live, ordinary fabric will do. For construction you will need the following materials:
- Beams are large strong branches without leaves or branches;
- Rope for fastening;
- Textile;
- Paints for painting a hut.
 Building such a house is quite simple: a regular hut is built using beams without additional branches. Next, the beams need to be covered with a single piece of fabric, leaving the top of the hut uncovered. After that hut fabric can be painted imitating traditional painting. In real tipis Bottom part symbolizes the earth, and the top symbolizes the air. The drawing can be chosen based on this. If you are vacationing with children, you can entrust them with painting the hut. This will help children feel involved in the process and will captivate them for more than one hour if the structure is quite large.
Outdoor recreation is always a great time, especially when you know that you will definitely not be left homeless under any circumstances. WITH hut building skills nothing will hurt you to relax while camping lightly, without a heavy, bulky tent over your shoulders. At the dacha, such a skill will help to captivate children and give parents a break, which will allow everyone to spend their free time with pleasure.
We all love to relax in nature. And it doesn’t matter where exactly we want to relax, in a flat forest, or in the rocky mountains. Naturally, when planning your vacation, you know in advance where you will spend the night, in your car, in a tent or sleeping bag. However, there is another option for overnight stay.
This option convenient theme that in it you will not only feel protected, but also be able to breathe fresh air in a pleasant atmosphere. This option is to build a hut. In this article you will learn how to build a treehouse.
Definition
A hut is a universal shelter that is built for a short time. First of all, it is built for overnight accommodation, as well as for protection from snow, heavy rain, temperature changes, strong winds, and the scorching summer sun.
There are these types of huts:

How to make a hut in the forest with your own hands
First you need to find appropriate place for the construction of a hut. This place should be safe for your life. We do not advise you to build a hut on the banks of a river, in narrow gorges, or at the bottom of a canyon. Because in case of flooding or heavy rain, this place may become unsafe. Also, do not build a hut under sagging rocks or near steep mountains.
You can build a hut without any tools. However, you will need a standard set to work:
- Axe.
- Rope (scotch tape).
The great thing is that you will most likely always have these tools with you. They will significantly reduce the work time, and the process itself will be more enjoyable.
As you can see in the photo, most huts can be built using a simple technique of weaving from branches. In order to do quality roof and walls that will be reliable in any weather conditions, you just need to use those materials that are available in the forest at almost every step, these are branches, bark, moss, leaves, grass. By collecting all these materials you can make a good hut with your own hands.

There are huts different shapes and size, it all depends on how many people it should accommodate, as well as what its purpose is - it will be a shelter from the sun or protection from the cold and wind. But with all this, you need to take into account the type of terrain, weather conditions and time of year.
Making a lean-to hut
A lean-to hut consists of only one wall, made directly by you. This wall should rest on something, it could be a fallen tree or a large stone or two trees growing nearby. You can make this wall or canopy from branches and cover it with leaves. This type of hut will serve as protection for you from light rain, scorching sun or other circumstances. However, you will not be able to completely protect yourself from strong wind, snow or rain. Also, this building is not so practical. Since you can have a good rest in it, however, you will not be able to comfortably spend the night there.

In order to build a building you will need two strong logs with branches at the top, 2-2.5 meters long. Drive these logs into the ground at an angle to the base and secure the crossbar at the top. At a distance of 30 cm, you should place branches (poles) with one end pressed into the ground and the other resting on the crossbar.
Making a gable hut
This type of hut is more convenient and practical. A gable hut is made according to the same principle as a lean-to hut. But the difference is that the poles that are installed from the crossbar to the base of the ground must be installed on both sides. This can be seen in the photo.
One side should be completely covered with small branches or leaves, and the other will be used as an exit. If you have a film or tarpaulin with you, then use it as additional protection from rain and wind.
Once you are done with the exterior work, start with the interior work. What is meant? You need to take care of the floor covering. Especially if you don’t have sleeping bags or other warm clothes with you. If you have to spend the night in cold and wet weather, make sure you don't sleep on the ground. Build something like a stretcher with your own hands and cover it with dry leaves and grass that you can find, or not necessary things which may be in your backpack.

Advice! If you are making a tent in rainy weather, then do not forget that water can get inside the tent. To prevent this from happening, dig a moat around the tent.
Important Note: In order for the shelter not to allow heavy rain to pass through, its thickness should be 20-25 degrees, and the angle of inclination should be at least 45 degrees to the base of the ground.
Remember, if there is a question about preserving your health or even life, you should not look for the most comfortable views materials. Use what you have on hand. The main thing is that the material you choose is dry and reliable. But, probably, few of us may need to build a hut in the forest due to various extreme situations. Therefore, in the next part of this article we will talk about how to help our children build their own hut.
Wigwam hut
We build the frame: draw a circle on a flat surface. Around the circle you need to dig a row of sticks. The upper ends of the sticks must be connected using rope, tape or wire. However, everything must be very reliable so that your children are safe. At this stage, we can say that the frame is ready.

After making the frame, you only need to cover the wigwam with colorful fabric or film, as you see in the photo.

If you have a summer house or your own vegetable garden, then do not lose this opportunity to make an original and very beautiful wigwam from sunflowers for children. To do this, you just need to plant a few sunflowers in a circle. And when they grow up, tie them together. You can only imagine how happy your child will be playing in such a hut that you built.
Let's sum it up
There are also other types of children's huts. For example, if you have a lot of trees, consider making a treehouse or building a large treehouse for playing with friends. You can even make a small hut in a children's room using improvised materials. Remember: joint work always unites the family. Before you build a hut in the forest with your own hands, it is important to think everything over, stock up on tools and start working.

Many lovers of outdoor activities sometimes stay overnight in the forest. In this case, you can sleep in the cabin of a car, in a tent or in a sleeping bag. However the best option will spend the night in a hut built from available materials. On fresh air with the pleasant smell of wood in good weather, a comfortable atmosphere is created for sleeping in this simple structure. But many people have a question about how to make a hut. Instructions for the construction of this structure will be provided below. More on this below.
Definition
The hut is a universal short-term shelter. It is used for overnight shelter, protection from the sun, strong winds, temperature and atmospheric changes, precipitation in the form of rain and snow.
Types of huts
There are many variations of this structure. However, there are three types simple huts. Namely:
- free-standing;
- attached;
- huts in a recess.
Each type has its own design features, which have much in common. They depend on the time of year, weather conditions and type of terrain.

How to make a hut with your own hands?
First you need to choose a suitable place to build this temporary shelter. It cannot be installed in narrow gorges, on river banks, or at the bottom of canyons. Because floods, flash floods or sudden downpours may occur. The danger comes from creating a hut under rocks that overhang the site, as well as at the foot of steep mountains. When choosing a parking place, you need to take into account the cardinal directions. Let's consider the main location options.
- How to make a hut in a mountain forest. The specified attached-type structure is well suited for this area. This means that one of the walls or even two walls will be made of wood or stone - part of the rock. IN in this case We must try to avoid precipitation. That is, do not place a hut in hollows with obvious traces of water flows. Because if it will rain, then a stream of water will flow down. Otherwise, the rules for installing this structure are the same as for a tent. The entrance to the hut should be on the side opposite the top. Grooves should be made around the perimeter to allow water to drain in case of rain.
- How to make a hut in a lowland forest? The answer to this question is quite simple. In a forest where there is a plain, it is possible to build a recessed, classic or attached hut. In this case, the place is chosen based on the weather. This is important. In cold weather without rain, you need to find a hole that will serve as a temporary shelter. When it rains, the specified structure is placed on an elevated place.

Choosing a hut type
1. Classic hut. This type of structure is made in the form of a fire pit for cooking. In this case, two poles or branches are installed vertically. The third is laid on them horizontally. Dressing is done using improvised means: flexible twigs, grass stems, vines.
In this case, there are still several types of installation. For example, 2 poles or straight branches, cut with a knife, are installed to each other at an angle at the exit from the hut and the back wall with a distance of 2-2.5 meters. It's not hard to do. Then the main pole is laid horizontally on them. The next option is a wigwam. In this case, you can lay the poles in a circle at an angle to each other in the form of a fire pit, and also use a living growing tree as a support point for them.
2. An attached hut. This also includes the type in the form of a wigwam around a tree. In this case, there may also be a hut created on the basis of poles that rest on a rock in a mountainous area. The walls are made like the above classical structure.
3. Recessed hut. This type of building looks like a classic hollow or is something between a dugout and a hut. That is, when only the top (roof) is covered.
Main principles of construction
Before you make a hut with your own hands, you need to know the following:
- Location.
- Type of hut.
- The basis of this structure should be several poles with sharp ends, sunk into the ground. One of them is installed as a load-bearing ceiling beam.
- The poles of the hut walls are installed with a slope of 45-60 degrees. Except when one wall is vertical.
- The roof must be stitched with branches (poles) in several tiers parallel to the ground along the perimeter between the installed beam and the ground. Then it will be easier to lay the spruce branches or branches.
- In deciding how to make a hut, it is necessary correct execution laying spruce branches on the base of the pole. In this case, it all depends on individual desire. This must be done in such a way that top part Place the lower spruce branches under the corresponding side of the layer on top. This is done in the same way as when Then the raindrops will roll down freely.
- Instead of spruce branches, branches with large leaves will also be used, as well as polyethylene with a tarpaulin.

Interior arrangement of the hut
This process is also important point. In the forest, when there are no usual sleeping bags, folding beds, air mattress and bedding, one must be able to adapt to such conditions. There are two types of arrangement flooring: with and without the presence of a lesion. Each case requires a separate approach. Typically, in the cool season, and also when you need to protect yourself from mosquitoes and mosquitoes, you should protect walls and dead wood from sparks from the fireplace. Therefore, they lay it out in the center, limit it with stones, sprinkle earth between the stones, and make a quarantine zone of about 15-20 cm around it. Dead wood is laid on the floor of the hut (on the ground) - last year’s leaves with branches, shoots. Material in the form of tarpaulin, excess clothing, or polyethylene will also work.
Construction of a hut in the forest
This case also has its own nuances. Experienced travelers know how to make a hut in the forest. In this case, you can build a shelter different types. The most simple option considered a classic hut. Any lying tree is suitable for the construction of this structure. It will serve as a kind of frame for the hut. The branches of this tree will become a holding agent for those rods that create the roof. Before you make a hut, the photo of which is provided in the text, you should remember that before starting this process you need to make sure that the lying tree will not crush you. Next, you need to cut off with a knife or tear off with your hands the excess branches that are inside the structure. This is important to do for convenience. The resulting branches are folded so as to form a roof slope for the hut. The thickness of the laid layer determines whether raindrops will get inside the structure. With a lying tree, you can build either a single- or double-sloped hut, depending on the position in which it is located. A lean-to hut can easily be expanded to the second option indicated. Let's look at this in more detail next.

Construction of a lean-to hut
This process is not complicated. The simplest lean-to shelters begin with a frame, and a film or tarpaulin is attached to it on top. The lower edges are pressed against stones or a log. This shelter serves as a screen. You can make a lounger like a bed from spruce branches. The fire should be lit at a distance of about one meter from the sun lounger. This is important. At night, firewood is added to the fire. At a temperature of about +5 degrees, you need to stock up on 2-3 dry thick two-meter logs in advance. You can use them to make a “Nodya” fire. To do this, two or three logs are placed on top of each other with smoldering coals between them. This provides warmth throughout the night.
Gable hut
In this case there is also nothing complicated. You can use any available means in the form of spruce branches, reeds, hay, grass or straw. You need to start by preparing thin rods, a support pole and two strong flyers for the base of this structure. In this case, you need to have some skills. Install the flyers by vertically driving them firmly into the ground a third of the length so that they do not wobble. A strong horizontal pole is installed on top of them, on which thin rods are laid at an angle in the form of rafters. Then the material is laid on them from bottom to top. This must be done so that the top row overlaps the bottom. The back and side walls of the hut are covered in the same way. A fire with a heat shield is lit at the entrance to this building. In this case, it should be taken into account that the specified heat shield must be tilted towards the entrance.
How to build huts with your own hands from branches?
Let's take a closer look at this process. Before making a hut from branches, you need to prepare:
- large knife or ax;
- tree branches;
- strong rope;
- stakes made of thick branches.

First you need to decide on the shape and materials of construction. The optimal option is considered to be a gable option, that is, in the form of a tent. To do this, you need to prepare 6 thick branches about a meter long with a diameter of 5-7 cm. Two of them should be slightly shorter. These branches will become the basis of the frame of the hut, serving as the back and front walls. After choosing a level place, stakes are installed, digging them into the ground in the form of two tripods, one opposite the other. The distance between the stakes will be the length of the hut. In this case, the tripods should face each other with one side of an imaginary triangle. Then thin twigs or rope are attached horizontally to the resulting empty walls. Also in this case you can use climbing plants. There are many of them in southern regions Russia. The vertical distance between the branches should be about 20 cm. These crossbars will be used to secure the sheathing branches.
In general, nature itself suggests how to make a hut with your own hands in the forest. Properly laid branches will shield each other. The crown of the tree will provide shelter from the rain. Walls are also being built. In this case, you should take fluffy branches or spruce branches from coniferous trees. After this, you need to break them off so that a hook is formed at the broken end. It is needed to subsequently attach the branch to the crossbars. In this case, it is necessary to begin the construction of walls from the bottom side. This must be done in such a way that the upper branches overlap the lower ones. Then the raindrops will roll down. If you wish, you can line the floor with branches. As a result, the question of how to make a hut from branches can be resolved very simply.

Construction of the specified structure for children on a tree
Many of the children thought about how to make a treehouse. In this case, everything is also quite simple and clear. With the right approach, you can build a treehouse for your children and grandchildren. If on summer cottage There are 2 trees nearby, then between them you will get a good structure. This will not take much time and building materials. Before you make a treehouse, you need to stock up on the following devices and tools:
- sheets of plywood: one with a thickness of 18-20 mm and two - 8-10 mm;
- bolts;
- timber with dimensions 50x150 mm and 50x100 mm;
- hacksaw or circular saw;
- galvanized nails;
- roofing felt;
- birch bark.

The construction of the hut should be based on 2 boards 50x150 mm. In this case, they are attached to two thick trees. There is nothing complicated in this regard. It is necessary that the diameters of the tree trunks be approximately 20 cm. Then the bottom of the hut with the side walls, as well as triangles for the brackets, are cut out of a sheet of plywood. This will require a lot of patience and scrupulousness. Next, triangular sidewalls are assembled from pre-prepared and sawn half-timber bars. After this, they are bolted together. This will be followed by the process of connecting the assembled triangular sidewalls with a ridge beam. Its cross-section should be 50x100 mm. After this, it is necessary to connect the indicated sidewalls with the two beams located below. Next, using brackets, attach the resulting frame to two support boards with a cross-section of 50x150 mm, which are already pre-fixed to the trees. Now you need to take the bottom, cut out of plywood. It is necessary to drill holes for nails. After this, you need to nail the bottom to the lower beams and joists with galvanized nails with large heads. Now we need to think about building a roof and hatch windows. The best solution in this case is a multi-layer roof. This will ensure reliability. In 1 layer, plywood with a sheet thickness of 8-10 mm is used. The second one can be made of roofing felt or glassine. And for the third layer, birch bark will be used.
Bottom line
Having read the above, everyone can decide for themselves the question of how to make a hut from boards, branches and other improvised means or building materials, as well as find out what types of these structures exist.