How to mount an LED lamp. How to Install LED Ceiling Lights
The level of demand for LED lighting is constantly growing, both in the industrial and residential sectors. This fact is explained by the fact that the installation of LED lamps allows you to reduce the amount of electricity consumed and at the same time avoid the harmful radiation effects characteristic of other types of lighting devices.
The functionality and safety of operation of such lamps depends on how competently their installation was carried out. You should not perform the process yourself or trust incompetent professionals.
To ensure adequate lighting, a comprehensive professional approach to its arrangement is required. We recommend the specialists of our company. You can view the portfolio of electrical installers of the Leader of Services company in the “Masters” section.
Stages of LED lighting installation
To install LED lamps could provide an opportunity maximum use their light resource, the work process must be carefully thought out and prepared.
When choosing lamps, you need to consider:
- their purpose - wall, ceiling, street, landscape;
- operating conditions - internal, external;
- device power.
And if we're talking about about the lighting arrangement in the room, its area, height and type of ceiling construction are also taken into account.
Unlike traditional light sources, LED devices can be placed on any surface of the room - along the perimeter of the ceiling, floor, or built into furniture. But first you need to connect the electrical wiring. Therefore, it is most convenient to combine the process with general repair work. Especially if you plan to replace the lamps with LED ones.
When installing LED lighting in a suspended ceiling, it is very important to ensure the safety of its operation - use a corrugated or metal hose for installing power supply wires, and also connect circuit breakers.
Our specialists will be happy to install LED lamps, as well as quickly and efficiently perform other types of electrical work for you. installation work.
"Service Leader" - we work for you
"Service Leader" is a company operating in Moscow. Our activity consists of professional performance of work that is encountered in Everyday life- repair, household, plumbing, electrical, etc. The full list is in the “Services and Prices” section.
The company's staff consists of highly qualified specialists. All of them are citizens of the Russian Federation, possessing high degree professional skill. Your applications are processed within an hour after they are submitted on the website.
Electricity these days has become the basis of all human civilization in general and the individual little person in particular. Industry, culture, transport, everyday life - everything is based on electricity and confidently crowds out all other types of energy.
However, there is also a fair fly in the ointment in this huge barrel of honey - the constantly growing cost of electricity, which puts an unbearable burden on the consumer. The steady increase in the cost of energy resources, the need to save them, and the acute problem of nature conservation have forced humanity to use several methods to reduce energy costs while maintaining efficiency.
LEDs
One of the ways to reduce costs in the twenty-first century is wide application LEDs as household lamps. Easy to install, easy to use, with no harmful effects on humans and the environment, they are replacing compact electric energy-saving lamps, which aroused interest just yesterday. For example, a 36W LED light can work effectively for interior lighting industrial and domestic rooms and offices. Aesthetic external shape, stylish design, effective light output - 80 Lm/W. Operating time - thirty thousand hours.
Device
The structure of the lamp consists of a complex of LEDs that correspond to the total power of a conventional lamp, a control circuit, a metal or plastic case with a reflector. LED energy lamps used in everyday life are equipped with a regular E14 or E27 base. Which is convenient for replacing previous conventional incandescent lamps. The number of LEDs can be different - from one to a whole complex, combined into one chain and connected to the control circuit through an electrical power supply. For example, ceiling LEDs have this structure.
Cooling
Since the LED generates a large amount of heat during operating load mode, it must be cooled. Radiators to which LEDs are attached do a good job of neutralizing the influence of heat. However, it is necessary to pay attention that in the area of contact between the LED and the cooling radiator, a special thermal paste that has good heat transfer should be used. Otherwise, with regular overheating of the element in question, its service life is greatly reduced. However, the installation of LED lamps takes into account such disadvantages. Everything is covered in this process.
Specialization
Due to the many tasks and different configurations, the installation of LED lamps is divided into several types:
- ordinary linear;
- household ceiling;
- wall sconces;
- industrial high power;
- regular and specialized spotlights;
- underwater version (for various types of reservoirs);
- LED controllers (for creating color dynamics, in particular at discos or concert performances).
The set of lamps can include motion sensors to significantly increase the lifespan of LEDs, which are used only when needed. Such equipment functions perfectly in the entrances of houses and extensive corridors of office premises. And also in other places where constant lighting is not necessary.
Ready-made lamps are sold, which are equipped with radiators designed for existing LEDs. If you don’t have enough skills to install it yourself, you can use existing solutions and buy, in particular, an LED device for your home - complete LEDs on radiators. They are combined into a body that can be a decoration for every apartment. Most often it is created. Its installation, depending on the type of installation work, is quite simple and cheap.
Linear luminaire
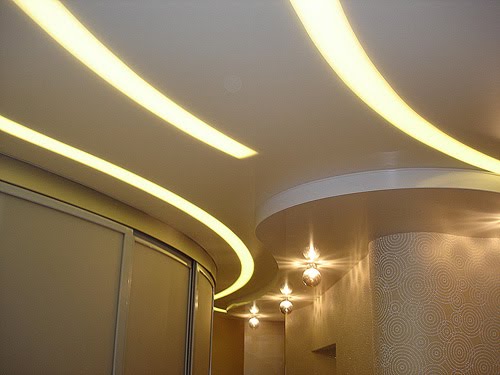
Linear LED luminaires, increasingly integrated into electrical systems residential buildings and industrial buildings are playing an increasingly important role in everyday life. They have become an inseparable detail of interior design. These devices are widely used when installing various types of ceilings, creating wall designs and some interior elements.

Therefore, the installation of linear LED lamps is becoming a common mass phenomenon. This affection stems from the fact that good lighting plays a major role in creating a comfortable microclimate in every room. Proper lighting is necessary not only from the point of view of comfort for the eyes, but also to emphasize the specificity and beauty of the style.
LED lighting makes a big difference:
- will hide the shortcomings of the room, showing its best advantages with the help of a small spot of light;
- will support the lighting of the room design;
- will build good lighting for individual books and book rows;
- will provide illumination of the work area in the kitchen;
- highlight the uniqueness of each exhibition display;
- can shine both inside and outside any industrial premises.
With the help of mounted linear lamps, it is possible to bring to life the most original ideas of the designer.
Ceiling lamps
Built-in LED ceiling lamps and panels replace all types of lamps with fluorescent lamps, as well as other types of built-in household lamps.
The leading advantages of lighting buildings with LED ceiling lights and panels will be:
- significant energy savings and, consequently, a reduction in monthly electricity costs;
- long service life (up to fifty thousand hours - this is a very, very long time in fact);
- no need for constant replacement of non-working lamps, as well as legislative prohibitions under a special program for the elimination of LED technology;
- reduction of cooling costs during the warm season.

It should be pointed out that installing LED lamps on the ceiling, as a rule, provides better brightness than the same devices with fluorescent lamps used for office premises. Thanks to more efficient work, LED lamps will consume approximately one third less energy.
Another important element The device is a power supply. It is this that ensures the bright and continuous burning of the LED lamp. If you use low-quality power supplies, the lamp may flicker when lit, which is very harmful to the eyes. This is the so-called strobe effect, which is used in nightclubs and discos. The power supply contains a transformer electronic type, which is most susceptible to breakdowns, but has small size, which is very convenient for hidden installation.
Also, induction type transformers can be built into power supplies. These transformers are the most reliable and have a lower price compared to electronic transformers. Induction transformers are characterized by high weight and size. Drawing a conclusion from the above, the radiator and power supply must be selected depending on the location where the lamp will be installed.
The visit of the master in Moscow is FREE.
LED lamps are promising devices for lighting in almost all conditions: outdoor or indoor at permissible high temperatures and very low ones.
Advantages of using LED lamps:
1. The service life of this technology is about 8 years (possibly more) when compared with fluorescent lamps, then it is 4-16 times longer;
2. Inertia in LED installation absent, which is also important (that is, the light comes on immediately after switching on and at full power);
3. Safety of use;
4. High strength;
5. Small dimensions, which makes the lighting system more compact;
6. Ceiling chandelier, having LED lightening, does not flicker;
7. Minimal infrared and ultraviolet radiation;
8. There is no release of mercury vapor;
9. Low heat generation;
10. Light is directed into one sphere.
They turn off and on instantly without the inertia that is typical of other lamps; the quality of their lighting does not depend on the number and frequency of switching on. Therefore, motion sensors can be installed on street LED lamps, which can successfully save energy.
LED lamps are divided into types:
Linear
- ceiling
- wall
- industrial
- spotlights
- underwater version (for pools and fountains)
- LED controllers (for implementing color dynamics, for example, at discos or concert performances)
Installation of LED lamps, at first glance, does not represent anything complicated. And perhaps this is exactly the case if you have sufficient experience and the necessary tools. However, for a large number of people, installing LED lamps turns out to be a very difficult task, and very often the operation of this equipment depends on this.
What do you need to know about installing LED lamps?

It would be better to order the installation of LED lamps from real professional craftsmen who work in our company. Our highly qualified specialists will always: Carry out all work efficiently and quickly, as well as at the most affordable price. We always approach the solution of tasks set by the client responsibly. They have extensive work experience. They have all the tools necessary for the job.
To replace a spotlight lamp, you must:
Turn off the voltage in the room or apartment;
- carefully remove the retaining ring that holds the protective glass;
- carefully remove the failed lamp and replace it with a new one;
- Reinstall the glass and secure it with the retaining ring.
Required tool:
LED lights;
- plastic rings;
- fishing line (used to install fasteners);
- metal hangers;
- terminals;
- transformer;
- knife.
By entrusting the installation of LED lamps to our highly qualified specialists, you can always count on high-quality results, as well as fast completion of any work. We issue a mandatory warranty for all types of services provided for a period of one year. Our technician arrives within 1 or 2 hours, which allows us to resolve even emergency situations.
When I decided to renovate the hallway, one of the first questions that arose was the question of choosing the type of ceiling finish and which ceiling lights to install. Having many years of operating experience stretch ceiling in the bathroom and living room made of PVC, it didn’t take long to choose the type of ceiling. I decided to install a PVC suspended ceiling due to its many advantages compared to other types of ceiling finishing.
The ceiling lights took some thought. On the one hand, I wanted to install modern LED spotlights, and on the other hand, in the hallway there was a homemade set of chandeliers and sconces, made with my own hands. I liked them, and I didn’t want to part with either the chandelier or the sconce.
Ultimately, a compromise solution was found: the chandelier and sconce at the entrance to the hallway were left hanging on former places, and in the hallway corridor, where a single-lamp lamp hung on the wall, install spotlights built into the suspended ceiling.
Before installing a suspended ceiling, it is necessary to lay electrical wiring, and in order to lay the wires it is necessary to develop electrical diagram, based on the type and number of lamps, the type of light bulbs and their power.
Selecting the type of light bulb for a recessed ceiling light
Before purchasing a lamp built into a suspended ceiling, you need to select the type of light bulbs and determine the required number of them to ensure sufficient illumination of the room. Currently, four types of lamps are used for installation in recessed ceiling lamps: incandescent, halogen, compact (they are also called energy-saving or fluorescent lamps) and LED. Each type of light bulb has its own advantages and disadvantages; in addition, it affects the minimum distance between the installation horizon of a suspended ceiling and a fixed one, which is a determining factor in rooms with low ceilings.
Using the table below, you can easily do optimal choice type of lamps for suspended ceilings, based on your requirements and boundary conditions.
| Table for selecting the type of light bulbs for recessed ceiling luminaires | ||||
|---|---|---|---|---|
| Technical specifications | Lamp type | |||
| Incandescent | Halogen | Energy saving | LED | |
| Minimum distance between main and suspended ceilings*, cm | 10-12 | 5-6 | 10-12 | 5-6 |
| Supply voltage, V | 220 | 12, 220 | 220 | 12, 220 |
| Luminous flux*, Lm/W | 10-15 | 15-20 | 50-70 | 80-120 |
| Maximum power*, W | 40 | 40 | 40 | 7 |
| Color temperature, °K | 2700 | 3000 | 2700, 3300, 4200, 5100, 6400 | 2700, 3300, 4200, 5100 |
| Service life*, hour | 1000 | 4000 | 8000 | 70000 |
| Price | Very low | Low | Average | High |
Technical parameters marked * may differ up or down depending on the design of the lamp and light bulb, the power of the light bulb, the manufacturer, and the type of suspended ceiling. For example, PVC stretch ceilings are afraid of heating above 60°C, and this limits the permissible power of light bulbs in recessed luminaires.
It should be noted that halogen lamps, designed for a supply voltage of 12 V and 220 V, are very sensitive to excess supply voltage and often burn out as a result. For 12 V halogen lamps, a step-down transformer or power supply (adapter) is required, for which you must remember, in case of installing a suspended ceiling without access to the interceiling space, to provide a special place on the wall.
You can obtain more detailed information about incandescent and halogen lamps, energy-saving lamps, and LED lamps by visiting the website pages specifically dedicated to them.
Calculation of power and number of lamps
The power of the lamps depends on the size of the room (area, height and shape), the color of the walls and furniture, the purpose of the room and the preferences of the owner. Some people like bright light, while others prefer warm, diffused light of low brightness.
It is almost impossible to accurately calculate the power and number of luminaires, taking into account all factors. For an estimated calculation, you can use the illumination data presented in the table, thanks to which, taking into account the luminous flux depending on the type of light bulb, you can determine how many and what power lamps need to be installed in the room, depending on its type.
| Table for calculating the power and number of lamps depending on the type of room | ||||
|---|---|---|---|---|
| Type of room | Power required to illuminate 1m2 of room area depending on the type of lamp |
|||
| Incandescent | Halogen | Energy saving | LED | |
| Children's | 40 | 30 | 10 | 5 |
| Kitchen | 30 | 25 | 7 | 4 |
| Living room, bathroom, toilet | 25 | 20 | 6 | 3 |
| Bedroom, hallway, corridor | 20 | 15 | 5 | 2 |
| Utility rooms | 10 | 7 | 2 | 1 |
Let's look at an example of a calculation that I did for the hallway corridor. It was planned to install LED ceiling spotlights. The shape of the corridor is the letter T with areas of 2.8 m2 and 4.5 m2. The total area of the corridor was 7.3 m2. Let's calculate the required power of the lamps 7.3 × 2 = 15.6 W. Since the ceiling height was 2.75 m and the walls were planned to be painted in creme brulee color, taking into account the complex shape of the corridor, then optimal solution There will be an installation of four ceiling spotlights with LED lamps installed in them with a small margin, power 5.5 W, supply voltage 220 V with a GU5.3 pin base. The pin plinth for suspended ceilings is good because it has small dimensions, which is important when the inter-ceiling space is small in height.

Before the renovation, there were paintings by artists on the walls in the corridor, which were planned to be left in their original places after the renovation was completed. Therefore, LED lamps were chosen for undistorted color rendering. white light, color temperature 4000 K. If you need warm light, then you should choose a lamp with a color temperature of 2700 K.
It should be noted that it is not always advisable to use recessed ceiling lamps in rooms as the only source of lighting. A much better result can be obtained by using additional wall lamps or table lamps in the work or rest area. In this case, the power of the lamps in the ceiling lamps can be reduced.
If you have local lighting lamps, it is quite possible to completely abandon the lamps built into the suspended ceiling, replacing them with LED strip ceiling lighting. So, when solving the issue of lighting the premises of an apartment, there is room for creative imagination to unfold.
Selecting a wire for wiring spotlights
To lay the power supply wiring for four selected lamps with a total power of 22 W, any double-insulated electrical wire designed for wiring is suitable. A copper stranded double connecting wire, for example type PVA 2×0.75, is best suited. You don’t have to think about the cross-section of the wire cores, since the maximum current will not exceed 0.1 A.
When using 12 V halogen lamps in ceiling lamps, the wire cross-section must be calculated. One such 60 W light bulb consumes a current of 5 A. And if ten light bulbs are needed for lighting, then the current consumption will be 50 A.
Selection and installation of a recessed ceiling spotlight
The range of recessed ceiling lamps in any lighting store is huge, but they are all designed the same and differ only in the type of body finishing and additional decorations. Some models of recessed luminaires provide the ability to change the direction of the light flux within small limits.

Since I needed to illuminate the corridor, the choice fell on the simplest type of recessed lamp, which also included a base socket.

Any recessed ceiling lamp consists of a body, which is a shaped profile ring with areas for attaching two springs with ears. Depending on the type and power of the light bulbs, the lamp housings come in different diameters and may not have them, like the lamp in the photo above, or they may have an electric socket installed, usually E14.

A special place is occupied by LED ceiling spotlights, in which the LEDs are installed directly in the housing on a printed circuit board.

The light bulb in such a lamp cannot be replaced, and if it fails, you will have to replace the entire lamp or look for replacement LEDs. Such lamps are expensive.
For lamps without sockets, a spring in the form of a cut ring is used to secure the light bulb in the body.

The light bulb is inserted into the lamp body and is fixed due to the fact that the spring ring, unclenching, fits into a specially made groove in the body. This lamp is suitable for installing both halogen and LED bulbs. When replacing halogen bulbs with LED bulbs or vice versa, you must remember to check what supply voltage they are designed for.
To secure a ceiling spotlight in a suspended ceiling, regardless of its type, a hole is cut in a given location on the ceiling, slightly smaller than the outer diameter of the flange of the lamp body.

The ears of the springs are brought together by hand to such an extent that they pass into the hole in the ceiling. The ears are inserted into the ceiling hole and released. Leaning on the inner surface of the suspended ceiling, the lugs are pulled in until the flange stops against the lower surface of the suspended ceiling and thus fix the luminaire.
Such simple design Mounting the ceiling lamp allows you to hide the elements of its fastening and easily remove the lamp if necessary. Simply grab the base of the lamp and pull it down.

After installing the lamp body on the suspended ceiling, a wire is threaded through it and connected to the socket using a terminal block. The socket is placed on the base of the light bulb, the light bulb is inserted into the lamp body and secured with an expansion spring.
Electrical wiring diagram
for spotlights
Before installing a suspended ceiling, after choosing the type of light bulbs, calculating their power, the number of lamps and their installation points, an electrical wiring diagram is developed. When developing an electrical circuit, it is necessary to take into account the points and methods of connecting the wires to each other and to the lamps.

Since the wires to which it was previously connected were already coming out of the wall Wall Light, then it was decided to connect the ceiling lights to these wires. It was planned to install a suspended stretch ceiling made of PVC, and the wires came out above the level of the stretch ceiling, and, therefore, there would be no access to the connection points of the wires after installing the ceiling. Therefore, it was decided to make all wire connections in the most reliable way, twisting followed by soldering with tin-lead solder. The soldering points were marked on the electrical diagram.
When choosing a place to install lamps and chandeliers in rooms where there is a TV or computer, you must not forget that the angle of incidence of the light beam is equal to the angle of reflection. Taking into account this rule, lamps must be installed in places that exclude their reflection on the monitor screen, therefore, to select installation points for lamps, it is necessary to think about how the furniture will be arranged, in what place the TV or computer monitor will be installed.
When choosing light bulbs for a supply voltage of 220 V, installation additional devices not required. In the case of using light bulbs with a supply voltage of 12 V, it is necessary to provide space for installing transformers or adapters, taking into account their overall dimensions and possible access to them for Maintenance or repair.
Attention! Before connecting spotlights, to avoid damage electric shock, it is necessary to de-energize the electrical wiring. To do this, turn off the corresponding circuit breaker in the distribution panel and check the reliability of the disconnection using the phase indicator.
Electrical wiring installation
for connecting spotlights
After purchasing lamps, determining their installation locations, purchasing materials and equipment, you can begin installing electrical wiring.

Installation of electrical wiring for connecting lamps can be carried out at any stage of the renovation of the room, right up to the installation of suspended ceilings. But when repairing the walls in the corridor, it turned out that the light from the existing lamp was not enough. Therefore, the installation of electrical wiring had to be done first, and temporary sockets with energy-saving light bulbs had to be connected to the electrical wiring for lighting.

Before installing the wires, it is necessary to mark on the ceiling the installation locations of the lamps (circled in the photo) and the points where the wires are attached. To avoid sagging, the wires, depending on their rigidity, are fixed in increments of 40-50 cm.

To secure wires to the ceiling and walls, there are special dowel clamps (pictured on the left) and nail brackets (pictured on the right) of different sizes. To secure the wire with a dowel clamp on the wall, you need to drill a hole, put the dowel clamp on the wire and hammer the dowel into the hole. To secure a wire with a nail clip, you need to press the wire against the wall with it and hammer in the nail. Suitable for installation of wires and cables on wood, plastic, plaster.

Nail clips driven into a concrete plastered ceiling may fall out and remain on the PVC sheet. Therefore, this type of fastening was discarded. It turned out that I didn’t have dowel clamps at hand, so I used simple and reliable way securing the wires to the wall using a vinyl chloride tube clamp. A hole is drilled in the ceiling, a dowel is driven into it, and a self-tapping screw is screwed into the dowel through the hole made in the clamp. Since the weight of the wire is negligible, any self-tapping screw and dowel of the smallest standard size will do.
Making a wiring harness
ceiling spotlights
Since the electrical wiring for ceiling lamps after installing a stretch ceiling will be inaccessible for maintenance and repair, all wire connections in the inter-ceiling space must be made extremely reliably. Connections are usually made using terminal blocks, such as Wago. But the most reliable type of connecting wires is soldering, and this is the method I used.

To minimize the amount of work at heights near the ceiling, a harness was made in advance, which will only need to be fixed to the ceiling and connected to household electrical wiring.
To determine the length of the harness wires and soldering points, using previously made markings on the ceiling, the distances between the wires for connection and the installation locations of the lamps were measured. The measurement results were immediately applied to the electrical circuit, which was also an electrical circuit.
The harness was made of copper stranded wire with double insulation (the core is entwined with silk thread and covered with polyvinyl chloride). For convenience, the wires were twisted together into a pigtail.

After removing the insulation from the wires, they were tinned with solder. In the second section of the corridor, the wires had to branch out. Therefore, the wires were twisted in pairs and soldered with solder. Please note that to increase the reliability of the insulation, the connection points of the wires were made offset relative to each other.

Before connection, insulating tubes were put on the wires, which, after soldering was completed, were moved to the connection points. To prevent displacement of the insulating tubes, they were fixed on both sides with cambrics tightly fitting on the wires. Together with the displacement of the connection points, this insulation method guaranteed the reliability of the electrical wiring. Insulating the wires could also be done using ordinary insulating tape. To avoid confusion, the cambrics were marked.
When bending the cross beam, a small section of the wire harness passed below the level of the suspended ceiling. This section of electrical wiring ran under the plaster. To ensure reliable insulation, it was additionally covered with a polyvinyl chloride tube.

After the harness was secured to the ceiling, it was time to connect it to the apartment electrical wiring. For this, the length of the conductors coming out of the wall double wire was cut offset. Since the wire was old, its insulation became rough and, in order not to damage the wires, it was removed thermally using a soldering iron. The cores were stripped and tinned with solder, and insulating tubes were put on them.

All that remains is to wind the ends of the harness onto the wires network wire, solder with solder and put on insulating tubes. Thanks to the technology of shifting the wire connections, tubes are needed practically for human safety and aesthetics. Electrical wires cannot accidentally connect to each other.

The connection point is suspended from the ceiling using a clamp with a self-tapping screw. The electrical wiring for the spotlights has been completed.

Temporary electric sockets in places where spotlights will be installed are connected using terminal blocks, the light bulbs are screwed in and the repair can continue.
LED Ceiling Light Installation
on a PVC stretch ceiling
The technology for installing ceiling lights, including LED ones, on any suspended ceiling of a rigid structure, such as plasterboard, is described above. slatted ceiling or Armstrong. In the case of installing a spotlight on a suspended ceiling made of PVC or other plastic material It is necessary to install additional fastening, otherwise the ceiling will sag under the weight of the lamps.

For these purposes, special fittings are produced. The photo shows a universal platform (ramp) for mounting spotlights. The platform has the shape of a cone, the surface of which consists of steps.

To adjust the diameter of the platform mounting hole to a specific type of ceiling lamp, use a sharp knife to cut off the excess steps from the cone.

The platform is attached to the main ceiling using perforated steel tape. A piece of tape of the required length is unrolled from the roll and cut with metal scissors.

There are two platforms with holes on the platform for fastening the tape with self-tapping screws. If you don’t have a short-length self-tapping screw, you can tighten a long one. The protruding part must be removed with side cutters.

The fittings for spotlights are screwed to the ceiling with self-tapping screws, led light bulbs connected to check. Everything works, you need to remove the light bulbs and you can start installing the stretch ceiling.

After the suspended ceiling is installed, the installation of lamps begins. To ensure that the PVC film does not tear and does not heat up too much, before making a hole in it for the lamp, a special plastic thermal insulation ring is glued to the place of its installation with special glue.

The film is cut out along the inner circumference of the ring with a sharp knife, the cartridge is removed and the platform is centered. The perforated tape is easily deformed, and the ceiling bends, so you can easily adjust the height and location of the platform in the horizontal plane.

Installing a ceiling light on a platform will ensure its reliable operation and will prevent the stretch ceiling from sagging and being damaged due to excessive heating when using halogen light bulbs.

In the photo you see the final result of the work on installing spotlights in a suspended ceiling.
If you need installation of LED lamps, the price will be reasonable if you contact Yuda. Specialists with extensive experience will install lamps of any complexity.
Specialists offer installation of diode lighting fixtures all types:
- ceiling
- invoices
- hanging
Installation services can be ordered in any district of Moscow. When performing work, craftsmen use their own specialized equipment and tools.
Features of installing diode lamps in the interceiling space
To install LED lamps, a specialist must have practical experience and knowledge. Only a qualified craftsman can perform high-quality installation of lighting fixtures.
To install diode lamps, a regular electrical cable is used: Yudu craftsmen lay the wiring according to a previously approved diagram, and then draw out the points to which the chandelier and lamps are connected. In suspended ceilings, the electrical installation of lamps is carried out from the inside - only the lighting fixture (chandelier, sconce, lamp) remains outside.
Designing a layout of lamps in a room is important point, on which the quality of lighting will depend. For ceiling systems To supply light, craftsmen use diode strips, which provide uniform diffused light. IN office premises installation of lighting fixtures can be done pointwise, above each work area. Ceiling lighting systems are combined with overhead wall lighting fixtures. This will allow you to maintain the intended interior design.
No matter what room the diode lamps are installed in, the terminal blocks must be insulated to prevent fire when the electrical wiring is shorted. Private craftsmen make Yuda insulation using modern consumables.
How much does it cost to install overhead and pendant LED lamps?
The cost of installing an LED lamp performed by Yudu performers is low. The price for electrician services depends on:
- number of lighting connection points
- location of lighting fixtures (on the ceiling, wall, built into the floor, arch, furniture, etc.)
- the need to develop a project
- complexity of the LED lighting system
- quantity of consumables used (for insulation, connecting wire, etc.)
- urgency of order fulfillment
If you need inexpensive installation of LED lamps, the price will be reasonable when ordering from Yuda. In the price list you can see the approximate prices for electrical installation services. And the final cost of the master’s work will be known only after all the details of the order have been clarified.
Advantages of Yudu performers:
- affordable prices for electric installation work(the cost of installing LED lighting devices can be negotiated individually)
- execution of orders of varying complexity
- installation of lighting fixtures in any room (residential, office, retail, warehouse)
- departure to any address in Moscow 7 days a week, including holidays
- high quality of services
To place an order for the installation of diode lighting devices in Moscow, publish an application on the Yuda website. In the task please indicate:
- in which premises the work will be carried out (apartment, office, retail or warehouse buildings)
- Is there electrical wiring in the room?
- how many connection points for lamps (chandeliers) are needed?
- the place where the lamps need to be installed (ceiling, walls, floor, arch, etc.)
Diode lamps have a minimum incandescent temperature, so they can be mounted anywhere (both for main lighting and decorative lighting).
Yudu contractors interested in ordering will send you proposals with a full list of work on installing lighting fixtures, as well as the cost of services. If you need installation of LED lamps, the price will be lower than the market price when ordering services on the Yudu website.
Natural fuels suitable for mass energy production are gradually being depleted. alternative energy It is not developing fast enough and does not have time to compensate consumers for the lack of electricity, which inevitably leads to a constant increase in its cost. In such conditions, an alternative to expensive and ineffective incandescent lighting is needed.
The problem was partially solved by the so-called energy-saving lamps, which quickly gained popularity. However, their high price and insufficient durability did not allow them to become a “lifesaver” for everyone and enter every home.
Not so long ago they had a worthy and much more effective replacement - LEDs. Ease of use, ease of installation, energy efficiency, environmental friendliness, low cost - all this allows the use of LED lamps for interior lighting in every home.
Initially, LEDs did not have the necessary parameters and were used only in the illumination of various devices or in low-power emergency systems. However, with the development of technology, they have increased their capabilities and are now widely used in both household and industrial premises. There are many options for use: from decorative multi-colored lighting to basic lighting of large rooms.
The installation features of LED lamps significantly distinguish them from classic incandescent lamps. Perhaps this is why the pace of their spread is not as rapid as one might expect.

However, there is nothing overly complicated about making LED lighting yourself. You just need to have knowledge of certain rules for working with such light sources. For this purpose, it is worth considering their pros and cons, rules of calculation, selection and installation.
Advantages and disadvantages
Main positive qualities which he has led light ilnik, are as follows:
- The highest energy efficiency of all light sources available on the market;
- Environmentally friendly, no emissions at all harmful substances during operation and during disposal of used elements;
- Extremely long service life, absolutely incomparable with incandescent or fluorescent lamps - 10 years or more.
Important! Big time The service life of LEDs directly depends on their quality. That is, the cheapest Chinese fakes can work for 1-2 months, while more expensive high-quality ones may not burn out after 15 years.

- The LED lamp allows for very smooth adjustment of the brightness level, as well as the ability to change the color of the lighting (!);
- The LED in its design does not contain breakable elements, is not afraid of shocks and constant vibration;
- The familiar voltage surges in the home electrical network lead to the “blinking” of standard lighting fixtures - LEDs do not have this disadvantage, since their luminosity is not related to the voltage of the electric current, but to its strength;
- There is no infrared and ultraviolet in the emission spectrum of LEDs - the paint of wallpaper, walls, and fabrics will not fade, as under the rays of incandescent lamps.
As always happens with technical devices, there was a fly in the ointment. However, to date, only one problem has been discovered: the fairly high cost of high-quality diodes. But if we take into account their service life, then it is probably worth talking about the high cost of incandescent and fluorescent lamps, and not LEDs.

Application area
There are two main ways in which you can connect LEDs for lighting:
- use of LED strip for distributed lighting of a room: with its help you can create decorative lighting individual areas - well suited for “hidden” lighting, when the light source itself is not visible;
- using a ready-made LED lamp as a light source is a more expensive option, suitable for “spot” lighting.
Important! Lighting using ready-made LED lamps has a more traditional and familiar look, especially if it is made in the body of wall sconces or as a chandelier for the ceiling. is no different visually from its ordinary counterparts, and you need to work with it the same way.
Since working with LED lamps is practically no different from a similar procedure with ordinary traditional lamps, they do not require separate consideration. Is it worth knowing how to correctly calculate the power to sufficiently illuminate the premises. But since the power calculation is similar to that for the LED strip, that is what should be used.

LED strip allows you to create the most “sophisticated” lighting schemes for a room, illuminating various individual zones (for example, making lighting kitchen apron or the contours of cabinets), make hidden lighting under the ceiling or illuminate the walls around the entire perimeter of the room. The possibilities are limited only by the designer's imagination.
The available options are greatly expanded by the ability to use different colors in lighting and change them. Here, of course, you need to know when to stop and not overdo it - too much color can lead to the opposite result and make the interior design tacky.
Hidden lighting under the ceiling along the perimeter of the room visually increases its size, which is important for small city apartments.
A common way to use LED strip is lighting in cabinets, mezzanines and other closed elements interior Complete with an automatic switch, this adds greater functionality to them (especially true for kitchen cabinets and large wardrobes).
Calculation of the number of diodes
To simply calculate the required power of LEDs, you can use a comparison with conventional incandescent lamps; for this you need to know the indicators of the luminous flux emitted by these light sources:
- each incandescent bulb produces approximately 13 lm/W (lumens per watt) of luminous flux;
- different LEDs can produce different levels ranging from 75-90 lm/W (average 80 lm/W)
Knowing this data, it is quite simple to calculate the number of LEDs that can replace an incandescent lamp. For example, instead of a 100-watt light bulb that emits 13x100 = 1300 lumens, you will need 16.25 W (17 - rounded to big side) LEDs. Thus, you can use 18 LEDs of 1 watt each, or 9 pieces of 2 W each, or 2 powerful ones of 9 W each. Or you can use one powerful 20-watt LED spotlight.

Important! When purchasing LEDs, you should pay attention to their luminous flux. On average, it is 75-90 lm/W, but some specimens have significantly best characteristics. For example, the Luminus CSM-360 LED has a rating of 115 lm/W, and the Cree XLamp XHP70 model has a rating of 150 lumens per watt.
To organize standard spot lighting, it is more rational to use high-power LEDs or LED lamps. If you plan to evenly illuminate the ceiling or walls over the entire area, then it is optimal to take many low-power light sources (for example, a strip with LEDs).
Selecting a Power Source
It is also necessary to resolve the issue of how to connect LED lighting to the electrical network, because the LED voltage is not 220, but 12 or 24 volts (strips with a supply voltage of 36 and 48 volts are available, but this is rare).

The length of the LED strip is always standard and is 5 m, but it can contain a different number of diodes with different powers. For the calculation, one should proceed from the total power of the powered tape.
In general, the following steps should be taken to calculate the required power supply power for connecting an LED strip:
- The manufacturer usually indicates the power indicator per meter (for example, 6 W/m), which means that to obtain the total power you need to multiply this figure by the length - in the example it will be 6x5 = 30 W;
- For power supplies, such an indicator as power reserve is used. If the lighting is planned to be turned on from time to time (for example, lighting in cabinets), then it is taken equal to 1.3. If you install permanent main lighting that will work long time without switching off, then the power reserve is assumed to be 1.5. The power of the power supply is obtained by multiplying the power consumed by the LEDs by the reserve indicator - in the example it will be 30x1.5 = 45 W (if constant lighting is planned) or 30x1.3 = 39 W (for periodic switching);
- The operating voltage of the diodes is indicated on the tape, and the power supply should be selected at the same voltage. The modern market offers a huge number of power supplies, from which it is easy to select with the necessary parameters - in the example, this is a 12 V and 45 W power supply (or 12 V and 39 W for periodic switching).

Important! It is not always possible to select a power supply with exactly the calculated power. In this case, you should purchase a unit with higher power: in the example, these could be units of 50 and 40 W, respectively.
As can be seen from what has been described, the calculations are simple and can be easily done on the go right in a hardware store if you know the required lighting parameters. When purchasing, you should also pay attention to the design of the housing - they can be sealed or not. For work it is worth purchasing waterproof ones, but for ordinary premises - not (due to the difference in price).
Mounting the tape and connecting to the network
Before starting work on placing the tape in its intended place, you should remember several general mandatory rules:

Installing an LED strip in its intended place, for example, on the ceiling, is quite simple, but still requires a certain sequence of actions:
The constant increase in the cost of energy resources, the need to save them, the urgency of preservation environment pushed humanity to use LEDs as light sources. Easy to install, convenient to use, and not having a negative impact on humans and nature as a whole, they are gradually replacing the recently popular compact energy-saving lamps.
So, to understand the benefits LED lamps, you need to understand what they consist of and what their operating principle is.
LED lamp device

The lamp consists of a set of LEDs that correspond to the total power of the lamp, a control circuit and a housing with a reflector. LED lamps designed for household use, are equipped with a standard E14 or E27 socket to replace conventional incandescent lamps. The number of LEDs can be different - from one to several dozen, included in one chain and connected to the control circuit through a power supply.

Since the LED produces a significant amount of heat during operation, it must be cooled. Radiators to which LEDs are attached do an excellent job of removing heat. Please note that at the point of contact between the LED and the heatsink, a special thermal paste must be used to ensure good heat transfer. Otherwise, with constant overheating of the LED, its service life is significantly reduced.
The photo shows several types of radiators for LEDs.

LED lamp circuit
A typical LED control circuit in a luminaire looks like this:

A quenching resistor and capacitance are installed at the input - they act as a step-down power supply. Further, since the LEDs are only powered DC, a diode bridge is installed that converts alternating voltage to direct voltage. In the presented circuit, all the LEDs are connected in series, but this is not the only way to connect them. Such “bulbs” can be connected in parallel to each other or in a mixed way, as shown below.

Parallel connection of LEDs. A current-limiting resistor must be connected in series to each lamp to protect the LED from breakdown.

Mixed connection of LEDs. IN in this case Each group of series-connected lamps is connected in parallel to each other.
The disadvantage of a series connection is that if one element of the circuit fails, the entire assembly will not be able to work, since an open circuit has formed in the circuit. If the LED does not just burn out, but there is a breakdown, then in this case the circuit will not be interrupted, but since the supply voltage remains unchanged and the number of consumers has decreased, they will all begin to work with overload and eventually burn out. This also applies to mixed connection schemes. The most reliable in this case parallel circuit connecting an LED lamp, even if half of the lamps fail, it will be able to continue to perform its functions, albeit not at full capacity. But such schemes are the most expensive, so they are used quite rarely.
How to assemble an LED lamp?
Thanks to modern technologies and the variety of LEDs that are sold in electrical stores and construction supermarkets, it is impossible to assemble a lamp from LEDs a lot of work. First you need to decide what type of lighting is preferable for the selected room. For example, if this is a corridor in the hallway, then there is no need to install spotlights, but it will be more aesthetically pleasing to use an LED strip, which you can easily install yourself by gluing it around the perimeter of the ceiling.

It is sold completely ready for installation, on one side its end is closed with a plug that protects the contacts from oxidation, and the other has output wires, which are connected to the power supply with correct polarity. Depending on the length of the tape and, accordingly, its power, it is necessary to select a power supply (LED driver) that could power the entire chain without overload. Up to 60 LEDs can be placed in one meter of such tape. As a rule, choose a power supply that has a power 10-15% higher than the rated load. It is highly not recommended to close such devices in small niches with limited ventilation, since LED drivers can generate a significant amount of heat during operation. An alternative is to use power supplies with forced ventilation.

If an LED strip works well for a hallway, then for a hall or bedroom it will be too ineffective as the main lighting. In large rooms it is used as lighting, and the main lamps are placed on the ceiling or walls for maximum comfort. When planning LED lighting, you need to take into account the area of the room, the height of the ceilings in it, the shades of the surface of the walls and, accordingly, the power of the lamps. When the entire set of equipment has been purchased, we begin to assemble the lamps.
To do this, an LED is attached to the radiator with thermal paste applied. If the radiator area allows heat to be removed from several lamps, it is permissible to attach a nominal number of LEDs to it. How LED lamps are selected, articles on the Internet describe this process in sufficient detail. The main thing you need to pay attention to is their power and size. Thus, SMD LEDs are considered one of the most popular. They are marked smd3528/1210, smd5050/5060 and smd5070 (the most powerful). The numbers in the LED labeling indicate their size. For example, smd5050 has a size of 5x5 mm, and smd5070 has a size of 5x7 mm. Due to their small size, such LEDs are used almost everywhere: in LED strips and lamps, in rulers and in other lighting devices.
LED lamps are divided into types:
- linear,
- ceiling,
- wall,
- industrial,
- spotlights,
- underwater version (for pools and fountains),
- LED controllers (for implementing color dynamics, for example, at discos or concert performances).
Lamps can be equipped with motion sensors to significantly increase the lifespan of LEDs, which turn on only when necessary. Such equipment works great in the entrances of houses, long office corridors and other places where constant lighting is not necessary.

There are ready-made lamps that are equipped with radiators designed for LEDs installed in them. If knowledge for self-assembly is not enough, then you can use ready-made solutions and purchase, for example, an LED lamp for the home - assembled LEDs on radiators. They are enclosed in a housing that can decorate any apartment.

Installation of LED lamp
The variety of luminaires with LEDs allows them to be used in almost any place, including rooms with high humidity. But LED lamps emit a significant amount of heat during operation, so you should avoid installing them in the kitchen above the hob. Due to additional heating and poor heat dissipation, LEDs will not last long and will quickly fail.

LED lamps have proven themselves to be excellent in living rooms and bedrooms. They install perfectly and without any problems on any surface. This is how, for example, an LED lamp is installed on a suspended ceiling:

Guided by this simple diagram, such lamps are installed in the same way on dropped ceilings from plasterboard.
But if in the room in which you plan to install LED lighting, the ceilings are monolithic concrete slab, then you need to choose surface-mounted or pendant type lamps.

In this case, the LED lamp or its suspended structure is mounted directly on the concrete surface using special holes in the housing or other devices.

Connecting an LED spotlight
Attention! All work related to connecting lamps to the electrical network must be carried out with the voltage turned off to avoid electric shock!
Of course, in order to connect a spotlight, it is necessary to lay current-carrying wires to the place of its installation. If you plan to install a suspended or suspended ceiling, then the wire is pulled into a corrugated plastic sleeve, which, in turn, is secured with brackets on the ceiling.

After laying all the wires and installing the LED drivers in a place convenient for their maintenance with good ventilation, the suspended ceiling is mounted. Next, holes are carefully cut out in it corresponding to the diameter of the lamps and the wires are carefully routed out and connected to the terminals of the lamp. After connecting the lamp, install it in the cut hole, being careful not to break the lamp or damage the stretch ceiling film. Moreover, if the room has a suspended ceiling, then thermal rings must be installed on the lamp, which prevent overheating of the film. But for plasterboard ceilings this procedure is not required.
The connection is made according to the diagram:

If the lamps are assembled and connected correctly, then when voltage is applied to the power supplies, the lamps should light up.
How to replace a spotlight in a lamp?
Of course, manufacturers of LED lamps claim enormous service life for their products, but if LEDs are used incorrectly, their lifespan can be significantly reduced and they will require replacement.
To replace a spotlight lamp, you must:
- turn off the voltage in the room or apartment;
- Carefully remove the retaining ring that holds the protective glass;
- carefully remove the failed lamp and replace it with a new one;
- Replace the glass and secure it with the retaining ring.
Replacing lamps should be done with cotton gloves so as not to damage the LED and not to leave grease on its surface, which is found on our fingers.
After completing these operations, you can apply voltage and enjoy the results of your work.
Prices for new buildings, apartments with a mortgage for young families. You can choose the layout of the apartments to suit your taste. Apartments in Balashikha are an excellent choice.