Do-it-yourself electrical wiring in a wooden house - step-by-step instructions. Basic requirements for electrical wiring in a wooden house Wiring in a corrugated pipe in a wooden house
All electric installation work require accuracy from the performer, increased attention, strict compliance technical rules and established standards. When planning and implementing electrification wooden house it is necessary to obtain advice from a qualified electrician and become familiar with regulatory documents, the basic requirements and sequence of laying the electrical wire.
Requirements for electrical wiring in a wooden house
Installation of electrical wiring in wooden houses has some differences and features from the electrification of stone houses. Safety must be a priority when designing and installing cables. There are a number of basic rules that require strict adherence:

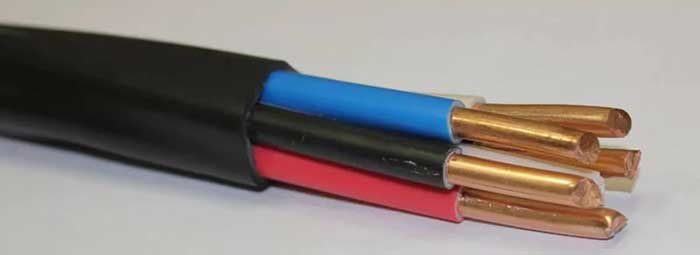
- Careful insulation of conductors electric current using non-combustible materials (NYM, VVGng, VVGng-LS).
- Aluminum conductors must be replaced with copper conductors with a cross-section of at least 16 mm2. The cable must enter the house through a metal sleeve. The transition of the wire from one room to another is carried out through a rigid metal pipe.
- It is advisable to carry out electrification of a wooden house using the “open” method.
- It is necessary to accurately calculate the cable thickness, leaving a margin of at least 30%.
- Particular attention should be paid to the quality of the materials used. You need to choose a cable with non-flammable insulation.
- If installation is required hidden electrical wiring Be sure to use a metal pipe. Laying cables in corrugated pipes is prohibited.
- Installation of an RCD, ground loop and lightning rod is required. In this case, not only electrical appliances are subject to grounding, but also metal pipes in which the cable is laid.
- The input unit - electrical panel should be isolated as much as possible from the wooden structures of the house. Sometimes you have to build brick wall, and the floors should be made of cement/concrete screed.
Electrical wiring options in a wooden house
Installation of electrical wiring in wooden house do it yourself, namely cable routing, can be done in three ways:

Do-it-yourself electrical wiring in a wooden house: diagrams
According to current standards when electrifying a private house without installing a transformer, the power consumption cannot be more than 15 kW. This indicator is calculated by summing the power of simultaneously switched on electrical appliances. If the result obtained is less than 15 kW, then install a 25A input circuit breaker, otherwise an additional transformer will be required.
When developing a wiring diagram, connection points are divided into different consumption groups. For example, lighting devices are powered from one machine, a separate device is required for sockets, and an additional device is required for street lighting.
It is advisable to equip personal automatic machines and a separate power supply branch for powerful electrical equipment: an electric stove, a boiler or an electric boiler. Separate power supply circuits are also required for detached outbuildings.
Important! For safety reasons, it is better to increase the number of power supply branches - this measure helps to reduce potentially dangerous connection sections.
Below is approximate diagram do-it-yourself electrical wiring in a private wooden house.

Some nuances when developing a scheme:
- The input machine and meter of the energy supply organization require to be placed outside for easy control of electricity consumption.
- For outdoor placement, the meter and circuit breaker must be in a sealed housing that prevents the ingress of moisture, dirt and dust. The box's protection class is at least IP-55. Requirements for boxes installed inside wooden structure a little lower - IP-44, the main condition is that the body is made of metal.
- For emergency shutdown electricity, it is necessary to place an RCD - the device will trip if there is a short circuit in the network.
Do-it-yourself electrical wiring in a wooden house: step-by-step instructions
Development of a power supply project
For development individual project It is necessary to obtain technical specifications from the electricity supply organization (RES), which will become the basis for further work.
Designing the power supply of a wooden house is carried out in the following sequence:

When organizing power supply and drawing up a project, you should be guided not only by personal wishes, but also by certain requirements:
- Only vertical or horizontal arrangement of wires is allowed.
- All turns of the wire are performed strictly at right angles.
- Sockets, switches and distribution boxes should be freely available.
- According to the rules, the installation of switches is carried out at a distance of 0.6-1.5 meters from the floor level, the cable is fed from above.
- The optimal placement of sockets is 0.5-0.8 m from the floor, the recommended number of sockets is 1 pc. for 6 sq.m. In rooms with a lot of household appliances There will be more sockets.
- Wires should not be placed closer than 10 cm from door/window openings. It is necessary to prevent contact of wires with metal elements and nearby wires (minimum permissible distance - 0.5 cm).
Selection of equipment and cables
To avoid complex calculations to determine suitable cable, you can use the electrical engineering reference book. The cross-section of the wire core directly depends on the expected loads.

The power consumption of equipment and electrical appliances is indicated in the technical data sheet or operating instructions. Based on these values, a wire with cores of the required cross-section is selected. To determine the size of the input cable, it is necessary to sum up the power of the installed electrical appliances.
Advice. For a wooden house, you should choose a cable marked “NG” (non-flammable) and “LS” (low smoke emission). Typically, wires with a cross section of 2.5 mm and 1.5 mm are used for internal wiring.
The input circuit breaker is selected with a rating sufficient so that at maximum load the power to the house does not turn off, but the circuit breaks, preventing a short circuit.
For single-phase power supply, the circuit breaker is selected as follows:

When choosing switches and sockets, take into account some parameters:
- the amount of current for which the equipment is designed;
- installation option: external/hidden wiring;
- the number of keys - for switches, the number of places - for sockets.
- High power household appliances (electric stoves, washing machines, boilers, fireplaces, refrigerators, etc.) are subject to mandatory grounding. In such situations, it is advisable to use sockets with a terminal for connecting the ground wire.
- "Tees" must be avoided. To simultaneously connect several electrical appliances, install a group of sockets or dual models.
- The choice of switches is determined by the lighting mode. For simultaneous switching on For several light sources or one lamp, the switch is set to one key; for different modes - two- and three-key switches.
Installation of the machine and input of power supply
According to the developed diagram, distribution boxes are installed, mounting points for switches, sockets and lighting devices are marked. Mount the electrical panel housing in the designated location and perform the following actions:

- Installation in the meter panel housing.
- Installation of an introductory machine on metallic profile(din rail). Connection to a two-pole circuit breaker, phase and neutral.
- The terminals (output terminals) of the meter are connected to the input of the input circuit breaker.
- Installing a cable into the house and connecting it to the input terminals of the meter.
- A voltage relay, RCD, and circuit breakers for various power groups (lighting, sockets) are installed on the DIN rail.
Cable entry into the house is carried out underground or over the air. The second option will be cheaper, but this supply is considered less reliable. For “air” input, self-supporting insulated wires. The main condition is the installation of a fireproof sleeve at the input site in the house.

With the underground method, a metal pipe is used for entry, protecting the supply cable from various influences. Cable laying using this method must be agreed upon with the power distribution company.
Cable laying, installation of switches and sockets
The wire of the selected cross-section according to the layout plan is laid in a closed or open way.
Do-it-yourself internal wiring technology in a wooden house:

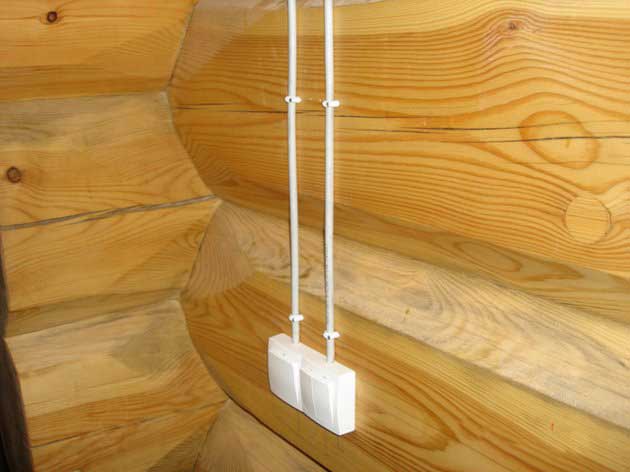
Let's look step by step at how to do electrical wiring in a wooden house with your own hands using wall-mounted cable ducts:

Important! The number of connections affects the system's ability to carry loads - the more there are, the worse the load capacity.
RCD and grounding
Arranging a grounding loop involves performing the following actions:

- Preparation of metal rods diameter 3 cm/length 3 m.
- Digging a trench 30 cm deep in a triangular shape, where the length of each side is 1 m. Install metal rods at the corners of the formed triangle.
- Connecting reinforcement to each other with metal corners using welding.
- Weld an eye (loop) to one corner and fasten a steel rod 1 cm thick to it.
- The rod is laid so that it is connected to the grounding conductor in the electrical panel. The insulation of the grounding conductors of the cables is yellow-green.
It is advisable to place an RCD in the panel after the metering device. This device will protect a person from electric shock if it leaks onto the equipment body. The RCD parameters are selected based on the rated current in the network. This protective device especially relevant for rooms with increased level humidity (bathroom, bathhouse, swimming pool, etc.).
DIY electrical wiring in a wooden house: video
Common Newbie Mistakes
Electrification of a wooden house is a responsible undertaking. According to statistics from firefighting organizations, most wooden structures catch fire primarily due to faulty electrical wiring. Some novice masters may ignore the advice of professionals and make a number of serious mistakes:

- Hiding wiring under wooden ceiling structures.
- Laying cables under the baseboard.
- Use for laying wire corrugated PVC pipes Despite the practical qualities of the material and the ease of its installation, PVC pipes are prohibited for use for the electrification of wooden buildings.
- The location of the insulated cable in the groove without the use of a metal pipe.
- The use of plastic boxes for sockets and switches.
Despite their attractiveness, buildings made of wood have a significant drawback - the material from which they are built belongs to the category of fire hazard (it ignites quite easily and also burns quickly). Therefore, special requirements are imposed on electrical wiring in such houses. Moreover, if we're talking about about internal communications. What kind of wire should you buy to install wiring in a wooden house? Let us consider this issue in as much detail as possible and clarify important points.
Core material
There are no restrictions on this item. But experts point out that for indoor wiring in wooden buildings, it is advisable to choose products with copper conductors. It is much preferable to aluminum-based analogues.
- Electrical conductivity is much higher. Consequently, line losses will be less.
- Both designated metals are subject to corrosion (oxidation). But copper not so much. Why is oxide dangerous? In this layer, the conductivity drops sharply, the resistance increases, and as a result, the wire heats up.
- Copper is stronger than aluminum, including in bending. Consequently, if there are breaks in the veins, the risk of possible sparking is practically reduced to zero.
- Screw terminals copper wire hold more securely. Therefore, during operation, the quality of connections does not decrease. With aluminum wires it is more difficult - you will have to regularly check the line and make “tightenings”, since the contacts (the metal is soft) weaken over time.
Note
There is an intermediate option on sale - wires with composite conductors, made of aluminum copper. This alloy optimally combines all the advantages of both metals, but the indicators are, naturally, averaged. When choosing such products, consulting a professional will not be superfluous, since you will have to take into account many factors and decide on priorities based on the specifics of the line and general scheme in-house wiring.
Insulation

Examples of wires and prices
It is hardly worth listing the entire assortment. Moreover, the prices of the same type of wires differ depending on the region. For in-house electrical wiring, the most popular products are those with a core cross-section of 2.5 square meters. They are used to connect switches, sockets and a number of medium-power household appliances - washing machines, air conditioning equipment and the like. Using this example, it’s easy to get an idea of the cost. various types wires
*Price in Russian rubles per linear meter.
- VVGng and its modifications – from 38.6;
- RKGM – from 25.9;

- NYM – from 42.

What not to buy
PUNP. This wire is still found on sale today, and is even still produced by individual companies. It attracts with its low price and is often used to connect sockets and household appliances. Unfortunately, not everyone knows, and dealers are silent, that this wire is prohibited from being used for indoor electrical wiring, since its characteristics no longer comply with the latest GOST.

These wires have copper cores, and their insulation fully meets all the requirements for cable products for installation inside a wooden house.
Wooden houses are chosen as housing for many reasons: some people are contraindicated from living in concrete “boxes,” while others like beautiful log houses. However, living in them is closely related to the concept of safety. That is why electrical wiring in a wooden house is considered one of the key aspects.
We will talk about how to properly install electrical wiring in a wooden house. Let us tell you what schemes Consumables And electrical installation products used in laying lines along walls made of timber or logs. With our advice, you can create a secure and trouble-free network.
Even if all logs, beams and boards are treated with fire retardants, they remain vulnerable to accidental fire. For this reason, the stages of constructing an electrical system - from design to installation of sockets and switches - need to be known to both skilled “do-it-yourselfers” and owners who supervise the work of hired builders.
According to the legislation of the Russian Federation, for residential buildings with a power consumption of no more than 15 kW, drawing up an electrical network design is not required. But the company supplying electricity must provide a diagram and data on the total power consumption. This is necessary for calculating the allocated power on the line and installing a meter.
Some electricity supply companies, when concluding a contract, still require a project that includes, in addition to the internal wiring diagram, installation points for sockets, switches, junction boxes, and an electrical panel with a meter
In the process of developing a project, you need to take into account all the nuances: the exact location of electrical installations, the choice of cable and wiring method, the need for grounding, etc. How the project is drawn up and preparation for installation work, let's look at it in more detail.
Step #1 - drawing up a diagram and work plan
You can do the design yourself if you have experience in such work, or with the help of specialists by concluding an agreement with a design organization.
A professionally drawn up document contains the following points:
- electrical panel diagram;
- electrical installation plan;
- calculations for installing a ground loop;
- outputs outside the house, if any - autonomous sources of electricity;
- equipment installation plan with specifications;
- if approval is required, a package of permits;
- explanatory note.
But first you should contact Energosbyt to obtain technical specifications - technical specifications, which are signed according to SNiP.
Owners who apply for a connection with a power of less than 15 kW will have to collect the least amount of paperwork. They need to write a list of electrical appliances and calculate their total power. If the power consumption is more than 35 kW, a linear power supply circuit is required. For 380 V networks, a three-line diagram is drawn up.
Nowadays, wooden houses are already the norm. Everyone wants to live in an environmentally friendly way clean house, but at the same time modern man does not want to give up the conveniences of modernity. It's about lighting, use household appliances, computers, etc. All this will become possible only if we install it inside the house electric wires, install switches and sockets, distribution panels. When it comes to a wooden house, which is easily flammable and burns, special requirements are put forward for the installation of wiring, compliance with which is the key to the safety of all residents. Let’s figure out how to properly install electrical wiring in a wooden house and what must be taken into account. The material will help you evaluate your strengths and decide whether it is possible to do all the work yourself or whether you will have to call a professional for help.
No. 1. Requirements for wiring in a wooden house
Wood is one of those types of materials that ignite easily and burn well. can easily catch fire from a normal short circuit in the electrical circuit, so the process is to minimize the likelihood of a short circuit occurring, and if it does occur, to minimize the consequences. The following requirements are put forward for wiring in a wooden house::
No. 2. Hidden wiring in a wooden house
Electrical wiring in wooden buildings can be done in two ways:

A wooden house is a beautiful, cozy structure, but easily flammable, requiring increased attention to the power supply process. Doing electrical wiring yourself is not an easy task, but it can be done. You just need to approach the issue responsibly, in compliance with the norms and rules.
Requirements for wiring in a wooden house
Electrical wiring in a wooden house must meet the main requirement - to be safe. More than half of the fires in buildings of this type occur due to a short circuit in the electrical network due to mechanical damage insulation or increased load on the cable.
You can eliminate the risk of fire if you follow the basic requirements:
- Correct selection of materials.
- Reliable insulation.
- Possibility of automatic power interruption.
- Regular network diagnostics.
Compliance with these requirements will reduce the likelihood of fire in wooden structures and ensure the safety of property in both city and country houses.
Regulations
The provisions governing the installation of electrical power in wooden buildings are contained in "Rules for electrical installations" (PUE) and in the Code of Practice “Design and installation of electrical installations of residential and public buildings”.
They provide selection criteria distribution devices, conductors, automation, lighting, the terms used and their meaning are indicated.
Electrical wiring is still regulated Building codes and rules ( SNiP).
SNiP 3.05-06-85 describe methods for introducing a power cable into a living space, and SNiP 31-02– requirements for the installation of power supply systems in residential buildings.
Preparation of a power supply project
The first stage of electrification of the facility is project preparation. In a private house, drawing up an electrical wiring diagram can be done on your own. To do this, you need a house plan with the placement of furniture, equipment, electrical appliances, and the designation of sockets and switches. The installation location of the distribution panel and the passage of cable lines are marked.

The location of the distribution boxes is indicated, the maximum power consumption of all devices, the total number of machines and the rated load on the input machine are calculated.
Cable selection
After compiling electrical diagram you need to decide which wire to use in a wooden house: aluminum or copper. The first one is cheaper, the second one is more reliable. Having settled on aluminum, you need to remember that its cross-section should be larger than copper, and it is brittle when bent. More suitable material is copper, wires from which can withstand temperatures from -50 to +50 ° C.
Having decided on the house, you can move on to choosing its brand. For wooden structures, VVG non-flammable copper wire with solid cores and reduced smoke emission is more suitable. It has high anti-corrosion properties and does not deform due to temperature changes.
When planning how to wire a house, you need to remember PUE requirements on insulation coloring: cable cores must be different color. This will simplify the process of installation, maintenance and repair.
Selection of devices and automation for the distribution panel
Purpose of device selection automatic protection– network and equipment security when emergency situations. Each device has its own purpose. All devices are located in the distribution panel.
Circuit breakers protect against voltage overload and short circuit.
(RCD) – from fire and electric shock.
Voltage relay - against load drops affecting the operation of devices.
They combine the functions of a circuit breaker and an RCD and save space when installed in a panel.
The integrated use of these devices guarantees reliable operation devices and the safety of people in the room.
Installation of electrical wiring - step-by-step instructions
Installation of electrical wiring in a private house requires preliminary preparation and following step-by-step instructions consisting of the following steps:
- project development and determination of the total equipment capacity;
- selection of cables, automation devices and electrical appliances;
- power supply, connection of circuit breakers, electricity meter;
- installation of an electrical panel;
- internal cable routing;
- installation of sockets, switches, lighting devices;
- system testing.
This sequence will show how to properly install electrical wiring in the house and ensure its reliable operation. It is important to remember that each step must be carried out in compliance with safety rules: turn off the power to the room in which work is being done, do not use bare wires, place all connections and branches in boxes, lay the cable either vertically or horizontally, avoiding its intersection.
Following the step-by-step instructions will allow you to complete the installation efficiently.
Installation of distribution panel
The distribution board is designed to receive and distribute electricity indoors. Everything begins with its installation electrical work. It does not matter whether the wiring is carried out in country house, city cottage or village log house.

The shield must be made of fireproof material, placed in a dry place and locked with a key. There cannot be rooms above it with high humidity (shower, bath, toilet), and within a radius of half a meter - heating equipment, water and gas supply systems.
An electric meter, an input circuit breaker, an RCD, grounding bars, a voltage relay and circuit breakers are mounted in the panel. different groups nutrition.

Grounding device
Any modern house equipped household appliances in a metal case, and possible contact of metal with electricity requires grounding - protecting people from electric shock through electrical appliances.
You can do it yourself.

A trench 30 cm deep is dug in the shape of an equilateral triangle with a side of 1 m. Pins 3 m long and 3 cm in diameter are driven into the corners, which are connected together with an angle using welding.
A hole is cut in one of the corners, a grounding wire is attached using a bolt and nut, which is connected to the busbar in the distribution panel. The grounding conductors of cables in yellow-green insulation are attached to this bus.
Inserting the power cable into the room

Electricity enters the building through power cable, entering switchboard. It can be supplied in two ways: aerial and underground.
In the first case, the cable is supplied through the air from the electric pole to the house, where it is attached to porcelain fittings. This method is simple and cheap, but has a number of disadvantages: it is less durable, there is a high probability of damage to the wire by wind, snow, and branches.
The underground method is more reliable, but more labor-intensive and expensive. A trench is dug into which the armored cable is laid or in metal pipes. A layer of sand 20 cm thick is poured on top, a warning tape is laid, and the trench is buried.
– main element wiring, because it bears the load from all the electrical appliances in the house.

Laying cables and connecting them
Installation of electrical wiring in a private house is carried out along the routes indicated in the project diagram. Distribution boxes are mounted along it, switches, lighting fixtures. In wooden buildings, wires are used only with special markings, the insulation of which does not ignite even at high temperatures.
“Twisting” and “temporary work” are not allowed. It is better to minimize the number of turns and bends. Where possible, run the entire wire from the machine to the end point.
When installing electrical wiring in a wooden house with your own hands, you must remember that the boxes cannot be closed. decorative panels or ceilings that impede access for maintenance.
Installation of switches and sockets

Surface-mounted sockets and switches are selected based on the calculated current value and the possibility of connection under one frame. Before installation, turn off the power and make sure there is no voltage in the cable.
The most in a safe way fastening switches and sockets in wooden building is their installation on metal substrates. This will protect against possible hit sparks when closing or arcs when removing the plug. For a wooden house, it is preferable to use carbolite rather than plastic devices that have greater heat resistance and can withstand strong heat.
Methods for open wiring

Open electrical wiring in a wooden house is laid along inside premises. The main requirement is that the wire does not directly touch the walls, ceiling or floor and is protected: located in the middle of a channel, pipe or has several layers of insulation. Pipes and channels must be made of materials that do not support combustion.
Installation of wiring in a wooden house can be done in several ways:
- In a corrugated pipe made of PVC;
- In a metal sleeve;
- In PVC pipes or boxes;
- On staples;
- On ceramic insulators.
The most common options are the use of corrugated pipes and cable ducts.

The use of ceramic insulators or “” is becoming popular when there is an air space between the twisted electrical wire and the wall. This option also decorates the home.
Open wiring in a wooden house can combine several options. On walls and ceilings that have a flat surface, you can use plastic boxes, and in other areas - corrugated pipes.
Hidden wiring in a wooden house
Internal electrical wiring in a wooden house has its advantages and disadvantages. The advantage is the absence of corrugated pipes and cable channels that spoil appearance premises. There is no risk of mechanical damage to the cable. On the other hand, the complexity of installation, increased requirements for fire safety, additional financial costs.

Unlike external wiring, it is more difficult to conduct internal wiring in a wooden house. To do this, you need to know more requirements and nuances related to this type of power supply arrangement.
Hidden wiring should not have many turns, because... The cable must be laid in steel or copper pipes. The use of metal hoses and PVC corrugations is allowed only if they are protected with plaster or asbestos padding.
If installing external wiring does not require a special tool, then for hidden wiring it is necessary. Requires drilling in horizontal and vertical directions, cutting out seats for insulating boxes. You will have to pull not only wires and cables, but also a large number of steel or copper pipes. The latter are better suited because they bend well, taking the required form.

You can conduct wiring in the house with your own hands, open and in a closed way. This is done in places where the wires are connected to switches or sockets.
Installation errors
Typical mistakes when laying electrical networks indoors:
- the power cable is bent or weakened;
- fastening the wire to wooden structure what is prohibited by the rules;
- installation hidden wiring using corrugated pipes, metal hoses and plastic boxes;
- installing the distribution panel too close to the power cable entry point;
- the number of machines is calculated incorrectly: either more or less than necessary.
Wiring test
After installation, the wiring must be tested: conduct a visual inspection, measure the insulation resistance and ground wire, check the operation circuit breakers, RCD or difavtomat. The reliability of the electrical network must be maximum, because Electrical wiring requires increased attention and regular monitoring.