Add a heating battery to the apartment. How to install the battery correctly: from the diagram and selection of the radiator to its installation
For any type of radiator there is general rules for placing them indoors. There is also a certain sequence of actions that must be followed. The technology is simple, but there are many nuances.
How to place batteries
First of all, recommendations concern the installation location. Most often, heating devices are installed where heat loss is the most significant. And first of all these are windows. Even with modern energy-saving double-glazed windows, it is in these places that the most heat is lost. What can we say about old wooden frames?
If there is no radiator under the window, then the cold air descends along the wall and spreads along the floor. The situation is changed by installing a battery: warm air, rising upward, prevents cold air from “draining” onto the floor. It must be remembered that in order for such protection to be effective, the radiator must occupy at least 70% of the width of the window. This norm is prescribed in SNiP. Therefore, when choosing radiators, keep in mind that a small radiator under the window will not provide the required level of comfort. In this case, there will be zones on the sides where the cold air will go down, and there will be cold zones on the floor. In this case, the window may often “sweat”, condensation will form on the walls in the place where warm and cold air collide, and dampness will appear.
For this reason, do not try to find the model with the highest heat output. This is justified only for regions with a very harsh climate. But in the north, even from the most powerful sections there are big size radiators. For middle zone Russia requires average heat transfer, while southern regions generally require low radiators (with a small center distance). This is the only way you can accomplish key rule battery installation: cover most of the window opening.

In cold climates it makes sense to arrange thermal curtain and near front door. This is the second problem area, but it is more typical for private houses. This problem may occur in ground floor apartments. The rules here are simple: you need to place the radiator as close to the door as possible. Choose a location depending on the layout, also taking into account the possibilities of piping.
Rules for installing heating radiators
- The heating device must be located strictly in the middle of the window opening. When editing, find the middle and mark it. Then to the right and left you set the distance to the location of the fasteners.
- The distance from the floor is 8-14 cm. If you make it smaller, it will be difficult to clean; if you make it more, zones of cold air will form below.
- The radiator should be 10-12 cm away from the window sill. For more close location Convection deteriorates, thermal power decreases.
- The distance from the wall to the back wall should be 3-5 cm. This gap ensures normal convection and heat distribution. And one more thing: at a short distance, dust will settle on the wall.
Based on these requirements, determine the most suitable radiator size, and then look for a model that satisfies them.

These are general rules. Some manufacturers have their own recommendations. And take it as advice: before purchasing, carefully study the installation requirements. Make sure that all conditions suit you. Only then buy.
To reduce non-productive losses - due to heating the wall - attach foil or a thin foil heat insulator behind the radiator on the wall. This simple measure will save 10-15% on heating costs. This is how much heat transfer increases. But keep in mind that for normal “work,” there must be a distance of at least 2-3 cm from the shiny surface to the back wall of the radiator. Therefore, the heat insulator or foil must be fixed to the wall, and not just leaned against the radiator.
When should radiators be installed? At what stage of system installation? When using radiators with side connections, you can first hang them, then start laying out the pipeline. For the lower connection the picture is different: you only need to know the center-to-center distance of the pipes. In this case, radiators can be installed after the repair is completed.

Work order
When installing radiators with your own hands, it is important to do everything correctly and take into account all the little details. Experts advise using at least three fasteners when installing sectional batteries: two on top, one on the bottom. All sectional radiators, regardless of type, are hung on mounts with an upper manifold. It turns out that the upper holders bear the main load, the lower one serves to give direction.
The installation procedure is as follows:

We tried to describe in as much detail as possible the entire technology for installing heating radiators. It remains to clarify some points.

The most common . They are used for lateral connection heating devices any type, sectional, panel, or tubular (click on the picture to enlarge its size)
Mounting the radiator to the wall
All manufacturers require installation of heating radiators on a prepared, level and clean wall. From correct location holders depends on the efficiency of heating. A skew in one direction or another will lead to the fact that the radiator will not heat and will have to be rebalanced. Therefore, when marking, be sure to maintain horizontal and vertical lines. The radiator must be installed level in any plane (check with a building level).

You can slightly raise the edge where the air vent is installed (about 1 cm). This way the air will predominantly accumulate in this part and it will be easier and faster to release it. Reverse tilt is not permitted.
Now about how to position the brackets. Sectional radiators of light weight - aluminum, bimetallic and tubular steel - are hung from above on two holders (hooks). If the batteries are short, they can be placed between the two outer sections. The third bracket is placed at the bottom in the middle. If the number of sections is odd, place it to the right or left on the nearest section. Usually, when installing hooks, mortar sealing is allowed.

To install the brackets, holes are drilled in the marked places, dowels or wooden plugs are installed. The holders are secured with self-tapping screws with a diameter of at least 6 mm and a length of at least 35 mm. But these are standard requirements; read the passport for the heating device for more details.
The installation of the holders is different, but not radically. For such devices, standard fasteners are usually included. There can be from two to four of them, depending on the length of the radiator (it can be three meters long).

There are brackets on the back panel with which they are hung. To install the mount, you need to measure the distance from the center of the radiator to the brackets. Set aside a similar distance on the wall (preliminarily mark where the middle of the battery will be located). Then we apply fasteners and mark the holes for the dowels. The next steps are standard: drill, install dowels, attach brackets and secure with self-tapping screws.
Features of installing radiators in an apartment
The given rules for installing heating radiators are general for individual systems and for centralized ones. But before installing new radiators, you must obtain permission from the management or operational company. The heating system is common property and all unauthorized alterations have consequences - administrative fines. The fact is that with a massive change in the parameters of the heating network (replacing pipes, radiators, installing thermostats, etc.), the system becomes unbalanced. This can lead to the entire riser (entrance) freezing in winter. Therefore, all changes require approval.

Types of wiring and connections of radiators in apartments (click on the picture to enlarge its size)
Another feature is of a technical nature. If it is vertical (one pipe enters through the ceiling, goes to the radiator, then comes out and goes to the floor), when installing the radiator, install a bypass - a jumper between the supply and discharge pipelines. Paired with ball valves, this will give you the opportunity to turn off the radiator if desired (or in an emergency). In this case, no approval or permission from the manager is required: you have turned off your radiator, but the coolant continues to circulate through the riser through the bypass (that same jumper). You don't need to stop the system, pay for it, or listen to your neighbors' complaints.
A bypass is also needed when installing a radiator with a regulator in an apartment (the installation of the regulator also needs to be coordinated - it greatly changes the hydraulic resistance of the system). The peculiarity of its operation is that it blocks the flow of coolant. If there is no jumper, the entire riser is blocked. Can you imagine the consequences...
Results
Installing heating radiators with your own hands is not the easiest, but also not the most difficult task. You just need to take into account that most manufacturers give guarantees only if the heating devices are installed by representatives of organizations that have a license to do so. The fact of installation and crimping must be noted in the radiator’s passport, the installer’s signature and the company’s seal must be on it. If you don’t need a guarantee, your hands are in place, you can handle it.
Heating radiators differ from each other construction and metal, from which they are made.
Each type is more or less suitable for apartment.
Bimetallic. The design has elements made from different metals. There are aluminum-copper and aluminum-steel pairs. Good decision for an apartment. They have the highest heat transfer among other types of radiators. They are easy to install and have a high operating pressure of 35 atm. They are relatively expensive.
Aluminum radiators relatively easy to install, they have good heat dissipation. Operating pressure– up to 18 atm., which makes it possible to install in high-rise buildings. Almost resistant to corrosion. They are not installed if the pipes are made of copper, since this metal reacts with aluminum, which destroys both the pipe and the device.
Cast iron common in old houses of small number of storeys due to the low operating pressure of max 12 atm. They are not very suitable for apartments because, firstly, they are heavy, which makes the installation process difficult. The devices heat up slowly and cool down slowly, making it difficult to regulate the room temperature. On the other hand, these devices do not react with the coolant and are durable.
Steel. Low cost solution For apartment buildings several floors. They rust quickly, so their service life is short - 15-25 years. But they are easy to install. Compatible with any pipes. There is no possibility of expansion with additional sections.
 Exist special instructions for installation of thermal radiators. They are prescribed in SNiP. The device must withstand the coolant pressure in the heating system
The metal from which the radiator is made should not be combined with the system pipes galvanic couples. This happens, for example, when aluminum and copper interact. The reaction of such a connection will lead to corrosion.
Distance between the device and the protruding part of the window sill should be 10 cm. If this value is less than 75% of the radiator depth, release heat flow it will be difficult.
There must be a gap of at least 10 cm and no more than 15 cm between the bottom edge of the device and the floor. At a small distance, heat exchange will take place ineffective and slow, and with a large one there will be a strong temperature difference across the height of the room.
Important: the upper planes of the radiator sections must be in the same plane; a spread of more than 3 mm is unacceptable.
If the device is installed not under a window, but near a wall, the distance between these two surfaces is not less than 20 cm.
Radiator location
 The thermal device is installed in such a way that its heat transfer is as efficient as possible.
Best place- under the windows, since it is through them that the greatest heat loss occurs. If the room has an external cold wall, additional radiators are installed on it.
Pipes in the heating system:
- Steel pipes traditionally installed in apartment buildings large number of storeys. Tolerates high pressure and temperature. Subject to corrosion.
- Metal-plastic They began to be used when laying a heating system recently, but they have already become popular. Convenient for installing radiators.
- Polypropylene pipes are also popular. The ease of installation is due to the possibility of permanent connection using the diffusion welding method.
- Polyethylene pipes although they are not used often due to their somewhat high price and small scope of application. The latter is due to the design feature, or more precisely, the bending radius.
- Copper- a rare solution due to the high cost and high requirements for the coolant. Installed only in private homes.
Accessories
Accessories include auxiliary elements. designed to bleed air or other gases from the radiator. The presence of air in a heating device is called "air bag". This may cause the radiator to not work properly.
Attention! Before bleeding air from heating radiators, carefully read the instructions to avoid depressurization of the system.
There are also reflective screens on sale, which are mounted on the wall behind the heating device, designed to reduce heat loss. Radiator evaporators that maintain indoor air humidity. Fans that are installed on the device itself to increase heat transfer and drying.
What prevents efficient heating?
It can be cold in the room not only because bad work devices, but also because of the barriers that the person himself sets. Heat transfer decreases If:
- the radiator is covered with long curtains;
- the device is covered with upholstered furniture;
- there are protruding window sills;
- There are decorative grilles on top.
Connection diagrams and installation of an additional radiator
There are several installation diagrams heating radiators in the apartment :
- Lateral. The most common connection scheme due to high heat dissipation. The pipe through which the coolant is supplied is connected to the upper pipe, and the outlet pipe, respectively, to the lower one.
- Lower used mainly in apartments where pipes are hidden in the floor or run under the baseboard. The supply and discharge pipes are located at the bottom.
- Diagonal used to connect radiators with more than 12 sections. Warm liquid is supplied to the upper pipe on one side of the battery, and is discharged through the lower pipe on the other.
- Sequential can only be used on systems with high pressure, which is capable of ensuring the movement of coolant through all radiators.
Installing an additional radiator:
- Remove coolant from the system.
- Select a location for fastenings and install brackets.
- Assembling the radiator. For this purpose, a special sealing flax is used. To tighten connections, use a torque wrench.
- Installed on one of the side unused holes Mayevsky crane. The rest are plugged with a cork.
- The radiator is installed on the wall and can be adjusted horizontally and vertically.
- The thread is cut at the connection points with the riser, and the remaining necessary elements are attached. Everything is connected into one system.
- At the end - a mandatory leak test.
Before self-installation batteries in the apartment must be thoroughly prepared. Even minor errors can lead to an accident and additional monetary costs. You should choose the radiator itself, evaluate which connection scheme will be most effective and prepare the necessary tools in advance.
If you have basic technical knowledge and skills in working with tools, install the radiator is quite real. It is important to do your research, follow the instructions, and weigh each step.
For a master class on installing heating radiators in an apartment with your own hands, watch the video:
Find out what mistakes happen when replacing heating radiators in the video below:
Schemes for installing heating radiators in an apartment - take a closer look at the video:
Find out how to connect a heating radiator with the greatest efficiency from the video below:
Required tools and materials
Not a single construction or installation process can be carried out without a certain set of tools and devices. IN in this case you need to know what you need to install a heating radiator. Most often the same set is used, with some exceptions.
For example, aluminum and bimetallic radiators are installed in the same way, but cast iron batteries- according to a different scheme. They require the use of larger plugs, and the Mayevsky valve is replaced with an automatic air vent, installing it at the highest point of the system. Steel panel-type radiators have metal arms and are equipped with brackets for hanging.
Air release devices
Air always accumulates in heating radiators, which must be released periodically. On aluminum and bimetallic radiators For this purpose, Mayevsky cranes are installed. Most often it is located on the free upper manifold. This device is slightly smaller in size than the outlet, so an additional adapter is installed, which comes complete with the tap. When choosing a Mayevsky tap, you should focus on the diameter of the collector.

In addition to this device, automatic air vents are used, which are also suitable for installation on radiators. However, automatic devices are large in size, and their body can only be made of brass or nickel. Therefore, such a device does not look very attractive on white enameled radiators. This greatly reduces the demand for automatic air vents.
Stubs
Radiators with side connections have four outlets. The heating system pipeline is connected to two of them, the Mayevsky tap is most often installed on the third, and the fourth outlet is closed with a plug. This item does not spoil appearance modern battery, as it is painted with white enamel.
Locking elements
When installing batteries in an apartment, you will definitely need taps. They can be ball or shut-off; the second option allows you to regulate heat transfer. The taps are located at the pipeline inlet to the radiator and at its outlet. Ball valves allow you to disconnect the battery from common system in case of emergency repair or replacement during heating season. In this case, the supply of coolant to the battery is stopped without affecting the operation of the entire system. Ball valves have a relatively low price, which gives them a great advantage over similar devices. However, with their help it is impossible to regulate the heat transfer of the heating device, which is a negative characteristic of the device.

Shut-off control valves shut off the water supply to the radiator at in case of emergency, and at the same time allow you to change the intensity of the coolant flow. In addition, such devices look more attractive and have two configurations, straight and angular. This makes it possible to make the binding more accurate. But it is worth considering that the cost of shut-off control valves is several points higher than the price of ball valves.
In some cases, when using ball valves, thermostats are installed. They can be electronic, automatic and mechanical. Using this device you can change the heat dissipation of the battery. But it should be remembered that these devices can only reduce the flow, therefore, there is no need to install such a device on poorly heating radiators.
Additional tools and materials
For wall-type radiator models, you should purchase hooks or brackets, the number of which is selected depending on the number of sections of the heating device:
- If the number of sections does not exceed 8, and the length is less than 1.2 meters, then the device is attached at three points, two at the top and one at the bottom.
- Each next 5-6 sections require additional fastening.
In addition, in the process of deciding how to install a heating radiator yourself, you will need linen winding and plumbing paste, with the help of which the tightness of the connections is ensured. You should also take care of the presence of a drill, drill bits and level. Dowels may come in handy. In addition, it is necessary to purchase or rent equipment for connecting pipes and fittings.
Choosing an installation location
Before installing a heating radiator in an apartment, it is important to correctly determine its location. In most cases, heating devices are placed under the window so that the warm flow prevents cold from entering the room from the window opening. The width of the heating radiator should be 70-75 percent of the width of the window, in this case the glass will fog up less.

There are certain installation rules heating batteries in the apartment under the window:
- The device must be located exactly in the middle with an error of no more than 2 cm.
- The distance from the floor to the heating device can be from 8 to 12 cm.
- A clearance of 10-12 cm is required between the window sill and the radiator.
- Between the wall and back wall The device should leave a gap of 2-5 cm.
Compliance with these rules will allow warm air circulate normally in the room, providing effective heating.
Rules for installing heating radiators
Installation of heating radiators under a window must be carried out in compliance with certain rules:
- Before the beginning installation work It is necessary to level the wall, this will make the installation process much easier.
- Then mark the middle of the window opening on the wall.
- Then measure 10-12 cm from the window sill and draw a horizontal line; it will serve as a guide for aligning the upper edge of the radiator.
- The installation of brackets is carried out in different ways, so you should learn how to install radiators correctly. If the heating system has circulation pump, then the radiator should be positioned strictly horizontally. For radiators in a system with natural coolant movement, it is necessary to make a slope of 1% along the flow of water. A higher level of slope can cause stagnation.
Wall mounting methods
The above rules are important to take into account when installing fasteners. To fix the hook in the wall, you need to drill a hole, insert a plastic dowel into it and screw the fastener into it. This device allows you to easily adjust the distance from the radiator to the wall; you just need to screw in or unscrew the hook.

When installing heating radiators in an apartment with your own hands, it is important to understand how the load from the radiator is distributed on the hooks. The weight of the device is mainly supported by the upper fasteners, the lower hook only fixes the device in the desired position. To ensure that nothing interferes with hanging the radiator, the lower fasteners are placed at a distance of 1-1.5 cm from the level of the lower outlet of the heating device.
The radiator bracket is installed according to a different scheme. Before installing the heating radiator, it is applied to the wall. Then mark the places where the brackets are planned to be installed. Putting the radiator aside, attach the bracket to the wall and mark its attachment points. Holes are made in the marked places, dowels are inserted into them, and the bracket is fixed to the wall using screws. After installing all the fasteners, the radiator is installed in place.
Installation of underfloor heating devices
Despite the light weight of aluminum radiators, sometimes it is not possible to hang them on the wall. For example, on walls covered with plasterboard sheets, or made of lightweight concrete, it is not recommended to hang any structures without additional support. Some models of cast iron and steel heating appliances are equipped with legs, but their appearance is not always aesthetically pleasing.

Bimetallic and aluminum radiators can be installed on the floor using special brackets. They are fixed on the floor, a radiator is installed and, using special device fix the lower battery outlet on the bracket. Floor mounts may have a fixed or adjustable height. Such fasteners are fixed on the floor using nails or dowels.
Connecting heating devices
To solve the question of how to install a heating battery and connect it to the pipeline of the general system, use the following methods:
- Saddle connection.
- One-way connection of heating batteries.
- Diagonal connection.
If radiators with bottom connections are selected for installation, then the issue is easily resolved. The manufacturer himself determines the location of the supply and return pipes and requires unquestioning implementation of the recommendations. Otherwise, heating efficiency is not guaranteed.

When solving the problem of how to add a heating battery in an apartment, you should know that radiators with side connections can be installed using the above methods.
One way connection
This type of connection can be used in single-pipe or two-pipe systems. Since in most apartments the system is made of metal pipes, then you should consider a harness for this option. To work you will need the following elements:
- Ball valves in the amount of 2 pieces.
- 2 tees.
- 2 drives, these parts have external threads on both ends.
The connection of elements is carried out according to a certain scheme. For a single-pipe system, the mandatory installation of a bypass jumper is required, which will allow you to shut off the coolant supply to the radiator in unforeseen situations. Installing a tap on the bypass is strictly prohibited, as it blocks the movement of coolant along the riser.

In the presence of welding equipment and the skills to work with it, the bypass jumper can be welded. A two-pipe system can be assembled without a bypass. In this case, the supply pipe is connected to the upper manifold, the return pipe to the lower outlet. Cranes are installed in any case.
The tightness of the connections is achieved through the use of linen winding and plumbing paste applied on top of it. The amount of winding must be controlled, since its excess can lead to the formation of microcracks on the body of the connected elements, which threatens subsequent destruction. Such caution should be observed when connecting elements made of all materials except cast iron products.
Diagonal connection
By connecting heating devices diagonally, you can obtain the most efficient heat transfer. With lower wiring, the connection process looks quite simple: coolant is supplied to the upper inlet on one side, which comes out on the other side at the bottom.
This design looks more aesthetically pleasing, which cannot be said about a single-pipe system with a vertical riser. However, knowing how to properly install a heating radiator, you can achieve high heating efficiency with this option.

When deciding how to install heating radiators correctly, you should know that when connecting a radiator to a single-pipe system, installing a bypass is required.
Saddle connection
This option for connecting radiators to the heating system is more suitable for lower pipe distribution or when they are hidden.
Installation on a single pipe system can be done with or without a bypass jumper. If there is no bypass, installation of taps is necessary. Their presence will allow you to remove the radiator in the event of an accident and replace it with a drain.
The use of saddle connections for radiators with vertical wiring is considered ineffective, since heat loss in this case can reach 15%.
Proper installation of heating devices is an excellent way to ensure an optimal indoor microclimate during the cold season. Today we will talk about how to properly install heating radiators in an apartment. This work cannot be called too difficult. It is only important to strictly follow all the rules and nuances of installation.
How to choose a radiator?
The range of heating devices on the market is, frankly, impressive. A variety of batteries are presented - from budget to exclusive options. However, the principle “the more expensive the better” does not always work. Secret the right choice— in the ability to find the option that is optimal for you.
Here are the factors to consider when purchasing:
- Type of housing (apartment in multi-storey building, a private house).
- Heating system wiring.
- Method of installing a heating device.
- Temperature conditions in the heating system.
- Material used to make pipes.
- Location of the apartment in the house.
- The need for control devices and fittings.
Depending on the material of manufacture, there are such options.
Cast iron
Today's cast iron batteries are in no way reminiscent of the heavy, bulky “accordion” of times Soviet Union. These are flat panels of a completely modern design. Cast iron long time retains heat and has good heat dissipation. Cast iron batteries last quite a long time: from 20 to 50 years.
Important! The main disadvantage of cast iron products is their large mass. The weight of one section is 8 kg. For this reason, install them in rooms with wooden or plasterboard walls it is forbidden. In addition, due to the roughness of cast iron, radiators are quite difficult to clean from contamination.
Aluminum
In design they are not much different from cast iron products. The main difference is the weight of the sections (one section weighs 1 kg). Like cast iron, aluminum has good heat dissipation. Such batteries can be mounted on walls made of any material.
Important! The main disadvantage is the susceptibility to corrosion from chemically aggressive coolant and sensitivity to surges in water pressure.
Bimetallic
The bimetallic structure is a kind of compromise between cast iron and aluminum. Outwardly they resemble aluminum, but are chemically neutral with respect to an aggressive aqueous environment and are insensitive to pressure changes in the system. They are very easy to install, have good heat dissipation, and are affordable.
Steel
Steel radiators have modern design and excellent thermal properties. There are practically no disadvantages to steel structures, except that they do not withstand water hammer.
How to install a heating radiator with your own hands - preliminary steps
Before starting installation work, it is necessary to agree on the installation diagram with specialists. This will allow for proper installation and efficient heating of the apartment or house. Preliminary work is performed in the following order:
- Shut off the water in the apartment and near the installation site.
- Drain the water in the area where the radiator needs to be replaced.
- Blow out the pipes and drain the remaining water.
- Mount new battery in accordance with the instructions and recommendations of the manufacturer.
- After the heating unit is installed, test it for leaks.
Rules for installing batteries, in accordance with SNiP
Correctly install heating radiators in the apartment in accordance with the following requirements:
- It is necessary that the centers of the window and radiator coincide. The error should not exceed 20 mm.
- The width of the battery should be 0.5-0.7 of the width of the window sill.
- Battery height above finishing flooring should not exceed 120 mm.
- The distance from the top of the battery to the window sill should not exceed 20 mm.
- The interval between the battery and the wall is from 20 to 50 mm. This distance can be reduced if the wall is treated with heat-reflecting material.
Aluminum construction:
- Pre-assemble the device.
- Screw in the plug, install thermostatic and shut-off valves.
- Install the Mayevsky crane.
- Mark where the device will be mounted on the wall.
- If necessary, treat the wall with heat-reflecting material.
- Attach the brackets to the wall.
- Hang the battery on the brackets, placing hooks between the sections.
- Connect the radiator to an autonomous or individual heating system.
Important! There are 2 types of radiators for sale for different types of buildings: those designed for a pressure of 6 atmospheres (for autonomous heating systems) and devices designed for a pressure of up to 16 atmospheres (used for installation in high-rise buildings).
Features of installation of cast iron and bimetallic structures
The installation procedure is almost the same as for aluminum batteries:
- It is recommended to install devices at a slight slope to avoid air accumulation in the radiator (this leads to a decrease in heat transfer).
- Before installation, unscrew the device, check the nipples, then assemble it together.
- In houses with wooden walls Brackets alone cannot be used. The battery is installed on floor stands, and the brackets play the role of additional support.
A variety of heating systems provide a comfortable air temperature inside residential premises. The basis of the vast majority of heating concepts are special heat transfer devices, commonly called batteries. You can install them yourself if you know the nuances of the work.
We have collected and systematized for you all the information about connection options and methods. Taking into account our recommendations, installing heating radiators with your own hands will be carried out without the slightest difficulty. All readers of the article we presented will be able to cope with it without any problems.
A detailed description of connection options and technologies has been added visual diagrams, photo collections, video instructions.
An initial knowledge of the modes and operating conditions of heating devices will help you understand what battery designs are needed.
Below is a summary of information about the parameters of heating systems that are important when choosing batteries:
1. Internal pressure. The value required for the correct selection of a device that can withstand the pressure in the heating circuit:
- Private house (autonomous) = 1.5-2 atm.
- Private house (centralized) = 2-4 atm.
- 5-storey building (centralized and autonomous) = 2-4 atm.
- 9-storey building (centralized and autonomous) = 5-7 atm.
- House over 9 floors (autonomous) = 5-7 atm.
- House over 9 floors (centralized) = 7-10 atm.
If technical capabilities batteries are lower, there is a possibility of depressurization of the device with other negative consequences.
2. Permissible heating temperature. A characteristic indicating the upper temperature limit, above which the battery may fail:
- Autonomous = up to 90⁰С.
- Centralized with plastic wiring = up to 90⁰С.
- Centralized with steel wiring = up to 95⁰С.
Operation in violation temperature regime leads to melting of seals, deformation and loss of tightness of the device.
3. Degree of coolant contamination. A parameter that is mainly of interest to water supply owners:
- Autonomous private home = high, medium, low when installing filters.
- Autonomous multi-storey building= high, medium, low when installing a filter system.
- Centralized = low, in rare cases medium.
Water supplied centralized networks communal heating systems undergo comprehensive cleaning. The content of sand and clay suspension in water extracted from private wells, wells, and open sources may exceed the permissible limit.
Traditional battery installation locations
For further selection of battery designs, it is necessary to determine the points. They are placed in places of greatest penetration of cold. This is done to minimize the impact of drafts on the indoor microclimate. They also focus on ensuring availability for periodic maintenance.
Batteries mounted at the bottom create a thermal curtain in rooms with panoramic windows, for example, on verandas
Battery Location Areas:
- Window niches. The most common location for heating appliances.
- Extended spaces between windows. One of the popular additional options.
- Corners and blind walls corner rooms. It is used to enhance heating of rooms with increased heat loss due to intense exposure to winds.
- Bathrooms, storage rooms, bathrooms, one or two sides of which are combined with a solid load-bearing wall.
- Unheated entrances, hallways of private houses.
- Apartment corridors of the first floors of high-rise buildings.
Modern designs of heating devices fit under balcony door or the entrance to the loggia.
An example of the location of heating radiators in one house:
Image gallery
The most popular and rational location of the heating radiator is under the window, behind a protective decorative screen
If the space under the window is occupied, you can hang the radiator from an adjacent wall in close proximity to the window
An ordinary heating radiator hardly fits into the bedroom interior. The way out is a false cabinet or cabinet
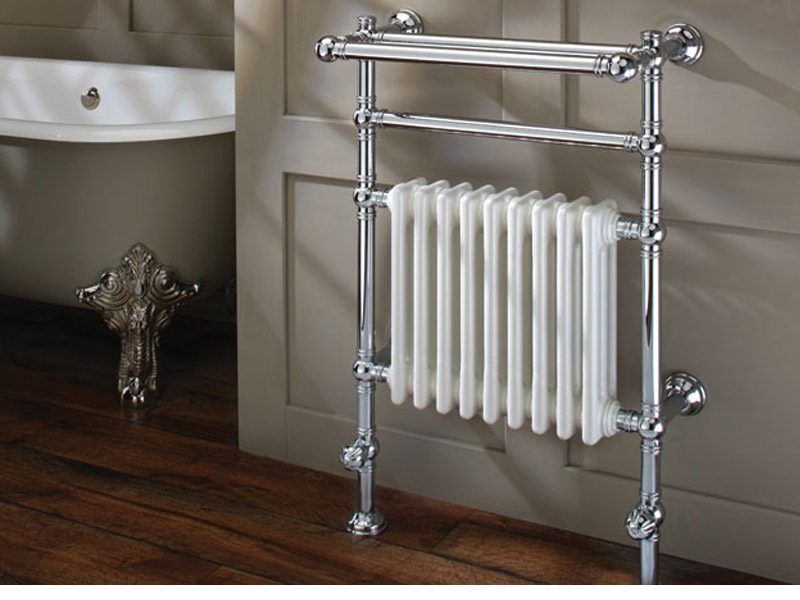
In the bathroom, the heating device performs the additional function of a heated towel rail, so it often differs in design
Traditional arrangement of batteries in the living room
How to place a radiator in a children's room
Installing the battery in a cabinet
Installing a radiator-dryer in the bathroom
Design specifics of heating devices
Structurally, batteries are divided into groups: radiators, convectors and registers.
Review of popular heating devices
Radiator is the most common type. This is a heating device consisting of vertical separate compartments. In classic collapsible products, sections are independent working elements. They are joined in the required quantity using threaded internal connections. This assembly scheme gives the batteries versatility.
Before installing or possibly completing a heating radiator, it is necessary to perform a calculation in accordance with the required thermal power. According to calculations, the number of sections of prefabricated batteries is selected. The horizontal cavities of radiators obtained by connecting sections are called collectors. Top and bottom.
Modern technologies have mastered the production of less versatile, but more reliable non-separable radiators using welding and solid casting methods. They do not have joints and seals typical for collapsible radiators. Design - for every taste.
A convector is a one-piece heating device made of a tubular or cavity heat exchanger with rows of heat-removing fins. Convectors are available in the following versions:
- Wall-mounted.
- Floor (duct)
- Skirting.
A register is a non-separable heating device made of straight, smooth horizontal pipes, arranged and combined in a certain way.
Details about the types of radiators
Radiators differ in the material used for their manufacture.
Within one variety there may be different design solutions, sometimes unexpectedly original
The heating appliance market can offer:
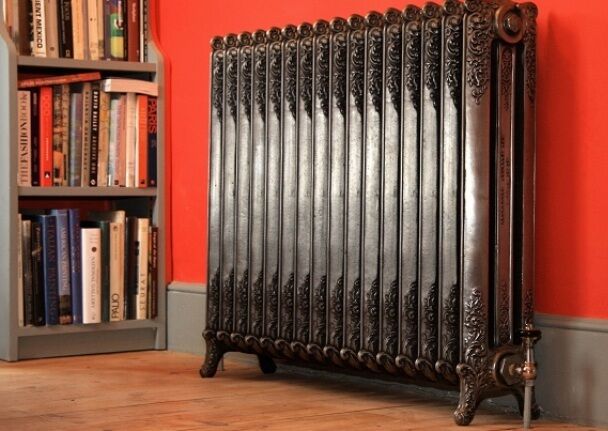
- Radiators are cast iron. The ancestors of the batteries of this group. Relatively inexpensive. Can withstand each operating mode. They serve up to 50 years. The main disadvantage is that they are heavy, which, however, helps retain heat for a long time when the heating is turned off.
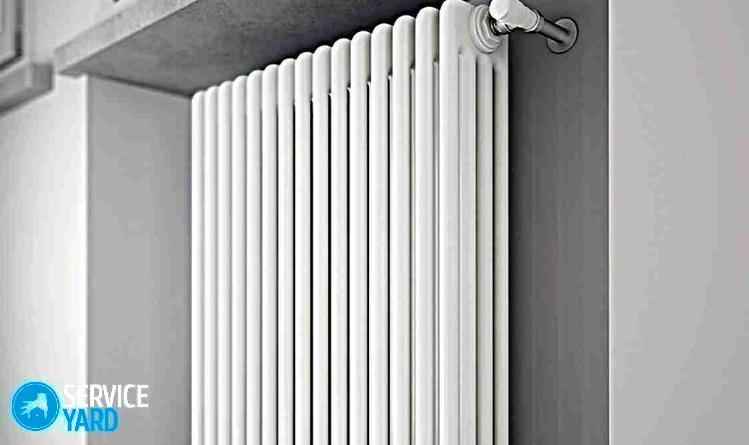
- Steel radiators. Such batteries are constructed from steel pipes. They work in any conditions, but are less durable than their cast iron counterparts. They have low heat transfer.
- Aluminum radiators. Made from lightweight, aesthetic material, these batteries dissipate heat better than anyone else. They are resistant to all operating temperatures, but are afraid of water hammer. Aluminum is very demanding on the quality of the coolant.
- Bimetallic radiators. Steel insides clad in aluminum – that says it all. The main characteristics are the same as those of steel, heat transfer is almost like that of aluminum. The price is steep.
- Copper radiators. These are “eternal” heat emitters for any room. Their only and most significant disadvantage is their extremely high cost.
- Radiators are plastic. Innovation in the family of radiators. For now they are only suitable for systems autonomous heating private houses with coolant heated to no more than 80⁰С.
The most sensitive to operating conditions. These radiators reliably serve only 15 years. Their use is only possible in autonomous heating systems.
Externally popular models of radiators from different materials similar:
Image gallery
A traditional type of radiator that served our grandparents faithfully. Old models have been replaced by stylized new ones
Steel radiators are characterized by a long service life and resistance to coolant characteristics
Low weight is a really important advantage of aluminum, especially if the heating device must be installed on a relatively weak support
Heating radiator made of cast iron
Heating device made of steel
Lightweight aluminum battery
Heating radiator made of copper
Characteristics of the convector variety
Convectors are significantly inferior in heat transfer to radiators, but in some cases they successfully complement or replace them:
1. Wall convectors. Batteries in this design are usually made of steel, so they are cheap. They are not resistant to water hammer, and their use in centralized heating systems is undesirable.
Convectors designed as panels look like closed radiators, are very attractive, and fit perfectly into any interior design.
But made in the form of pipes bristling with plates, such batteries are only suitable for installation in utility rooms.
2. Floor convectors (duct). An excellent solution for creating a thermal curtain at the door of a balcony or loggia. Made from durable, corrosion-resistant materials, they are unpretentious to operating requirements.
3. Skirting convectors. Capable of operating in all conditions and modes, these batteries are ideal for creating a microclimate where all other heaters would look cumbersome.
The baseboard type is appropriate in bathrooms and storage rooms adjacent to cold street walls and unheated entrances.
Brief description of heating registers
Once upon a time, batteries of this group were made handicraft using conventional welding. Registers can be used in any heating systems, but due to their unsightly appearance they are used mainly in auxiliary rooms: garages, storerooms, basements. Sometimes they can be seen in the entrances of old high-rise buildings.
Modern manufacturers have their eye on this group of heating devices.
Shiny chromed metal registers can decorate the designer renovation of any living space
Calculation of thermal power of batteries
The stage of preliminary selection of batteries is completed, you can proceed to calculating the thermal power required from them. The calculations are based on a relative power of 100 W for heating 1 m² of standard room.
The full formula includes many correction factors and looks like this:
Q = (100 x S) x R x K x U x T x H x W x G x X x Y x Z,
S= area of the heated room, where:
R– additional parameter for rooms oriented to the east or north = 1.1;
K– correction for the presence of external walls in the room:
one = 1.0;
two = 1.2;
three = 1.3;
four = 1.4;
U– insulation coefficient of street walls:
low = 1.27 (without insulation);
average = 1.0 (plaster, surface thermal insulation);
high = 0.85 (insulation performed according to special calculations);
T– weather indicator of the period of lowest temperatures in ⁰С:
up to -10 = 0.7;
up to -15 = 0.9;
up to -20 = 1.0;
up to -25 = 1.1;
up to -35 = 1.3;
below -35 = 1.5;
H– ceiling height index in meters:
up to 2.7 = 1.0;
up to 3 = 1.05;
up to 3.5 = 1.1;
up to 4 = 1.15;
W– characteristics of the room located on the floor above:
unheated and uninsulated = 1.0 (cold attic);
unheated but insulated = 0.9 (attic with insulated roof);
heated = 0.8.
G– degree of window quality:
serial wooden frames = 1.27;
frames with single glazing = 1.0;
frames with double glazing = 0.85;
X– ratio of the area of window openings to the area of the room:
up to 0.1 = 0.8;
up to 0.2 = 0.9;
up to 0.3 = 1.0;
up to 0.4 = 1.1;
up to 0.5 = 1.2;
Y– battery surface openness value:
fully open = 0.9;
covered with window sill = 1.0;
obscured by a horizontal projection of the wall = 1.07;
covered with a window sill and front casing = 1.12;
blocked on all sides = 1.2;
Z– battery connection efficiency (1.0 ÷ 1.13; for more details, see the section below).
The calculated value must be multiplied by a conditional coefficient of 1.15. It will provide some heat reserve to enable more precise adjustment of devices to operate in low-temperature mode.
Effective ways to connect
Before continuing to study how to correctly select, install and connect heating radiators and other heating devices, it is necessary to consider two main types of pipe layout of existing heating systems. They differ in the principles of organizing the supply of coolant to the batteries and its return to the system.
In practice, the pipe that supplies heat is called the “supply”. The pipe that returns the coolant is “return”. Vertical pipe wiring (supply or return) is called “riser”.
In single-pipe heating systems, the coolant is supplied unevenly. It will arrive at devices far from the boiler after it has cooled down somewhat. Therefore, single-pipe circuits have limitations on their length
Traditional wiring options:
- Single-pipe. The wiring is arranged in such a way that one pipe plays the role of supply and return. The batteries “crash” into it sequentially. The coolant bypasses the heating devices in the order in which they are connected.
- Two-pipe. In a two-pipe distribution, one pipe is the supply, the other is the return. With this option, the battery heating devices are connected simultaneously to both pipes, parallel to each other. The coolant circulates through all batteries simultaneously.
The “Z” coefficient in the formula for calculating thermal power depends on the options for connecting heating devices.
The most widely used connection methods in practice:
Method number 1. Diagonally. Z = 1.0.
This connection procedure is the most effective, especially if the heating system is not working well. The coolant enters the battery from the top on one side, passes through the entire internal cavity and exits from the bottom on the other side.
Thermal energy is transferred to the entire surface of the heating device. For radiators with a length of more than 12 sections, this method is highly recommended.
Method No. 2. From the side (top – entrance, bottom – exit). Z = 1.03.
Until recently, this was the most common method for connecting batteries. It is convenient for installation due to the short connection length.
For radiators up to 12 sections, the heat transfer is almost equal to the diagonal connection method. But this is debugged existing systems heating. If the systems are operating sluggishly, the hot coolant will not reach the final radiator compartments.
Method No. 3. Bottom on both sides. Z = 1.13.
Despite the least efficiency, this connection method quickly took root in new construction, thanks to plastic pipes. Heating system wiring is installed in the floor and does not overshadow the design of the premises. With properly configured heating systems, all parts of the batteries receive uniform heating.
The final stage of battery selection
The final stage of selection is based on the results obtained of the power required from the heating devices.
Ready-made one-piece designs of radiators, convectors or registers are selected at the time of purchase.
From the factory data sheets of the products, data on their thermal power is visible. When purchasing batteries, the specifics of the installation location (for example, the possible dimensions of the device) are taken into account.
Non-separable radiators and registers with individual parameters are manufactured by specialized organizations to order. Collapsible radiators should be considered based on the number of sections, based on their total thermal power.
Approximate individual powers of standard 500 mm sections made of different materials (Watt with a coolant of 70⁰C):
Cast iron = 160;
Steel tubular = 85;
Aluminum = 200;
Bimetallic = 180.
The power of collapsible radiators is regulated by attaching additional or disconnecting unnecessary sections.
When selecting batteries various designs for one room, it is more correct to start their selection with non-separable products.
It is also proposed to install a heat-reflecting screen between the battery and the outer wall. To make it, you can pay attention to modern heat-reflecting materials isospan, penofol, aluf.
An air vent is a small device built into the part of the battery where air can accumulate. For collapsible radiators, this is a threaded hole in the end of the upper manifold opposite the supply pipe inlet
When fixing heating devices in place, their deviation from the horizontal level is not allowed. It is allowed to raise the side with the air vent up to 1 cm for better collection and release of air.
When connecting heating devices to systems with risers, the centers of the battery inlets should not be higher than the centers of the outlets from the supply pipes. If, when connecting to risers, it is planned to equip heating units with taps or devices for adjusting the temperature, in single-pipe heating systems additionally necessary in their absence.
Bypass is a jumper parallel to connection batteries. This element allows you to organize control of the operation of the heating device. It is a piece of pipe connecting the inlet and outlet of the battery. The diameter of the jumper pipe should be one size smaller than that of the riser pipe. In two-pipe heating systems, the installation of bypasses is not required.
Due to the vastly different expansion coefficients of materials, it is not recommended to connect batteries using plastic hoses to steel pipe wiring. Conversely, the main plastic wiring excludes the transition to steel connection parts.
Until the installation is completed, it is advisable not to remove the packaging shell from steel, aluminum and bimetallic batteries in order to avoid their mechanical damage.
Preparing dismountable radiators for installation
If the purchased collapsible batteries do not have the calculated parameters, they should be modified by disconnecting excess sections or adding to the desired quantity. The radiator compartments are tightened together using plumbing nipples through round sealing gaskets.
The nipple is a short, thick-walled tube with an external thread. Half - right, half - left. Inside the tube along its entire length there are two opposite longitudinal technological protrusions.
The radiator wrench can be replaced with a chisel of a suitable length, with a tip width sufficient to confidently engage the nipple protrusions. The role of the wrench will be played by an adjustable pipe wrench.
The design of the collapsible radiator has a left-hand thread.
To correctly perceive the direction of rotation, it is recommended to unscrew or tighten the nipples by inserting a key or chisel into the holes of the sections where the threads are right-handed. To avoid distortions of parts, the holes must be alternated every other turn of the tool.
Securing dismountable radiators in place
Collapsible radiators are hung on special brackets. The most reliable are arc-shaped hooks mounted in the main walls of premises. In this case, the distances must be ensured:
From the floor = 6-12 cm, sufficient for cleaning and heating the bottom of the wall,
at least 7 cm to the window sill to ensure effective convection,
from the heat-reflecting screen or from the wall = 3-5 cm.
The brackets are mounted in such a way as to fit into the intersection space of the radiators. According to the unwritten rule, when hanging batteries, the end caps with right-hand threads should be on the right, and those with left-hand threads on the left.
Markings for hooks are carried out in the following order:
- Draw a vertical line of the axial center of the radiator (when installing the battery under a window, most often this is its center) with a length no less than the height of the battery.
- The distance between the spaces of the first and second sections of the radiator and the last and penultimate sections is measured.
- A horizontal line is drawn corresponding to the center of the upper radiator manifold, with a length no less than the measured distance (taking into account the general tips outlined above).
- The distance itself is plotted left and right on a drawn horizontal line symmetrically relative to the line of the axial center. The resulting two points are the places for the upper hooks. They will support the weight of the structure.
- From the point of intersection of the horizontal lines and the axial center, a distance equal to the center-to-center distance of the collectors (standardly 500 mm) is laid down vertically.
- A horizontal line is drawn through the intended point, corresponding to the center of the lower radiator manifold.
- The distance measured in point 2 is plotted left and right on a drawn horizontal line symmetrically relative to the axial center line. The resulting two points are the places for the lower hooks. They will ensure the immobility of the structure.
- At the designated points, holes are drilled for dowels, into which threaded brackets are screwed or hooks with smooth rods are hammered.
The drilling process is described for cast iron and bimetallic heating devices with no more than 10 sections, and aluminum radiators with no more than 12 sections. For larger batteries, a hook should be added in the center area at the top and bottom.
Fastening in place non-demountable types
Brackets for installing non-separable radiators are usually included in the product kit. The sequence of marking the mounting points of the brackets for hanging these batteries is described in the attached installation diagram. The procedure is similar to that described for dismountable radiators.
The choice of brackets for securing convectors is varied. It is determined by the location of the heating device.
The convectors are held on the walls with brackets, fixed to the floor, and suspended from below to the window sills
By analogy with collapsible radiators, they are hung on arched hooks that are immovably embedded in the walls. The total number of brackets is standardly four (two hold the upper pipe, two hold the lower pipe). For light registers, it is possible to use holders for pipes of the appropriate diameter with clamps.
Connecting batteries to heating systems
It is advisable to use a torque tool for connection work. The required tightening forces are specified in the passports of the purchased heating devices. To create a tight seal on threaded connections, you will need fluoroplastic sealing material, briefly called “FUM tape”, and sanitary linen.
If the connections of the batteries with the wiring of the heating system are made with plastic liners, you will additionally need:
- Welding machine for polypropylene parts.
- Or a crimping device for metal-plastic pipes.
When deciding to control the heating of batteries, taps or temperature control devices are purchased. Some ready-made designs are immediately equipped with built-in thermostats.
The required number of pipes for the supply line and the set of connecting parts (fittings) depend on the options for connecting to the heating system and are determined after the batteries are secured in place. Connection methods “diagonally”, “from the side” or “from below on both sides” are determined at the stage of calculating the thermal power of the installed