We assemble a miracle shovel with our own hands - design features, assembly process. Making a miracle shovel for the lazy with your own hands Miracle pitchfork drawing
Not everyone knows how to make a miracle shovel with their own hands, but almost all summer residents and gardeners, owners of personal plots know how difficult it is to dig up a vegetable garden. This procedure will be greatly simplified if you know how to make a miracle shovel with your own hands. It is worth noting that such a device is far from the only one in the arsenal of summer residents, there are others, but it is this device that can significantly reduce the time of digging up a site and save energy when working “in the field.”

A miracle shovel is necessary for digging up a site in spring and autumn, before planting plants during gardening and dacha work.
The latter is especially important, since anyone who has encountered such work knows how difficult it is to complete it. After all, intensive digging of a vegetable garden is not only difficult and tiring, but also detrimental to health. Homemade instrument It performs the functions of a regular shovel much better and, according to the owners of this device, it can quickly and efficiently dig up the required area of land.
Brief description of the tool

Many people believe that such a tool is capable of digging any soil, but this is a misconception. With this device you can only dig up areas with black soil or sand (soft soils); getting a stone (remnants of masonry, for example) under the shovel will lead to a stop in work. Another misconception associated with this miracle item is that people consider such a device to be similar to an ordinary shovel. However, it is not. Such a device is more reminiscent of a pitchfork, a plow, a rake, and headboards (since they can be used in a structure), but not a shovel. But the functions that this unit performs are similar to those bayonet shovel, which is used to dig up a site in spring and autumn, before planting plants during gardening and dacha work.
Despite the fact that the tasks performed by such a device are similar to those of a shovel, and the operating principles of these tools are similar, there are still differences that are very, very significant. So in the process of normal digging with standard gardening tools you need to apply significant force and have great endurance (after all, you need to not only insert the shovel onto a full bayonet, but also get it out with the soil), and when working with the miracle equipment, you only need to lightly press the handle of the device and the soil itself will loosen.
When working with ordinary tool there is a need to clean the surface from adhering earth and debris (humus, dry leaves, etc.), to break up stuck together lumps of earth (if this is not done, the dug up area will not be suitable for planting). Here rods, fittings or pipes themselves dig and loosen the area. Manufacturers of such devices also say in their advertising videos that this design significantly reduces the load on the spine.

Also, such digging removes weed roots, small debris, etc. from the soil. This also saves time on weeding, since weeds will not grow in this case.
Many summer residents often confuse such a “wonderful” tool with another non-standard industrial product called “Tornado”. However, this is not correct, since “Tornado” only loosens the soil and does not dig it up.
The shovel itself structurally consists of a frame with longitudinal pins, which serves as a baking powder. A shovel frame is attached to the ripper frame, and the connection must be movable. In this case, the reinforcement rods on the frames should not coincide in location and ensure free movement. In this case, the second frame has a lever handle, which is located at an angle to reduce the load and effort applied by the operator. However, this design has a number of technical difficulties that affect its operation.
Return to contents
Disadvantages in work
For all its advantages, this design has a number of disadvantages, which most manufacturers hide and do not mention in advertising videos. These include the following:

To create a shovel you need to stock up water pipe With conditional passage about 20-25 mm.
- There is no way to dig up dry soil with such a device. This minus completely negates all the positive functions. After all, there is nothing stranger than a tool that cannot perform its functions under certain conditions. external conditions, especially if a cheap primitive “brother” performs them perfectly, regardless of the condition of the soil. This minus imposes serious restrictions on operation, since the ability to operate such a device in a dry summer (and in some areas from May 1 to October 1) is impossible in principle. If you need to dig up a site during the dry season, the soil should be moistened. This requires physical effort, spending water resources and, as a consequence, financial.
- It is impossible to treat areas with clay or limestone soils with such a unit. For these purposes, you need to purchase a cultivator or use an old, “proven” bayonet shovel.
- The disadvantages include the high cost of a purchased product or the high labor costs of making such a device on your own.
Based on the disadvantages of such devices described above, it is worth saying that such a device is not a “super” device for work. Like most other similar “miracles”, they can only work under certain conditions in areas with soft soil. Therefore, before purchasing or making this tool, you must carefully weigh the pros and cons.
Return to contents
What is required to create

So, to create a frame, you need to stock up on a water pipe with a nominal bore of about 20-25 mm; the backs from old Soviet beds (those made from lightweight duralumin-aluminum pipes) are suitable. Selection depends on the choice of pipe welding equipment(for aluminum, electrodes and machines for welding non-ferrous metals are used). You also need to purchase rods that will serve as teeth.
The best fitting for these purposes is reinforcement about 0.3 m long. Next, the structure is equipped with a handle, for which a regular wooden handle is suitable.
Some are equipped with a carrying handle. The main cost item will be 4 bearings, which should perform the functions of movable fastening of the frames. Everything is completed by one single tool – an inverter welding unit. Why inverter? Because they can cook both non-ferrous and ferrous metals, replacing only the electrodes. And consumables for it - electrodes of one or two types. After purchasing materials, assembly begins.
First, the pipe is bent so that its shape resembles the letter “P”. If the back of the bed is used as a frame, then all excess should be cut off from it, leaving only the pipes in the letter “P”. To bend a pipe, the required bending points are heated red-hot over a fire, and then bent against a wall or pole.
In this case, the length of the symmetrical ends of the letter “P” should be about 1 meter, and the length of the short side should be from 30 to 50 cm. The most optimal length is 35-40 cm.
After preparing such a workpiece, reinforcement is attached to it by welding onto a short crossbar, which is welded parallel to the short frame crossbar (the distance from the frame crossbar to the crossbar with reinforcement is equal to 2 lengths of the reinforcement). This must be done so that the teeth face the jumper.
Next, some semblance of a pitchfork is made from the remaining pipe and fittings. In this case, the width of the forks should be 5 cm shorter than the width of the “P” frame. After which these forks are attached to the frame using bearings. At the final stage, the cutting is inserted into the device.
Miracle shovel is a real invention and assistant for the gardener. IN Lately gardeners and gardeners often began to use miracle shovel for digging earth. Now, on almost every personal plot there is such a tool. Moreover, some models of such tools have become quite popular among summer residents. Working with such a device significantly reduces physical activity. At the same time, with its help, the processing of the earthen area is carried out almost 3 times faster.
Pros and cons of miracle shovels
A miracle shovel can be called a universal garden tool. However, it has not only positive properties, but also negative ones. The device has many advantages:
- Thanks to such a shovel, a person works in the garden or vegetable garden with reduced physical activity;
- The wide span of the forks makes it possible to significantly speed up the process of cultivating a plot of land of any size;
- Working with the device is easy and simple;
- With the help of a miracle shovel you can process even heavy types of soil;
- High reliability and durability of the tool.
It is also worth paying attention to the disadvantages of the miracle shovel:
- For maximum results of work using this device, the worker’s weight must be at least 80 kilograms;
- If a shovel breaks, problems with repair may arise;
- It is impossible to make a figured dig with this tool;
- It is impossible to dig holes.
However, this garden tool can be used to cultivate any type of land. Miracle shovels can be used for loosening and digging soil for subsequent planting of vegetables. Thus, devices with forks that can dig the soil to a depth of 15 to 25 centimeters can be used to prepare the soil for planting some vegetables:
- corn;
- and other crops.
More tender plants (,) are planted not as seeds, but as seedlings. In this case, the holes should be dug with a regular garden shovel. It is worth noting that it is impossible to work a miracle with a shovel in the garden. With its help you cannot dig up trees or dig a hole, so the work should be carried out with a classic shovel.
Important! This device can be effective if the land plot has an area of 0.5 acres or more. At small sizes It is better to cultivate the soil using a bayonet shovel.
The main design elements of a miracle shovel
The miracle shovel not only performs its direct function - digging the earth, it also loosens and breaks clods of earth. The design consists of two strips with pins. They are movably connected to each other. Sometimes the device may consist of one such strip.
Some manufacturers produce models that have a back stop. This shovel is designed to make work easier when digging dense, heavy soil. So the miracle shovel is more like a double pitchfork.
If you look at the picture, you can understand that this tool does not resemble a shovel in any way. It also has other differences from a regular bayonet shovel. So, the model’s handle is much higher and should be at shoulder level. Some models have a crossbar at the top, which allows for two-handed operation.
The main advantages of the miracle shovel include the fact that it can perform several functions:
- Loosens the soil;
- Breaks up large clods of earth;
- Pulls out the roots of any weeds without leaving them in the ground;
- Easily digs potatoes, beets and other root vegetables.
The operating principle of this device is not complicated. If we describe it in general outline, then it will look like this: ordinary forks mounted on the back stop loosen the ground using the force that a person transmits manually tool, pressing on the handle.
At this time, the second fork teeth, located opposite and entering the lock, break up large lumps of soil during the loosening process. As a result, the earth is well dug up and loosened.
The ripper is equipped with a front stop, which provides good stability to the entire mechanism. Looking at the work of a miracle shovel, it can be compared to scissors that cut and crush piles of earth. At the same time, there is no need to cultivate the land with a garden rake.
The miracle shovel is an indispensable assistant for gardeners and gardeners. It is especially good to use it when digging large areas, since with the help of this tool the work process can be accelerated several times.
At correct operation With this device, you can independently dig up about 20 acres of land. And if you use several of these shovels, you can efficiently cultivate a whole hectare of land.
Watch the video! Miracle shovel, which one to choose
Types of universal rippers
Currently available for sale a large number of the miracle of the shovels that represent various designs. Some types of products can change the depth of soil digging, others are equipped additional functions. In addition, along with a manufactured product, on the shelves you can also see devices made by yourself according to special drawings.
Among industrial devices, there are several most popular models.
- Classic miracle shovel. Often made by gardeners themselves. This device, consisting of the main forks and a back stop, significantly reduces the load on the body. This increases the speed of work. The disadvantage of this design is that it does not break up earth lumps, so you have to additionally use a rake. Also, the tool can only be used for digging up black soils that are processed regularly;
- Plowman. For better labor productivity, manufacturers are constantly trying to improve the design. Thus, many rippers were created, including the Plowman. A special feature of this device is the length of the bayonet, which can reach 15 cm. Thus, the shovel ensures loosening of any type of soil;
- Mole Available with a fork length of about 25 centimeters. It was created specifically to allow deeper digging. In this case, the plants should be planted immediately after cultivating the soil. It is worth noting that digging soil with such a unit is not easy. Compacted earth or alumina are especially difficult to work with;
- There are universal miracle shovels. With their help, you can dig soil up to 20 centimeters deep, but only if the soil is black soil and freezes only to 10 cm. Under more severe conditions, this shovel is not suitable for cultivating garden crops. But it is suitable for decorative digging.
Watch the video! Digging an area for potatoes with a miracle shovel
Making a miracle shovel with your own hands
Sometimes gardeners or gardeners cannot choose the desired model ripper for certain reasons. In addition, production tools may not be affordable for everyone. Therefore, many people undertake to make a miracle shovel on their own. Moreover, such a miracle shovel, made by hand according to drawings and exact dimensions, it turns out no worse than the factory one.
Blueprints


To understand how to make a miracle shovel, you need to understand the drawings. After this, you should prepare the material to create a garden device. Also, to assemble the product you need to prepare special tools in advance:
- metal fittings and square pipe;
- welding machine;
- grinder.
It is important that the design meets all specified parameters, the main ones of which will be depth and width. These dimensions will depend on how deeply the ground freezes in the region, as well as for what purpose it is collected. this design. So, the device can be used for digging soil or for loosening it. If the device is made only for loosening, then a depth of 10 centimeters is enough.
If a tool is created to loosen the ground in which it is necessary to immediately plant greenery, then when assembling it it is necessary to take into account that the depth of the pothole should be 5 centimeters deeper than the freezing of the ground. It is worth noting that this mark will be different in each region.
When choosing the width of the forks, you should take into account not only your wishes, but also your physical strength. It is important that the width of the forks does not exceed 50 centimeters. If it works strong man, which can dig up huge piles of earth, then you can make a miracle shovel according to individual parameters. To do this, you need to find the necessary drawings and videos on special websites on how to properly make the structure with your own hands.
Stages of making a miracle shovel with your own hands (drawings)
- Before you begin assembling the device, you need to prepare all the parts. First, we take pre-prepared steel rods and cut them to length. We make bayonets from them, and then sharpen their ends.
- cut off the supporting strip from a square pipe.
- A metal pipe will be needed to make the base of the cutting.
- A thrust strip is also made from the pipe. It needs to be given an arched shape and attached to the supporting bar. All parts of the product are assembled using welding.
You can additionally mount a ripper to it, with which you can break up large lumps of earth. The design of the ripper is the same as that of the main forks. Two devices are attached to the moving mechanism. In this case, the miracle shovel will be able to dig soil in areas with a slope. In addition, it will be able to efficiently crush even small lumps of soil.
To complete the creation of an amazing device, you need to select a suitable cutting. If the product turns out to be too bulky, then the handle can be replaced with two metal pipes, which are welded to the tool; they are connected on top by a transverse one, forming two handles, which will greatly facilitate working with such a miracle shovel.
Watch the video! Do-it-yourself miracle shovel (drawings). Testing the miracle shovel in practice
There is a lot of work in the garden, but the most exhausting work is digging up the soil, cultivating it and removing weeds. They start digging ahead of time, in small areas because the load is too heavy. The miracle shovel will help reduce the complexity significantly and at the same time speed up the process at least twice. This relatively inexpensive and uncomplicated device really works, even on difficult soils.
What is different and what can
To be precise, this is not a shovel, but a ripper, since it not only digs, but also breaks clods. The miracle shovel consists of two (sometimes one) slats with pins movably connected. Some models also have a back stop - for easier digging of dense, heavy soil. So in reality it looks more like double pitchforks (see photo below).
Miracle shovel and its components
From the picture it is clear that this tool does not have a shovel as such, but the differences from the classic bayonet shovel do not end there. It also has a much higher handle - it should reach your shoulder. It is also convenient if there is a crossbar at the top - you can operate it with both hands.
The miracle shovel performs three operations at once:
- loosens the soil;
- breaks clods;
- “extracts” the roots of weeds without tearing or cutting them (in any case, damaging them much less);
- Digs root vegetables easily - you can dig carrots, potatoes, etc.
But its main advantage is that it greatly facilitates digging the earth, and the main load falls not on the back, as when using a conventional bayonet shovel, but on the legs (driving the working forks into the ground) and on the hands (turning the forks out of the ground). During work, the back is in a vertical position and is almost not loaded.

The only downside to this tool is the weight. It is really much larger than the bayonet one. But the super shovel can be rearranged; there is no need to lift it. Or rather, it is raised only a few times: when it is placed on the ground at the beginning of the row. Then, by pulling the handle, it is simply tightened a little.
There is another very attractive point in using a miracle shovel - it digs the garden at least twice as fast. This occurs due to the wider working part - up to 50-60 cm. Provided the physical activity This is very good.
How to work
Although this design is not particularly complex, working with it has its own characteristics. First, you need to start from the far edge of the bed, then move back, gradually dragging the forks back. well and general order actions like this:
- Holding the handle, place a miracle shovel and rest it on the front ripper.
- Stick the pitchfork into the ground. Drive them in until the back stop touches the ground. If the ground is heavy or dense, additional force may be needed - press your foot on the crossbar of the front forks.
- Pull the handle towards you. With this movement, the forks will begin to move upward. As they rise, they pass through the forks of the front stop, breaking up the lumps.
- Pull the device back a little, repeat all the steps (plug, squeeze, pull the handle).
It's actually very simple. It’s worth trying a couple of times and then everything repeats automatically.
Constructions
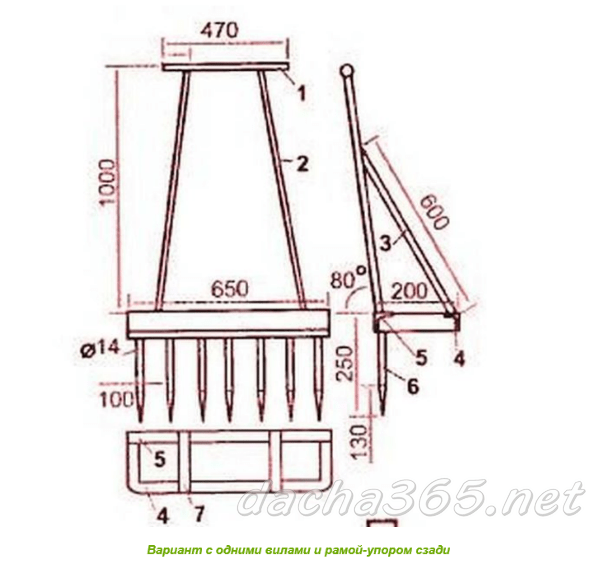
In addition to the option shown above (called “Tornado”, “Digger” or “Plowman”), there are several more variants of miracle shovel designs under different names.

Soil ripper without front support
This design also has working and support forks, but does not have a front stop. Because it is less bulky and weighs a little less. But the front stop gives increased stability during operation. And the weight when dragging is not so important.
The handle is attached to the working forks, the back stop is welded to the comb of the second forks. Both of these structures are movably connected to each other (even door hinges can be used).

Ripper miracle shovel for easy tillage
The photo shows one of the implementations, which is made on the basis of a corner and round pipe. When working, the pins are driven into the ground by pressing on the crossbar, and not on the stop, as in most models.
Digger
An option called “Digger” is essentially a wide fork with a stop for easier turning and a high, powerful handle.

Miracle shovel "Digger"
The peculiarity of this design is the stop and the adjustable handle. It is fixed with two bolts and adjusted to the height of the working person.
The emphasis is not stationary, but movable. It is fixed to the frame. When plunging the pins into the ground, press on it with your foot, then, without removing your foot, turn it out by pressing the handle of the fork out of the ground.

The physical load during work is low, the work progresses quickly. But this miracle shovel will not work for hard and lumpy soils: it does not crush the soil. She's under own weight goes through the pitchforks. But this is only possible on loose soils. On clay or black soil it is better to have a second comb with pins.
How to make a miracle digger, see the following video.
Lightcop
This miracle shovel design is slightly different from the previous one. The stops in it are rounded, the handle is arched, but the basic structure is the same. There is some drawback - there is no way to adjust the handle, but otherwise everything is the same - a movable stop and working forks.

Two options called "Lightcop". The simplest ripper for the vegetable garden, garden and cottage
It’s hard to say whether this variation is better or worse. It would be possible to evaluate only by comparing the performance of both copies on the same site.
If you watch the following video, you will see that with such a miracle shovel you can dig not only loose soils, but also heavy ones. And the second thing you can pay attention to is that for such soil it is better to have a second comb of pins, against which you can crush the inverted lumps.
What and how to make it from
The designs, as you have seen, are different, but the set of materials will be approximately the same. Their number differs, but the cross-section and characteristics remain unchanged.

You can use a round or profiled pipe, metal rods or “parts” from forks
Materials for production
They usually start with making the frame. It is often made from a profiled pipe, the optimal cross-section is 30*30 mm or so. The wall thickness is important - at least 3 mm. Some models used a corner. The shelf width is also about 30 mm, the metal thickness is at least 3 mm.
The handle can be made from the same profile pipe, you can use a round one. The thickness of the walls is also important. In principle, having made a latch, you can use a wooden shovel holder. Some purchased models provide for the installation of a wooden holder.

The main attention should be paid to the material that is used for the teeth of the working forks. It must be good structural steel. The forks are made from a rod of at least 8 mm in diameter.
What craftsmen make them from:
- They cut it off from an ordinary fork and weld it onto a miracle shovel.
- Straighten the suspension springs.
- Car springs are sawn into narrow strips.
If you can find a good rod - round, square or hexagonal - it doesn't matter, it will be much easier for you. Not a bad option, by the way, with a pitchfork. But you have to buy good ones, and this is not cheap. And one more thing: calculate the dimensions of the miracle shovel so that the working forks have 8 pins. Then you will need to buy two jokes of ordinary pitchforks.
If the design is chosen with two forks - working and thrust, you can place pieces of a suitable length of metal rod on the thrust forks. The loads here are not so high, so the strength should be enough. The diameter of the rod is 10 mm; you can use ribbed reinforcement, which is used to reinforce the foundation.
Dimensions
Most companies that produce miracle shovels have a range of sizes for this product. Our people are different in build and physical fitness. For men, you can make more massive models, and for women and older people, smaller and lighter ones. The average sizes are:

All other sizes are selected depending on the design and material used.
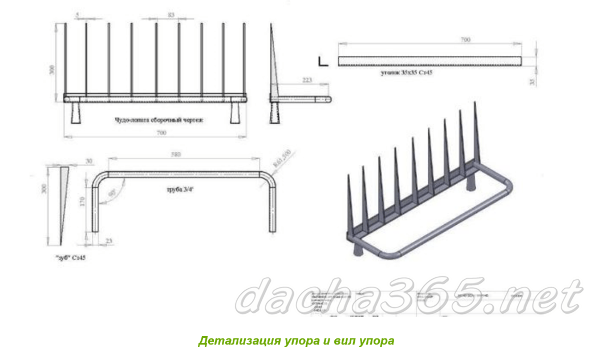
Blueprints


Detailing of the stop and forks


For centuries, a person has been accompanied by a bayonet shovel, but it is painfully difficult to work with it. This is probably why a person always wants to modify or improve it. So various magic digging tools appear, like the “Tornado”, designed to make the work of the tiller easier. Almost 10 years ago, the miracle shovel of the monk Father Gennady was invented, which he called the “Vyatka Plowman”.
It became a real gift to all diggers and plowmen. After all, any gardener knows that the hardest physical work associated with digging up the earth. We all pay for planting potatoes with pain in our backs, arms and legs. An Orthodox monk made his own version of the traditional bayonet shovel; he claims that digging with it is a pleasure, it even helps plant potatoes.
In the process of digging a garden, you have to bend down each time, pressing the shovel forcefully into the ground, and then, straining all your muscles, lift not only the heavy shovel, but also the soil on it. Of course, such work hurts your back. The Vyatka Plowman shovel allows you to work without stress. This is its main advantage, which is why it is called a “shovel for the lazy,” although it would be more accurate to say, for the weak, because any pensioner with it can become a digger.
It is not symmetrical, you can work with it only with one leg - the left one, but there is no problem with that, you can make a tool for the right leg. The inventor installed a bicycle handlebar at the top, so you can hold the shovel with both hands at chest level. The most important thing: there is no need to lift the earth; it turns over smoothly as a result of the turning movement of the hands.
With such a shovel you can increase labor productivity several times. It is successfully used for digging up a vegetable garden and planting potatoes, but you can also dig a ditch.
Principle of operation

The work consists of pressing the bucket (blade) of the shovel into the ground and turning over the layer of earth, turning the handles to the right. The earth turns over in a neatly cut layer and lies on the right. The back remains straight, there is no need to bend, a bayonet is stuck into the ground, thanks to which the blade of the shovel enters the soil under the weight of the leg. On light soil you can work with one hand. The spine performs only a rotational movement; without the use of force, with the help of a lever, the work of cutting, removing and turning over a layer of earth is performed.
You can plant potatoes with this “magic digger” as if you were using a plow. You need to dig one furrow (stepping back), put potatoes in it, and when digging the second furrow, even and neat digging occurs. Moreover, you can place fertilizer in the second furrow and bury it while going through the next furrow. With a bucket width of 30 cm, you will get a very even planting of potatoes, with 60 cm between the bushes.
Video “Everything about the instrument”
Advantages
The undeniable advantage of the “Vyatka Plowman” is its high labor productivity and the absence of stress on the spine when digging a vegetable garden. With its help, a digger can dig a trench, and a summer resident can easily and quickly dig up a garden. This miracle digger can handle digging up virgin soil. It is especially good to use it in light sandy soil, then you don’t even have to loosen it.

It’s interesting that this miracle shovel can be made with one’s own hands. The drawings are posted on the Internet; they were made by a resident of the Dnepropetrovsk region to help everyone. It can be made practically from scrap metal. You will need the following simple materials:
- stainless steel pipe;
- stainless steel shovel blade (preferably cold rolled);
- pin;
- bicycle wheel.
With the help of these drawings, a shovel for the lazy with your own hands can be made taking into account the height of a person. The horizontal handle should be located at chest level so that you do not have to raise or lower your arms. Although today you can buy a ready-made digger for any leg of your choice. It is in demand, which means that production can be entrusted to professionals, and you don’t have to understand the drawings!
Flaws
The miracle shovel of an Orthodox monk is an excellent tool that really makes the work of summer residents and diggers easier. But it is not suitable for every soil; on clay soils and black soil, the inverted layer must be broken up immediately, otherwise it will dry out to a stone state, and then it will be difficult to work with it. They say that it is suitable for re-digging an area, but digging virgin soil is very difficult due to the roots of weeds. It rotates the cut layer of soil by a maximum of 180 degrees, and when digging up an area with grass or after cereals, the soil must be completely turned over so that the roots are at the top.

We tried digging up potatoes with a miracle shovel, but it’s not as convenient as planting potatoes with it. It picks up the bush well, but the turn is not enough for all the potatoes to be on top.
It would be nice to have on the farm various modifications of shovels and other tools that make the life of a gardener-digger easier. Great to use as a ripper manual cultivator"Tornado". Some craftsmen adapt an auger for loosening the earth, and a shovel with an auger has become indispensable for manual snow removal. "Tornado" also facilitates physical labor when cultivating the land. His telescopic handle is adjusted so that the person does not bend his back, and a straight back gets tired less. "Tornado" is an excellent assistant when removing weeds.
It is placed above the bush, then pressed into the ground, turned and pulled out, the teeth scroll around the plant and snatch it out of the soil along with the roots. "Tornado" is flying, loosens, removes garbage from the garden. What he can still do is dig holes for planting plants, remove large weeds - everything for which without the Tornado cultivator he would have to bend over or squat. “Tornado” can even be adapted for transplanting strawberries; its teeth can easily grab a bush and turn it out of the ground without damaging the roots. Man always tries to improve his tools; the Tornado cultivator and the miracle shovel are excellent examples of this.
Video “Miracle shovel according to the drawing of monk Gennady”
In the video you can see how it is used in practice. this device. This video can dispel all doubts regarding whether it is worth switching to this type of shovel.
The miracle shovel for digging earth has recently become a common tool in the garden or summer cottage. At the same time, some devices have quite noticeably replaced the usual spades in households. This popularity is due to the fact that the miracle shovel allows, while significantly reducing the load on the gardener or gardener in the process of cultivating the land, to simultaneously speed up this process by 2-3 times.
WITH technical point In terms of vision, these devices combine a ripper and a fork. Most designs include the following elements:
- forks for digging and loosening;
- stops (front and rear);
- attachment of the handle;
- runners;
- stalk
If we describe the principle of operation of this mechanism, then in general terms it will be as follows: classic forks, mounted on the back stop with the help of manual force transmitted from a person to the forks via a handle, loosen the ground. In this case, the second teeth of the forks, placed opposite and entering the lock with them, break the clods of earth into small parts during the loosening process. As a result, it is not only dug up, but also loosened.

A front stop is mounted on the ripper, providing stability to the entire mechanism. From the outside, the miracle shovel works like scissors, cutting and crushing piles of earth, and at the same time turning them into almost invisible lumps, which on light soils do not even need to be leveled with a garden rake.
Such a tool greatly facilitates the process of digging up large areas of land, and this process is accelerated several times. Having mastered the tool, you will be able to use it to independently cultivate up to 20 acres of land. In the same case, when several miracle shovels are used on a site, it is quite possible to master an entire hectare.
Pros and cons of miracle shovels
The universal garden ripper, also known as the miracle shovel, has both positive and negative qualities. They all need to be carefully studied before you go to the store to make a purchase. For example, the advantages of this device include:
- opportunity to work for plot of land with sharply reduced physical activity;
- a significant increase in the speed of digging earth through the use of wide forks;
- ease of operation;
- the ability to dig up all types of soil;
- high reliability of the ripper and its durability.
The disadvantages of miracle shovels include:
- a very respectable weight of 80 kg necessary for effective work;
- difficulties with repairs;
- inability to perform figure digging;
- lack of physical ability to dig holes.

Despite the presence of the described shortcomings, this garden tools Excellent for arable work on all types of plots. At the same time, miracle shovels can be used both for loosening the soil and for digging it up before planting vegetable crops. For example, devices with forks that dig through the soil 15-25 cm can be used to prepare the soil for planting:
- corn;
- potatoes;
- cabbage and other garden crops.
Plants such as peppers, cucumbers and tomatoes are planted in the ground as seedlings, not seeds; holes for them are made manually using a regular shovel. But in the garden, the miracle shovel is practically useless, since it does not allow you to dig up bushes and trees, dig a hole, or prepare holes for planting. In this case, all work will have to be done with a classic balance shovel.
It is also worth noting one more circumstance regarding the efficiency of the described ripper. The fact is that it makes sense to carry out work only if the area of the area being treated is at least 0.5 acres. If it is less better land dig with an ordinary shovel, as you will do it faster.
Types of universal rippers
As described above, miracle shovels have very simple design, therefore, today manufacturers offer consumers a huge number of their varieties for sale, which allow you to change the depth of loosening and have additional functional elements in their design. In addition, many manufacturers of these devices do not prevent the dissemination of information on how to make a miracle shovel with your own hands, so you can find homemade devices on sale.
As for industrially produced rippers, today the most common of them are the following types of these miracle structures:
- ordinary classic;
- "Plowman";
- "Mole".
A classic ripper is, as a rule, homemade, and includes a back stop and main forks in its design. This design allows you to dramatically reduce the load on the body, and increase speed and productivity. However, in this case the clods of earth do not break up, and this has to be done with the help of garden rake. However, this type of tool can only be used for digging up chernozems that are regularly processed.
Since this design was far from perfect, the inventors constantly improved it, as a result of which the “Plowman” and “Mole” rippers were born. Thus, the miracle shovel “Plowman” has a bayonet 10-15 cm long, which makes it easy to loosen any type of soil. At the same time, its distinctive feature is effective work if the employee weighs more than 60 kg. Let us remind you that the classic miracle shovel can work with a worker weighing 80 kg.

As for the “Mole” ripper, its forks are 25 cm long and it is designed for deep digging. At the same time, plant garden crops in this case, it is necessary immediately after digging the area. It is also worth noting that it is quite difficult to dig the soil with this miracle shovel, especially if it is compressed or consists of alumina.

Manufacturers also produce universal shovels without a name. They are designed for digging soil to a depth of 15-20 cm, if the depth of soil freezing in the region does not exceed 5-10 cm, and the soil itself is black soil. If the cultivation conditions garden plants in the region they are more severe; such devices can only be used for decorative digging.
Making your own miracle shovel
Sometimes factory-made rippers are not suitable for gardeners for some reason; in addition, they have a fairly serious price. In this regard, many householders prefer to make them themselves. So, if you need a miracle shovel made by yourself, you can easily find its drawings, dimensions, as well as a video of the manufacturing process itself on the Internet.

Having figured out how to make a miracle shovel with your own hands, and having found its drawings, you can begin to select the tools and materials necessary to perform this type of work. Typically, to assemble a universal ripper you will need:
- portable welding machine;
- metal square pipe;
- metal fittings;
- grinder.
Before you start making a product such as a miracle shovel with your own hands, you should study the drawings and dimensions of this device. The main parameters will be the depth and width, which depend directly on the depth of soil freezing at the location of the site, as well as the purpose of using the miracle shovel. So, such a ripper is used either for digging or for loosening the soil. If you are only going to loosen the soil, a depth of 10 cm will be enough for you.
This classic version miracle shovels. In order for it to also break clods of earth, it will be necessary to additionally mount a ripper. It is welded in the same way as the main forks and is attached to a movable mechanism in order to be able to dig up areas with a slope, as well as to better break up small clods of earth.
The process of making a miracle shovel is completed by painting it, as well as selecting a suitable handle for it. At the same time, sometimes, when the device turns out to be too large, instead of a handle, 2 metal pipes, which are connected by a crossbar, forming 2 handles to facilitate work with this tool.