Homemade plow for walk-behind tractor. How to make a homemade plow? Manufacturing of attachments
After I got a self-made agricultural winch, which is used for plowing the garden, the question became: should I buy a plow or make it myself? Walking through the shops and bazaar of Smolensk, you get a strange feeling that the plows produced by the industry for walk-behind tractors are a sad sight.
And these industrial creations are suitable only for “picking” and not for plowing the land, and even with the rotation of the layer, and regarding the depth and width of plowing, we can conclude that for planting potatoes with a distance between rows of 60 cm, not one of the proposed ones is suitable in the plow trade. Either our manufacturers are saving money, or the power of the most popular walk-behind tractors is not enough to work with a normal plow with a working width of 30 cm. When planting potatoes, you shouldn’t plow one furrow three times. And the price wants to leave the best - under 2 thousand. rubles (for a couple of pieces of iron from a scrap metal collection point).
The next step to find something useful is to search the Internet. To my surprise, there are 3-4 original descriptions with drawings floating in the vastness of the Russian-language network (this fact surprises me very much). The next step is to look at what those around you are using. It was not possible to buy a suitable plow; the decision was made to make a plow with our own hands. Based on the fact that the plow was supposed to be used for planting potatoes with a winch for plowing, the following requirements are imposed on it:
1. Plowing width – up to 30 cm.
2. Plowing depth -10-20cm.
3. The plow must hold the furrow itself, without digging in or jumping out of the furrow. The geometry of the plow must ensure movement with the specified parameters without the help of a plowman.
4. Possibility of adjusting the depth and width of plowing.
5. Minimum weight and sufficient strength.
My uncle has been using his homemade motorized winch for plowing for more than 10 years and has tried several options. For the last few years, he has settled on an option optimized for a homemade motorized winch for the garden, namely for planting potatoes with a distance between rows of 60 cm. There is also a homemade hiller for a motorized winch and a homemade potato digger, all this can be viewed on the corresponding pages of the site.
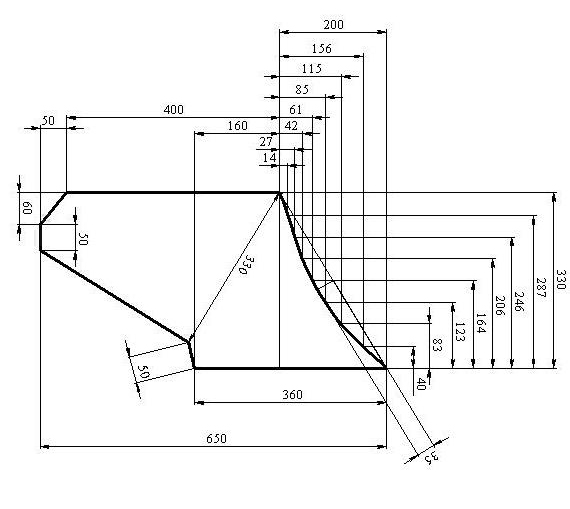
Plow drawing
Field board drawing.
The blade is bent according to this template until the two profiles coincide and then welded at an angle.

Using a drawing of a homemade plow, you need to draw a template for the plow pattern on thick paper, and then transfer the picture to metal and cut out the blank with a grinder. Personally, I used stainless steel material with a thickness of 1.8 mm. Many often use a sheet of 2-3 mm. The cutting part of the plow is reinforced with a strip of thicker metal. Someone suggests using a disk from a circular machine for these purposes, or a spring from a “Muscovite”. From personal experience, If country cottage area For a family of 4 people, plowing six acres in the spring and autumn is not worth pursuing for super-strength. It is more profitable to make a plow that is light but strong enough for its tasks. It’s better to repair or replace something after 10 years, and only if necessary, than to carry around the heavy structure of a homemade plow for 10 years. Excess weight to nothing.
This is what the plowing width adjustment system looks like. By rearranging the large wheel, you can change the plowing width within significant limits. When I plant potatoes, I set the grip to 30 cm, in two passes the distance between the rows is 60 cm. For autumn plowing of the garden or when plowing virgin soil, I use a smaller grip. The small wheel is made so wide that the plow does not press into the ground.


Having looked at the pictures below, you can imagine the basic principles of operation of a homemade plow, or rather a guide system that allows the plow, without the participation of a plowman, to move strictly in a straight line at the established plowing depth and width. The plowing width is regulated by moving the large wheel, which, when the point of application of the traction force is shifted as shown in the figure, is pressed against the furrow, which allows the plow to repeat the direction of the previous furrow. The plow turns slightly, which increases the plowing width. In fact, the width of the nose in the direction perpendicular to the axis of movement of the plow is less than 300 mm, however, the specified width is available for plowing.

The plow wheel runs along the bottom of the plowed furrow and this situation is observed from the previous furrow to the next. As a result of the application of traction force, a force is exerted to deepen the plow until the plow is aligned with the axis of the wheel, as shown in the figure, as a result, all forces are balanced, and the system operates very stably. Rough adjustment of the plowing depth is carried out by selecting the appropriate difference in wheel diameters, and smooth adjustment is carried out by adjusting the tilt of the plow. At this stage, there was no longer any need to use handles to control the plow, except for some special plowing conditions.

Plows not only loose soil as in the video, but also virgin soil

Plow for agricultural winch - video
The plow is used in conjunction with such a winch for plowing

You can find industrial motorized and electric winches for plows on sale.
When purchasing a mini-tractor for cultivating a small plot of land, the package often does not include all the elements attachments, so they have to be purchased separately. And the retail price of any spare parts is much higher and depends on the manufacturer and quality.
Equipment that meets all the requirements of a business owner is not always available on the market. That's why best option- make homemade plow, which at the same time will cost much less than factory equipment, sometimes of dubious quality.
To make a plow yourself, you need to know its design and the functions of its individual elements well. Typically, general-purpose arable attachments are used on private land. The design of such a plow can be divided into two main parts: working and auxiliary.
Operating equipment items include:
- A housing that includes a stand and field board. The blade and ploughshare are attached to the stand.
- The knife is the main cutting element of the tiller.
- Skimmer - additional cutting element attachment, designed for cutting the top layer of soil (turf).
Auxiliary structural elements:
- The frame is the base on which all other parts of the plow are attached. Its design includes longitudinal bars, spacers, and stiffening beams.
- Support wheel (its mounting height can be adjusted).
- A hitch is a special device with which attachments can be attached to an MTZ tractor or motor cultivator.
Plow with skimmer for walk-behind tractor
 The skimmer is designed to remove the top layer of soil when plowing land plot. He turns over a layer of soil with weeds, lays it at the very bottom of the furrow made by a body that is equipped special devices. He cuts and turns some of the soil on the side of the furrow. At the same time, the body with the equipment loosens the soil and distributes it evenly over the layer of weeds laid by the skimmer. To level the wall of the furrow, the plow is equipped with a special knife, which is mounted in front of the outer body of the attachment.
Types and structure of the case
Plows are divided depending on the number of bodies into single-, double-body and multi-body devices.
The housing design includes the following parts:
- rack;
- field board;
- ploughshare;
- dump
 The type and quality of plowing of the land plot depends on the last two elements of the structure. The ploughshare cuts the soil layer, which then rises along it towards the dump, then turns over and crumbles. The angle of rotation of the earth layer depends on the design of the dump. A field board is mounted at the bottom of the body, which prevents the plow from moving in the direction of the plowed land.
If you are interested in how to make a plow with your own hands, you should select drawings of its design based on the type of soil being cultivated with this attachment for an MTZ tractor or motor cultivator.
Plow body options:

Important! If you are planning to make a plow with a support wheel for a walk-behind tractor in living conditions, it is recommended to select the housing design depending on the type of soil.
The choice of housing depends on the type of crop being grown. Root crops need thoroughly loosened soil, to obtain which one of the above listed options agricultural attachments are not suitable. In this case, it is recommended to use a combined design. The body is equipped with a shortened blade, a plowshare and a rotor, which further crushes the soil during the cultivation of the land.
Blade design
Dumps can be:

Important! When choosing a plow design, it is necessary to take into account a significant point: the ploughshare and blade must be almost the same thickness (1 mm is the permissible “step” value, no more than 0.5 mm is the gap between the blade and the ploughshare).
Share shape
To make a plow with your own hands, drawings of a plow for a mini tractor need to be selected according to the type of soil being cultivated and the complexity of the device itself. First you need to decide on the design of the ploughshare.
A ploughshare is a part of a plow that cuts a layer of soil. Along the ploughshare, the soil further rises to the dump. For the manufacture of this structural element of the plow, high-strength hardened steel is used. You can make such a structural element of a plow field at home from an ordinary steel pipe.
Shapes of ploughshare:

Of the listed ploughshare options, the most popular is a chisel-shaped product for a reversible plow. They are considered the most stable during operation; the plow can be freely buried to the required depth.
Before you make the plow self made for a walk-behind tractor, you need to choose the right design diagram for the attachments. If available old instrument, new parts can be made based on it. If the old plow is missing, you can use Zykov’s drawings to make it. But it is necessary to take into account the parameters of the agricultural machinery on which it is planned further application self-made attachments.
It is no secret to every summer resident that tillage, including preparation for sowing and plowing, is the most time-consuming and tedious operation. Of course, if there are technical means (motoblock, tractor), this procedure can be much simplified, but to plow the land you need a plow. But any attachment for cultivating land has a considerable cost. To save money, you can make a homemade plow.
There are two ways to make a plow with your own hands:
- Do all the components yourself. This method is considered very complex, since many parts of the plow have a nonlinear shape, with a certain bend of different radii. And to bend the thick sheet metal at home, is a labor-intensive operation, sometimes even impossible without the use of special bending equipment.
- The second way is considered accessible to many walk-behind tractor owners. You can purchase ready-made housings in a retail chain, and assemble all the auxiliary parts and the frame for attaching devices yourself.
Application of plows
 The main task of the plow is considered to be turning over the fertile upper layer of plant soil. This operation (ploughing) allows you to significantly free fertile layer soil from weeds, root system which is already beginning to grow, but has not yet fully matured.
Seeds of weeds that have not yet sprouted during plowing move deep into the ground, which also makes their germination difficult. During plowing, the layer of soil loosens, becomes more pliable and soft, which improves the efficiency of crops and has a positive effect on the germination of cultivated plants.
At the first stages of using the plow as a tool for agriculture, it was dragged by people, then by domestic animals (horses, oxen), and currently this hard work is performed by agricultural machinery (tractor, walk-behind tractor).
Types of plows
 Many modern agriculture in their activities they use various equipment for tillage. Based on the method of aggregation, this equipment can be divided into:
- Trailed plow, which is driven by mechanized means on wheels. Currently, it is not used very often, because basically all modern agricultural machinery is equipped with a mounted-type system with a built-in hydraulic cylinder. According to agronomists, after treating the soil with such equipment, the arable land becomes more uniform and smooth. But the disadvantage of this equipment is the very large rotation angle, which prevents its use in conjunction with mounted and semi-mounted plows.
- Mounted plow capable of lifting only when using a technical attachment. It completely depends on the power of the tractor used. required amount equipment housings. The advantages of this type include the relatively low weight of the entire structure and its mobility (small turning radius). But the inability alone technical means working with a multi-furrow plow is considered a disadvantage of such equipment.
- Semi-mounted plow brought into working position using transport wheels and tractor attachments. The main advantage of using this principle is considered to be a large area of simultaneous plowing, which is achieved by the joint use of multi-furrow plows. Poor maneuverability and a large turning radius can be attributed to the disadvantages of semi-mounted equipment.
There are several plow designs:
- Plowshare plows- the most common, have been used since ancient times and are very popular now.
- Disk designs - are mainly used for plowing heavy land plots, as well as waterlogged or dry soils.
- Rotary systems- very convenient for cultivating virgin soil, more complex in design.
- Combined plows- combine both types of plows (disc, plowshare).
- Chisel designs- such devices do not rotate the soil layer. They are used very rarely, especially in individual households.
Plow device
 Structurally, the plow includes working parts, a frame, support wheels and a tow hitch. The ploughshare-moldboard mechanism, body, knives, skimmers, subsoilers are the working parts of the plow.
There are the following types of plowing device housings:
- Dumpless- serve for high-quality loosening of soil in areas prone to wind erosion, as well as in dry areas.
- Dump- designed for loosening the soil and plowing with formation turnover.
- Disk- effective when processing waterlogged soil, as well as for plowing hard and heavy soils.
- Cut-out- for moldboard cultivation of soil with a small fertile layer.
- Housings with subsoiler- used for plowing chernozems (thin and podzolic) and simultaneously deepening the plowing.
- With body mounted chisel for processing very hard, rocky soils.
- Combined systems - used for plowing heavy soil, while simultaneously loosening it.
The functional purpose of the ploughshare is to cut the soil layer and direct it to the moldboard device. The ploughshare quickly wears out due to high friction between the metal and the soil composition, which leads to a disruption in the technological process of plowing, an increase in traction resistance and excessive fuel consumption for the tractor. Structural properties can be restored by forging with a hammer, after pre-heating with a rock in the forge.
The blade cuts off a layer of soil from the wall of the furrow, moves it slightly to the side and lays it down with the top layer. Along the joint line, the blade and the ploughshare should fit tightly to each other, with a gap of no more than one millimeter.
The skimmer is designed to cut turf and dump it to the bottom of the furrow. With increasing depth of this structural element, the traction resistance of the plow increases, while the turf layer is sealed much worse.
The operation of cutting the earth in a vertical direction is performed by the plow blade. It also qualitatively improves the turnover of the soil layer, while simultaneously incorporating plant residues. In addition, the knife helps ensure a smooth plow run, creating a level wall and bottom of the furrow.
Plowing technology
 You can describe the technology for plowing the soil by familiarizing yourself with the principle of operation of the plow. Its work is that, moving in the soil, the skimmer of the device cuts off the top layer of soil, with growing plants, and places it at the bottom of the furrow. Next, along with the equipment the body removes part of the soil from the side of the furrow, loosens it and wraps the layer on set level depending on the plow design. Afterwards, the earth is laid on top of a layer of turf turned over by a skimmer. To level the wall of the furrow, a knife is installed in front of the last plow body.
General purpose plows are equipped with body systems with a working width of 25−40 cm. Systems special purpose are equipped with housings with a working width of 45−100 cm.
 When planning to make a plow, you must first decide what type of soil you will have to plow with the unit and the type of crop you are going to grow.
During operation, the unit body experiences enormous loads, it working surface exposed to abrasive soil. Therefore, for the manufacture of working parts, you need to use steel metal thickness 3−5 mm.
It is advisable to provide a removable design of the ploughshare, so that it can be sharpened.
Considering all these equipment operating properties, you can begin manufacturing a carbon steel blade. You can do this in three main ways:
- If the surface of the dump is cylindrical, then for making the workpiece the desired shape It is better to use sheet bending equipment. A steel workpiece, cut by gas welding or metal shears, is fed to sheet metal bending equipment at an angle of 23-25 degrees and bent. Then the finishing is carried out strictly according to the template, which is pre-cut from thick cardboard.
- Suitable for the manufacture of the unit and metal pipe with a diameter of 55−60 mm and a wall thickness of 4−5 mm. Cut out a template from cardboard, place it on the pipe and mark the dimensions. Treat with a hammer and, if necessary, fine-tune with sandpaper.
- This method is the most time-consuming and requires special skill. The workpiece is preheated in any way, but preferably in a forge, and then bent along a matrix.
The unit body is made of sheet steel with a thickness of at least 3 mm.
Plow assembly
 After making all metal elements structure, for assembly you will need a welding machine and a square sheet of metal measuring 50 cm. Then, to the prepared sheet We weld all the elements of the device, while respecting all angles and dimensions.
The next step is to fit the blade to the ploughshare. If you find a discrepancy in the angles of the parts, you need to bring them to normal using a hammer. We lightly weld all the parts to the side shield and weld the base plate and spacer bar onto it. We carefully inspect the resulting product as a result of all this work and, if we do not notice any errors, we carry out final welding.
Using a chisel or grinder, disconnect the unit from the metal sheet. Be sure to clean the welds, and sand the surface of the plowshare and blade with fine sandpaper.
DIY rotary plow
This type of plow is significantly different from the previous product. Compared to disk or reversible plows, the rotary unit has a more complex and labor-intensive design.
The operating principle of such equipment is very similar to the operation of an ordinary soil cultivator. Several movable shares are fixed to the axis by means of shafts. The operation of plowing the soil is carried out by rotating the axis.
This type of equipment operates with low traction forces, since the rotor discs exert a top-down force on the soil. It is very convenient when mixing fertilizers in the soil. But the use of such a system on rocky soils is difficult due to the possibility of rapid breakdown of rotating parts.
It’s worth thinking about how to make a plow from a skimmer if you can find several finished parts. More often, such a device is made for a walk-behind tractor, and skimmers are taken from a tractor unit. In this case, the general task of creating equipment will be to strengthen it to the walk-behind tractor.
Any person tries to make his work easier, so use technical devices is becoming increasingly popular among vegetable growers. Buying a soil tillage device is currently not difficult, but quite expensive. Sometimes only people who have the skills to work with metal can make such equipment on their own, meeting your wishes.
A do-it-yourself plow is a universal invention that is suitable for both plowing the land and planting potatoes. You can make a plow yourself from available materials. The proposed plow model consists of a control unit and a device designed for plowing (plow). The control unit is a stand, which consists of the main control elements and accessories. Namely:
1 – rectifier bridge (power supply).
2 – electric motor.
3 – gearbox combined with a gear.
4 – cable - 5 mm, acting as a winch.
5 – anchor (working part of the shovel).
A plow, which is designed for plowing land, consists of the following elements:
1 – steering wheel (plow control lever).
2 – ploughshare.
3 – base with fastenings.

Installation and connection of the plow.
1. The anchor must be installed at an angle for better support.

2. After which the anchor should be deepened into the ground up to the connecting strip.

3. Then the anchor is connected to the control device using a piece of reinforcement.

4. In front of the barrier bar, near the cable, reinforcement is also driven in. It will additionally hold the control unit in place during operation.

5. In the working position, the gearbox is in the engaged position.

6. The control unit is ready for operation.

7. After installing and securing the control device, attach the plow to it. To do this, the free end of the cable is attached to the base of the plow.

Operating principle and operation.
1. The plow is carried to the required distance.
2. The ploughshare is driven into the ground to the required depth.

3. Left leg is installed on a ploughshare, and the right one rests on the ground.

4. Thus, while moving the plow along the ground, the tiller pushes off with his right foot and controls the plow using his weight.

5. During operation, the plow steering wheel should not exceed the level of the plowman’s belt.

6. When the plow reaches the end of plowing, the control unit is turned off and the plow is again taken to the opposite side of the site. A plow made according to this principle is capable of plowing land that has been left without care for a long time.
9205 10/08/2019 6 min.Agricultural machinery has become a real relief for farmers and has allowed save a lot of time. Fortunately, now a large number of work is performed by various agricultural units, the presence of which brings significant relief to any farmer. Particularly popular are walk-behind tractors Due to the fact that seeders, plows, mowers and much more can easily be attached to the walk-behind tractor, it has become a complete replacement for a horse. Find out how to make it yourself later in the article.
Why do you need a plow
One of the most difficult tasks in farming: preparing the land for sowing. After all, in order to get the next harvest, the soil must first be loosened. This requires a tool that can be used to easily move layers of earth up.
In order to create furrows as quickly as possible, the plow is attached to a walk-behind tractor. Thanks to the use of this technique, the time spent on field processing is reduced tenfold.
The principle of operation of such a unit is simple: the cutting edge plunges the blades into the ground, which loosen the soil, before going deeper into it.
Due to the draft force, a harrow is created. This principle has been known for a long time; people used it thousands of years ago, so its effectiveness has really been tested by time.
For more information about the plow for a walk-behind tractor, watch the video:
Advantages of a homemade walk-behind tractor
To make the cultivation of the land as fruitful as possible, you can not buy a ready-made unit, but make a plow for a walk-behind tractor with your own hands, for example, for a Neva walk-behind tractor. IN in this case You can also use a walk-behind tractor. How to make a plow for a walk-behind tractor yourself?
Video: NEVA walk-behind tractor, plowing with a plow
Homemade devices have some undeniable advantages:
- You can calculate optimal design, tilt angles that are suitable for the soil in your field;
- Selecting a design for the power of your walk-behind tractor;
- Gain in price, after all homemade device will cost you less than a purchased unit;
- Confidence in quality, because you are making a plow for yourself;
- A feeling of pride that you are capable of such design achievements.
Various plow designs
First you need to decide on the design of the device, because there are several different types.
The cylindrical appearance of the plow is different excellent versatility, because it is suitable for almost any type of soil and field size. This shape allows you to cope well with crushing soil. In addition, making such a unit yourself will not be a problem.

The only drawback of this design is its shallow penetration into the ground.
Half-screw
If you do not need to loosen the soil, but only need to raise layers of soil, then the semi-helical shape of the working part of the plow would be an excellent option. She penetrates deep into the ground, but at the same time practically does not create a loosening effect. It is usually used for heavy soil.
Lemeshny
There are also plowshare plows, but they are quite difficult to make with your own hands, so they are not worth considering.
How to set up a plow
In addition, you need to correctly configure the plow: the working part of the edge should be inclined by about 40 degrees, because it is this inclination that makes the work as efficient as possible even on difficult soil.
You can learn about the advantages of operating a mini grain harvester.