Small glider made from ceiling tiles. How to make a glider with your own hands
Proposed simple designs gliders were developed in the experimental design circle of the SUT of Kostroma. All of them are made mainly of foam plastic, but differ from each other in dimensions, proportions, weight, wing manufacturing technology, and flight characteristics. Models are recommended for making by young modellers at home, in club classes and technology lessons.
A small, lightweight glider with a wingspan of 200 mm and a weight of 4 g (Fig. 1) belongs to the category of the simplest entertainment models and can be made in a few hours. It is launched in the gym by hand or in calm weather on sports ground using a catapult. The model with a wingspan of 230 mm and a mass of 7 g (Fig. 2) is somewhat heavier and stronger, and its flight duration is longer (about 15 seconds). The glider is designed to be launched by hand and using a catapult (even in light winds) on a football or other field.
A more complex model (Fig. 3) with a wingspan of 400 mm and a mass of 26 g is a throwing glider. Both beginners and experienced modelers are passionate about building throwing gliders. Competitions are held for this class of models. The main task is to achieve maximum flight duration. Gaining height is ensured only by hand throwing. When designing such a glider, one has to solve a whole range of problems. It is necessary to achieve the optimal ratio of the mass of the model, the shape and area of the load-bearing surfaces so that the glider can be thrown onto maximum height. After takeoff, the model should clearly enter the stable long-term gliding mode. For this purpose, in the proposed design the fuselage nose is made quite short, and the tail boom is made long, but light and strong. With such an aerodynamic design, the almost weightless and compact tail unit is located outside the zone of turbulence from the wing and works efficiently. Even in the absence of upward flows, students in grades 5 and 6, with a correctly executed throw, managed to achieve a microfloat flight duration of up to 30 seconds. To run such a model, a field of at least 200x200 meters in size is required, preferably outside the city.
The preparatory work consists of making life-size drawings of parts, making templates for the wing, stabilizer, fin and nose of the fuselage, and selecting materials. You will need foam plastic ceiling tiles 3.5 mm thick with dimensions 500×500 mm (sold in hardware stores and finishing materials), dense types of foam plastic, wood (spruce, pine, linden), PVA glue and paints.
1 - centering weight (lead); 2 - nose of the fuselage; 3 - fuselage (pine); 4 - wing; 5 - stabilizer; 6 - keel; material of parts 2, 4, 5, 6 - foam plastic

1 - centering weight (lead); 2 - nose of the fuselage; 3 - fuselage (pine); 4 - keel; 5 - wing; 6 - spar (match); 7 - stabilizer

1 - centering weight (lead); 2 - nose of the fuselage; 3 - fuselage (pine); 4 - keel; 5 - wing; 6 - reinforcement for the finger (plywood s1.5); 7 - spar (pine); 8 - stabilizer
It is recommended to start creating models with the manufacture of the wing, fin and stabilizer. After marking the contour according to the templates, these parts can be cut out with a scalpel. Then you should start profiling them. In order to simplify the design, the wing has a flat-convex profile along its entire span. It is better to remove a significant part of the material from the line of maximum thickness with a sharp knife. The surface finishing is carried out using sandpaper of various grains, glued to plywood plates measuring approximately 50x200 mm, with constant monitoring using templates. To give the wing of the model (Fig. 1.2) a small transverse V-shape, before gluing it into the slot of the fuselage along the axis of symmetry, an incision must be made on the upper surface. In the second of the proposed designs, the central part of the wing is reinforced with a short matchstick spar. In the model of a throwing glider (Fig. 3), a slot should be made on the lower surface of the wing and a spar should be glued into it. Further from the wing, where the spar ends, you need to saw off the “ears” and re-glue them at the required angle. Pre-joint surfaces are beveled with sandpaper so that the gaps are minimal.
As is known from the practice of launching throwing gliders, a good throw is obtained when the fuselage is grasped with the thumb and middle finger, and the last bend of the index finger rests on the rear edge of the root part of the right console. Therefore, it is advisable to reinforce its lower surface with a 1.5 mm plywood or cardboard pad for the index finger. The leading edge of the wing can be covered with thin colored paper on liquid PVA. The keel and stabilizer of the models have a “flat board” profile with rounded edges. The notch should highlight the “rudder” and “elevator”.
The nose of the fuselage of the models is made of dense foam, and the fuselage rail is made of light wood. A slot was made in the bow exactly along the wing profile and a cavity was drilled for a lead weight. The exact location of the groove on the lower surface of the fuselage for engaging the rubber cord of the catapult is selected experimentally.
The parts are connected using PVA glue. The wing is carefully inserted into the fuselage slot and fixed with glue. The area where the wing and fuselage meet should be reinforced with strips of drawing paper. Next, the keel and stabilizer are glued.
The finishing of the models includes painting the fuselage slats and paper-covered sections of the wing with nitro enamel.
Debugging of airframes begins with the elimination of distortions, and then proceeds to balancing. The center of gravity of models launched using a catapult (Fig. 1,2) should be at a distance equal to approximately 33% of the wing width, measured from the junction of its leading edge with the fuselage. The throwing glider has a centering of approximately 45°. Adjustment is carried out by increasing the mass of the centering weight or reducing it by drilling it.
During test runs of models, due to minimal deflection of the elevators and rudder, a smooth transition is achieved after gaining altitude to hovering in a left turn. Recommendations for launching and debugging simplest and throwing gliders were previously given in the magazine.
A. TIKHONOV, Kostroma
Our conversation today is about foam flying models. The advantages of this material are obvious: the simplest model can be made in fifteen minutes, more complex ones in two to three hours.
Thin foam sheets - main construction material for all models of gliders and aircraft that we will talk about. Such plates can be cut from thick foam plastic yourself using a nichrome wire heater, but the easiest way is to use the cheapest ready-made foam ceiling plates, the so-called ceiling decor, used in apartment renovations.
In addition to foam plates (ceiling decor), you will need wooden slats, preferably pine or linden, whatman paper, plasticine, and glue. Special glue is now sold for polystyrene foam.
The simplest of them is shown in Figure 1. Plan wooden slats cross section 4x4 mm. Towards the tail it can be made thinner - reduced to almost nothing. Cut the stabilizer and wing to the dimensions shown in the figure. Slightly round the edges at the top sandpaper. Heat the stabilizer consoles over an electric lamp and bend them upward at a right angle - you get two keels. Bend the wing consoles upward by 20 degrees. Stick a piece of plasticine to the nose of the model so that the center of gravity of the model is approximately in the middle of the wing.
Before launch, check for any distortions in the wing and stabilizer.
Launch the model with a light push along the horizon. Don't be upset if your first flight is unsuccessful. The model needs to be taught to fly.
Let's say the glider dived sharply. Heat the rail with a soldering iron next to the stabilizer and slightly bend it upward. If the glider is making a sharp turn, bend the trailing edges of the fins in the direction opposite to the direction of the turn.
If the model lifts its nose up, loses speed and falls onto the wing, add some plasticine.
A well-adjusted model should fly more than ten meters when launched from the hand.
You can make an interesting flying toy for your younger brother or sister. Look at picture 2. This duck flies beautifully.
Cut the body, wings and stabilizer from foam plates. The configuration of the wings does not have to be observed exactly; it is only important not to reduce their area and not to disturb the symmetry of each pair.
The upper wings should be parallel to the lower ones when viewed from the side. And if you look from the front, the ends of the wings are about 10-15 mm higher than the root parts. In addition to glue, you can strengthen the wings with a couple of pins.
Glue a rounded plate to the duck's beak from below, as shown in the figure. The angle of attack, that is, the inclination of this plate, should be 8-10 degrees. Attach 5-10 g of plasticine to the front edge of the plate. Now start it up and, if necessary, adjust it, just like the glider.
Another simple model is the “frame” (Fig. 3). It is also built from slats and foam plastic. Try to plan the slats as thin as possible. Stick a piece of plasticine to the nose, simulating a cockpit.
Two large-area keels significantly increase the model's directional stability, so it flies almost straight or in a circle of large radius. The adjustment is the same.
Now let's move on to more complex models. True, they are not complex in themselves, but only in comparison with the first models.
But, before talking about them, let's say a few words about gluing foam plastic.
The best glue- polyvinyl acetate emulsion (PVAE). It provides strength and elasticity and does not contaminate the foam. Special glue for polystyrene foam is now sold in any specialized hardware store. Where they sell ceiling decor, they also sell this glue, for example, “Master” glue. Stationery, casein, dextrin, BF-2, BF-4 - they all glue foam well.
What is the comparative complexity of subsequent models? They are larger in size, therefore, the load-bearing planes need to be made more rigid. Increasing the thickness of the wing is unprofitable: the model will become heavier, and in addition, drag will increase. This means we need to look for other ways. There are several of them.
First. Along the entire length of the wing and stabilizer on top, you need to cut a thin wooden strip. To do this, a groove is cut approximately in the middle of the wing along the width of the slats, the slats themselves are lubricated with glue and inserted into the groove.
Second. Strips of whatman paper 10-20 mm wide are glued to the top and bottom of the wing and stabilizer. Instead of whatman paper, you can use birch or linden veneer.
Third. The front and rear halves of the wing are cut out separately and glued to a 1-1.5 mm thick strip. The width of the slats is equal to the thickness of the wing. This is perhaps the most The best way.
Figure 4 shows a schematic model of the airframe. You already know the manufacturing technology - here only the dimensions are different and the wings and stabilizer are given rigidity. Such a model, if launched with a handrail to a height of several tens of meters, will fly for about a minute and a half. And if you want it to fly even longer, give the wing and stabilizer an aerodynamic profile - it is shown in the figure.
The next model is in Figure 5. Its silhouette is reminiscent of modern airplanes. This glider can also be launched in the wind. The model is heavier than the previous ones, so when starting you need to push harder. It flies steadily and for a long time.
The rake-fuselage at the tail is two times thinner than at the bow - this is rational for strength and alignment. The wing and tail are made of thicker foam plates compared to previous models. If the wing turns out to be not rigid enough, cut a spar made of pine or linden into it.
Give the wing and stabilizer an aerodynamic profile.
The glider, shown in Figure 6, is launched from a rubber catapult like a slingshot. By bending the trailing edges of the fin and stabilizer, you can ensure that the model will perform a turn, a loop, and if the trailing edges of the wing consoles are bent in opposite directions, then a roll.
And finally, a very interesting “flying wing” model is shown in Figure 7. It is larger in size than some sports models. And the quality of its flight (provided you do it carefully) will exceed all your expectations. The model reacts poorly to gusts of wind; moreover, it flies even better in the wind.
If you can’t make a wing from a whole plate, glue it together from pieces. Cover the front edge with pre-curved pine slats for rigidity. The rack in the middle has a cross-section of 3x3 mm, and at the ends 1.5x1.5 mm.
A stabilizer is installed in the center of the wing on two foam pylons. Its installation angle is 5 - 8 degrees relative to the root of the wing.
The weight is carried forward on a strip glued to the lower surface of the wing strictly in the center. Two fins are installed on the wing consoles.
Some "technological" tips. To cut polystyrene foam, use only a sharp knife, and do not press on the knife, but rather saw it with it. Then the foam will not crumble.
Using sandpaper, sand the surface of the foam both along and across the wing. Small holes in the foam have little effect on the flight quality, so there is no need to putty on them. Do not press hard on the sandpaper or move it quickly, because the foam may heat up and melt.
You can paint the model with colored ink from a spray bottle, applying a light layer. Make the inscriptions on the wings like this: before painting, pin the paper letters, and after painting, remove them - you will get an unpainted inscription.
In one of the old issues of the magazine "Pioneer" instructions, drawings and diagrams are given on how to make simple model glider type "A-1" with your own hands, at home.
Glider model flies without a motor and propeller, smoothly descending, gliding, as if gliding in the air. It is usually launched from a handrail. A lifeline is a thick thread fifty meters long with a ring at the end. There is a hook on the glider model, and this ring is put on it.
The model must be launched against the wind. She's like kite, rushes upward and rises to a height of about forty-five meters. At this moment, the launcher loosens the rope, the ring slides off the hook, and the model flies freely. When there is no wind, the launcher has to run a little with the rope so that the model rises to approximately the same height even in calm conditions. If the model falls into an ascending air flow, it will not descend and may even begin to gain altitude.
There are glider models different sizes. In aircraft modeling, two types of models are most common: “A-2” and “A-1”. “A-2” is a large model, with a wingspan of about two meters. Such models, if they are well adjusted, fly for two to three minutes, and sometimes they can even completely disappear from sight. But they are complex, only experienced aircraft modelers can build them.
Children, with the help of adults, can start building smaller and simpler models - “A-1”. The wingspan of this model is 1,000-1,200 millimeters, and it flies on average from one to two minutes. These models have one indispensable requirement: the total area of the wing and stabilizer should be no more than 18 square decimeters, and the weight in flight should be no less than 220 grams.
Model of the glider "Pioneer"
Parts and materials - blanks
To build the model (Fig. 1), it is necessary to prepare the following materials in advance:
1. 18 plates of plywood 1 mm or 1.5 mm thick or cardboard 2 mm thick; the size of each plate is 130X10 mm
2. Pine strip with a section of 12X3 mm, length 1,110 mm.
3. Pine slats with a cross-section of 5X4 mm, length 1,110 mm.
4 a. Pine slats with a cross section of 7X7 mm, length 650 mm.
4 b. 4 pine slats with a section of 7X3 mm, each 250 mm long.
5. 2 pine slats with a cross section of 10X2 mm, each 130 mm long.
6. 2 sheets of writing paper.
7. 1 sheet of plywood 3 mm thick or thick cardboard 4 mm thick, size 340X120 mm.
8. A sheet of plywood 3 mm thick or thick cardboard measuring 200X100 mm.
9. 2 pine slats with a cross-section of 10ХЗ mm, each 700 mm long.
10. Pine plate 3 mm thick, size 25X15 mm.
11. Pine slats with a cross-section of 10ХЗ mm, length 130 mm.
12. Pine slats with a cross-section of 5x2 mm, length 150 mm.
13. Pine slats with a cross-section of 5x2 mm, length 120 mm.
14. 5 pine slats with a cross section of 3X2 mm, each 90 mm long.
15. Pine plate 2 mm thick, size 100X25 mm.
16. 2 pine slats with a section of 3X2 mm, each 400 mm long.
17. Pine slats with a cross-section of 3x2 mm, length 85 mm.
18. Pine block with a section of 5X3 mm, length 120 mm.
19. 2 sheets of tissue paper 400X500 mm for covering the wing and tail.
20. Oak or bamboo pin 25 mm long, 4 mm in diameter.
21. Rubber tape with a cross-section of 1X4 mm, length 1,500 mm.
22. 30 nails 8 mm long.
23. Nitroglue, it can be replaced with casein or carpentry glue.
24. A strong thread 50 m long for a lifeline with a ring at the end made of wire 1 mm thick.
In front of the ring, a triangular flag made of fabric 300-400 mm long and 50 mm wide is attached to the rail.
In all figures and in the text, parts are indicated by the same number. Each part is made from a blank. To find out the dimensions of the blank from which the part must be made, look in the list of blanks for the number that indicates the part.
How to make a glider: wing
Using template 1 (Fig. 2), cut out of cardboard, it is necessary, as accurately as possible, with a sharp knife or jigsaw to cut out 18 ribs from plywood or cardboard, giving the wing a certain profile. For convenience, it is better to knock all 18 blanks into a stack in advance with nails and cut out all the ribs at the same time.

Then, for the rear edge 2, you need to plan the prepared strip with a plane into a triangular section and bend it over the fire of a spirit lamp or kerosene lamp in two places, retreating 240 mm from each end so that the ends of the rail on the left and right would be raised 140 mm from the middle. Before bending, moisten the bends with water.
After this, in the locations of the ribs (Fig. 3), use a hacksaw to make slots 2 mm deep and 1 mm wide (Fig. 2).

The front edge 3 is made of pine slats; it bends in the same way as the trailing edge. Then the main longitudinal part of the wing - spar 4 - is assembled from slats 4a and 4b. Rail 4a must be cut (its length is 650 mm) and glued to its ends and tied with threads to slats 4b as shown in Figure 3. In this case, you need to be careful so that the ends of these slats are raised 140 mm above the middle.

Now you need to mark with a pencil on the board according to the drawing (Fig. 5)
position of the ribs, spar and edges and pin the leading, trailing edges and spars on the board (Fig. 6).


The ribs are put on over the spar, their ends are inserted into the slots in the trailing edge and the toes are pressed tightly against the leading edge.
All joints of the wing parts must be thoroughly lubricated with glue. The trailing and leading edges are glued together at right angles with a strip 5, the ends of which are attached to the trailing and leading edges by means of paper pads 6. For rigidity, paper squares must be glued to the fracture site of the leading edge of the wing.
After the glue has dried, you need to remove the pins, remove the wing from the board and use a sharp knife to cut off one edge of the leading edge so that the leading edge does not protrude beyond the contour of the profile. Then check to see if the wing is warped. If there is a misalignment, it can be eliminated by bending the wing over the electric stove.
Next, the wing must be covered with tissue paper 19. The straight central part of the wing and the end parts, bent upward, must be covered separately. Moreover, the top and bottom of these parts are also covered separately: first the bottom, and then the top (Fig. 7).

After covering, you need to spray the wing with water from a spray bottle and lay it on a flat board, place supports under the ends of the wing, press the wing against them with some weights and leave it to dry in this form (Fig. 8).

Fuselage and keel
The front part of the fuselage is cut out of plywood or cardboard according to Figure 9. Overlays 8 are glued to the toe of the front part on both sides and secured with nails. At the top, make a cockpit with a pilot, as shown in Figure 9.

A pin cut from bamboo is fixed with glue across the plane of the front part of the fuselage 7. Then, on the sides of the front part of the fuselage, slats 9 are attached to glue and on nails, as shown in Figure 4. On top of slats 9, a pine plate 10, cut according to Figure 4, is also fastened to nails and glue. at a distance of 100 mm, “crackers” 11, cut from pine slats.
The keel is flat, it is assembled using glue from slats and paper squares on a flat board according to the dimensions indicated in Figure 5: front edge 12, rear edge 13, top edge 14 and bottom edge 15 from a pine plate.
Paper squares must be glued first on one side (Fig. 4), when the keel is pressed to the board with pins. Then the keel must be removed and the angles glued symmetrically on the other side. The assembled keel is installed between the fuselage slats 9 as shown in Figure 4. The joints are glued, and the slats are connected to the keel with two nails.
The lower part of the keel, protruding under the slats, is covered on both sides with writing paper, and the upper part of the keel is also covered with tissue paper on both sides.
Stabilizer
The stabilizer is assembled on a flat board in the same way as the keel.
The leading and trailing edges 16 and ribs 17 are made of pine slats. The dimensions of the stabilizer are shown in Figure 5. To attach the stabilizer to the fuselage, a pine block 18 is attached to it with glue and threads. The stabilizer is covered with a continuous sheet of tissue paper on top.
Assembling and adjusting the model
Place the wing on the fuselage and press it tightly with rubber band 21. The stabilizer is inserted with a block 18 between the slats 9 and the rear part of the fuselage.
In front of the stabilizer and behind it, slats 9 must be tightly tied with a rubber band. Look at the model from the front: the stabilizer should be parallel to the wing, the wing and stabilizer should not be distorted.
The assembled glider model must be balanced and checked whether its center of gravity is located correctly. To do this, balance the model by holding the wing on two fingers. Your fingers should be approximately on the circle that marks the center of gravity in Figure 5. If the tail of the model outweighs, pour shot into the toe of the fuselage.
Regulate glider model You must first launch it over the grass or over the snow, launching it from your knees with a slight push, and then move on to launching it from your hands from full height. If the model lifts its nose at launch, you should gradually increase the load in the fuselage toe or slightly reduce the wing installation angle by slightly trimming plate 10 on top.
If the model flies steeply nose down, you need to increase the angle of the wing by making an additional thin pad on the same plate.
Having adjusted the model when launching from the hands, you can proceed to launching from the handrail. The handrail ring is put on, like a hook, on the lower “horn” of the fuselage.
The model must be launched from the rail strictly against the wind, and the first launches must be made first in light winds.
I. Kostenko, Pioneer magazine, 1959
Tags: do-it-yourself glider, how to make a glider with your own hands at home, drawings, glider model.
Drawing a sketch
How to make a plane from foam plastic?
To answer this question, you must first look at the analogues of flying machines. The main feature of designers is observation. Therefore, before you start making an airplane, you need to find out what it consists of. If parents help small child(up to 7 years) in modeling, then you can get by with primitive shapes such as the fuselage, wings and tail. If a child is over 7 years old, then he can study well, and most importantly, understand the design of a flying machine. Any aircraft consists of:
- fuselage;
- cockpit canopy;
- power plant;
- wing;
- chassis;
- stabilizer;
- elevator;
- keel;
- rudder.
The next step is drawing drawings. They are presented in large numbers on the Internet, one example can be seen below. 
What tools are needed?

Video on the topic
Preparatory work
We make an airplane

Working out the details
To finally close the question of how to make an airplane out of foam plastic, we need to discuss the details. As with any layout, details play an important role. And it doesn’t even matter how far the plane departs from reality. Even a fictional model needs elaboration. The first step is to draw the pilots' windows and passenger windows. If you made a three-dimensional model, you can cut out windows to increase realism.
Foam plane - SU-37
Next we move on to drawing the doors. The main thing is to make them proportional to the model. A harmonious size can be derived based on the width of the finished windows. Next you need to think about the chassis. Many may say that “my plane is taking off, and therefore he removed them.” But even if this is so, the model still needs a hole where the landing gear is hidden during flight. Not a single plane will take off without turbines. Even in a flat model you need to mark them. This can be done by gluing small circles of polystyrene foam together. Well, the most enjoyable part of creating a foam model is painting the airplane. Here you can show your imagination, or you can follow the clear canons of real flight structures. No one will judge a child if he wants to make his airplane “flowered” or “polka dotted.” Well, realistic models do not require a large abundance of colors. It is better to leave the plane white, drawing a couple of colored lines on the fuselage.
Home comfort
Hobby
Home comfort
Loving parents never refuse to make a toy with their own offspring. Even if there is enough money for regular trips to the toy store, the same plane from plastic bottle with your own hands...
Home comfort
Food and drink
Hobby
Hobby
Hobby
Hobby
Hobby
Foam throwing models
The first airplane model.
If you want to start doing something big and serious, but have no skills in modeling, then try making throwing airplanes. They are very easy to make and are a gateway to creativity. Based on such models, skills in manufacturing, launching, and the most simple settings models, there is a desire to come up with something yourself...

I called this scheme “Buran” due to its slight resemblance to the Soviet spacecraft.
Before starting work, you need to prepare a sharp knife, preferably a stationery knife with replaceable thin blades, a foam ceiling panel about 4 mm thick without patterns or embossing, so that it is even and smooth. It is good to glue with PVA, "Dragon", "Titan" or other adhesives for ceiling foam panels. Do not use glue containing organic solvents!!! These are all nitro adhesives, Moment, Supercement, etc. They immediately dissolve the foam.
The fuselage is made from 4 x 6 mm pine slats.
foam planes blueprints
Weight 4 x 15 x 70mm. The load is made so wide that the center of gravity (hereinafter referred to as the CG) of the model is below the wing, and the model does not turn over with its keel in flight.
Cut the wing and upper part of the model fuselage according to the template from ceiling panels. The template can be made from cardboard according to the drawings.


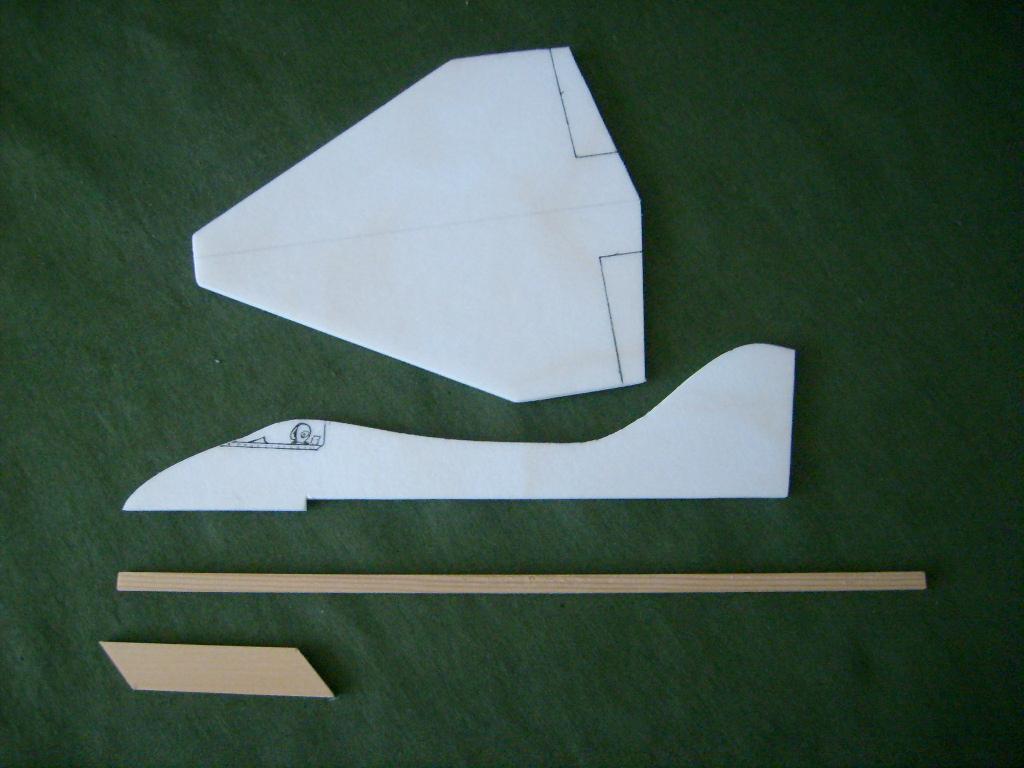
The drawing shows a size of 4 mm in the “Wing Gluing Place”, this is for a 4 mm panel, if your panel has a different thickness, then this cutout should correspond to the thickness of your panel, this is so that when gluing the upper part of the fuselage and the wing there is no “step”, then the lower part (wooden) will fit well and stick well.
We cut everything out, checked the quality and can glue the parts together.
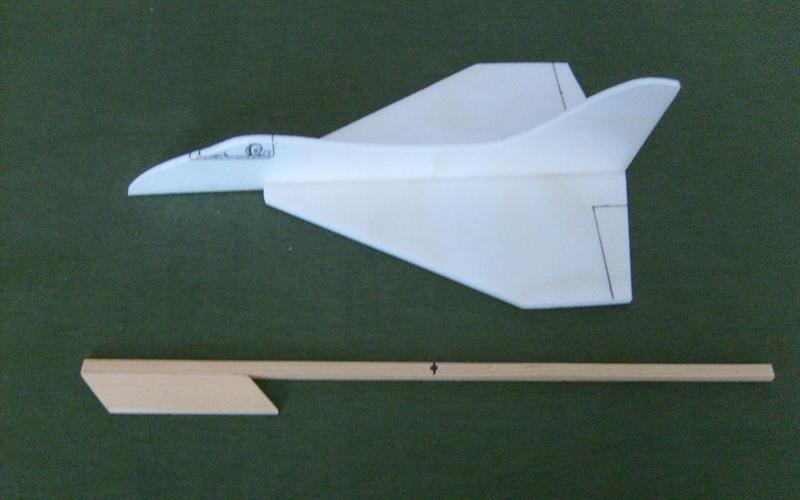
First we glue the rack and weight, then the top of the fuselage and the wing, then the rack and weight to the wing from below so that the noses are aligned and there are no protrusions of foam and wood between them.
It is advisable to glue it like this: lubricate the weight with glue approximately 1 mm thick, press it to the rail, (see drawing) disconnect it and let it dry for 3-5 minutes, then connect it again and compress it, keep it compressed for about a minute. Ready. Lubricate the upper part of the fuselage with glue in the “Wing Gluing Place”, carefully press it along midline wings, disconnect, let dry, then reattach and hold for a little while, about a minute, pressing. In about 10 minutes
glue it this way bottom part fuselage to the wing with glued top part fuselage.
An hour later, after complete drying, you can paint and begin adjustments.
You can paint with felt-tip pens and colored tape, acrylic water-soluble paints. Nitrovarnishes (nail polish) cannot be used!!! The foam will dissolve immediately!
You can test the paint on scraps of foam.
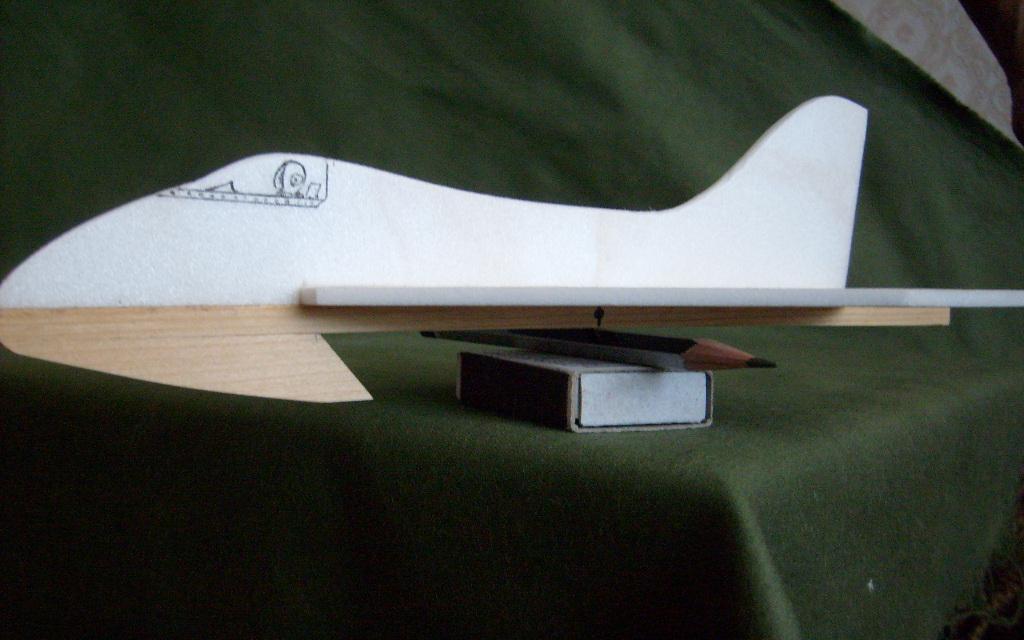
Alignment check.
Centering can be ensured by trimming the weight or “tail”. To determine what to trim, you need to make a mark on the side of the rail with a pencil - the C.T. point. should be 130 mm from the nose. Put it on the table Matchbox, place a hexagonal pencil on it and place the plane perpendicularly on the pencil so that the CG mark is on the top edge. If the nose outweighs it, we cut the weight; if the back part outweighs it, we cut the tail. We achieve balance.
Other adjustments during flights.
When thrown horizontally, the model should fly smoothly with a slight decline; if all the planes are level, and the model dives (lowers the nose), trim the load a little more, it is too heavy, and if it pitches up (raises the nose, loses speed, then lowers the nose), then trim the rear rail (can be shortened, can be made thinner).
With normal alignment, the plane flies well. On the street it is convenient to launch from a catapult (rubber loop, buy at a fishing store) at an angle of 30-40 degrees to the horizon. Do not launch towards trees or obstacles, otherwise there will be creases on the wing.


In general, the model is tenacious due to the low weight and elasticity of the foam. By slightly deflecting the elevons, figure flight can be achieved. They need to be deflected with a little “pinching”, then the foam bends well without breaking.
If the right elevon is tilted up and the left elevon is tilted down, the plane will fly turning to the right. If the right one is down and the left one is up, then there will be a left turn. If both are up, then the model will pitch up (raise the nose), and if both are down, then dive. They are called elevons because they deflect like elevators and like ailerons to provide roll and pitch control. They are mainly used on airplanes - flying wing designs. Like our model.
This is a variant of the Buran with two keels. You can trim the main fuselage template by removing the keel part. And glue two fins, the same size as on the main fuselage template.

************ *********** ***********
Here is another very good and “flying” model with two keels

The technology of manufacturing, adjustment and launch is exactly the same as that of Buran, only the drawings (click and download) are different:


After acquiring minimal skills, try experimenting. This is interesting! Good luck!!!
Anything that is unclear can be discussed in letters or on the forum http://forum.rcpilot.ru/
These Buran drawings can be downloaded and printed, then templates can be made.
Return to main page Schematic
How to make a plane from foam plastic: modeling with children
Often children, engaged in creative modeling, ask their parents how to make a plane out of foam plastic. In order not to get confused in such a situation and not to lose authority in the eyes of your child, you need to read this article and remember the simple sequence of actions.
Drawing a sketch
How to make a plane from foam plastic? To answer this question, you must first look at the analogues of flying machines. The main feature of designers is observation. Therefore, before you start making an airplane, you need to find out what it consists of. If parents help a small child (under 7 years old) in modeling, then you can get by with primitive shapes such as the fuselage, wings and tail. If a child is over 7 years old, then he can study well, and most importantly, understand the design of a flying machine. Any aircraft consists of:
- fuselage;
- cockpit canopy;
- power plant;
- outer and inner flaps;
- wing;
- chassis;
- stabilizer;
- elevator;
- keel;
- rudder.
It is not necessary to show all these details in the future model, but even a novice designer needs to know them.
The next step is drawing drawings.
They are presented in large numbers on the Internet, one example can be seen below. But, of course, you can show your imagination and draw your own unique plane.
What tools are needed?
Lumpy foam or foam ceiling tiles. The tile is more convenient in the sense that it is easier to cut, and its width will be the same throughout the entire part. The undoubted advantage of piece foam is the fact that you don’t need to buy it. Almost every person has it in their home and is great for children's crafts.
Stationery knife or scissors. If a child independently looks for the answer to the question of how to make a plane out of foam plastic, then it is better to give him scissors. If the creative process will be controlled by parents, then it is better to use a stationery knife.
Glue. You can take regular PVA, it is suitable for gluing foam. But if you want to assemble a model airplane quickly, then it is better to use Moment glue or its equivalent.
Paper or cardboard for patterns.
Additional details. Their number and name will depend on the type of aircraft you want to assemble. This may include paper clips, skewers and rubber bands - this is necessary for a model airplane with a rubber band motor. You may also need a radio-controlled motor (for example, from an old radio-controlled car). If you are wondering how to make an airplane out of foam and wood, then you will need sheets of plywood, which will later become wooden parts.
Video on the topic
Preparatory work
How to make a foam plane that flies or carries only decorative function? For both options you need to make preparatory work. It involves redrawing drawings onto thick cardboard. This step is necessary to ensure that all patterns are preserved until the end of the work and even longer. If any part of the plane breaks, it will be easy to make it again if you have a pattern. The next step is making the foam parts. You need to transfer the paper patterns onto the material and cut them out.
We make an airplane
How to make a plane out of foam plastic with your own hands? After making all the parts, you need to assemble them in the correct order. The first step is to attach the wings to the fuselage. They need to be glued clearly in the middle, otherwise the model will not have the correct balance. The next step is gluing the “tail”. The rudder, elevator and fin all need to be exactly in place, again for the model to have excellent balance.
Working out the details
To finally close the question of how to make an airplane out of foam plastic, we need to discuss the details. As with any layout, details play an important role. And it doesn’t even matter how far the plane departs from reality. Even a fictional model needs elaboration. The first step is to draw the pilots' windows and passenger windows. If you made a three-dimensional model, you can cut out windows to increase realism. Next we move on to drawing the doors. The main thing is to make them proportional to the model. A harmonious size can be derived based on the width of the finished windows. Next you need to think about the chassis. Many may say that “my plane is taking off, and therefore he removed them.” But even if this is so, the model still needs a hole where the landing gear is hidden during flight. Not a single plane will take off without turbines. Even in a flat model you need to mark them. This can be done by gluing small circles of polystyrene foam together. Well, the most enjoyable part of creating a foam model is painting the airplane. Here you can show your imagination, or you can follow the clear canons of real flight structures. No one will judge a child if he wants to make his airplane “flowered” or “polka dotted.” Well, realistic models do not require a large abundance of colors. It is better to leave the plane white, drawing a couple of colored lines on the fuselage.
Home comfort
How to make glowing water at home? Experimenting with children
Not long ago, glowing water became a very popular pastime. You can also get it at home. But this procedure leaves behind quite a large number of dirty dishes. Therefore, please note that…
Hobby
How to make paper weapons with your children
Every year the popularity of gifts made from paper is growing. And now the holiday is approaching - Defender of the Fatherland Day. And it’s time for mothers and their children to make figurines of a pistol, machine gun, shuriken, tan...
Home comfort
How to make an airplane from a plastic bottle with your own hands
Loving parents never refuse to make a toy with their own offspring.
Throwing gliders made of foam - Part 1 (Paper Art 12) made of paper
Even if the money is enough for regular trips to the toy store, the same plane made from a plastic bottle with your own hands...
Home comfort
How to make a gun from Lego? Let's figure it out together
Do you want to please your child? We are, of course, talking about boys. Because it is for them that we offer to buy a Lego Pisto constructor that is both fascinating and makes you think and show your imagination...
Food and drink
How to make cream from butter and condensed milk with cocoa powder
Before making cream from butter and condensed milk, you should definitely prepare a sweet and fluffy sponge cake. After all, it is precisely these cakes that are the basis of the most delicious and beautiful cakes. In addition, to prepare dessert…
Hobby
DIY aircraft modeling: how to make an airplane out of wood
Every boy in childhood dreamed of being at the controls of an airplane. The sky, clouds, and travel have always attracted adventurers and brave men. But to feel closer to aviation, you don’t have to buy a plane ticket...
Hobby
How to make letters from foam plastic with your own hands
Decorative words, letters and even entire phrases are an incredibly popular decor for interiors and photo shoots. This decoration can be made for a special holiday or to photograph in an original way…
Hobby
How to make crafts from foam plastic with your own hands
The interior is one of the most complex images, the creation of which takes a lot of effort, time and money. Some people prefer to use the services of specialists, while others consider themselves specialists and do it themselves. IN …
Hobby
Making a tank from matchboxes together with the children!
Parents have long noticed the fact that children play better with homemade toys. You can play with them both at home and in the sandbox outside and not be afraid that your child will lose or give these toys away. So, let's consider...
Hobby
How to make ice cream from plasticine? Creating with children
Before you start sculpting from expensive materials, you should practice on plasticine. If you want to engage in creativity with your child, then it is better to buy plasticine for children's creativity. Firstly, it is inexpensive, and...
Which boy doesn't admire structures like airplanes? And aircraft models made from ceiling tiles with your own hands is great gift for children interested in aviation. Especially if they took part in assembling the airframe. The article will tell you how to make a simple airplane model from ceiling tiles.
Aircraft modeling
Model airplane construction is a popular technical sport that is of interest to schoolchildren, students, workers and engineers. At the same time, everyone chooses for themselves a class of aircraft models that suits their interests.
In aircraft modeling there are three fairly large groups of aircraft models, presented in the table:
| Model class | Peculiarities |
|
|
In such models, designer intervention is impossible during flight. All adjustments and settings of the aircraft are completed when it is launched. They can be: - motorless - gliders; - with a simple, very small, internal combustion engine, which is attached to the body with an elastic band. The motors on the models work for a few seconds to throw the light-winged structures up to a hundred meters up, and then they smoothly go down. Timers or special clock mechanisms are used to turn off the engine and switch the steering wheel to planning. |
|
|
With such models, the athlete controls wire threads, which are called cord. The devices fly in a circle with a diameter of approximately 40 meters. The “pilot” is located in its center with the control stick. When you pull the handle towards yourself, the elevator deflects, and the device obediently flies up. And moving the handle away from you causes the model to descend. The devices are:
|
|
|
Controlled remotely, wirelessly. For this purpose, there is a set of radio equipment, which includes a transmitter, in the hands of the operator, and a receiver with steering control mechanisms, mounted on board the model. |


Model aircraft structure
Tip: Before you make an airplane from ceiling tiles, you need to become familiar with its design.
The design of all models is very similar. The main components of the radio-controlled airplane model are shown in the photo.

This:
- Fuselage. This is the basis of the entire model on which the following are mounted:
- bearing structures;
- tail section;
- chassis.
Installed inside:
- engine;
- aircraft control equipment: receiver, steering controls, batteries.
- Wing. Serves to create lifting force. The wing keeps the model in the air.
- Ailerons- control surfaces located at the rear end of the wing and deflected up or down in antiphase. They allow the plane to tilt left and right.
- Tail. It consists of a vertical part - the keel, and a horizontal part - the stabilizer. This device provides stability to the aircraft so that it can fly straight and level without tumbling in the sky, randomly changing the direction of its movement.
The rudder is installed at the rear end of the keel.
- Chassis. Allow the model to take off from the surface and then land on it.
Advice: If there is no landing gear, the model should be launched by hand, and the plane should be landed “on its belly”.
- Engine. Creates the movement of the model, allows it to gain the desired height, and then maintain a given speed.
- Tank. Serves for the fuel needed to run the engine.

- Receiver. Receives the transmitter signal, amplifies it, and processes it. And then it transmits to the steering gears.
- Steering cars. The signal coming from the receiver is converted into moving the model's rudders through the connected rods.
- The receiver and machine are powered from the on-board battery. Usually these are four “finger” elements.
Model selection
Advice: When choosing to make an airplane from ceiling tiles with your own hands, you need to ensure, first of all, that it is reliable to take off and land, and then that it satisfies aesthetic needs.
The aircraft model must have the following properties:
- Be stable: stay in the air well without much input from the pilot.
- It is easy to repair, which is ensured by aircraft models made from ceiling tiles.
- Sufficient strength, but without compromising flight qualities: withstand hard landings and fly well.
We do it ourselves
To work you will need tools and materials:

Making any design, including an aircraft model, with your own hands begins with the development of drawings. To do this, you can use the services of specialists or copy them from websites, print templates on a printer or draw them according to size.

After the printer:
- Printouts on A4 sheet formats are laid out on a flat surface according to serial numbers. The result should be a life-size image of the aircraft elements.
- All the necessary sheets are glued together.
- When gluing sheets without disturbing the dimensions and geometry of the future aircraft.
- Cutting lines are drawn by connecting special crosses drawn at the corners that define the boundaries of the image.
- The resulting airplane drawings from ceiling tiles are combined with structural fragments, glue is applied to the uncut edges of the sheets, and all parts are carefully glued together so that their joints coincide very precisely.

- This way all the fragmented elements of the model are glued together.
- Paper templates are cut out with scissors.
Manufacturing of blanks
Blanks for assembling the aircraft are cut from ceiling tiles using prepared templates.

Tip: To prevent the sheets from moving from the tiles, they must be fixed to the surface of the material with glue. After marking is completed, the glue does not have time to dry and the paper is easily removed without damage for further use.
- To mark a simple part with straight lines, it is enough to pierce all its corners with a needle.
- Remove the stencil and, using a ruler from adjacent puncture points on the tile, cut through the material with the tip of a knife.
- The ruler is shifted to the next adjacent points until the complete cutting of the part is completed.
- A workpiece of complex shape with rounded sides can be completely cut out according to the template.

- It is advisable to mark each part to facilitate its purpose, according to the assembly drawing.
Airplane assembly

Before you start assembling all the parts, it is better to watch the video.
The aircraft assembly technology can be roughly described as follows:
- Double partitions consisting of several parts are glued together, which increases their strength. For example, fuselage partitions.
Tip: For work you should use Titan glue, its price is the most affordable for beginning modelers. It is more convenient to apply glue with a syringe without a needle, using it as a dispenser.
- To ensure that the ends of the cut parts are smooth, they are sanded with sandpaper.
- The side of the fuselage is placed on the table so that the front side is towards the outside of the aircraft. All mounting holes are cut out on it.
- Using this part, the same holes are made on the second half of the fuselage.
- Glue is applied to the glued side of the front compartment partition blank and the part is pressed into place at the installation site. After spreading the composition on the mating part, the workpieces are separated and left for the glue to partially dry for about 30 seconds. The parts are connected again and pressed with force for about 10 seconds.
- When assembling an aircraft, it is necessary, if necessary, to adjust the dimensions of the battery compartment, constantly checking with a square or ruler the perpendicularity of the parts being joined.
- This is how all the fuselage partitions are gradually assembled.

- After installing all the partitions, the second side of the fuselage is glued.
- The nose of the aircraft and the mounting of the frame for the engine are being completed.
- The upper part of the fuselage is installed.
- The tail blanks are glued together. In this case, reinforced tape fittings are immediately laid to fix the rudder and toothpicks for rigidity.

- The gluing is clamped with a board and clamps, which will ensure evenness of gluing.
- The tail is glued into place.
- The verticality of the elements is controlled and strictly maintained.
- The elevator parts are glued together. In this case, a bamboo skewer and tape are placed inside to fix the steering wheel. To ensure reliable gluing of the ceiling halves, the tape can be perforated with holes.
- The elements are compressed with a board and clamps, and left for about a day until the glue dries completely.
- The edges are ground down with sandpaper or a stone at an angle of 45°, which will allow them to not rest against each other when the planes of the model are tilted.
- The wing is assembled, lines are marked on it for gluing stiffeners, ribs, and spars.

- A wooden axle or spar can be made from a wooden ruler 50 centimeters long.
- The spar rail is glued.
- The joint in the center is reinforced with two small slats.
- Foam plastic neurites are glued in.
- Set required form wing plane. To do this, the substrate or ceiling material is rolled onto a piece of pipe.
- Glue is applied to all mating elements and final gluing is performed. Wing for setting time adhesive composition fixed by any in an accessible way: weight, clothespins, tape.

- Small dents caused by clothespins are sanded with sandpaper.
- The cavities in the center of the wing are closed and inserts are glued.
- After the glue has dried, the ailerons are marked. In this case, it is necessary to additionally look at the assembly in the light so as not to get on the partition.
- They are cut through on both sides with a cutter and the finished aileron is removed.
- Opened cavities are sealed with strips of tiles.
- The ailerons can be glued immediately with reinforced tape or later, before the main fitting of the aircraft model.
- The front part of the wing can be reinforced with reinforced tape.
- The entire model is covered with tape, which serves for beauty, and most importantly gives the structure greater strength, which will allow the product to withstand impacts from falling.
- The adhesive tape is smoothed with a warm iron, which will finally attach it to the ceiling tiles.
- A slot is made in the body of the aircraft into which the wing is installed.
- Servos are installed on the wing. To do this, the elements are applied and outlined with a marker, and a seat is cut out.
- Wires are being pulled homemade crochet made of wire.
- On the contrary, hogs are installed on the ailerons and connected to the servos with a rigid wire.
- Two servos are installed in the aircraft fuselage, for the rudder and the elevator.
For fixation, it is better to use double-sided tape, glued to all contact areas of the servo. - The elements are installed in place and the supporting walls are additionally glued. The rods are laid from rigid wire to the rudders.
- A frame is made to mount the motor.
- It is glued on the motor mounting side thin plywood, bolts will be screwed into it for fixation.
- The frame for the motor is glued into place.
- The motor driver is mounted in front of the fuselage, and the wires are brought out through the ventilation window and connected.

Car modeling, motor glider, foam planes. Motor installation
- The direction of rotation is checked.
- The fairing is put in place and secured with tape.
- To strengthen the installation site of the wing, it must be secured by gluing plywood or thin shingles.
- The receiver is installed, and all the wires from all the electronics are collected together.
- The bottom of the fuselage is glued, a hatch is cut for mounting the battery.
- The total weight of the model is approximately 450 grams.
- You can fly over a model airplane. The video will show you how to do this.
Assembling airplanes from ceiling tiles is the simplest option, which a novice aviation enthusiast can do if desired. The main condition is to do everything carefully, adhering to the assembly technology, and it is better to take the advice of a specialist.