Do-it-yourself smokehouse in the country from a barrel. How to make a smokehouse from a cold smoking barrel
In this case, an integral element of the design of a cold smoked smokehouse is a dug trench designed to transmit smoke. At one end there is a hearth, deepened into the ground by about 400 millimeters, the other is occupied by a barrel with a volume of 200 liters, partially buried. The depth of the trench should not be greater than the size of the recess for the fireplace, and its length should not exceed two meters.
In this case, the trench serves as a chimney
The bottom of the barrel should first be cut out with your own hands, and the barrel itself should be buried and lined with bricks to reduce heat loss, smoke and prevent air access. It is very important that the connection between the barrel and the trench is airtight. To ensure the passage of smoke, the trench is lined with bricks, after which it is covered with a sheet of iron or slate and sprinkled.

Cover the firebox with a sheet of iron to prevent wood chips from igniting.
You can also use a pipe instead of a trench. The cold smoked smokehouse from the barrel is located in such a way that there is enough free space around it, and it is best to place it under a canopy to increase the time of its use in the future. Steel rods are placed on top of the barrel for laying out products. The rods must be equipped with special hooks on which meat carcasses or other products are attached, after which top part When the smoking process begins, the barrels are covered with a large piece of burlap.

For large pieces of meat, hooks are used, and small pieces can be laid out on the grill
During the smoking process, smoke, coming from the firebox through the chimney into the barrel, envelops the food, while maintaining its constant temperature and not evaporating.
Option No. 2
A more preferable option for the location of the smokehouse, which provides for good upward draft of hot air due to the natural slope. The difference between this method of smoking is that the design assumes the presence of a dug adit-chimney designed to supply smoke from the hearth to a barrel located at some elevation. A self-made cold smoked smokehouse from a barrel consists of the following structural elements:
- a chimney no more than two meters long and about half a meter deep, leading from the hearth located in the recess to the barrel;
- the combustion chamber of the hearth, in which kindling is produced;
- fuel used for kindling and located in the hearth;
- brickwork, which is used to line the walls of the chimney and its bottom;
- a barrel with a cut out bottom located in the upper part of the structure;
- burlap blankets designed to cover the top of the barrel during smoking;
- a metal grate located at the bottom of the barrel, just above the cut out bottom;
- metal grates on which cold smoked products are placed;
- a combustion door covering the hearth and designed to regulate the air flow to the fire, the intensity of the combustion process and control the amount of smoke coming out.

This method is good when the terrain in which the location is located household, provides the possibility of using natural height differences. Then you can really dig a tunnel with your own hands and, placing a barrel on a hill, lead the chimney to the fireplace. You should also make a grate with your own hands from materials available on the farm, on which the products for cold smoking are laid out. Willow twigs woven into a shape of the required size are suitable for this. The grid cells are secured with strong wire. It can be thin, a lattice is made from it, and the outer rim is made of wire of a thicker diameter. It should be wrapped around a barrel in order to find out exact size grilles, lightly press and the rim will be secured.
You can use one grid, or you can install several at a certain level from each other. It is recommended to place the gratings at intervals of 150 millimeters. To secure the gratings, make loops and weld them to the walls of the barrel. You can use self-tapping screws by screwing them into the walls.
The firebox door can be made of hardwood. It should not be made too heavy; in addition, it should be solid to avoid smoke leakage.
In cases where it is not possible to use the natural slope of the terrain to ensure good smoke draft, you can create it yourself. To do this, you need to place the barrel on a stand or artificial structure, and the bottom of the barrel should not be cut off. The chimney should be a pipe connecting the smoking chamber and the firebox. The pipe must be hermetically inserted into the barrel.

For better traction, place the barrel on a stand
Option No. 3
Cold smoked products take longer to cook than hot smoked products due to the lower smoke temperature. To ensure this, in addition to the smoking barrel, you can use another one, which will serve as a filter. The liter volume of the barrels should be the same (200), they should be placed on top of each other and welded together. This must be done in order to increase the volume of the chamber and the distance between the products and the fire source, which will ensure the cooling of the smoke passing through the filter. At the junction of the barrels, a soaked serpyanka should be placed as a filter, but it should not leak. Rare burlap, used to clean soot from smoke, is also suitable. The barrel with products is installed on top. Sawdust is placed at the bottom of the lower barrel and set on fire (you can sprinkle it with fresh grass to lower the temperature). The resulting smoke, passing through the burlap, cools and enters the food. The process should not be interrupted, since it will be extremely difficult to subsequently restore a suitable smoldering regime for the sawdust and it is impossible to accurately determine the amount of time required to properly prepare the products.

Homemade cold smoked smokehouse from a barrel requires maintenance special conditions work required to achieve the desired result. It is necessary to adjust the smoldering force of sawdust in the fireplace, which determines the temperature of the smoke in the barrel, its concentration and uniformity of distribution. A smokehouse prepared with your own hands must be protected from a situation in which the smoldering of sawdust becomes a full-fledged flame, for which it is necessary to constantly monitor the condition of the hearth. You should definitely first consider the location of the thermometer that measures the temperature of the internal environment of the smokehouse during the cold smoking process. Approximately 100 grams of sawdust are required for one bookmark. For example, when smoking hams that are stored for a short time, it is necessary to maintain a temperature of 60 degrees. The duration of the smoking process will be 12 hours. The remaining parts of the carcass should be smoked in a similar mode 2-3 times; less time can be spent. As when frying shish kebab with your own hands, in the smokehouse you can use firewood and sawdust from the following tree species: birch, oak, all fruit tree species, as well as ash. Firewood and sawdust should not be used coniferous trees, due to the fact that when burned they emit bitter smoke with a strong smell of resin. The result will be a bitter taste of the product, and the smokehouse will subsequently need to be cleaned and put in order. To get smoldering coals in the hearth, and not a flame, you should line its bottom with firewood, sprinkle small sawdust on top and set it on fire.
A barrel smoker is an ordinary smokehouse that is made to cook excellent barbecue on your own. In this article you will learn how to make a hot smoked smokehouse from a barrel.


Good cold smoked smokehouses in the store cost around 15-20 thousand rubles, and the price for smokehouses highest quality reach 60-70 thousand rubles, although in quality they are not much different from homemade smokehouse from a barrel, which we will build with our own hands for 5-6 thousand.
Step 1: Required Materials and Tools


For the main barrel:
- The barrel itself: can be found for 1-1.5 thousand, it is better to look for a restored one, it will be cheaper.
- Lid: I used a grill lid that someone threw away. Any one with the same diameter as the barrel, or a little larger, will do.
- Ball Valve: I used a 1/2" forged brass ball valve. If you do not use a supercharger, then such a tap may not be enough. In this case, it is worth taking a larger faucet. (300-400 rubles)
- A 1/2-inch cast iron bushing that connects to the ball valve from inside the barrel. If your faucet is a different size, then you need to take the appropriate bushing. (100-120 rubles)
- M20 washers: to strengthen the connection between the tap and the barrel - 2 pcs. (40-50 rubles)
- Brass guide rails: 2 pieces are enough because they can be cut in half. Note: if you use a different barrel, you need to calculate required amount guides - 2 pcs. (300 rubles)
- Clamps that are inserted into the guides from above - 12 pcs. (1 package) (150-200 rubles)
- Nuts and bolts: for attaching the guides to the inside of the barrel - 9 pcs. (3 for each guide) (100 rubles)
- High temperature paint: any will do. Some craftsmen paint flames or various logos on their barrels. (300-400 rubles)
- Handles I used a metal handle with screws. (200-300 rubles)
- Steel grating(s). Grill grates with a diameter of 50cm work great. You can find it in the store for (800-1000 rubles)
Cart for charcoal:
- Expanded steel. If you take two pieces of 60x30cm expanded steel, the result will be a large basket. You can take one such sheet and cut it in half to get two pieces 60x15cm. Then the basket will turn out to be small, and it may not be enough for 10-12 hours of operation of the smokehouse.
- Smaller mesh. It is well suited for making a coal basket. It should be smaller than the grate on which food will be cooked.
- 100mm bolts + nuts. For basket legs.
- Washers that will fit 100mm bolts.
- 12mm bolts, nuts and washers for fastening the ends of expanded steel. Any size/caliber. I used 8mm hex bolts and nuts.
- Wire. Used to attach expanded steel to the edges of the grating. You can try using paper clips. I also used wire to create handles.
- Drill and bit to drill 22mm holes.
Step 2: Remove old paint and apply new paint


If your barrel has a permanent top, it will need to be sawed off. You can use a saw.
The next step is optional, but if the paint on your barrel is not heat-resistant, then when cooking it will peel, crack and give off a pungent odor. This will ruin wonderful aroma barbecue from your smoker when it is running.
There are several ways to remove paint. I used paint remover, then burned the barrel with a torch, and then sanded it with a sanding wheel. Once the coating is removed, you need to apply a couple of layers of your heat-resistant paint.
Step 3: Cut a hole and install the ball valve


Use a suitable drill bit and drill a hole in the side near the bottom of the barrel. The hole should be as close to the base as possible. Be sure to leave enough space for the washers.
Attach the ball valve by screwing it to the bushing through the hole using an M20 washer on each side. The washers will help hold the faucet in place and seal the seal.
Also attach the handles.
Step 4: Installing Shelves


In my smokehouse of 200 liter barrel They use adjustable shelving so I can change the height. This way, I can add multiple racks at once if I want to make a lot of ribs, or remove them if I'm cooking multiple pork butts, which take up a lot more space. The downside is that I have to be careful when removing the grill or charcoal basket so I don't drop the staples. It's very annoying when the staple falls right into the middle of the burning coals.
Cut the rack rails to the size of the barrel and install them into the smoker, then insert the racks.
If you don't need to adjust the grates, you can make one and nut and bolt it directly to the barrel.
Step 5: Charcoal Basket


Show 5 more images


Let's make a basket for charcoal:
- Take one piece of expanded steel and bend it until it matches the curvature of the lattice.
- Cut 6-10 pieces of wire and bend them into a "U" shape.
- Use the cut pieces to attach the trim to the grille. Twist the wire several times to make it tight.
- Bend the second piece of expanded steel and bolt it to the first.
- Using a large piece of wire, attach the second piece of steel to the grill.
- Screw the legs using 100mm bolts.
- Attach the wire as a handle and you're done!
Step 6: Where's the thermometer?


Every smoker needs a thermometer, and you may have noticed that my build doesn't have a built-in one. I designed my own automatic thermostat with thermometers you can build. If you don't want to create one, you have two options:
- Buy a wireless thermometer, such as the Maverick ET732. It shows the exact temperature and has an additional thermometer to monitor your meat. It also has an alarm and wireless communication, so it's perfect for late-night gatherings. If you end up using your smoker frequently, this will come in handy. The disadvantage is that it costs about 4,000 rubles. If you decide to get one, the easiest way is to make a small notch on the top edge of the smoker and run the wires through it under the lid.
- Use an on-board thermometer like the one shown. I don't recommend getting one because they are not accurate and the temperature at the edges can be higher than in the center. The thermometer needle can also interfere with the grates. The only advantage is that they are inexpensive.
If you go this route, drill a hole in the side just below the top grate and insert a thermometer.
Step 7: What to do if you don't have a grill lid with a spout

If you don't have such a cover, you need to make one. The best option would be to buy a barrel with a removable lid and attach a pipe to it.
Most economical option BBQ grill - homemade. This design is easy to make with your own hands at home, if you have the materials, tools and step-by-step instruction with photo. If the first two points are yours, then the third is my prerogative. In the resulting unit it will be possible to smoke, fry and simmer meat. You can assemble it in 6 hours of continuous work, but the result will please you for many years. A barbecue grill made from a barrel is an indestructible and very useful thing.
By the way, step-by-step assembly smokehouse from a barrel is located.
First, let's decide what we need:
- 200 liter barrel – the best option from car oil famous manufacturer. The advantages of this barrel: large wall thickness, the oil barrel does not rot. Read below for information on how to wash;
- Welding, mask, protective gloves. Kempi welding machine (a welding machine that performs welding with a special wire in an environment protected by gas). It is possible to use an inverter welding machine, but it requires significant skills in welding thin metals;
- Little Bulgarian;
- Grinder discs – grinding and cutting;
- Hammer;
- Hacksaw for metal;
- Welding corner;
- Roulette;
- Drill;
- Bimetallic crown for drilling holes;
- High temperature heat resistant paint;
- Hinges;
- Thermometer;
- Steel rod 8-10 mm;
- Steel strips;
- Square pipe;
- Double-sided rivets.
Don't forget to take precautions. When working with metal, always wear gloves, because metal edges have razor-sharp burrs. When working with an angle grinder, you need glasses, otherwise hot scale may get into your eyes.
Cleaning the barrel and welding the chimney
- Make sure there is no fuel left in the barrel. Rinse it with water. Insert into the grinder grinding disc and sand work surface from paint.
- The inside of the barrel must be cleaned of oil. Dishwashing liquid is suitable for this. You need to wash the barrel 3 times, rinsing off the foam with hot water.
- We calculate the chimney pipe so that its upper end is higher than the top point of the barrel (for draft). To create a chimney, a thick pipe with a diameter of 50 mm is useful. We cut the ends for the connection angle at 45 degrees and weld them together.
- We search and mark (vertically on the lid of the barrel) appropriate place for a chimney on a barrel, so that the top point of the chimney is 5 cm above the barrel. After this, we create a hole with a 50 mm bimetallic crown. Then we weld the pipe.
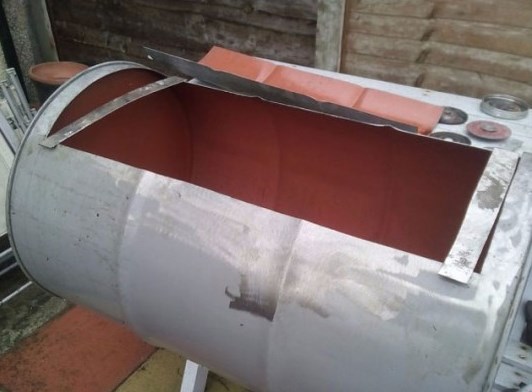
Cutting out the cover and welding the side strips

- We draw an even line along the barrel, slightly below the chimney pipe, and a second, parallel line, just above the middle of the barrel from the end. Then we connect the lines to the edge, at a distance of about 3 cm from the end of the barrel, on both sides. The door must be cut out using a fine 2.5 mm disc. First we cut the ends, then the top, and finally the bottom.
- We carefully bend a strip of metal 0.7-1 mm into the shape of a barrel. The more precise the fit, the less smoke will come out. Side stripes are the key to door rigidity. We weld spotwise every 5 cm so that the side strips fit more tightly onto the barrel.
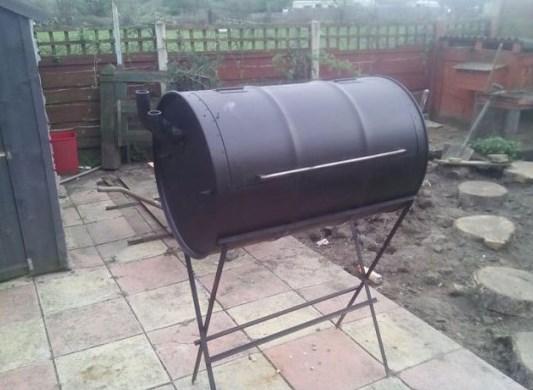
Creating grill legs and attaching hinges

- The legs will fold like scissors. They consist of two rectangles, one of which is smaller than the other. They are connected to each other by bolts on both sides slightly above the middle.
- Door fit is the most important stage, so we measure seven times and cut once. Place the door on the barrel so that it fits tightly into place. The opening where the hinges will be located should be tiny - 2-3 mm. To achieve this, you need to move the door up as much as possible and try to open the door. Make sure nothing is snagging or getting in the way. Only then make marks for the hinges.
Door construction

- Once you understand and double check that the door is working correctly, weld the bottom strip. You can do it as in the photo, but it is better to bend it in shape and fit it to the stiffening ribs of the barrel. Weld it so that the structure does not move at the base of the barrel’s stiffening ribs.
- We weld the lid handle from metal and place it in the center of the door, but ideally you need to build wood covering. It will reduce the likelihood of burns.
Grill guides

Guides are iron pins that hold the grate or meat onto the hooks. They also make the barbecue structure more durable. We will connect the lower guides so that they act as handles. For guides we use 8 mm wire rod or 1 cm rod. Drill 50 mm holes from the bottom on both sides and make.
The role of the lattice will be played by a grid of of stainless steel. It is resistant to high temperatures, meat does not stick to it.
The final

At the end, we make a few important touches to complete the work:
- Insert the thermometer.
- We paint with fireproof paint.
- We make a hook to secure the lid.
Many people consider a smokehouse to be an indispensable thing for a summer residence. It's hard to argue with this. And if you are a hunter or fisherman, then such a product is simply priceless for you. It's always nice to eat smoked meat, fish or game cooked in nature. If you need a smokehouse, then you have two development options. The easiest one is to go to the store and buy a smokehouse for yourself. But not everyone can afford it. Therefore, many choose the second option - to make a smokehouse for their dacha themselves. I would like to say that for this you do not need to be a seasoned craftsman, and the tools and materials needed for the work are quite affordable.
Many people have a barrel in their dacha that is lying around idle. If you don’t have one, then you can buy it, because it will become our raw material for the smokehouse. It is advisable that the barrel be 200 liters. This will allow you to smoke a lot of meat. So, if you're in the mood, let's learn how to make a barrel smoker.
The concept of cold and hot smoking
To begin with, you must understand that there are two types of smoking that your unit can perform:
- hot smoking;
- cold smoking.
The point may be clear to you. In the first case, the method is quite fast, safe and high quality. The raw materials placed inside are treated with smoke, the temperature of which on average reaches 70 degrees Celsius (range from 45 to 120 degrees). In such an environment, you need to smoke from two hours to two days. As a result, you will get a juicy, aromatic and tasty finished product. It can be eaten immediately. This is the main difference.

If we talk about cold smoking, then this process takes much longer. Ready-made salted small slices of the product are placed in the smokehouse, which are processed there for 4 days (minimum 2, it all depends on the result). As for large pieces, they can stay inside for even a week. The average smoking temperature reaches 40 degrees. What is the essence of this method? Moisture from meat or other product is gradually removed, saturating the raw material with smoked taste and aroma. The dish will be moderately dried and with a bit of fat.
Note! This type of smoking is good because the original product can be stored for a long time.
As you understand, a cold-smoked smokehouse and a hot-smoked smokehouse differ only in operating temperature, and, accordingly, in the final product. Let's find out what it is like, a hot smoked smokehouse with your own hands. In addition, you can make a unit from two barrels to increase the amount of raw materials that can be processed. This way you can make a cold-smoked and hot smokehouse with your own hands. But decide for yourself what it will be like.

Preparing tools and materials for creating a smokehouse
The first thing our work begins with is preparing everything necessary for work. As mentioned at the beginning, all the tools are simple and anyone can work with them. And it will take a little material to arrange it. Here is a list of the entire arsenal:

This is quite enough for you to have an excellent cold or hot smoked smokehouse from a barrel. All that remains is to consider the instructions for creating the structure. We will consider two options for smokehouses made from barrels: those made without a welding machine and with its use. After all, not everyone knows how to use it or does not even have it. This will help you bring everything into reality.
Making a smokehouse from a barrel without a welding machine
This method has a huge advantage, because only a limited number of people can and know how to use a welding machine. This is not a grinder; professional skills are needed here. This is the option that most users choose. So, let's get to work on creating a smokehouse from a barrel.
First of all, you need to prepare the barrel for work. What does it mean? Its surface needs cleaning. It will help you with this Sander or a special attachment for an angle grinder. Carefully treat the surface of the barrel so that there are no traces of rye or paint left on it.

Important! Don't neglect safety rules. During operation, small particles will be formed that are harmful to the eyes and respiratory tract. Therefore, you need to work in a respirator and goggles.
Look at the photo. This is exactly the kind of structure we will build with you. There is no need to make drawings, as the photograph will help you navigate.

Here it is used as a stand metal structure. These can also be corners. You decide. Now all the instructions for creating a smokehouse barrel will be given step by step:
That's all, now make smoke as much as you like. This design is inexpensive, and its creation will take a maximum of half a day. Everything is quite fast, simple and cheap. And no welding was used. The photo shows how everything looks finished.
Note! You can make a barrel smoker in a vertical position. The essence of the work is exactly the same, only the type of structure changes.
Do-it-yourself smokehouse from a barrel, option No. 2
If you are a welder, or know how to use a welding machine, you can simplify your life and do everything much faster. You just need to choose a barrel that is clean both outside and inside. If previously they were stored in it chemical substances, then it is better not to use it. In this option, we will consider the vertical arrangement of the smokehouse. This is what a barrel smokehouse and the smoking process in it will look like.
Manufacturing instructions:
Look at the photo, which schematically shows the smoking process and the smokehouse itself, made with your own hands.

Smokehouse option No. 3 - cold smoking
If you are interested in the cold smoking scheme, then you can also make the design yourself. This is a universal smoking apparatus, which is made without a built-in firebox. Its peculiarity is that the barrel can be used for both one smoking method and another.
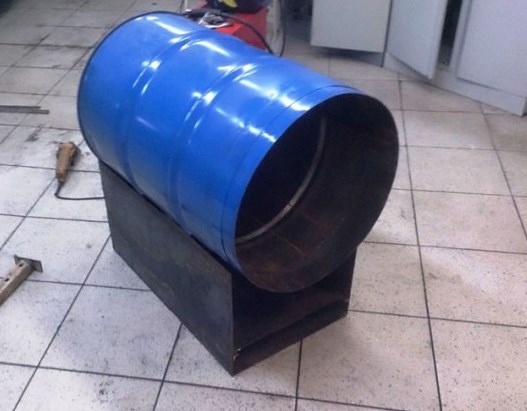
You need a barrel that has a strong bottom. You need to make small holes (holes) in it. The firebox is constructed as a separate structure. It can be made of metal or brick. Make the top of the firebox uncovered.

A smokehouse will be made on top of the firebox, and the products inside will be processed using the hot smoking method.
Now you need to make a firebox for cold smoking by making a chimney and a hole for the pipe to enter from below. In fact, the insides of the barrel are made according to the same principle, only without a collection of waste and combustion products. The cooled smoke will enter the barrel through the pipe and do its job. Look at the photo to see how this can be implemented.

Conclusion
Now you know how you can make a smokehouse in your dacha from a barrel. You could see that the method is simple and quite feasible. You just need to prepare everything you need and set aside a few hours for work. But in the near future you will be able to enjoy delicious dried fish, sausage or other meat. This taste will help you forget about all the hard work you have done. The design will definitely leave you indifferent. And to help you with the task, we have prepared a video.
Juicy, aromatic, with a golden crust, smoked meat or fish is a delicacy that is impossible to refuse! But choosing it in a store means relying on the integrity of the manufacturer. If you have a house with a plot or a dacha, then it is better to make a smokehouse with your own hands, for example, from an unnecessary barrel. The cooking result will be excellent, and the dishes will be healthy.
Do-it-yourself smokehouse from a barrel for cold smoking method
The product is prepared in a cold smoked smokehouse from any barrel in the following way: smoke from the firebox goes through the tunnel and cools (to 35–40 C) before entering metal container. The distance that combustion products must travel is 2–7 meters. Exceed maximum length not recommended - problems with traction will occur. The lid needs to be pressed heavy object to prevent metal deformation. Visual diagram smokehouse is shown below.
So, let’s make a smokehouse from a barrel with our own hands:
- We will choose a fire-hazardous place on the site, with additional amenities in the form of a bench and table on which the products will be placed;
- Let's assume the location of the future chimney. Its parameters: length – 2–7 m, width – 30–50 cm, height – 25–27 cm. At this stage, it is important to think about creating good draft, which is formed by the temperature difference between smoke and air. A regular fan will help improve traction;
- Prepare: barrel (preferably 200 liters), mesh, thin sheet metal, lattice, fasteners(such as bolts), burlap and tools for digging a trench and making a chamber;
- We dig a trench for the smoke channel and seal it with a pile of soil;
- We will equip the firebox: we will make recesses the size of about a third of the barrel, put a sheet of metal on which the wood chips will be placed;
- Let's start making the camera. We separate the bottom from the container and in its place we weld a mesh or a perforated sheet of metal cut to size using a welding machine. To trap volatile smoke particles, we place burlap on the mesh;
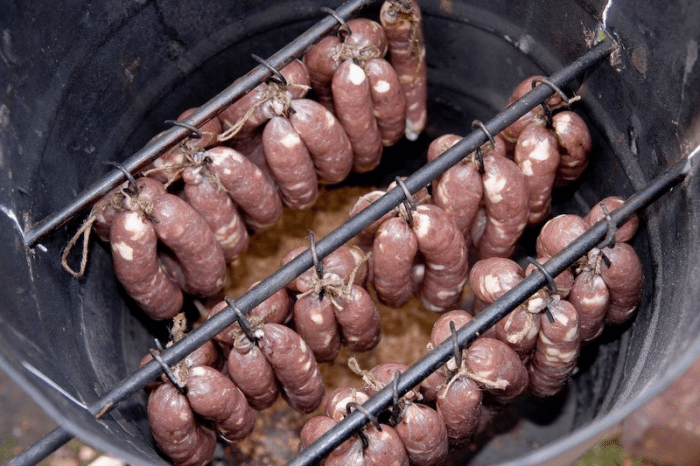
- We will stir the grid where the products will be placed in the upper part of the barrel on the hooks welded in advance (20-25 cm away from the edge). You can replace the grate with rods with hooks on which fish or meat is hung;
- We assemble the entire structure according to the top drawing and test the smokehouse

How to make a cold smoked smokehouse from a barrel is clear, but you should remember that the processing time of the product in it ranges from 10 hours to several days.
For a uniform process, the pieces should be cut to the same thickness, do not add new ones during the process and do not combine products of different types!
Hot smoking in a barrel
It is easier to make a hot smoked smokehouse from a barrel than a cold one, provided you know how to handle the tools. Schematic diagram constructive solutions presented below. 
The manufacturing process consists of the following points:
- Cut the top out of the barrel with a grinder (if there was no flammable material in it). You can also use a metal cutter. Bottom part do not cut it off, since it will serve for laying wood chips;
- Provide for the presence of hooks inside the barrel (set back 20-25 cm from the edge of the top of the container), which will hold the mesh for placing the product. To obtain a larger volume of finished products, several floors of grids are installed. You also need hooks holding a metal sheet to collect liquid (20–30 cm from the edge of the bottom of the barrel);
- The lid covering the barrel is cut out. A handle is welded or bolted onto it;
- The structure is installed on bricks to create a gap for lighting a fire. It is enough to use 3 bricks on one and the other side of the barrel
The smokehouse is ready and you can start preparing delicacies. Lard, meat, sausages or fish are placed on a wire rack and covered with a lavsan bag and a lid. A weighting object is placed on top so that the metal does not deform under the influence of high temperatures.
To prevent the product from losing its shape during smoking, it is tied with jute twine!
Cooking time depends on the type of product, but on average varies from 30 minutes to several hours - quite quickly compared to the cold smoking method, since the smoke temperature is 80–90 C.
We smoke in a barrel powered by a blowtorch.
This option is good because the smokehouse made from a barrel with your own hands is independent of wood or electricity. A heating element – blowtorch. So, how to do it:
- The top cover is cut off;
- 3–4 metal rods (thin reinforcement 5–6 mm) are welded inside the container. They will hold the hooks with the product;
- A hole is cut in the bottom of the barrel, to which 2 are welded inch pipe with internal thread (coupling);
- Separately, take a piece, 15–18 cm long, of a two-inch pipe and cut an external thread on it;
- A piece of sheet metal is cut out and welded on the opposite side of the pipe thread to seal the hole. How to make a glass where the wood chips will be placed. It is this place that will be heated with a blowtorch.

A cold-type smokehouse made from a barrel is significantly different in design from a device for hot processing. At the first mandatory element is a long chimney in which the smoke, reaching the smoking chamber, cools to 35–40 C. Cooking is extended, but the maximum is retained in the product useful substances. The second device is easy to make and quickly cooks meat and fish. Smoked food connoisseurs can build themselves a multifunctional device with the ability to change the design for cold and hot smoking.