Arched partition. Construction of plasterboard partitions: for interior design and zoning
One way to increase your living space is to remove the doors. But there is not always the opportunity or desire to break down the walls. Then the former doorway is designed in the form of an arch. Another use case arched openings— divide a long corridor into zones, breaking up the too simple geometry. When making repairs on your own, arches are most often made from plasterboard: it’s easiest to make them yourself.
Types of arches
Interior or corridor arches may have different shapes. They differ mainly in the shape of the upper part and sometimes in the way they are connected to the vertical parts. Their main types are presented in the photo.
This group is missing one of the most popular Lately- semi-arch. They have a rounded corner only on one side, on the other it remains straight. This is where the name came from - semi-arch. It looks good in modern interiors: minimalism, hi-tech, maybe art deco.

The classic is distinguished by the correct shape of the top. This is strictly a semicircle, the radius of which is equal to half the width of the doorway. This type looks good with an opening height of at least 2.5 m. It fits well into any interior, but looks best in a long corridor, or instead front door to the kitchen.

An arched opening in the Modern style is distinguished by a small radius of curvature and a sharp transition at the junction with the vertical components of the opening. It looks good if the walls and ceiling have more or less simple design. Looks great in place of the former one balcony door, good when entering the office.

The “Romantic” style arch is more likely to be simply rounded corners (mostly masters call it that). Looks good with a large width and not the greatest height.

The “romantic” shape is good with large width and small height
The “ellipse” shape is very close to “romance”. It differs only in greater curvature in the middle part. Also suitable for low and wide openings. It just looks a little softer.

Trapezoid is a non-standard design consisting of broken lines. It is difficult to play out in the interior, therefore it is used infrequently: for some non-standard designs.

One of the design options is trapezoid
It’s very similar to a regular opening, and that’s essentially what it is, only without door leaf. For greater originality, it is often accompanied by wooden carved elements in the form of columns on the sides. In this form it is good for classic interiors, as well as ethno-style - Greek or Roman, depending on the type of columns.

For decoration in modern styles They use another example - next to the main arch, they place smaller portals. This technique allows you to “beat” a simple form.

Another version of the “portal” arch
Before you start making an arch, you need to decide on its parameters. select the type, and then the parameters: where it will start, and what the radius of curvature will be. It could be a really sharp bend, or it could just be some rounding of the corners.

To understand how your chosen shape will look, you can cut out a template from cardboard and attach it to the doorway. Evaluate the effect. If everything suits you, you can make a blank using this template. But only one - for one of the sides of the opening. The second one needs to be done in place, otherwise it will turn out crooked.
Step-by-step instructions with photos: the fastest way
Do-it-yourself plasterboard arches different ways. This takes a minimal amount of time. Having decided on the shape, we proceed to installation. We attach a frame to the prepared opening, cleared of peeling plaster and relatively leveled, according to the dimensions of the future arch. It is made from a drywall profile or a dry wooden block of a suitable size. Sometimes, if the wall is narrow, you can only choose wood.

To begin, we cut out a rectangle from drywall to the size of the future arch, find its middle, mark it, and then temporarily screw it into place. We retreat from the edge 12.5 mm - the thickness of the plasterboard sheet. If the adjacent walls are already plastered, add a couple more millimeters of putty so that the surface can be leveled.

Now we take a piece of profile or hard corner and set aside half the width of the opening from one edge. At this point we make a hole in the corner and insert a nail into it. We stick this nail into the middle of the doorway we marked earlier on the sheet. It turns out to be a kind of compass, with which it is easy to draw an ideal line.

Device for outlining an arc
By changing the mounting height, you can get a more or less high arch. If you need a flatter curve, increase the length of the “compass”.

Having removed the sheet, we cut out an arc along the outlined contour. This can be done with a special drywall saw, a metal saw with a fine tooth for a smoother edge, or a jigsaw (there will be a lot of dust). If the cut is not very even, we level it using a grater attached to it. sandpaper. With this device we achieve a perfectly even curve of the shape we need. We fasten the cut fragment of the arch - the side wall - back into place.

If everything is smooth, there are no distortions or irregularities, on the other side of the opening we attach the same sheet of drywall as a few steps earlier - a rectangle or square, depending on the shape. It must be fixed strictly vertically. Now we transfer the shape of the arch onto it. We take a square, at a right angle and press one side against the drywall, onto which we transfer the arch, and the other side against the arch. Having aligned the square perpendicularly, mark a point with a pencil. We make such points along the entire arc. The more often they are done, the easier it will be to draw the line and the more accurate the match will be - the less you will have to grind down.

Why is it so difficult and not just to make a copy of the first sheet? Because few openings are symmetrical. As a result, installing the second sheet so that the lines of the arch coincide is very problematic.
Having marked all the points, remove the sheet, draw a line, and cut along it. We mount on old place. Now we take the smoother again with sandpaper and now we smooth both edges until they match completely. One point - the trowel should be wider than the opening so that both walls of the arch are captured in one pass.

We measure the length of the arc, cut out a piece of the profile of the same length, make notches on the walls every 3-4 cm. This tape will need to be secured along the arch arch on one side and the other.

We fasten it with self-tapping screws, carefully, pressing the profile and holding it with a block, not with your fingers: it’s easy to get the screw into your fingers. By the way, you need to wear gloves when working with the cut profile. If you don’t, you’ll definitely cut your hands.

By the way, the back of the profile can be aligned along the edge - it’s easier to work this way, but the joint will still have to be sealed later. Screw the strip to the other side in the same way.

This is a bottom view - profiles are attached to the sides
There is a second way to attach the profile - attach it to a quick-setting universal glue, such as liquid nails. This method is acceptable if the opening width is small. If the arch is thick, the glue may not be able to withstand the mass of drywall that will be attached from below.
The next step is to attach the jumpers. First, the depth of the arch is lost, 1-1.5 cm is subtracted from it. This will be the length of the lintels. Cut profile pieces of this length.

Jumpers are cut from the same profile
At the places where the jumpers are attached, the “petals” are cut off, and the prepared fragment is installed and secured. It should not rest against the walls, it should be located approximately 5 mm from the back. Jumpers are needed to make the structure more rigid, otherwise it “walks” when pressed.

Next, you need to cut out a rectangle from drywall that will cover the structure from below. Its width is determined simply - from the outer edge of one sheet of plasterboard to the outer edge of the second sheet. The length is measured with a flexible tape (can be a tailor's tape) or a tape measure with an assistant. We attach this sheet with self-tapping screws to the arch frame. The sheet has to be bent, but read how to do this a little lower - closer to the end of the article.

Arched opening made of plasterboard: second method (photo report)
This method is good if the thickness of the partition is small: try attaching the profiles if the gap between them is several centimeters, and then attach the jumpers. It all starts the same way: the first wall of the arch is cut out, attached and transferred to the second sheet.

Afterwards, wooden crossbars are cut along the width of the gap between the two sheets, which are attached along the edge of the arch with self-tapping screws.

The cut strip of drywall is fastened starting from one of the sides. To make it more convenient, you can fix it with clamps, since the thickness of the wall is small. When attaching the strip, you can use the self-tapping screws that were used to fasten the bars. This way you will definitely hit the crossbar.

Then all that remains is to secure a special perforated corner in the corner and smooth out the unevenness.

A corner is attached to the arch arch, everything is puttied

It is also more convenient to smooth the dried putty along the arch arch with the entire plane of sandpaper attached to a grater. It’s unpleasant that dust falls into your eyes, making it almost impossible to work without glasses.

How to make an arch instead of a door: method three - typesetting technique
Another way to make arches from plasterboard with your own hands is by typesetting. The arch is divided into segments and assembled from pieces that create a curvature close to the required one.

They are attached to putty diluted with a mixture of PVA and water. This batch dries quickly, so first we cut the plates and try them on. You can fold it on a table, but the vault will turn out upside down, but it will allow you to evaluate how correctly the plates are assembled.

Then the plates begin to be attached to the opening, periodically strengthening them with self-tapping screws for reliability. Place washers under the heads so as not to push through the cardboard. Remove excess putty immediately. If it gets stuck, it’s impossible to tear it off. Finished surface they are treated with a primer to improve adhesion (adhesion), and then they are puttied, leveling the arch. To make it easier to display, you can use a template attached on both sides.

Making sharp bends using this technology is not easy, but for rounded corners and semi-arches it is a great way to do without profiles.
How to bend drywall
One important detail: standard wall plasterboard bends poorly. For curved surfaces, they specially came up with thin ones - 6 and 6 mm thick. This bent part is easier to make from it. With a slight curvature, such a thin sheet can bend easily and without tricks. If you don’t want to buy thin GVL, there are two ways to bend the standard one.
First- take a needle roller and roll the cut section well on one side. You need to roll with force so that the plaster breaks. Then the leaf is soaked in water and left for two to three hours. After such procedures, it should bend quite well. You take it, fix it on one side, and gradually press it against the arch frame, bend it, gradually screwing it along the edges with self-tapping screws. The method is not bad, but if there is a lack of experience and insufficient processing of the gypsum, the sheet may burst. You will either have to mask the gap later, or start over.
Second way to bend drywall: on one side, make notches with a knife approximately every 4-5 cm. The notches should cut the paper. This strip is also gradually fixed, breaking the plaster as necessary. It bursts along the cut lines with light pressure.

Video on the topic
Drywall itself, in turn, is a very popular and sought-after material, which is often used for interior decoration premises. This material is now in great demand, as it has an affordable price and is of excellent quality.
It is thanks to the quality this material even over a long period of time does not lose its appearance and can last for quite a long time.

Very often, drywall is also used to create elements such as indoor arches. In this case, he is given the required form and fixed in the required place. The use of arches allows you to give this or that room a more representative look, which will become another highlight of the interior.

How to create an arch?
If we talk about the procedure for creating an arch, then in this matter there are many nuances that you need to know about. The fact is that such work may require not only patience, attentiveness and accuracy, but also minimal knowledge of geometry. Only in this case can it be done well and efficiently.


Before you start making an arch, you must first prepare some tools. In this work you may need: drywall (preferably with a reserve), a wall profile with dimensions 27X28, a mounting knife, special metal screws 5x25, additional frame fasteners and a press washer. Having prepared these tools, you can begin creating an arched structure.

Typically on brick or concrete base making an arch is not as difficult as it may initially seem. Using frame fasteners and self-tapping screws, you can complete this job in a few hours.

The only thing you need to pay attention to is the quality of the design itself. It is better that it is not too thick, otherwise problems may arise when fixing it. It will simply be poorly secured and after a while it may even fall.


When starting work, first of all you need to take a pre-prepared wall profile and attach it to the wall so that it is placed along the existing perimeter of the opening itself on both sides at once. After this, you need to take exactly the same type of profile and insert it into the existing profile that was originally installed on the wall. The latter must be secured with press washers.

Preparing drywall should be done with extreme care and without haste. It is necessary to cut the drywall in such a way that subsequently its width is identical to the width of the opening itself, and the height corresponds to the overall radius of the circle. It is better to use a mounting knife as a cutting tool.

After the piece of drywall has been prepared, it is necessary to attach it to the wall profile using self-tapping screws. IN in this case For fastening, you may need about 22-25 screws, each of which should be located at a distance of 18-20 centimeters from the previous one.


Creating an arch outline
Next you need to move on to creating an arched outline. It requires drawing a semicircle in the appropriate place. Moreover, in order for it to turn out perfectly even, it is necessary to use a tool such as a large compass. In a situation where such a tool is not available, you can make it at home.

You need to take a profile with parameters 27x28 and a length that is 5-6 centimeters greater than the existing radius of the arch circle, and make a small hole in it on one side. Having made a hole of 5-6 millimeters, you need to insert a pencil into it, after which you need to screw in a self-tapping screw on the other side.

In this case, the latter must be screwed in at a distance which, in turn, will be equal to the total radius of the arch. After these simple manipulations you should get a so-called improvised compass.

How to use this compass? You need to place it so that the self-tapping screw is located strictly in the center of the lowest edge of the drywall section. After this, you need to slowly draw a semicircle and then carefully cut it out.

Now we need to move on to the procedure for making a profile with a so-called serpentine shape. It needs to be cut on both sides so that it can then be shaped into an arc. The latter needs to be attached to the semicircle from the inside.


It must be remembered that all of the above actions must be performed not only from the outside, but also from inside the arch itself. After this, it will need to be additionally sheathed in those places that remained untreated.

To sew up an existing arched bend, you need to take drywall of the appropriate size and hold it in water for 10-15 minutes. This will allow it to become more flexible and elastic.

After this, you need to install it in the initial position of the arch bend, give it the required shape and fix it with self-tapping screws.

Photo of a plasterboard arch


Drywall is a universal material, therefore popular and in demand. It is used quite widely in the construction industry and, for example, you can build a plasterboard partition with an arch. The work is painstaking, but you can do it yourself without the help of professionals.
 Drywall - material for fastening arches
 If you know how to hold an instrument in your hands, then it will not be difficult for you, just follow certain steps and our recommendations.

Today you can see the following types of structures built in houses and apartments:
- A partition with an arch can be a full-fledged structure separating rooms with an arched opening. The opening can be left without a door, or a decorative cloth can be installed. Also like this if you need to zone a space, for example, partition a room into sleeping area and storage area. In this case, the partition will be small and the arch will be wide.
 View of a partition with an arch
 - Partition with the formation of an angle. Such a partition is mounted if you need to partition off a large studio, highlighting separate room, while the partition will rotate 90%, forming.
 type of partition with the formation of an angle
 - A partition with windows is a creative and unusual design, which designers use to make the interior weightless and airy. Often such partitions are made in office premises for more daylight.
 This is what a partition with windows looks like
 It’s up to you to decide what kind of DIY structure you’ll have in your home; ideas for plasterboard partitions can be seen in the photo.
Marking with drawing up a plan
The first thing you need to do is mark out the room in order to understand how harmoniously the partition with an arch will fit into the interior of the room.
In addition, you need to calculate the exact square footage of the fenced-off room - this is important; literally one centimeter may not be enough to place certain furniture.
Watch the video: how to make an arch from plasterboard.
Next you need to draw a plan on paper. In the future, as soon as you independently assemble the first partition from gypsum plasterboard, you may not need it and you will be able to help your loved ones by remodeling the apartment with partitions from plasterboard.
All dimensions should be indicated very accurately on the plan, so you will visually imagine what you will get in the end.
 Dimensions of the created arch
 Start of installation
So that you know where to start installing the structure with your own hands, read a few recommendations described below:
- The plan has been created, now you need to determine where the arched opening will be located. Don't forget that it shouldn't be too narrow, as you will need to carry furniture into the room.
- – you also need to decide on this parameter right away. If your partition is purely decorative, then laying insulating material is not necessary. And if the structure that is supposed to be equipped will be a partition between rooms, then it is necessary to soundproof it.
 Soundproofing
 - Material – you need to calculate the exact quantity for installation. The profile and drywall can be calculated very accurately and you don’t have to buy too much. The quantity must be purchased with a reserve. As soon as you make the calculations, it will become clear how much a gypsum plasterboard partition will cost you.
You can proceed to the second stage of work.
Frame installation
Having prepared the necessary materials and materials, you can begin the most important process, installing the skeleton of the future partition with your own hands:
- Installation begins with profiles. If the partition is decorative, then it is enough to take a 27x28-starter. Applying this profile will decorative design air, since the thickness of the partition will be only 4 cm. You plan to use sound insulation - the guide profile is taken 40x75, this optimal size, for laying insulating material inside the partition. The starting profile is purchased by size.
Read also
Noise insulation plasterboard partition
 Installation of partition profile
 Important! Do not forget that the wider you take the profile, the smaller the square footage of your room will be.
Since we have already determined on the plan what function is assigned to the partition, there will be no problems with the purchase of drywall:
- partitions in wet areas mounted with moisture-resistant plasterboard (green);
 Installation of moisture-resistant plasterboard
 - for structures in other rooms, you can use ordinary gray plasterboard.
 View of a partition made of ordinary plasterboard
 Let's return to the frame:
- We draw a straight line on the ceiling, in the place where the partition will be located. To prevent the structure from shifting, you can mark an exact parallel straight line. The starting profile is applied to this straight line and attached to the ceiling. Then, using a plumb line, you need to mark points on the floor and draw a straight line between them - this will be the location for attaching the second starting profile. Do not forget .
 Attaching the starting profile
 - The next step is to install the guide. The first profile is installed and attached directly to the wall. The rest need to be placed every 60 centimeters. The profile must be installed according to the level.
 Installation of a rack profile for drywall
 Important! If a more rigid structure is required, then the distance between the rack profiles is reduced to 40 centimeters. It will take a little more material, but the design will be more reliable.
- Once the assembly of this structure is ready, you need to cut the cross members from the rack profile to equal sizes. These crossbars are used to twist adjacent profiles - as a result, you should get a lattice made of.
 ready-made grille from profiles
 - The doorway is equipped with rack profiles, which it is desirable to strengthen wooden blocks 5x5 cm, if you plan to install doors.
 This is what a doorway looks like equipped with rack profiles
 The frame is ready - the most difficult process is completed, next comes the installation of drywall and sound insulation
Fastening gypsum boards, sealing seams
Some consistency must be observed to obtain a high-quality design.
- First of all, fasten yourself. We start fixing it from the wall; it should lie exactly in the middle of the rack profile. Fastening is done using plasterboard-metal. The fastening pitch is 15-25 cm in a checkerboard pattern.
 Attaching drywall to the partition
 - If the sheet begins to sway, you need to trim it - you simply made a mistake in size, or did not comply with the installation level.
Advice! Try to set the profile correctly and level, adhering to exact dimensions between them, otherwise, a situation may occur that the sheet will not lie on the edge of the profile, and it will be impossible to secure it. You'll have to rebuild the frame.
- Once one side is covered with plasterboard, you can begin to install soundproofing. You can use any material, it all depends on your financial capabilities. If you don’t have the opportunity to buy expensive material, you can use polystyrene foam or mineral wool, with a layer thickness of 5 cm. Despite its cheapness, this material has shown itself on the positive side, it not only absorbs sound well, but also adds fire safety to plasterboard. It is environmentally friendly and can be used for partitions even in children's rooms.
 Soundproofing installation
 If there is no need to carry out insulation, then you can skip this stage and immediately begin screwing the gypsum board on the second side of the structure. Installation is carried out similarly to the first side.
When remodeling premises, the load on the bottom floor slab is usually critical. Therefore, the plasterboard partitions in the photo are the best option compared to others construction materials. The technology of gypsum plasterboard structures is as simple as possible for self-made. To create a partition, you will need to build a frame from a galvanized profile, fix sheets on it, and lay a layer of sound insulation inside.
Before making a partition from plasterboard during redevelopment internal space, it is necessary to prepare the tool really necessary for this technology.
Professionals use laser devices (for example, a plane builder for 30 - 5 thousand rubles), cutters (minimum 500 rubles), miter saws(purchase budget from 10 thousand), since they need high performance. When purchasing this equipment, a home craftsman will spend more than the cost of the materials along with hiring a professional team of finishers. The minimum set of tools for one-time work is:
- perforator – fastening the profile to brick, concrete walls, floors
- screwdriver – frame assembly, sheeting
- level - necessary to control the horizontals of the lower guide profile, doorway lintel
- plumb line - it takes longer to work with it, but errors are completely eliminated
- knife - gypsum board cut
- scissors – profile cut
- spatulas – set narrow + wide for filling joints
You can do without a level if the floor and ceiling are already lined with guaranteed compliance with the horizontal. The lower, ceiling profile is fixed along the existing planes, the lintel is installed along the marks from the ceiling on both sides of the opening. The main characteristics of newly erected structures are: Interior partitions made of plasterboard are rarely solid, so at the design stage you can save work space by installing a sliding door, the leaf of which is placed inside the structure when opened. For arches you will need a simple device, a special profile. When saturated with moisture, a sheet of plasterboard becomes flexible, which allows you to build arched, radius, curved partitions with perfectly smooth surfaces that do not require leveling. The semicircular internal wall by default is superior in aesthetics to classic rectangular rooms. The minimum width of a wooden door leaf is limited by GOST to 4 cm, frames to 7.5 cm. Therefore, for partitions with hinged doors, a thickness less than this size is not recommended (5 cm profile + 1.25 cm drywall on both sides = 7.5 cm). If you plan to install a sliding panel hidden inside the structure, the width increases to the following size: Thus, the thickness of the partition is 8 + 3.4 + 2.5 = 13.9 cm, minimum. On the other hand, the working space of the room is saved; furniture can be placed in close proximity to the opening. GCR is an economical material that levels out significant unevenness with a subsystem on which the sheets are fixed. However, it is not allowed to attach starting profiles to loose, weakened bases or existing cladding with low adhesion. Loose concrete is removed, cracks in brick walls are sealed with putty. Before starting work, to ensure high-quality marking, it is necessary to remove the debris remaining after dismantling and remove dust from the surfaces. The step-by-step instructions below will help you make plasterboard partitions with your own hands. The partition can have a simple or complex configuration. However, in any case, it is necessary to draw two lines on the floor and ceiling in the same vertical plane. The problem is solved in several ways: In the video, a do-it-yourself plasterboard partition is being erected using standard technology before finishing the premises. The plasterboard interior partitions in the photo were created in compliance with SNiP standards, taking into account the dimensions of construction materials: The profile is fastened together with self-tapping screws or a cutter with periodic monitoring of the level of each element. The flatness of the structure is ensured by starting profiles. For the convenience of making heat, sound insulation, wiring of communications (air inlets for stationary vacuum cleaners, switches, electrical sockets, air conditioning equipment pipes, ventilation), first one plane is sewn up with plasterboard. When installing sheets, you must consider: The plasterboard partitions in the photo of the living room kitchen at the outer corners are reinforced with a metal perforated corner. This increases the wear resistance of the structure in passage areas. The gypsum board is cut with a knife on one side, after which the material is broken in this place, and the second layer of cardboard is trimmed.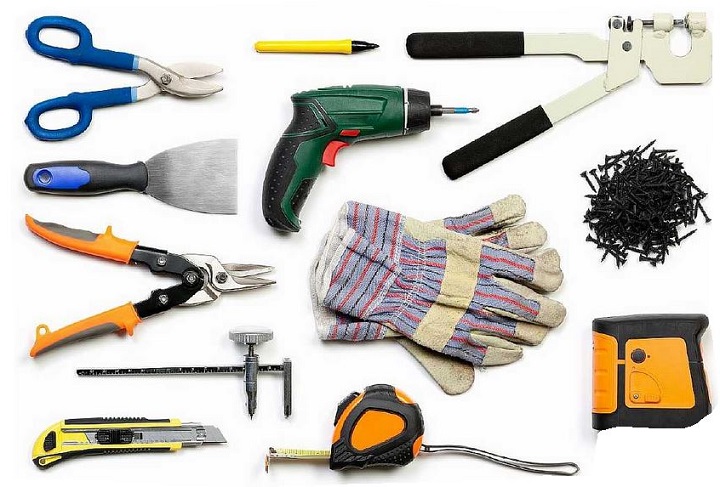
What should you consider when designing a partition?
Preparation of the grounds
Surface marking
Installation of the power frame
Covering the frame with gypsum plasterboard sheets