DIY Finnish candle. Video and photo instructions
The main advantage of such a fire is that you don’t have to worry about it, even if there is dirt and slush around. In winter, you don’t have to worry that the snow under the fire will begin to melt and thereby extinguish the fire. Finally, a “Finnish candle” is safer than a regular fire in places where there is a lot of dry grass and leaves. Finally, such a fire can simply be moved from place to place. The “candle” will burn all night, and it will only require one log. And the shape of the fire is such that it is convenient to use when cooking - after all, pots or a kettle can simply be placed on top of a log, like on a burner.
How to make a “Finnish candle”

In order to make a “Finnish candle”, you need to have a log 30-50 cm thick, as well as a saw. The height of the log is not that important. The cut is made approximately three-quarters deep. Most often they cut into 4, 6 or 8 parts. After this, a small hole will appear in the log. Kindling will be placed and lit in it.

If you don’t have a saw at hand (and most likely you won’t have one on a hike), you can use an ax. In this case, it will be more difficult to make such a fire. The log needs to be split into four parts with an ax. Each piece will have to be ground down in the middle so that when they are put together, a hole will form. After this, all that remains is to tie the logs with a strong rope, or better yet, with wire.

Finally, a “candle” can be made by simply stacking several logs side by side. Each should be 5-15 cm thick. Uses 3 to 8 pieces of wood.
A spoon of tar

Finally, it is worth mentioning the disadvantages of the “Finnish candle”. Preparing such a fire requires a certain skill and experience. Also, as has already become clear, you need tools. " Finnish candle» not very good for heating. You also need to take into account the fact that if the fire has been extinguished, then lighting it again will be extremely problematic, almost impossible. It’s easier to prepare a new candle.
Before making a Finnish candle, prepare a saw, wire or adhesive tape, nails and a log that will become a candle. And then to make an Indian candle, follow the instructions:
1. Find a dry log with a diameter of 10-40 cm without knots. The tree can be anything, just keep in mind that each type has its own characteristics. For example, spruce and pine sparkle when burned, so it is better not to use them for heating. You need to be careful with birch, because it burns very strongly, you can get burned, and it smokes a little due to the tar in the bark. Best option- well-dried aspen. When burning, its flame is even and colorless.
2. Cut it depending on the purpose of the candle (15-40 cm). If you will be lighting a fire for cooking, use a log that is thick and short so that you can place the dishes directly on it. The candle will be stable. For lighting, on the contrary, a long and thin candle that can be carried if necessary will be convenient. And for heating you need a thick and long one so that for a long time burn.
3. Split a dry log into four pieces. These will later be used to make a Swedish fire.
4. In each part, remove the middle so that when assembling the log you get a hole with a diameter of 5-7 cm, and make small notches. Perfect option, if you find a hollow tree. After cutting or splitting, you will need to scrape out the rotten middle of the hollow.
5. Fold 4 logs into a single log, wrapping them with wire, trying to leave as few gaps as possible. This will prevent them from falling apart and quickly burning through large gaps. This way you should end up with a solid log with an empty middle.
6. Place the sawdust that remains after cutting off the middle or birch bark into the opening for kindling. The filling of a wooden kerosene stove and its location affects the degree of combustion. Located at the top of the hole, birch bark will burn for a long time, only weakly. This candle is more suitable for warming up food or for heating. Well, if you put the birch bark on the bottom, the fire will be very strong, which is good for cooking or lighting, but the candle will not last long. The best option is its location in the middle. Also make sure that there is draft for combustion. To do this, place the candle on stones or logs.
That's all the instructions on how to make a taiga candle.
A Swedish or Finnish candle is a simple and convenient alternative to a tripod with a pot or even a stationary outdoor stove.
Let's talk about something so simple, but very effective method build a fire, a real torch for lighting and cooking, like a Swedish candle. This method has other names: “Finnish primus”, “hunting candle”, “Indian candle”, “Canadian torch”. The option is simple, but very interesting.
How to make a Finnish Primus
The Finnish primus does not require candles at all! All that is required to create a Swedish candle is a suitable piece of log or log.

The wood for such an original hearth can be anything. According to reviews, pine and spruce are often used as the most available options, however, these woods do spark when burning, so care should be taken. Birch burns very strongly and produces smoke. But the aspen - perfect tree for a Swedish candle.
A piece of wood about half a meter high is required, although sometimes a log is taken a little higher or lower. The main thing is that it is level and can stand vertically. The diameter of the log can be from 10 to 40 cm.
The size of the log depends on the purpose for which you will use it. If you want to cook food over an open fire, you should take a log that is thicker, but relatively short and stable. A taller, but thinner log is suitable for lighting; it can be moved if necessary.
Important! The piece of log must be dry! A wet log burns very poorly, smokes a lot, and most likely you won’t be able to light a fire at all.
The logs are cut using a chainsaw. You can use a regular saw, but the process will be much longer and you will have to put in more effort. The cuts should be approximately three-quarters of the log's height. They are made crosswise. It's very similar to cutting a cake, the pieces on top look exactly like this.
How many cuts to make is up to you. Four is the minimum, you can do six or eight. Remember that the more cuts you make, the faster your log will burn!
To start the combustion process, we recommend pouring a little gasoline into the center of the cuts and then setting it on fire. A Swedish candle burns much more economically than a regular fire. It burns for a long time, the flame is even, and you can put a kettle, pot, or frying pan on top of the log. You will definitely have time to cook food on a live fire.
The second way to make a Swedish candle is to saw and split the block of wood completely into four parts. The core is removed a little so that there is empty space inside. Then the four logs are folded back into one log, secured, and wrapped with wire. In this case, sawdust can be placed in the hole in the center, which will serve as kindling.

Making a Swedish candle or Finnish primus stove yourself is very simple, although you can buy blanks already cut if you are going into nature and are not sure that you can find a suitable log in the forest.
A simple but convenient fire that burns brightly and for a long time can be built on any flat area; sometimes the log is placed on stones or other support.
Even barbecue is prepared with the help of a Swedish or taiga candle. We are sure that you will appreciate this option for creating a fireplace, especially if you often go out into nature. However, during a picnic in your own yard, you can also surprise guests with this method of making a fire. published
If you have any questions on this topic, ask them to the experts and readers of our project.
Anyone who loves outdoor recreation (especially not a picnic, but an active one - hunting, fishing, hiking) knows how important a properly lit fire is. If you don’t carry a barbecue with you, you need to worry about safety so that you don’t have to run away from a forest fire and feel like a criminal. And lighting a fire in the snow, so that it doesn’t go out every minute, seems to many to be the pinnacle of fire-making skills. However, experienced travelers know how to build a fireplace in a fire-safe manner so that it burns for a long time, does not go out even in slush, and does not require regular feeding. Everyone calls it differently: Finnish candle, taiga candle, Indian or Swedish, but the essence remains the same. There are even several ways to make it.
Maxi-bonfire
The Finnish candle is most successful if you “land” not far from sawn logs. No effort is required: select three saw cuts of approximately the same height and diameter, place them in a circle close to each other and light a fire in the middle. In order for the fire to burn evenly and the burnout to be the same in all directions, you need to choose the logs wisely in height. The Finnish candle lasts the longest; the logs should be twice their diameter in length. The power of such a fire is enough to boil a five-liter cauldron in a third of an hour, and you don’t even need to hang it - it will rest on the logs themselves. As the logs burn, they seem to form into a hut. If you need a Finnish candle fire for a long time, at this stage you can maintain it as usual, by adding firewood.

If you have a chainsaw
If there is no need for such a large hearth and the presence of an appropriate tool on your hands, you can do otherwise. A piece of thick log half a meter long is taken and sawed crosswise (not all the way, about three-quarters of the length). If the diameter of the cut is large, you can work with the chainsaw a little more to get eight “slices”. You should not make more cuts, because the narrower the sector, the faster your Finnish candle will burn out. The log is firmly fixed to the ground (you can dig it in or support it with stones), kindling is placed inside (from sawdust, or just liquid ignition) - and for several hours the fire is at your service.

Field method
Suppose there is no saw, but do you need a Finnish one in this case? Well, there is an ax in nature anyway. The log of wood chosen for this purpose is split like regular firewood, only a little more diligently so that the logs do not vary too much in thickness. Then they gather into the original log, only around a thick branch - this will be the hearth. Below, closer to the ground, and approximately in the middle, the Finnish candle is tied, preferably with wire - it will definitely not burn out. But if you don’t have it, twine, fishing line, and flexible rods will do. It is especially important to tighten it securely at the bottom, since in the middle the logs will burn out faster, and without good fixation near the ground, your fire will fall apart. The central branch is pulled out three-quarters from below and sawed off, after which the Finnish candle is placed on the ground. By the way, if the original log is not too massive, you can use this branch as a leg and simply stick it into the ground.

Hand candle
If there is no nearby (either a suitable dry object for sawing, or a saw or even a normal ax), then the Finnish one is made a little differently. Quite thick poles, at least five centimeters in diameter, are collected around the area and gathered into a bunch, again around the center branch. The side of the poles that will be inside needs to be cut a little with a knife - it will work better. The rest of the manipulations are the same as when creating a “finca” from logs.
Primus candle
It is used specifically as a stove for cooking. The main points are the same as when making a fire-candle using the field method. There are two nuances:
- The original log must be partially hollowed out from the inside. Alternatively, you can not plan the core, but split it into logs and peel them. Such a fire is assembled in the snow using the same method, around a branch, but the cavity inside must be made artificially, and the outer walls are closed, if possible, without cracks.
- On two opposite sides, the logs are either trimmed less or pushed upward more, by five to six centimeters. Due to this design, the fire in the center will be fanned by air, and its tongues will be directed predominantly upward.
Such a Finnish candle is not suitable for heating - the fire is all concentrated inside. But the food cooks much faster.

What can a Finnish candle be useful for?
In addition to cooking and heating (except for the Primus stove), such a fire is simply irreplaceable as a beacon. Experienced fishermen who go out at dawn leave it on the shore as a signal for those who are late - in the dark it can be seen from afar.
It is very convenient when using Finnish candles that almost until they burn out completely, they can be moved from place to place without difficulty and without causing burns. The long-lasting nature of the fire can be considered a significant advantage: a medium-sized log provides light and heat for about four hours. And a maxi-fire without additional fuel can perform its functions all night long.
If you are not a fan of “wild” tourism and fishing, but you like to meet New Year at the dacha, Finnish candles placed along the paths will bring romance and decorate the garden no worse than garlands and Chinese lanterns.
Every person who from time to time gets out of the house into nature should be able to make a fire to cook food and warm up. However, not everyone can make a “Finnish candle” - a fire that never goes out on its own, even if there is snow, slush and gusty wind around.
Advantages of the Finnish candle

The main advantage of such a fire is that you don’t have to worry about it, even if there is dirt and slush around. In winter, you don’t have to worry that the snow under the fire will begin to melt and thereby extinguish the fire. Finally, a “Finnish candle” is safer than a regular fire in places where there is a lot of dry grass and leaves. Finally, such a fire can simply be moved from place to place. The “candle” will burn all night, and it will only require one log. And the shape of the fire is such that it is convenient to use when cooking - after all, pots or a kettle can simply be placed on top of a log, like on a burner.
How to make a “Finnish candle”

In order to make a “Finnish candle”, you need to have a log 30-50 cm thick, as well as a saw. The height of the log is not that important. The cut is made approximately three-quarters deep. Most often they cut into 4, 6 or 8 parts. After this, a small hole will appear in the log. Kindling will be placed and lit in it.

If you don’t have a saw at hand (and most likely you won’t have one on a hike), you can use an ax. In this case, it will be more difficult to make such a fire. The log needs to be split into four parts with an ax. Each piece will have to be ground down in the middle so that when they are put together, a hole will form. After this, all that remains is to tie the logs with a strong rope, or better yet, with wire.
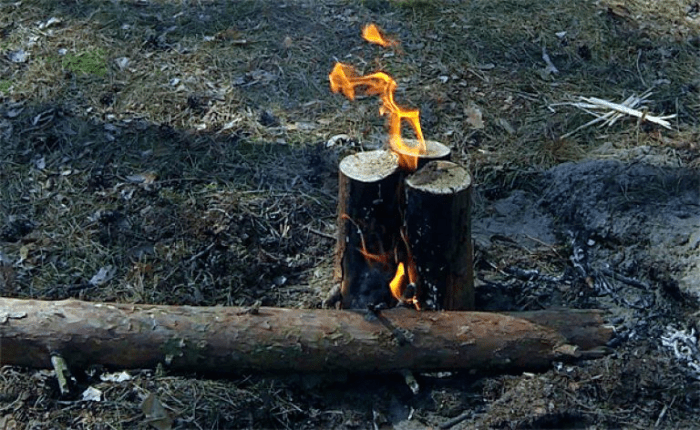
Finally, a “candle” can be made by simply stacking several logs side by side. Each should be 5-15 cm thick. Uses 3 to 8 pieces of wood.
A spoon of tar

Finally, it is worth mentioning the disadvantages of the “Finnish candle”. Preparing such a fire requires a certain skill and experience. Also, as has already become clear, you need tools. The Finnish candle is not very suitable for heating. You also need to take into account the fact that if the fire has been extinguished, then lighting it again will be extremely problematic, almost impossible. It’s easier to prepare a new candle.
Continuing the topic, which will help in the country and in the forest.